

Growing

Four Lavender Farm Gardeners Share Their Recommended Companion Plants
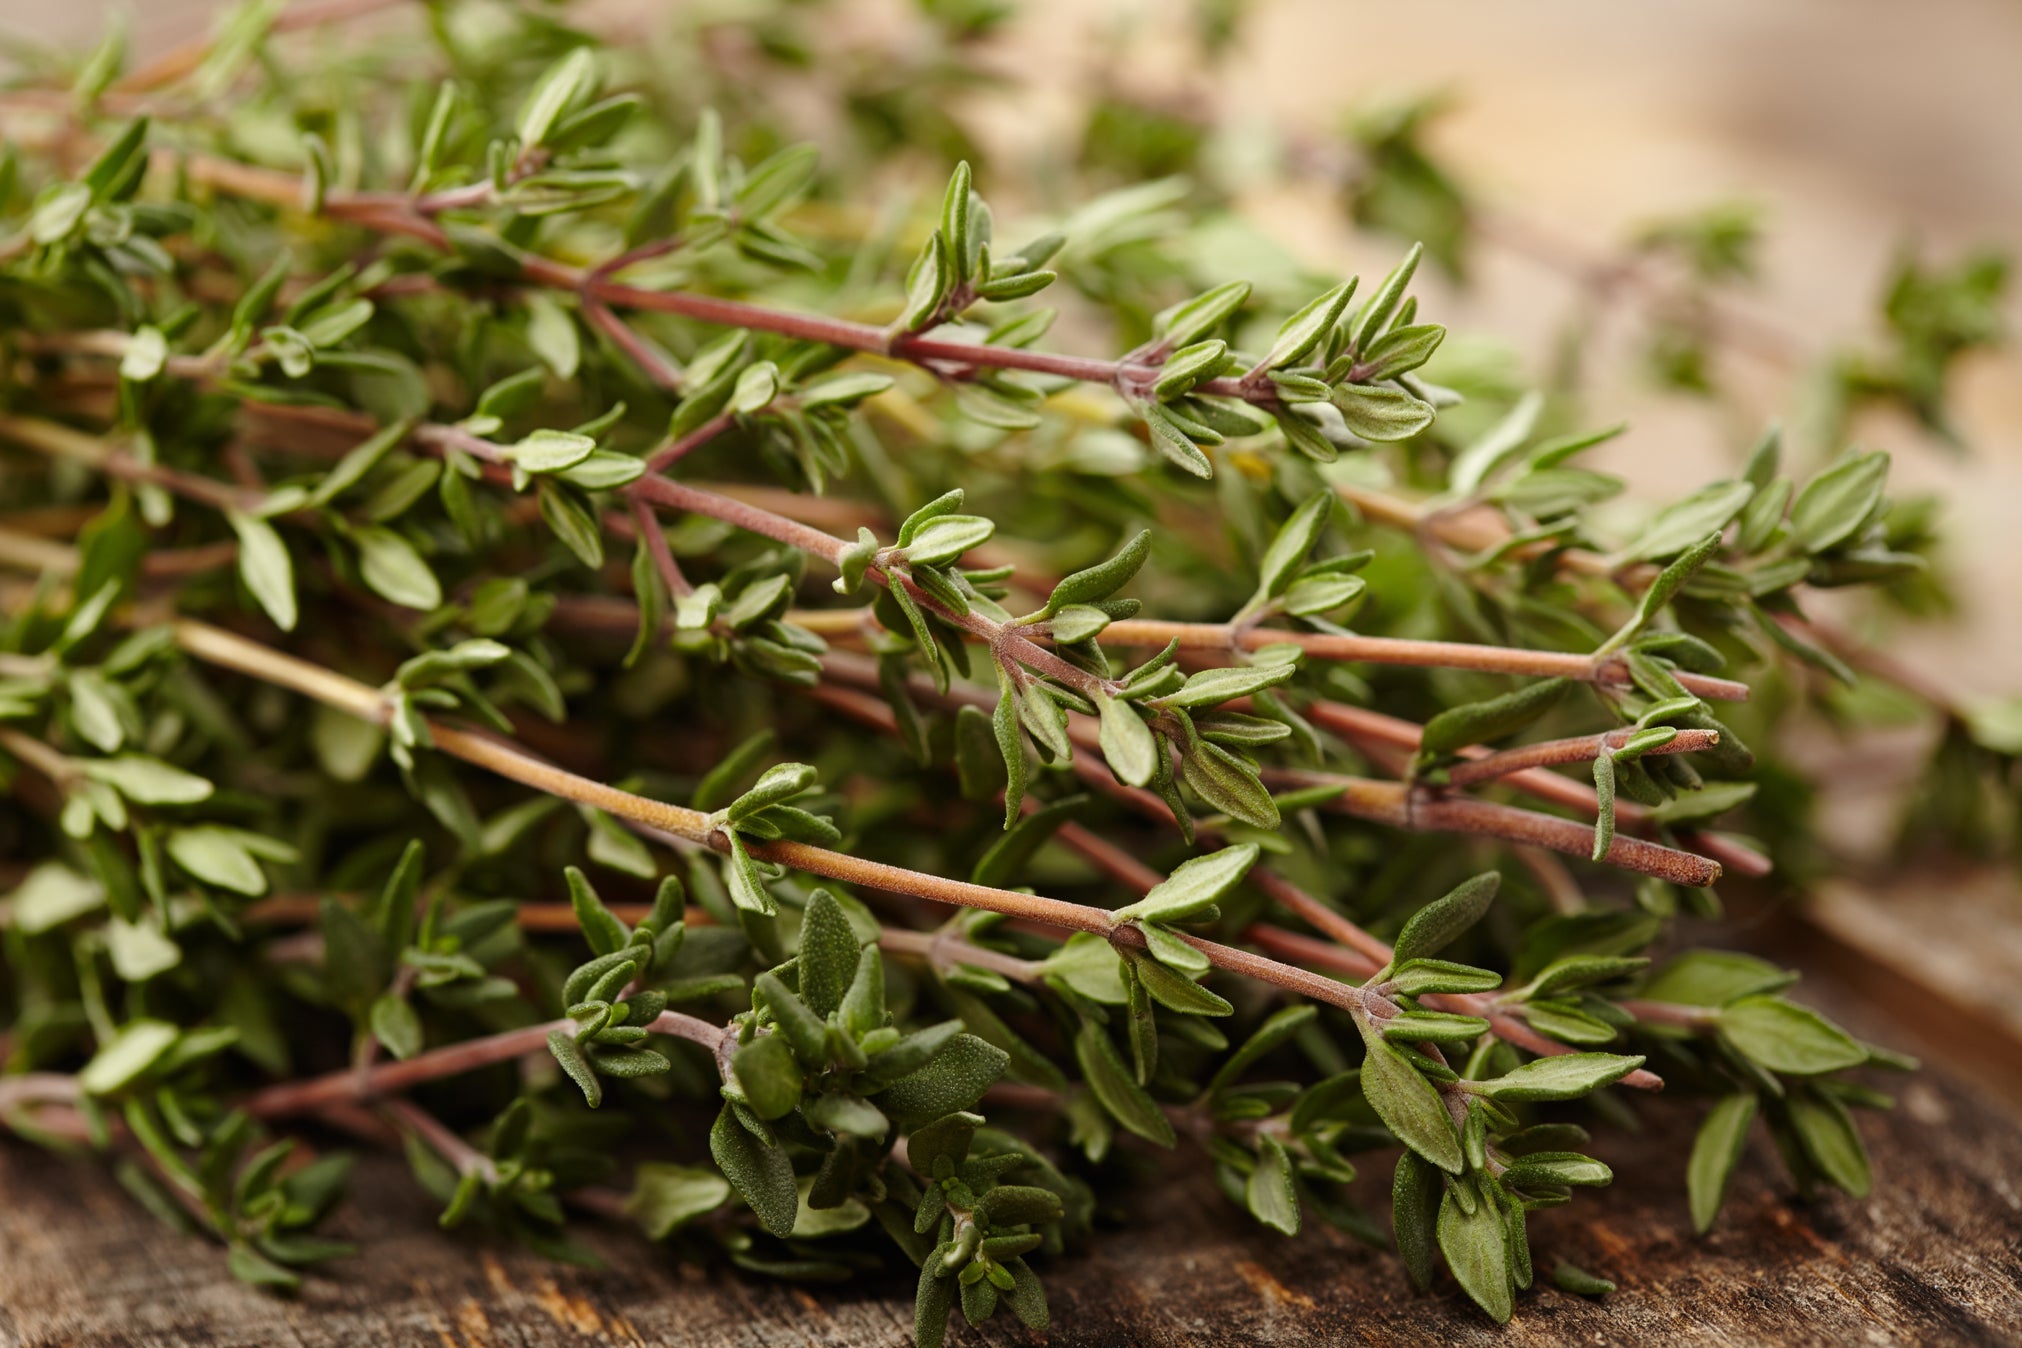
IN THIS GUIDE Companions Chosen By The Experts 1) Oregano 2) Bee Balm 3) Thyme 4) Ice Plant 5) Celery 6) Sweet Basil 7) Ornamental Onion 8) Rose Shrub 9) Yarrow 10) Ruby Grass 11) Sage 12) Purple Coneflower 13) Broccoli 14) Cardinal Flower 15) African Daisy 16) Parsley 17) Baby’s Breath 18) Black-Eyed Susan 19) Rosemary 20) Blue Fescue References Lavender is a wonderful aromatic shrub with evergreen foliage that is popular in herb gardens or traditional cottage planting schemes. With a preference for a sheltered position in full sun, it will need to be grown alongside other plants that can also tolerate and thrive in these conditions. Companions Chosen By The Experts Nick and Lyndsay Butler are the co-owners of Lavender Fields, a lavender farm based in the heart of Hampshire. “Lavender is a good bed mate with most plants,” say the Butlers. “The most important thing to consider for companions is size, given the vast number of lavender varieties available, especially from specialists like us, can range from 0.2-1m in height and width when fully grown. “If you are planting at the front of a border, you may want to consider a dwarf variety. If it is a large space you are looking to fill, you will want a larger growing variety. “The same consideration should be given to the companion plant.” So, what do Nick and Lyndsay grow with their lavender? “On the farm, we have planted lavender with roses, box hedging, and geraniums, to name just a few. “It is also lovely to interplant them with spring flowering bulbs that provide some colour when the lavender is not flowering.” Charlie Byrd is a farmer that has been growing his own lavender for nearly 25 years. He owns Cotswold Lavender, a specialist seller and farm in the southwest of England. “We grow grass and clover between the rows of lavender on our farm,” shares Charlie. “Grass is a natural weed suppressant and the clover, being a legume, naturally fixes nitrogen from the air and makes it available for the grass and lavender.” “Lavender combines well with roses, but my favourite would be to interplant them with Echinacea ‘Sensation Pink’,” says Patrick Fairweather from Fairweather’s Nursery. E. ‘Sensation Pink’ “This gives a flush of colour at the end of the summer. “Planting spring bulbs and tall summer-flowering alliums also works well.” “I find this works well as Echinacea flowers at the same time as Lavender (July in the UK) and also prefers a sandy well-drained loam soil,” adds Roy Nicol, Master Horticulturist. Julia Snowball is the Head Gardener at Yorkshire Lavender, a huge lavender farm based in the north of England. “At Yorkshire Lavender we grow Mexican Feather Grass among the lavenders to bring movement and contrast to the plantings. A. sphaerocephalon “We also have Allium sphaerocephalon dotted among some of the taller lavenders to add extra interest.” In the rest of this guide, we share twenty companions to grow with your lavender – plants that not only can grow well in a similar position, but might also bring about added ornamental value or act as a good pest deterrent. 1) Oregano BOTANICAL NAME: Origanum vulgare HARDINESS RATING: H6 PLANT TYPE: herb / perennial FLOWERS: pink FLOWERING SEASON(S): summer / autumn SIZE: 0.5-1m in height, 0.5-0.1m spread Starting with another garden herb that is commonly grown here in the UK, oregano bears pink flowers on tall, erect stems in the summer and autumn that will look lovely next to the similarly built blooms of lavender. Not only that, but oregano is also a great pest repellant as it attracts beneficial insects like lacewings that feast on aphids and other small flies that could potentially damage your lavender crop. “In my experience, Oregano has a habit of spreading outwards, becoming a much larger plant over time and flopping over other nearby plants,” says Roy. “To counter this, when it has been cut back in the autumn, I reduce the size of the plant with a sharp spade, replanting pieces elsewhere as required.” 2) Bee Balm BOTANICAL NAME: Monarda didyma HARDINESS RATING: H5 PLANT TYPE: herb / perennial FLOWERS: pink and red FLOWERING SEASON(S): summer SIZE: 0.5-1m in height, 0.1-0.5m spread Monarda didyma, more commonly referred to as bee balm, is a hardy perennial that is beloved by bees and other pollinators. Also preferring a site in full sun, you can plant bee balm next to lavender if you have particularly loamy or sandy soil. Like lavender, some varieties also produce purple flowers, but the petals of bee balm are frilly, growing up to 1m in height on top of upright, dark stems. 3) Thyme BOTANICAL NAME: Thymus vulgaris HARDINESS RATING: H5 PLANT TYPE: shrub / herb FLOWERS: white and pink FLOWERING SEASON(S): summer SIZE: 0.1-0.5m in height, 0.1-0.5m spread Thyme is another shrub that will look great when planted next to lavender, with its purply-white flowers making a nice companion to your purple-flowering lavender shrubs. Both of these herbs thrive in full sun, poor well-drained soil and a sheltered location and will work well together in a herb garden planting scheme. 4) Ice Plant BOTANICAL NAME: Hylotelephium spectabile HARDINESS RATING: H7 PLANT TYPE: perennial FLOWERS: pink FLOWERING SEASON(S): summer SIZE: 0.1-0.5m in height, 0.1-0.5m spread With small pink flowers growing in clusters on stems up to 50cm in height, ice plants (often known as Sedum) make delightful additions to any garden displays, and, when grown next to lavender, they will also thrive in the full sun with minimal irrigation. Sedums are low-maintenance perennials and will not require too much care when planted out. Just make sure that the growing medium you are planting them in is not acidic, as these plants need an alkaline to neutral pH. 5) Celery BOTANICAL NAME: Apium graveolens HARDINESS RATING: H2 PLANT TYPE: vegetable SIZE: 0.1-0.5m in height, 0-0.1m spread The first and only vegetable on this list, celery makes a delightful addition to salads, soups and smoothies. By planting celery with lavender, this vegetable will grow more readily, as lavender is said to repel white moths and the celery fly which are some of this veggie’s worst pests.1 Do be aware before planting that celery requires quite a moist growing medium and will need to be watered more frequently than your lavender plants. 6) Sweet Basil BOTANICAL NAME: Ocimum basilicum HARDINESS RATING: H1C PLANT TYPE: annual / biennial FLOWERS: pink and white FLOWERING SEASON(S): summer SIZE: 0.1-0.5m in height, 0.1-0.5m spread Sweet basil is one plant you won’t have to worry about in regards to additional watering, as it thrives in almost identical conditions to lavender. Basil can act as a deterrent to aphids and other common pests that might affect lavender and therefore help it to grow more vigorously. However, basil is not always great for growing with other herbs that might pair well with lavender, so avoid planting basil near sage, rosemary or thyme. 7) Ornamental Onion BOTANICAL NAME: Allium HARDINESS RATING: H6 PLANT TYPE: bulb FLOWERS: purple FLOWERING SEASON(S): summer SIZE: 0.5-1m in height, 0.1-0.5m spread With onions, leeks and garlic all suitable for planting near lavender, alliums are a great bulbous plant to add to your herb gardens for mutual benefits. Not only do alliums usually display purple blooms in the summer months that will look great with the flowers of Lavandula, but alliums are also great for pollinators and will attract an abundance of bees and butterflies to your herbal displays. Alliums also love the same conditions as lavender too, so you won’t need to worry about altering them. 8) Rose Shrub BOTANICAL NAME: Rosa HARDINESS RATING: H6-H7 PLANT TYPE: perennial FLOWERS: varies FLOWERING SEASON(S): summer / autumn SIZE: 1-1.5m in height, 2.5-4m spread If you’re looking for an ornamental plant to plant with your lavender, you can’t get much better than roses. “Our favourite companion plant for lavender would definitely be roses,” says the Butlers. “The aroma of the two plants combined is lovely!” Shrub roses in particular are great to plant with lavender shrubs are they thrive in the sun and can tolerate conditions that other varieties might not be able to. Roses, unfortunately, attract aphids, whilst lavender shrubs attract ladybirds, which are notorious for eating pests. So, by planting your roses near lavender, it will protect them from aphids and also help them with pollination, all whilst brightening up your garden beds and borders. “The lower part of many roses are often quite bare, such as Hybrid Teas or upright English Shrub Roses such as Rosa ‘Queen of Sweden’, so Lavender does a good job of covering this up,” adds Roy. 9) Yarrow BOTANICAL NAME: Achillea millefolium HARDINESS RATING: H7 PLANT TYPE: perennial FLOWERS: cream, white, yellow and pink FLOWERING SEASON(S): summer SIZE: 0.1-0.5m in height, 0.1-0.5m spread Like lavender, yarrow is a hardy perennial that thrives in full sun and well-drained soil that can provide a burst of colour to your flower beds and borders. Yarrow produces clusters of small flowers that appear in summer in shades of pink, white and yellow, so you have a wide range to choose from, but all will go well with the purple flowers of a lavender shrub. This plant is also a great choice for a wildlife-friendly garden, as its blooms are just as much of a delight to pollinators as they are to us. 10) Ruby Grass BOTANICAL NAME: Melinis nerviglumis HARDINESS RATING: H2 PLANT TYPE: perennial / annual FLOWERS: pink / white FLOWERING SEASON(S): summer / autumn SIZE: 0.5-1m in height, 0.1-0.5m spread Melinis nerviglumis, also known as ruby grass, is a frost-tender perennial that is usually grown as an annual here in the UK. This grass produces a clump of tall, thin stems that bear cluster of feather-like flowers in summer and autumn that are either white or pink in colour. Ruby grass can be planted in between the herbs in your garden to provide a grassy backdrop and a subtle show of colour and it will also not require much care once planted out. 11) Sage BOTANICAL NAME: Salvia officinalis HARDINESS RATING: H5 PLANT TYPE: herb / perennial FLOWERS: blue FLOWERING SEASON(S): summer SIZE: 0.5-1m in height, 0.5-1m spread Like lavender, sage is native to the Mediterranean and is a drought-tolerant perennial herb that loves basking in full sun.2 Sage is a great herb to grow in your garden because it can be harvested from spring to autumn and will taste great throughout this time period, best used in dishes with squash or as a garnish.3 12) Purple Coneflower BOTANICAL NAME: Echinacea purpurea HARDINESS RATING: H5 PLANT TYPE: perennial FLOWERS: purple and brown FLOWERING SEASON(S): summer / autumn SIZE: 1-1.5m in height, 0.1-0.5m spread Pairing lavender with another purple plant like Echinacea purpurea is bound to be a beautiful sight, but this is not the only reason that these two are a good match. Purple coneflowers are perhaps even more drought-tolerant than lavender, so this plant will not need any additional watering and will thrive in a well-drained position in full sun. 13) Broccoli BOTANICAL NAME: Calabrese HARDINESS RATING: H3 PLANT TYPE: vegetable SIZE: 0.1-0.5m in height, 0.1-0.5m spread As we’ve already mentioned, lavender is a good companion plant for vegetables as its flowers release a scent that can deter pests from munching on your leafy greens. Broccoli is one of these veggies that will truly reap the benefits that lavender can provide. The pollinators that lavender will bring to your vegetable patch can help increase the yield of your broccoli and there’s some speculation that lavender can also help deter slugs, which usually love to feast on broccoli and other brassicas. 14) Cardinal Flower BOTANICAL NAME: Lobelia cardinalis HARDINESS RATING: H3 PLANT TYPE: perennial FLOWERS: red FLOWERING SEASON(S): summer / autumn SIZE: 0.5-1m in height, 0.1-0.5m spread The cardinal flower is sure to stand out wherever it is planted, thanks to its bright red flowers that grow on tall spikes up to 1m tall. This perennial needs to be planted in a loam-based site with poorly-drained soil, so you might be wondering how it can make a good companion plant with lavender, which notoriously favours drier conditions. Although I would not recommend planting these in the same ground, when placed in containers next to each other, the cardinal flower and lavender will create a stunning display that will encourage pollinators from your area to visit your garden. 15) African Daisy BOTANICAL NAME: Osteospermum jucundum HARDINESS RATING: H3 PLANT TYPE: perennial FLOWERS: purple FLOWERING SEASON(S): summer / autumn SIZE: 0.1-0.5m in height, 0.5-1m spread Blooming well into autumn even when your lavender plants have stopped flowering, African daisies are gorgeous perennials that bear daisy-like flowers in shades of purple from May onwards. This lovely plant thrives in the same conditions as lavender and, aside from some additional care over winter, should return each year and is relatively low-maintenance. 16) Parsley BOTANICAL NAME: Petroselinum crispum HARDINESS RATING: H6 PLANT TYPE: herb / biennial FLOWERS: green and yellow FLOWERING SEASON(S): summer SIZE: 0.1-0.5m in height, 0.1-0.5m spread There are mutual benefits when it comes to planting parsley with lavender. Parsley is a hardy herb that will make a beautiful grassy backdrop when planted near your lavender shrubs. Lavender is also great for attracting beneficial insects that will feed on pests that frequent parsley, such as aphids and flies. Be aware that parsley does need watering more frequently than lavender, so make sure that they are planted at a large enough distance apart to ensure they are both receiving the correct care without imposing on the other. 17) Baby’s Breath BOTANICAL NAME: Gypsophila paniculata HARDINESS RATING: H4 PLANT TYPE: perennial FLOWERS: white FLOWERING SEASON(S): spring / summer SIZE: 1-1.5m in height, 1-1.5m spread With a preference for dry, alkaline soils in a site that receives lots of sun, using baby’s breath as a companion plant for lavender is an obvious choice. The white flowers from this plant that appear throughout the spring and summer months will look great with any plant but will pair particularly well with lavender and its purple blooms. Although it might need some care over the winter, you should find that baby’s breath is relatively easy to grow. 18) Black-Eyed Susan BOTANICAL NAME: Rudbeckia fulgida HARDINESS RATING: H6 PLANT TYPE: perennial FLOWERS: yellow, brown and gold FLOWERING SEASON(S): summer / autumn SIZE: 0.5-1m in height, 0.5-1m spread Black-Eyed Susan is a common sight in UK gardens and for good reason. This low-maintenance plant thrives in a range of conditions and looks great doing it, producing yellow, daisy-like flowers in the summer and autumn with brown centres on stems that reach up to 1m in height. The bright golden blooms will compliment the purple flowers that lavender plants produce, and since both plants are popular with pollinators, why not try planting them together in a wildlife-friendly garden? 19) Rosemary BOTANICAL NAME: Rosmarinus officinalis HARDINESS RATING: H4 PLANT TYPE: shrub FLOWERS: purple, blue and white FLOWERING SEASON(S): spring / summer SIZE: 1.5-2.5m in height, 1.5-2.5m spread I think that rosemary is one of the best plants to grow with lavender. They both thrive in the same conditions, produce stunning blue and purple blooms at the same time in spring and summer and are also aromatic herbs that don’t overpower each other. As far as companion plants go, you can’t get much better. “As Rosemary has a tendency to become a large, sprawling shrub if left unattended, it’s a good idea to prune it back after flowering in the late spring to keep it to size and prevent it from flopping onto the Lavender,” says Roy. “It can also be grown as a low hedge in the same way as Lavender, so this principle can be applied to have complementary hedges grown together – even forming a pattern to your design!” 20) Blue Fescue BOTANICAL NAME: Festuca glauca HARDINESS RATING: H5 PLANT TYPE: grass FLOWERS: green FLOWERING SEASON(S): summer SIZE: 0.1-0.5m in height, 0.1-0.5m spread To finish up this list I’ve picked Festuca glauca, also known as Blue Fescue, as I think it pairs rather nicely with lavender when planted in rock or gravel gardens or in more traditional cottage garden schemes. With silvery-blue foliage and green flowers in the summer, this plant is a delight even when planted on its own. This ornamental grass thrives in full sun and is drought-tolerant so could even be planted out in your herbal beds to create a more natural, grassy look. References 1. Why Can Lavender Be Used to Repel Moths? – The Chemistry of Lavender. (2017, July 10). Compound Interest. Retrieved March 21, 2023, from https://www.compoundchem.com/2017/07/10/lavender/ 2. Ridley, R. (n.d.). Mediterranean Herbs. The Herb Society. Retrieved March 21, 2023, from https://herbsociety.org.uk/information/gardening-with-herbs/mediterranean-herbs/ 3. Good Food Team. (2022, June 10). Sage. BBC Good Food. Retrieved March 21, 2023, from https://www.bbcgoodfood.com/glossary/sage-glossary
Learn more
Follow These Basics For Rosemary Pruning To Keep Your Plant Healthy, Abundant And Bushy
IN THIS GUIDE Do You Need To Prune Rosemary? Pruning Over Winter Pruning After Flowering Reducing The Size Shaping For Hedging Rejuvenating A Mature Shrub Rosemary is an incredibly useful plant to grow in your garden and is also a great companion plant for wildlife attraction and pest control. It is also, of course, a popular culinary herb, and you can also use it in a wide range of other ways in your home. When placed in the right location, rosemary can be an excellent low-maintenance plant and will generally take up very little of your time. Pruning is one element of plant care to think about when growing this evergreen herb, but even this job is not hugely complicated or time-consuming. When pruning rosemary, here are the basic things to keep in mind: Pruning rosemary is not essential, but pruning is useful for keeping rosemary plants healthy, abundant, bushy and looking their best. Rosemary is best pruned in late spring or summer (often after flowering), and should not be pruned later in the year. Pruning can often simply be harvesting when it comes to a rosemary plant, so you do not necessarily have to think of these as separate jobs. Precisely when and how you will prune depends on what you want to achieve. We’ll cover pruning for different purposes below. Difficulty Easy Equipment Required Secateurs When To Prune March-July Do You Need To Prune Rosemary? Rosemary does not necessarily have to be pruned at all. However, there are a number of reasons why pruning can be beneficial when growing rosemary in your garden. Pruning rosemary will: Allow you to remove any dead, damaged or diseased material after winter. Encourage a bushy and compact habit. Keep the size of the plant in check. Allow you to shape the plant if used in hedging or topiary. Rejuvenate an overgrown or mature rosemary shrub. Pruning Over Winter Rosemary is H4 hardy, which means it is hardy through most of the UK. However, during a harsh winter, especially if you live in the north or a colder region, tips on a rosemary bush may sometimes blacken and experience some frost damage. Here in Fife, Scotland, my rosemary occasionally experiences a little damage after a severe winter, though this has not stopped the plant from growing into quite a large and bushy shrub. In the spring, I will check over the plant, and where there are areas of damage, I will simply prune these off. The damage is never extensive, so this just involves giving the plant a light trim. Pruning After Flowering The rosemary I have on the sunny fringes of my forest garden does not flower, which is probably because the conditions are fertile there and rosemary flowers best in poor and very free-draining soil. However, since I am most interested in growing rosemary as an aromatic herb for culinary and other household uses, I don’t mind this. Where rosemary does flower well, the plant is typically pruned lightly for maintenance immediately after flowering. Rosemary flowers in late spring or early summer, so whether flowers actually form on your plant or not, this is the best time to give the plants a trim. Generally speaking, less is more when it comes to pruning rosemary. Maintenance pruning generally just involves removing tip growth and unsightly branches here or there as required to maintain a bushy habit and a pleasing shape. I don’t really prune my rosemary as such, but regular harvesting basically amounts to the same thing, since I regularly remove small sprigs for cooking and larger stems for drying. I will generally harvest or prune from the top 15-20cm of the mature plant. Reducing The Size If you would like to reduce the size of a rosemary shrub and keep it in check, you can give it a trim all over, but you should take care not to reduce branches too much in length and ensure that you do not cut right back any woody material. Flowers will form on the current or previous year’s growth and pruning too much can reduce or even eliminate flowering the following year. Shaping For Hedging If you are growing rosemary for hedging or topiary, then you may trim it to keep its shape in spring, then again in early summer for a neater and more orderly growth habit and form. Think about the shape that you would like to achieve, then simply lightly trim to achieve the form you desire. Take care not to prune any later in summer or in autumn, because this can encourage tender new growth that is less likely to make it through the winter months unscathed. Rejuvenating A Mature Shrub Mature rosemary shrubs that have become leggy and woody might respond to harder pruning, though you will lose any flowering that there may have been, and should still not remove more than a quarter of the plants. Pruning back by around a quarter in spring may rejuvenate your shrub. However, generally speaking, it is best to take cuttings or layer the rosemary shrub and replace one that has become overgrowth and woody altogether. “I find that hard pruning can rejuvenate a straggly Rosemary, but will have its limits,” shares Colin Skelly, a Master Horticulturist. “If you need to prune hard, take cuttings from the cut material. If it fails to respond or becomes straggly again, which is likely after a year or two, then you will have replacements ready.”
Learn more
Salvias Will Grow Happily In Containers (And It's Essential For The Tender Ones)
IN THIS GUIDE Can You Grow Salvia In Pots? Choosing Suitable Containers Choosing Compost Potting Up Salvia Pot-Grown Salvia Care Sage plants’ unusual, irregularly-shaped flowers are as much a treat to the eyes as the zesty leaves that are a treat to the palate in pot roasts and stuffings. You may be wondering if you can grow sage in containers. Luckily for you, this article has all the answers. Can You Grow Salvia In Pots? Yes, you can, and if you are growing salvia varieties that are hardy only to H3, you probably should. That way you won’t have any trouble protecting the frost-tender plants over the winter, as Vicki Weston from Weston’s Salvias explains: “Salvias will grow happily in containers and, for the tender varieties, many of which are still in spectacular flower in November, it’s essential.” Choosing Suitable Containers I’d recommend you choose a terra-cotta pot with drainage holes. It’s best to avoid containers made of plastic and other synthetic materials. As for the size of the container, this depends on the present size of the plant and, eventually, on its ultimate height and spread. “I think that many people use containers for salvias because they are nervous about their plants surviving over winter,” Vicki says. “Remember that shrubby types grow thousands of feet up in the South American mountains, so they are tough. “Hot Lips, Royal Bumble and lots of other varieties are hardy to -10°C and, ironically, as a container is colder, they are less safe in the winter in a pot than in the ground!” Salvia varieties’ ultimate heights range from a compact 0.3-2m, so the size of the container will be very variable. I’d recommend choosing a container with a height that is about half as much as the current height of the plant, or even a little more. Salvia roots grow relatively quickly and it has a well-spread root system, so be sure to pot on or consider using a bigger pot in the first place. Choosing Compost Salvias perform best in moderately fertile, but not overly rich, soil with some organic content, but they are susceptible to root rot so excellent drainage is non-negotiable. “Choose a very good potting soil with little organic matter so the soil doesn’t become sour due to a lack of oxygen,” advises Lyndi Garnett, from the Victorian Salvia Study Group. For all salvia except Rosemary varieties, you can’t go wrong with a high-quality outdoor or all-purpose potting mix. Otherwise, loose soil that is a mix of grit or perlite, sand, and organic compost will do very well for most salvia. For Rosemary varieties, less fertile soil such as a balanced loam should be used. The soil should be kept moist, though it should be allowed to dry out between waterings. Potting Up Salvia Potted Salvia plants will need to be potted up until they attain their ultimate size. Nearly all salvias should not be left in their original containers permanently as they can become rootbound with resultant stress on the plant, causing it eventually to die. Whether you pot on or transplant your salvia, a sunny May morning would be ideal. For most Salvia varieties we suggest that the new pot should be two sizes up from the current one. Lightly water the potted salvia, then dig a planting hole that is a little deeper and a little wider than the plant’s pot. Remove the Salvia with the soil from the pot, then gently shake out some of the soil from the roots. If the roots are well spread, place the crown in the hole to transplant, but if they are rootbound then you will need to loosen the roots and spread them out before placing into the new container. A good way to do so is to dip the root system into a tub of clean, cold water, gently swish them around, and separate them. Backfill around the hole, firm up the soil and water thoroughly. How Many Salvia Can You Plant Per Pot? For full-grown perennial salvia, I’d suggest that you grow only one per pot so that the pot’s dimensions are appropriate for the given plant’s size. Most salvia varieties require soil nutrients to produce the most eye-catching blooms and the most delectable leaves, so it is wise to let each plant play by itself. “Pots can be positioned in various locations – shade or sun,” says Lyndi. “Most like a sunny sheltered position, but it can vary, so check the preferences for the varieties you are growing.” Pot-Grown Salvia Care For the most part, salvia in pots should be kept in full sun in a sheltered spot. Varieties that are hardy to H6 or H7 may be kept in an exposed location. Whether your salvia plants are in containers or in open ground, regular deadheading will prolong blooming. During hot summers, keep an eye on salvia containers kept in full sun. If the plant is drooping, increase the frequency of watering and shift it to a partially sunny location where it will get dappled or filtered sunlight. “Water your potted salvias around once a week with regular feeding,” recommends Lyndi. “Make sure there’s lots of air around the pot and that you don’t over water.” Fertilise these plants once a year in the spring with a balanced controlled-release fertiliser, taking care to use the product in proportion to the size of the plant and the container. As salvia varieties vary widely in hardiness from frost-tender H2 plants such as Salvia dombeyi (giant Bolivian sage) all the way to fully hardy H7 ones such as Salvia x superba (hybrid sage) – whether or not winter care is required will be up to the particular variety. “Know your plant – perennial or herbaceous,” advises Lyndi. “If it becomes winter dormant, it is herbaceous and should be overwintered accordingly.” In general, varieties that are not hardy in your region should be overwintered indoors or kept in a greenhouse.
Learn more
English vs French Sorrel Explained, With 12 Interesting Varieties To Try And Grow
IN THIS GUIDE English vs French Sorrel 1) Garden Sorrel 2) Belleville Sorrel 3) Round-Leaved Sorrel 4) Sarcelle Blond Sorrel 5) Fervent’s Large Sorrel 6) Red-Veined Sorrel 7) Patience Dock 8) Arctic Dock 9) Indian Sorrel 10) Heartwing Sorrel 11) Mountain Sorrel 12) Sheep Sorrel References Several edible varieties of ‘Sorrel’ are found but these straddle two different genera, Rumex and Oxalis. To compound the confusion, many a species in each genus is also informally known as ‘Dock’ with a preceding qualifier! Rumex acetosa or Common Sorrel is the ‘Herb Sorrel’ or the Sorrel herb – it includes several varieties. English vs French Sorrel The Common Sorrel that is most ‘commonly’ used as a herb in the UK and that used to be grown in cottage gardens is called – not too surprisingly – ‘Garden Sorrel’. It is called ‘English Sorrel’ in the US. Then there is also a French Sorrel – in fact, there are two French Sorrels. Both Sorrel De Belleville and Round-Leaved Sorrel are colloquially known as ‘French Sorrel’. Many perennial species of Wood Sorrel that have clumping or creeping forms are of more value for their simple but exceedingly pretty small flowers, and for making lovely groundcover. Rumex sanguineus or ‘Blood Dock’ Among the various species and varieties of Herb Sorrel, several of the most useful ones are outlined underneath. R. acetosa or Common Sorrel includes several varieties, all of which are dioecious. It is a hardy plant. 1) Garden Sorrel Botanical Name: Rumex acetosa Native to the British Isles and grows wild in fields and meadows. It has oblong, somewhat arrow-shaped, leaves with a notch at the base, and which are of a medium bright green colour. The leaves vary in shape and size – the lower ones are bigger and broader and are stalked while the younger leaves are smaller and narrower and are sessile. The plant grows to 50-80cm and has a spread of 10-30cm. 2) Belleville Sorrel Botanical Name: R. acetosa ‘De Belleville’ Also a variety of R. acetosa, and it is the French French Sorrel. Compared to Garden Sorrel leaves, this variety’s leaves are longer and more arrow-shaped. They are a bright emerald green. Maturity or position of the respective leaves being the same, this herb’s flavour is milder and less acidic than that of Garden Sorrel.1 3) Round-Leaved Sorrel Botanical Name: R. scutatus Also called French Sorrel because it grows wild in France and neighbouring regions. This is a monoecious plant and it has broad, somewhat halberd-shaped or heart-shaped leaves. The plant grows to only 30-45cm high. It grows along the ground and has a clumping habit; the taste of the leaves is sharp and very acidic. 4) Sarcelle Blond Sorrel Closely related to Sorrel de Belleville and is an old French cultivar. It starts putting out leaves very early in spring. Its leaves are even longer and narrower than those of Sorrel de Belleville. Its leaves too have a mild, acidic flavour. 5) Fervent’s Large Sorrel Another French variety. Like Blonde de Lyon, its leaves emerge very early in spring; moreover, it produces abundantly. The leaves are slightly blistered. This variety too is a clever choice with respect to flavour. 6) Red-Veined Sorrel Botanical Name: R. sanguineus “If I had to recommend one sorrel it would be Red-Veined Sorrel, a beautiful edible that has so many culinary uses,” shares Master Horticulturist Dan Ori, This variety has flat lettuce-like leaves of a brilliant green hue with prominent blood-red veins. It grows to about 30cm and is native to Europe and Asia. This Sorrel is a ‘triple play’, to use Baseball terminology: It tastes a little like lettuce so the young spring leaves can be eaten raw in salads. Older, basal leaves are good substitutes for spinach and kale. Third, it bears tiny red-coloured flowers in summer and is an excellent choice for an ornamental plant in shrubberies and rockeries mainly because of its very unusual and decorative foliage. 7) Patience Dock Botanical Name: R. patientia A very hardy species – this is the Sorrel that was used as a herb and a leafy green in Ancient Greece and Rome. It is a tap-rooted perennial that grows to be a tall plant often exceeding 2 metres in height. Rather than a herb it is more of a leafy green. It puts out leaves with the first signs of spring and is still eaten in two or three countries on the Continent. 8) Arctic Dock Botanical Name: R. arcticus Arctic Dock or ‘Sour Dock’ is a perfectly hardy species that is indigenous to Alaska and the Arctic regions and grows even in the Arctic circle. It has lanceolate leaves that are a part of the diet of the Eskimo People.2 In summer the plant bears lovely upright red panicles. 9) Indian Sorrel Botanical Name: R. vesicarius Bladder Dock has an upright form with ovate leaves. It grows in the temperate and tropical zones of Asia. The leaves are broadly oval. They have a pleasantly sour taste and are distinctive for their succulence for which reasons they make for a very fine salad leaf. 10) Heartwing Sorrel Botanical Name: R. hastatulus Has some of the prettiest and also tastiest leaves – deep, bright green, and tart and tangy. It grows wild in the Southern United States but is little known even in its native regions. It attains a height of about 60cm, making it an excellent choice for the home garden. 11) Mountain Sorrel Botanical Name: R. montanus Includes three variants. These plants are distinguished by their much larger leaves that can be up to 30cm and which are blistered to some or another degree. These Sorrels’ leaves are just about the most highly acidic leaves of all. 12) Sheep Sorrel Botanical Name: R. acetosella This is not an edible herb and is more like a coarse weed; however, it is worth mentioning for three reasons. It is a favourite fodder for sheep. Third, it is an invasive weed. References 1. Sorrel. (n.d.). Retrieved March 24, 2023, from https://academics.hamilton.edu/foodforthought/our_research_files/sorrel.pdf 2. Rumex arcticus. (n.d.). Flora of the Canadian Arctic Archipelago. Retrieved March 24, 2023, from https://nature.ca/aaflora/data/www/pgruar.htm
Learn more
Harvesting Your Rosemary: Aim To Remove The Fresh New Stems Up To 10cm In Length
IN THIS GUIDE When To Harvest Rosemary 1) Choose Sprigs To Harvest 2) Cut The Sprigs 3) Use And Store Your Rosemary Rosemary is an evergreen shrub grown in gardens throughout the UK for ornamental and culinary purposes. “Rosemary’s pungent smell is instantly invigorating and it is also a culinary herb,” shares Sonya Patel Ellis, a Garden Writer. “It can be used for roasts, bakes and bread, and makes a lovely addition to cocktails. I use it as a stirrer in a gin and tonic along with thyme syrup and a slice of grapefruit or orange.” Harvesting rosemary is fairly simple if you follow this easy three-step process: Choose which sprigs you want to harvest. Cut the sprigs from the plant. Use and store the rosemary for use as and when you need to use it. This process is explained in more depth below. Difficulty Easy Equipment Required Gloves, secateurs or scissors When To Harvest All year round When To Harvest Rosemary Rosemary, being evergreen, can be harvested at any time of the year. However, the supple new growth produced during the summer months has the best flavour. 1) Choose Sprigs To Harvest Rosemary, like many other herbs, is best harvested little and often and early in the morning before the day warms up. When choosing which rosemary sprigs to harvest, it is best to aim to remove the fresh new stems up to 10cm in length, as some of the older and woodier growth can be less flavoursome. If collecting rosemary for its oils, it is best to harvest the plant in early summer just as the plant comes into flower, as this is when the oil concentrations are at their highest. A larger harvest can be taken, but it is advisable not to remove more than 20-30% of the plant at any one time, as this may put the plant under undue stress. 2) Cut The Sprigs When harvesting rosemary, it is best to cut the chosen sprigs or stems using a clean and sharp pair of secateurs or scissors, keeping the shrub in a pleasing shape. However, try to only remove the fresh green growth, as rosemary does not regenerate well if cut back into the old wood. 3) Use And Store Your Rosemary Rosemary can either be used when freshly cut or dried and stored for future use. If used soon after cutting, the rosemary sprigs can simply be added whole to a meat roasting dish or the leaves stripped for adding to gravies, stews and sauces. Rosemary doesn’t tend to freeze well, but if dried it can be stored for months on end. To dry rosemary, wash under clean water and allow the sprigs to dry out fully, either by hanging in a well–ventilated spot out of direct sunlight or in a low oven spread out on a baking tray. Once the hung rosemary is dry, but not too brittle, strip the leaves from the stems and store in a sealed container until required. “Inspired by botanicals in cocktails, I have started to freeze the tips of rosemary stems in ice cubes,” shares Horticultural Consultant Colin Skelly. “I use the rest of the stem for cooking in summer and I can then use the ice cubes in stews and soups in winter.”
Learn more
Harvesting Basil: 'Leave At Least Two Sets Of Leaves Behind Per Stem' Says Peter Lickorish
IN THIS GUIDE 1) Pick The Leaves When Mature 2) Prune To Keep Its Shape 3) Store The Basil 4) Use As You Please Basil is a delightful addition to pasta sauces, pizza toppings and Thai-inspired cuisine, so it’s helpful to have a plentiful supply to hand in the kitchen. Thankfully, it’s one of the easiest herbs to cultivate, meaning even novice gardeners shouldn’t run into any problems. Although it’s easy to sow and care for, it can still be tricky to know exactly how and when to harvest the plant, how to use it in your cooking, and the best ways to store it. For that reason, we’ve put together this guide, consisting of the following steps: Start picking leaves when the plant is mature enough. Prune it to keep it in shape. Store it for the future. Cook with it like a culinary wizard. To clarify the process as much as possible, we’ll investigate each of those stages in isolation in more detail below. Difficulty Easy Equipment Required Small pruning scissors When To Take Cuttings Throughout growing season 1) Pick The Leaves When Mature You can begin harvesting leaves from your basil plant when it’s ready – this will become apparent from the vibrancy of its foliage and its height (a minimum of 15cm in or 6 sets of leaves high). When harvesting, pick leaves from the tops of stems, rather than cutting away stems entirely. “Leave at least two sets of leaves behind per stem,” Peter Lickorish, a Self-Employed Horticulturist since 2018, suggests. “Try to keep harvesting to no more than three pairs of leaves at a time per stem.” This will allow for new growth to appear in the place of the harvested foliage. 2) Prune To Keep Its Shape As well as harvesting your plant when you require leaves, it’s also important to continually prune the stems so as to encourage as much growth as possible. “Cut stems cleanly to just above a leaf with sharp scissors or secateurs, either after harvesting, or when stems become tall with large spaces between leaves,” says Peter. “The top leaves tend to be upward facing or flat, whereas lower leaves can hang. “Sometimes, the change between the two is a good indicator of where to harvest down to. “Harvesting and pruning keeps the plant vigorous, but make sure you leave behind some leaves on the stem. “Holding your secateurs with the bevelled blade to the plant will give the cleanest cut.” If fed, watered and harvested regularly, your plant will continue to flourish throughout the summer months. You should also keep an eye out for any flower spikes since these will divert energy away from the production of leaves and cause it to go to seed. Nip the flowers in the bud before they develop. 3) Store The Basil As mentioned above, harvesting basil continually is the best way to keep the plant going all through the season. As a result, you’ll need to store your surplus leaves. You can do so by placing them in the refrigerator for up to 3 days, or, if you do cut the entire stem, you can place this upright in a glass of water until needed. When freezing basil, place whole or chopped leaves into an ice cube tray and cover with water or add olive oil. 4) Use As You Please Ideally, you’ll cook with your basil leaves on the same day you harvest them for maximum freshness. If this is the case, pick them in the morning, when they are at their juiciest and tastiest. It’s said that tearing the leaves with your fingers (rather than chopping them with a knife) will help to release more of their delicious aroma. You should only wash them immediately prior to use and add them at the end of the cooking process – otherwise you’ll end up with soggy leaves in both scenarios.
Learn more
Cultivate Aromatic Basil At Home With These Tips From Master Horticulturists
IN THIS GUIDE Overview Common Varieties How To Grow Basil Basil Plant Care References Basil is a popular and delicious herb to grow. You can grow it in your garden for the summer or grow it indoors, but there are certain things you need to know in order to do so successfully. In this guide, we’ll help you understand more about this useful culinary herb and give you the information you need to grow it at home. Growing herbs like basil at home is a great way to start your gardening journey or to expand your gardening skill. It can help you avoid the costs (both financial and environmental) of purchasing fresh herbs like basil in plastic from a supermarket or other store. Overview Botanical Name Ocimum basilicum Common Name(s) Basil Plant Type Herb / Annual Native Area Africa to South-East Asia Hardiness Rating H1C Foliage Deciduous Flowers White or pink When To Plant February to July Harvesting Months June to September Common basil, also known as great basil, has the botanical name Ocimum basilicum. This is a culinary herb in the Lamiaceae family, which is native to the tropical regions of South East Asia.1 Plants called ‘basil’ also come from other species in the Ocimum genus. Examples include Ocimum sanctum and O. americanum. In the UK, most people are most familiar with O. basilicum, also known as sweet basil, and we’ll focus on this species for this guide. However, you might be surprised to learn just how many different variants even of this type of basil are available. Common Varieties Exploring the nuance of different types of common basil is one of the great things about growing your own basil at home. O. basilicum ‘Cinnamon’ Here are some of the popular types and cultivars of basil with varying leaf colours and flavours to consider: ‘Cinnamon’ ‘Crimson King’ ‘Lettuce Leaf’ ‘African Blue’ ‘Thai Sita’ ‘Floral Spires’ O. basilicum var. minimum O. basilicum var. thrysiflora O. basilcum var. citriodora How To Grow Basil Growing Basil From Seed Growing basil from seed is relatively easy. Basil can be sown indoors from February or early March, or any time right up until July. The seeds are sown into pots of peat-free potting mix, sometimes in a propagator when sown early, but usually on a light windowsill that is warm and without extreme temperature fluctuations. Planting Out You do not necessarily have to plant basil out in your garden. In fact, basil is often best kept in a container and grown on a bright and sunny windowsill indoors. Container growing is a good way to ensure that you can harvest your basil for as long as possible. However, it is also well worthwhile to consider planting out basil in the garden, since as well as being a useful culinary herb, it is also a very useful companion crop, especially for tomatoes. Where tomatoes can be grown outdoors or in a greenhouse successfully, you should get an annual crop of basil too. “Strong aromas from basil reportedly help repel thrip pests, so not only do the two flavours mix well in the mouth, but they work well together in the garden,” explains Peter Lickorish, a Lecturer on Horticulture. Basil should be planted out once all risk of frost has passed in your area, which is usually, unless growing undercover, from late May onward. Make sure that you harden off your plants by slowly acclimatising them to the outdoor conditions before planting them in the ground or before placing containers outside full time. Growing In Containers Growing basil in containers is often the best option, as mentioned above, for gardeners in the UK. But indoors or outside, you do have to make sure that you choose the right pots or containers, a suitable growing medium, and take care of your plants carefully. “Compost should be peat free with good drainage, so consider adding perlite and make sure to break up any large lumps,” Peter suggests. One downside to growing in containers is that you will have to water more frequently. The smaller the container, the quicker it will tend to dry out. “Terracotta pots, as well as being decorative, can retain and release some moisture back to the compost,” explains Peter. Of course, you can grow basil on its own in smaller, individual pots, but one other option to consider is growing basil in larger containers alongside one or more other plants in a mixed herb pot. Basil Plant Care If you place basil in a suitable location, it should be relatively easy to care for. Make sure that you consider the environmental needs and care basics outlined below to make sure that you are successful in growing these plants. Light Basil should be grown in full sun. They will enjoy a spot on the south or west side of a raised bed with tomatoes, or a sunny spot on a patio or in a courtyard garden in a container. In a container, in beds, or in the ground, they should thrive in a sunny spot that is sheltered from strong winds. Indoors, you should be sure to place a basil plant in as bright and sunny a location as possible. A south-facing windowsill is ideal. Soil Conditions Basil requires moist, but reasonably well-drained soil. A kitchen garden bed used for other annual crops should provide the right conditions. Preferred Climate Basil is a plant native to the tropics. It cannot withstand any frost at all and can only ever be grown outside in the UK over the summer months. Its hardiness rating is H1C, so it can cope with temperatures down to around 5-10°C, but no lower. The more warmth you can give it, the better it will tend to grow. Since basil likes warmth, providing a spot which is as protected and sheltered as possible is the key to success. Watering, Humidity & Fertilising Though the medium of soil should be free-draining, basil does like plenty of water and reasonably high humidity over the summer months. Water well and regularly, but always make sure, especially when growing in containers, that excess water can drain away. Try to water before mid-day if possible and try to water the soil at the base and not the leaves of the plant. This can reduce problems such as powdery mould or mildew. Mulching around basil with comfrey leaves or other organic mulches can help retain water and will also help meet the plants’ nutrient requirements. Pruning With basil, pruning and harvesting are one and the same. Pick the leaves and tops off basil little and often through the summer months, from July to September outdoors, and through autumn and into winter if you are growing indoors, or move outdoors plants indoors before frosts threaten. You can pick plenty, just be sure to leave at least three couples of side shoots so that regrowth can continue. Pinching Out If you are looking to maximise your yield of leaves for culinary use, you should pinch out the flowering heads as soon as these emerge to perpetuate leafy growth. However, remember that there may be benefits in your garden to leaving some basil plants to flower. They can attract pollinators and other beneficial insects and they can look beautiful too. Common Pests & Problems Slugs and snails can be a problem, as can leafhoppers, and aphids. Companion planting and generally increasing biodiversity in your garden can help with pest control outdoors. “Woodiness developing in stems and incorrect watering are among the most common problems,” Peter adds. “Regular harvesting can prevent plants from becoming woody to maximise longevity. “For watering, aim to hit the sweet spot between giving fast-growing plants the moisture they need and leaving them sitting in wet, sludgy compost.” Companion Planting Tomatoes don’t just like basil as a companion in the ground; they can work very well together in containers too. Basil is also a good companion for peppers and aubergines. Garlic or other alliums can also be beneficial as a companion for basil and these other crops, and marigolds are another great addition to polycultures that include these plants, helping to lure away aphids. Basil can also work well in combination with other culinary herbs which like similar growing conditions. Herbs to plant alongside basil include oregano and chamomile, which are said to help in the basil’s growth and flavour. Parsley and basil can grow alongside one another too. Borage, anise, bergamot, chicory, and coriander are some other herbs which can thrive in similar conditions. Harvesting Try to pick only what you need and either use or preserve it as quickly as possible. Basil is really best fresh, but can also be frozen in cubes of water or olive oil, or dried for later use. It’s important to note that harvested basil leaves should be stored unwashed until you need to use them, as they will turn slimy. References 1. Basil. (n.d.). Iowa State University. Retrieved March 13, 2023, from https://hortnews.extension.iastate.edu/1997/3-21-1997/basil.html
Learn more
Mint Cuttings Are One Of The Easiest To Take - 'Use It As An Introduction To Propagation'
IN THIS GUIDE Stem Cuttings Root Cuttings Dividing Mint Mint is one of the easiest culinary herbs to cultivate in a garden, but it can even become too successful and spread too vigorously if left unchecked. This herb comes in many varieties and makes an excellent groundcover and wildlife-friendly plant, which can help with pest control in an organic garden. Once you have some in your garden, in the right location, in full sun or partial shade and in moist soil rich in organic matter, it should go from strength to strength. It is also extremely easy to propagate your plants and grow new mint from cuttings. There are two types of cuttings that you can take from mint plants: Softwood stem cuttings Root cuttings “Mint cuttings are one of the easiest to take, so I’ve used it as a great introduction to propagation for children,” says Master Horticulturist Colin Skelly. “This is a great activity for school garden clubs, for example, where everyone gets to take one home when they’ve taken.” Both of these are straightforward gardening jobs that make it easy for you to obtain new mint plants for your garden that are copies of the parent plant, and we explain how below: Stem Cuttings To grow mint from step cuttings, taken between March and May: Take cuttings 8-10cm in length from new shoots on an existing mint plant. Take off the lower leaves and cut the stem just below a leaf node where the leaves emerge from the stem. Place the stems into a glass of water and leave the glass in a light, airy location until you see roots begin to form (make sure to refresh the water as needed). Roots should emerge within a couple of weeks. Once you see some good roots, place the cuttings into a pot with good quality, peat-free multipurpose compost. Water well and keep the medium moist. Pots should be kept indoors for a week or so, and once well established, if healthy and happy, they can be transplanted into their final growing positions. Root Cuttings To grow mint from root cuttings in autumn or winter: Use a hand fork to excavate thick roots or stolons growing around the edges of an existing clump of mint in the garden. Cut off long sections of healthy-looking roots to use for cuttings. Cut the section of stem, using a sharp knife, into sections 2-3cm long. Indoors or under cover, fill a seed tray with a 50/50 mix of multi-purpose compost and horticultural grit. Lay the root cuttings flat on the surface of this tray, then cover them over with more compost and water them in well. Once new growth emerges, pot up individual new plants into their own pots to grow on, or plant them directly out into the garden between March and May. Dividing Mint If you purchase mint in a pot from a supermarket, you can also divide the plant by simply easing it from the pot, and teasing it apart with your hands to make several sections, then replanting each of these sections into its own pot. Mature mint plants growing in the garden can also easily be divided. Simply lift a clump or a portion of a clump from the ground, and you can divide it into sections. The best times to do this are in spring or autumn. You can create as many new plants as there are stems. As long as you make sure each stem has some root attached, each one should grow into a new mint plant that you can grow elsewhere in your garden or give away to family or friends. With these methods in mind, you will never need to purchase more than one mint plant and can obtain plenty of mint for your garden.
Learn more
Basil Propagation - 'Check That The Cutting Has Between Two And Four Pairs Of Leaves'
IN THIS GUIDE 1) Select Your Mother Plant 2) Take Your Cuttings 3) Prune And Trim 4) Place In Water 5) Allow To Root 6) Transplant Into Pots 7) Aftercare References Basil is extremely simple to grow and propagate, which means even the most novice horticulturists can cultivate it with ease. That’s a far better alternative to buying basil from the supermarket every week, since your basil will invariably be fresher, cheaper and more easily accessible. You can even use a store-bought plant to take cuttings from and propagate your own! Just follow these simple steps and you can’t go far wrong: Select your mother plant Take your cuttings Prepare your cuttings with a prune and trim Place cuttings in water Allow them time to root Transplant your cuttings into pots Take care of your newly propagated plants If those instructions sound a little daunting to you, don’t worry. Difficulty Easy Equipment Required Pruning scissors, mason jar, pots, potting compost When To Take Cuttings May (if planning to plant outdoors), anytime if growing indoors We’ve explained each step in greater detail to make things as straightforward and free from stress as possible below: 1) Select Your Mother Plant The health and maturity of the plant from which you take your cuttings is all-important in ensuring that they not only survive, but thrive. Avoid any plant which has wilting or drooping leaves, holes in the foliage or any sort of discolouration on any part of the plant. You also want a plant that’s mature enough to withstand pruning, but not too mature that it’s already begun flowering. Select one which has at least four sets of leaves per stem. It’s irrelevant whether this is a plant you have cultivated yourself (perhaps from previous cuttings) or a store-bought one from a garden centre or supermarket. 2) Take Your Cuttings When taking your cutting, follow the stem all the way down to the lowest leaf node on it, then make an angled cut with pruning scissors or secateurs just above that point. Don’t be fearful of trimming the mother plant, since regular pruning is actually beneficial to its health. This is because it prevents it from becoming leggy and overgrown. Depending on the size and age of your mother plant, you should be able to obtain multiple cuttings from the same plant. Indeed, in the healthiest specimens, it’s possible to take upwards of ten cuttings from your mother plant. 3) Prune And Trim Before moving on to the next stage of the process, you must prepare the cutting for rooting. “First, check that the cutting has between two and four pairs of leaves – long stems can be cut into two cuttings,” shares Peter Lickorish, a Horticulture Lecturer. Then thin the foliage on the cutting, especially at the bottom. Strip away all of the lower leaves to halfway up the stem, since being submerged in the water will hamper the growth and development of the cutting. Having said that, you do not want to prune away all of the leaves. Those at the top of the plant must remain to allow the plant to continue to photosynthesise. One optional step is to dip the cut end of the stem into a rooting hormone or honey to give it the best chance of flourishing – but this is not strictly necessary. 4) Place In Water Now it’s time to place your cutting or cuttings in water. The best receptacle for this job is a glass vessel, such as a mason jar. This will allow you to see how clean the water is – since maintaining cleanliness is key to preventing bacteria from taking hold and keeping your cuttings as healthy as possible.1 It’s also advisable to use dechlorinated water. You can do this by boiling tap water and then allowing it to cool. Although not absolutely necessary, it’s another way of ensuring the cuttings have the best chance possible. “Being quick is good with cuttings!” says Peter. “Think of them as a fish out of water. If you have lots to trim and prepare, keep them in a damp freezer bag so they don’t dry out before it’s their turn to get placed in water.” Place them in the water so that the upper foliage rests on the lip of the jar. 5) Allow To Root Place the receptacle in a location that receives plenty of morning sunshine, such as an eastern-facing windowsill. Indirect sunlight in the afternoon is preferable since, although basil does love sunlight, too much of a good thing can end up scorching the leaves and hindering its growth. The exact time it takes for roots to appear may vary from plant to plant, though generally speaking you should expect to see some growth within the first couple of weeks. However, you should wait until the roots have reached 5-8cm in length before transplanting, which normally occurs after around a month. 6) Transplant Into Pots At this point, you can now move your cuttings into compost, as Peter explains: “Make sure you crumble the compost up to make it nice and fine. “It will come as a shock to find hard lumpy compost, having had only water around the roots. “seed compost is especially fine.” Prepare pots by filling them around half full with potting compost, ensuring that they have good drainage at the bottom. You can plant more than one cutting in a single pot, especially if roots have become intertwined in the same jar, but generally speaking, you want to separate them. Place the cutting (or cuttings) onto the compost and gently splay the roots as widely as possible. Then layer more potting compost onto them and tamp it down around the stem to keep it upright. While it is possible to plant your basil cuttings outdoors, it’s much more challenging (especially in the UK climate), so we recommend keeping them potted and moving outdoors only during summer. “They will need a degree of weaning before they’re ready for life outdoors,” says Peter. 7) Aftercare Water the compost of your potted cuttings to ensure that it is damp but not sodden – you don’t want to drown your fledgling plants! You should also observe a regular watering schedule thereafter, irrigating your plants whenever the top centimetre of the soil is dry. With the cuttings now fully potted and watered, you can give yourself a pat on the back as you’ll have created potential new mother plants for the future. Remember to harvest the leaves frequently to encourage further growth and to ensure that you always have enough basil around the kitchen to satisfy you and your family’s cravings for this delectable herb! Happy propagating. References 1. Hygiene In Plant Propagation. (2004, December). Nursery & Garden Industry in Australia. Retrieved April 17, 2023, from https://www.greenlifeindustry.com.au/static/uploads/files/np-2004-11-wfrlrsunfssp.pdf
Learn more


