

Growing

Unhappy Ficus Plant? Here Are 5 Reasons For Drooping Or Yellowing Leaves
IN THIS GUIDE 1) A Lack Of Light 2) Temperature Issues 3) Environment Changes Or Root Disturbance 4) Overwatering Or Waterlogging 5) Pest Problems Ficus benjamina can be a beautifully elegant and relatively easy houseplant to grow. However, it can be fussy if the basics are not in place and it is not cared for correctly. And in my experience, it is quick to let you know when it is not happy. A wide range of different stressors can cause leaves to turn yellow and drop off. Some of the most likely causes of drooping or yellowing leaves on a Ficus bejamina are: A lack of light or sudden changes in the amount of light. Temperatures that are too high or too low. Changes to the environment or root disturbance. Overwatering or waterlogging. Underwatering during warmer months can also be a common cause. Pest problems like mealybugs or scale. We share more insight into each of these problems and solutions for each below. 1) A Lack Of Light The first reason that a weeping fig might start dropping its leaves is that it is located in too dim or shaded a location. These are plants that require bright but indirect light within a home. They cannot thrive in a very dark situation. These plants are also prone to experiencing stress when there is a sudden change in the environmental conditions. A change in the light levels is one change that can spark off stress in the weeping fig plant. 2) Temperature Issues Sudden changes in temperatures can also cause leaves on a weeping fig to fall. Temperatures that fluctuate too extremely, those that are too high and that are too low can all cause stress and lead to this problem. Careful placement of a weeping fig in the first place is very important. You need to choose a location that is not in a draught or too close to a heat source such as an oven, stove or radiator. These houseplants need temperatures to remain consistently at around 16°C and will suffer if the temperatures fluctuate much from this. The temperatures should remain above 13°C, even through the winter months and will usually die if temperatures drop below 10°C. 3) Environment Changes Or Root Disturbance Weeping figs can be low-maintenance when they are in the right place with the right conditions, but it is important to remember that they are intolerant of changes. When first potted up into a new container or when repotted, they can lose some of their leaves due to the stress. They may settle down over time as long as the conditions they require have been provided, but you should always take care to disturb or move one of these houseplants as little as possible. 4) Overwatering Or Waterlogging Sometimes, leaf fall or yellowing leaves on a weeping fig plant may be due to a problem with excessive watering or poor drainage. These plants require a growing medium that is moist yet free-draining. The top few centimetres of the growing medium should feel dry before you water it once more and when watering, excess water should always be allowed to drain away freely. Yellowing leaves and leaf drop can be a sign of overwatering or waterlogging and potentially indicate a problem with root rot if this issue has been allowed to persist. If you feel as though you may have been neglecting the regular watering schedule required for a Ficus, this may also be the cause – especially if the plant is showing these signs during warmer months. 5) Pest Problems Since dropping leaves on a Weeping Fig are typically a sign of stress of some kind, this problem can also be caused by a pest infestation. When growing indoors, these plants can be plagued by many common houseplant pests, such as mealybugs, scale insects or red spider mites. Severe infestations can sometimes lead to defoliation. While there are other issues that can potentially cause both leaf drop and yellowing leaves on a Ficus benjamina, ruling out the above is typically the best place to begin when trying to solve the problem. Often, with the root cause removed or remedied, the plant will be able to recover.
Learn more
Caring For A Ficus Benjamina Houseplant - These Plants Are Tolerant Of Neglect
IN THIS GUIDE Overview Common Types Weeping Fig Care Ficus benjamina, also known as the ‘Weeping Fig’, ‘Java Fig’ or ‘Java Tree’, is a popular houseplant. It can be placed outside in summer in a mild and sheltered position, but it is commonly grown indoors year-round. It is highly prized as a houseplant for its elegant form and glossy green leaves. Overview Botanical Name Ficus benjamina Common Name(s) Weeping Fig / Java Fig / Java Tree Plant Type Houseplant / Tree / Shrub Native Area Southeast Asia and Australia Hardiness Rating H1C Foliage Evergreen Flowers Inconspicuous, followed by reddish-orange fruits which turn black When To Plant May to September When To Prune January to March With the right care, this plant can look seriously impressive and bring a taste of the tropics to a home. It also has a tolerance for relatively poor growing conditions, making it a good choice for those who are not necessarily the most green-fingered of people and for those looking for a relatively low-maintenance houseplant that won’t be too fussy to grow. Common Types As well as growing the species type Ficus benjamina, which has received an Award of Garden Merit from the RHS, you can also consider a variegated version with white variegation on the leaves. The variegated cultivar ‘Starlight’ has also been given an Award of Garden Merit. There are also compact cultivars to choose from if space is limited. ‘Too Little’, for example, is popular with bonsai enthusiasts. Weeping Fig Care Caring for a weeping fig is relatively simple as the plants are tolerant of a lot. However, there are certain things that you do need to provide to grow these plants successfully, since not getting the basics right means that these plants can lose their leaves. Below are the main things to think about. Light & Temperature Outdoors, where they can be placed in the summer, weeping figs require full sun to partial shade. Indoors, where they are often kept, they will do well in a south or west-facing window, in bright but filtered light. These plants can cope with temperatures of 5-10°C but not below and will not survive in freezing conditions. A steady temperature of 16°C is ideal – which is why these plants are generally grown indoors or only placed outside in summer. Preferred Soil These plants need humus-rich soil which is moist yet free-draining. A loam-based potting mix that is peat-free is generally considered to be the ideal growing medium when you are growing a Ficus benjamina indoors in a container. Watering Ficus benjamina will require regular watering, but it is also important not to overwater and to let the growing medium dry out somewhat between waterings. Water deeply when the top few centimetres of the growing medium feel dry to the touch. I would implore you to water well but to make sure that excess water can drain away freely. I tend to find that if I am a neglectful plant parent and forget to water my Ficus regularly, this is a plant that is quite good at letting you know it is unhappy – often by wilting, turning yellow and dropping leaves. Curtail watering, but do not stop entirely, during the winter months. Feeding During the spring and summer months, it is best to feed weeping figs with an organic, balanced liquid plant feed every couple of weeks. I find that a seaweed feed is ideal, but feed only occasionally during the coldest part of the year. Pruning Ficus benjamina is in RHS Pruning Group 1 and has a naturally well-balanced framework of branches and a pleasing shape – so they don’t necessarily need pruning to keep them in shape. Light maintenance pruning is all that will ever be required when growing these plants and even that light pruning is not always required. In late winter or early in the spring, check the plants over and if there is any damaged, diseased or dead material, this can be pruned out. You can trim branches that are crossing or overly congested too if you wish. Repotting It is not ideal to repot a Ficus benjamina too frequently. These plants can have a tendency to drop their leaves in response to environmental change, which includes being moved to a new pot. If they really need it, young weeping fig plants can be repotted into a slightly larger pot in the spring. Once they are larger and more established, it is best to keep the same pot. You can, however, replenish any nutrients by adding a top layer of compost in the existing pot each spring. Overwintering When a Ficus benjamina has been placed outside during the summer, it will need to be brought back indoors or undercover before temperatures drop below 13°C to avoid any issues. Remember to reduce watering and feeding over the winter months and keep temperatures to 13°C or above at all times during the coldest part of the year. Propagating Ficus benjamina can be propagated by means of seed or cuttings. Leaf buds or semi-hardwood cuttings can be taken to grow on and become new plants to add to your houseplant collection. Common Problems Like other houseplants, weeping figs can get infested with pests such as scale insects, mealybugs, thrips and red spider mites. But most of the issues that occur when growing these plants arise because of a problem with the environmental conditions or because of a sudden change in the environment. If you do notice your plant ‘acting up’, I’d generally advise you to look at light exposure and watering in the first instance.
Learn more
Rooting Plantlets From Stolons - Here's How To Propagate Spider Plants Effectively
IN THIS GUIDE What Are Stolons? 1) Rooting Plantlets From Stolons Rooting In Water Rooting In A Pot 2) Layering 3) Dividing 4) Growing From Seed If there is an indoor plant that can be described as stylish, it is the spider plant – with its ribbony foliage, slim lines and cool tones. If you have a spider plant in your home and would like one for your office or vice versa, these cooperative plants make that very convenient for you. Propagating spider plants from the stolons they produce, which are the long, cord-like runners that can be seen hanging off these plants, can be done in two ways. These two methods, described underneath, are the ones I would recommend and are arguably the most straightforward ways to propagate spider plants. However, two additional methods are also described, to make four possible ways to propagate Chlorophytum: Rooting plantlets from stolons – detaching spiderettes from runners emerging from the pot. Layering – taking runners from an existing plant and growing spiderettes in a pot alongside the mother Chlorophytum. Dividing – splitting the rhizome of a congested plant into multiple separate plants. Growing from seed – starting from scratch by sowing collected or store-bought seeds. Each of these methods is explained comprehensively underneath. Difficulty Easy Equipment Required Gardening gloves, mini secateurs When To Propagate Anytime (so long as the conditions are met) What Are Stolons? As potted spider plants mature and grow, they become root bound. After the roots grow into the pot and touch its inner sides, they start to curl and curve round inside the pot. After a spider plant becomes root bound in this way, it will start developing runners, also known as stolons. Stolons are long tendrils on which the plant will initially grow short-lived but pretty little flowers. These white, six-petalled flowers have a star-like shape. After the flowers are gone, closer to the ends of the stolons, baby spider plants, plantlets or spiderettes will form that are miniature replicas of the parent plant. It is these spiderettes that can be rooted so as to form a brand-new spider plant. Sometimes spiderettes start to develop air roots, which, though they may be quite small, are very distinct. These rootlets make propagation even more of a breeze. 1) Rooting Plantlets From Stolons When you choose the plantlet that you wish to detach and root, keep in mind that the bigger they are, the greater the chances that they will survive. Choose the ones that look vigorous and well-coloured and reject those that are lax and appear washed out. With a pair of sanitised mini-secateurs, detach a spiderette from the stolon. Cut the spiderette right where it is attached to the stolon at its base, where a knotty nub or bud will be visible, making sure that you do not cut into the plantlet. You can cut off as many spiderettes as you like. If the stolon is undamaged, it will likely produce new plantlets, though for aesthetic reasons, you may wish to prune it. Rooting In Water These plantlets can then be rooted and thrive in a container of water. Even though spider plants are not aquatic plants as such, they will give a very good imitation of being one! Take a small jar with a narrow neck. If you try to use a regular jar, the plantlet’s foliage will likely flop back in it. You will need rainwater, chlorine-free bottled water or distilled water and should avoid using tap water. Fill the jar or flask with a small volume of water initially. Place the spiderette in the jar or flask so that it is partially supported by its foliage draping over the neck of the jar and support it as you continue to pour water from near the side. Do not get the foliage wet. The trick is to submerge the whitish base of the spiderette and, of course, the roots (if there are any) while leaving the foliage entirely above the water. Place the container in a warm spot where it gets ample indirect sunlight. An hour or so of filtered sunlight is fine, but direct sunlight should be avoided. Change the water about once a week or earlier if it appears less than clear. Rooting In A Pot Take a 9cm pot or a 13cm one that has drainage holes. The smaller size is more suitable, but the plant will soon outgrow that pot. Likewise, you can use either a seed-starting or regular potting mix to root spider plant plantlets. If the spiderette has no rootlets, simply make a shallow and narrow hole in the medium with a dibbler or your gloved finger. The depth of the hole should correspond with the size of the white base of the plantlet. If the spiderette has rootlets, scoop up a little bit of the medium to make a hole in which the rootlets can nestle. Set the plantlet in the medium, keeping the green foliage entirely above the soil. Gently firm up the medium all around the spiderette. You may have to dampen and mound it around the plantlet to ensure it stays upright. Place the pot in a warm spot where it gets ample indirect sunlight and water the new plant regularly so as to keep the medium moist. 2) Layering Layering is nature’s way of propagating spider plants and it too has to do with spiderettes. When there are multiple spiderettes hanging off a stolon and you want to layer more than one, it can be quite fiddly. The advantages of this method include a higher success rate and strongly-rooted new plants. To layer plantlets, use a pot or planter of the appropriate size that has drainage holes at the base. Prepare the appropriate number of pots or the planter with a potting mix. Dampen the medium, then make shallow holes in the pots or planter. The depth and width of the holes should correspond to the size of the nub and white base of each plantlet and any rootlets it may have. Place the pots or planter by the side of the mother plant. Stretching out the stolon as necessary, gently push each plantlet into a hole and firm up the damp soil around it so that only its whitish base and any rootlets are in the soil. You may need to mound the soil around the base of one or another plantlet and provide support if necessary. Water the new plants regularly. After a couple of weeks, the stolon can be cut off with sterilised mini-secateurs. Snip it close to each new plant but do not risk cutting into the plant. Let a couple of centimetres of the stolon stay attached to each plant on either or both sides. 3) Dividing As spider plants are rhizomatous, clump-forming perennials, they are amenable to propagation by division. However, division is not typically undertaken as a method of propagation, but rather, if and when a spider plant gets congested, it is divided to clean it up. Propagation then becomes a happy side-effect! If a spider plant has visible clumps and is becoming congested, prepare the appropriate number of pots with potting soil and dampen it. Water the plant well and then prise up the soil ball from the pot. Allow the soil to fall off and gently brush it away to partially expose the roots. Separate the different clumps and disentangle what you can, starting from the crown. Next, from the midpoint between every two clumps, cleanly slice downward through the roots with a sharp knife. Whatever cannot be disentangled may cleanly be sliced through, but do not pull it apart. Re-pot the clumps without undue delay into the prepared pots and water in the new plants. 4) Growing From Seed Spider plants can be grown from seed, which is a less commonly-used method for propagating these indoor charmers. Seeds may be collected or store-bought, but either way, they should be sown within a couple of months, as they do not remain viable for very long. They may be sown any time of the year provided that the pots are kept in a warm spot indoors where they get ample indirect light. It is advisable for the pots to have drainage holes and you can use seed-starting or potting mix. Nudge seeds into a depth of 1-1.5cm, cover loosely with the medium and then dampen. Thereafter, keep the medium constantly moist, but not soaked. Seeds should germinate in approximately a fortnight. Plant expert Dan Ori gives us one last tip for a healthy young plant: “Although not critically needed, I like to keep the humidity up with young Chlorophytum for the best leaf quality. I grow them in my shower room as it gets lots of non-direct light, but you could grow them in any warm light room and mist them with water once a day for the same effect.”
Learn more
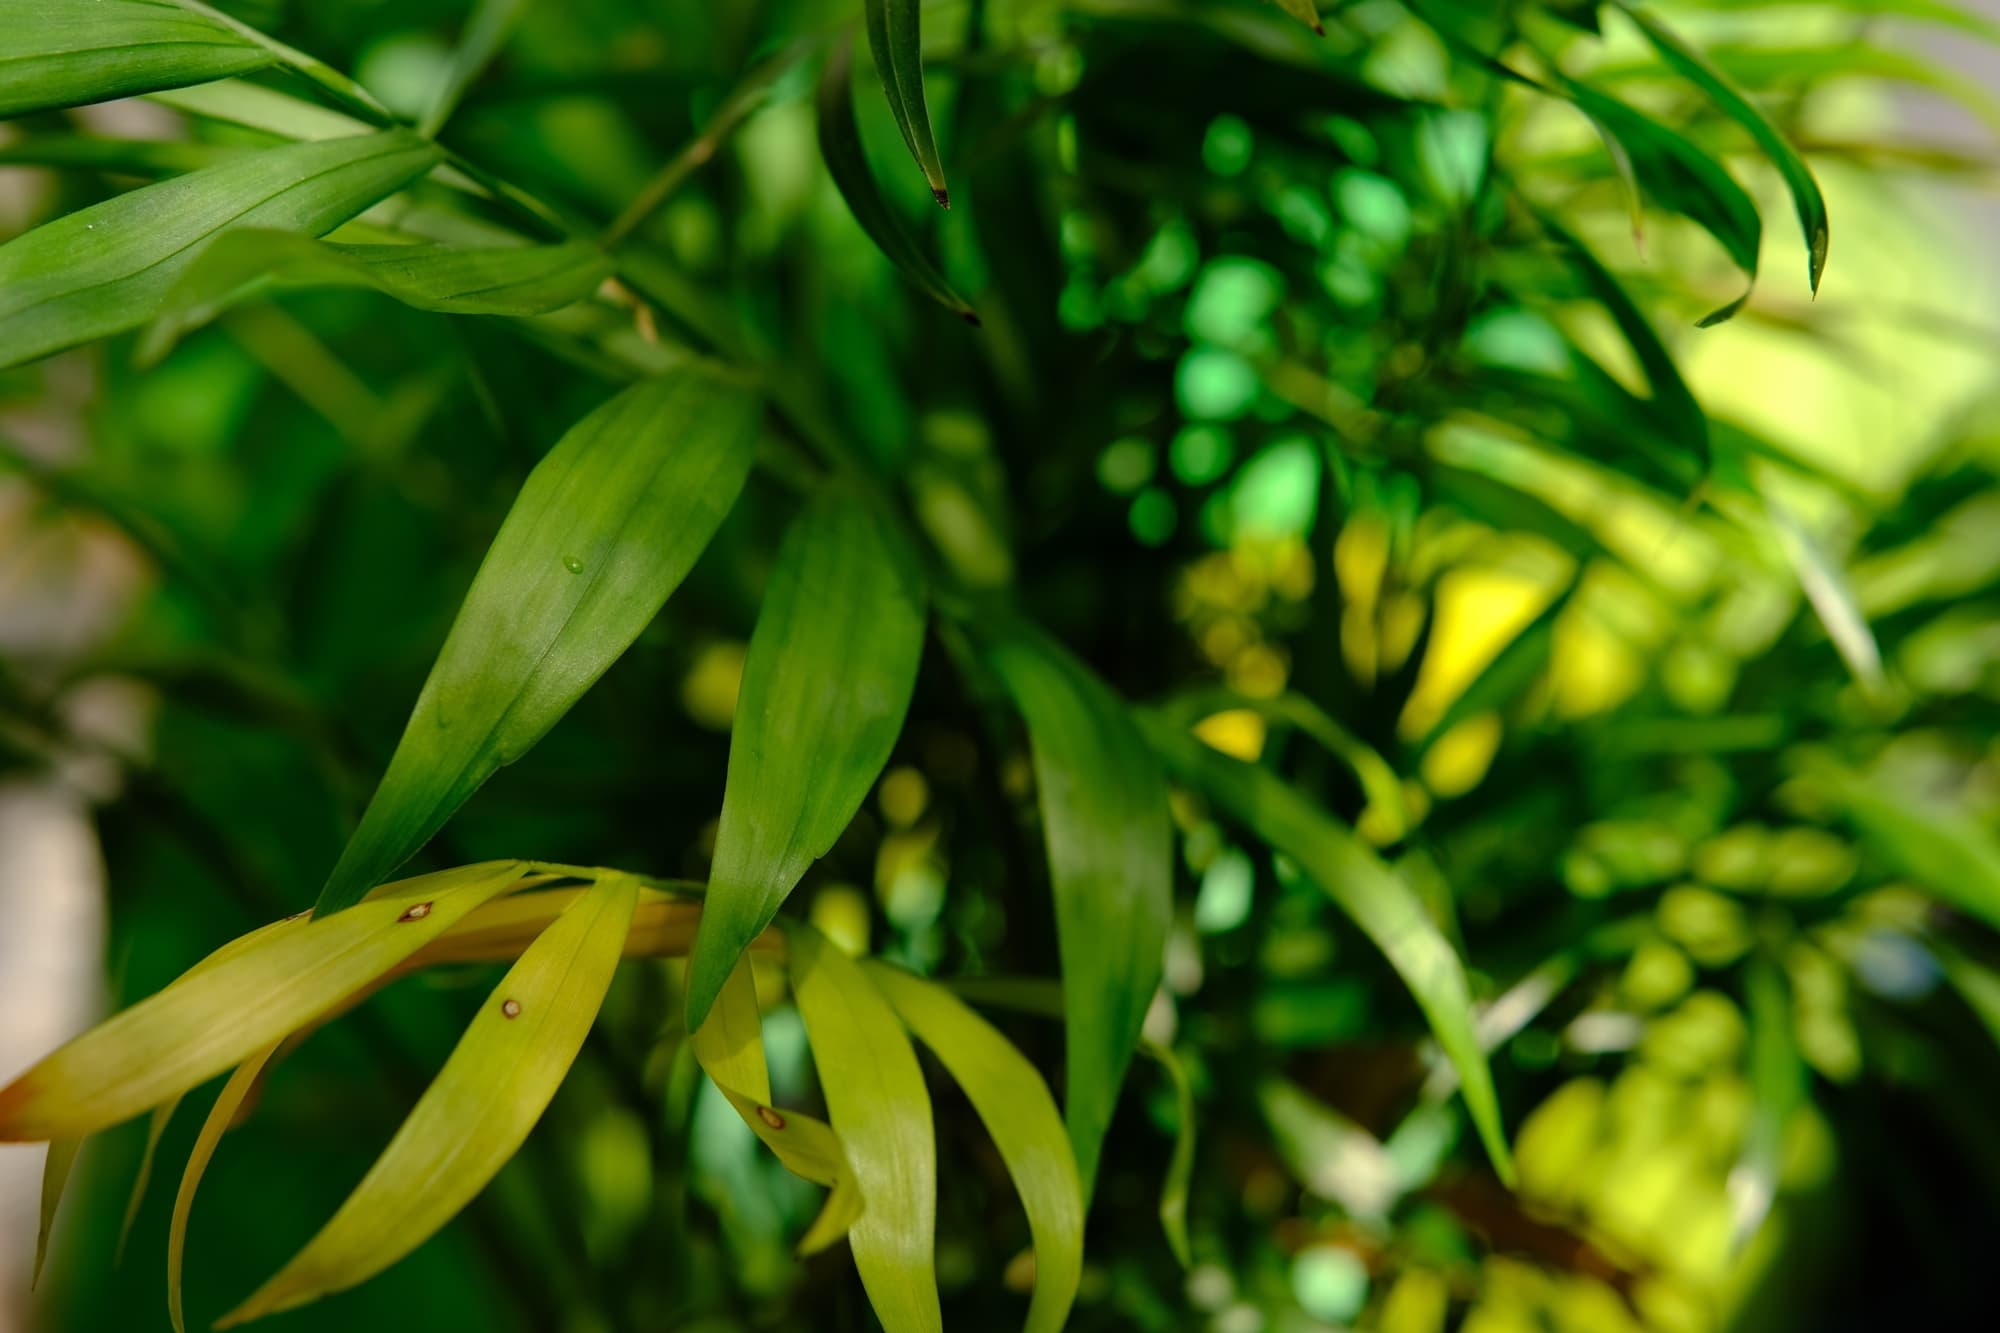
Howea Forsteriana ‘Kentia Palm’ - How To Grow Them Successfully As Houseplants
IN THIS GUIDE Overview Kentia Palm Care References The Kentia Palm is the quintessential ‘Parlour Palm’ of the Victoria era and is still very popular as a houseplant today. Growing it indoors here, so far from its native range on an Australian island, is actually a very easy thing to do, which accounts for its enduring popularity with houseplant growers in temperate climes of the Northern Hemisphere.1 Overview Botanical Name Howea forsteriana Common Name(s) Kentia Palm Plant Type Houseplant Palm Native Area Australia Hardiness Rating H1A Foliage Evergreen Flowers Small, shaped like stars, borne in groups of spikes, followed by little oval fruits (not usually seen in houseplants in the UK) When To Plant Year-round The Kentia Palm, which goes by the Latin name Howea forsteriana, is native to Lord Howe Island, Australia.2 Seed exports from the island of this species first began in the 1870s and these palms soon became the height of fashion, seen in many of the swankiest palaces, hotels and homes.3 While the Kentia palm can be grown outdoors in warmer temperate climates as well as tropical ones, it is most commonly grown as a houseplant in the UK. It has an RHS hardiness rating of H1A, meaning that it is best grown indoors or under glass throughout the whole of the year. Howea belmoreana Most of the time, Kentia Palms are sold as species types and not as named cultivars. The species Howea forsteriana has been given an Award of Garden Merit by the RHS. Another related species, also from Lord Howe Island, is Howea belmoreana (Belmore Sentry Palm), which is rather similar but somewhat smaller. This can also be a great choice for indoor cultivation. Kentia Palm Care Kentia Palms do have the reputation of being relatively easy to grow. However, in order to grow them successfully as houseplants, you do need to understand the conditions that they need to thrive and the care that they require. The key details that you need are outlined below: Light & Temperature Kentia Palms need a location indoors that has bright but indirect light. They like to be in a warm environment, ideally one with temperatures between 18-24°C. Temperatures ideally should not drop below 15°C and certainly not below 12°C. A bright and well-heated bathroom can be the perfect spot for a Kentia palm because, in addition to liking warmth, these palms also like a moderately humid environment. Growing Medium These palms should be potted up into a container filled with a soil-based growing medium; mixed with some sand or grit to improve drainage – or with composted bark and leaf mould in equal parts. Watering It is essential to water moderately during the summer months, allowing the palm to dry out, but it is also important to make sure that you do not overwater and that excess water can always drain away freely. This is because waterlogging can be a major issue for this plant. Over the winter months, only water sparingly. Feeding It is generally a good idea to feed Howea forsteriana with an organic liquid plant feed once a month during the summer, while the plant is in active growth. A balanced liquid plant feed like a compost tea can be ideal. Plant expert Dan Ori shares that watering with tap water can make the compost alkaline, which is not desirable for Howea: “Top-dressing the top layer of compost each spring with fresh ericaceous compost is often enough to offset the effects of being watered by tap water as well as providing accessible nutrients for the plant,” he suggests. Pruning With Kentia Palms, no pruning is required. Propagating Kentia palms are propagated by seed, which is sown into a heated propagator that provides temperatures for germination which remain above 19°C. Though not impossible, it would be challenging to grow your own Kentia Palm from seed and, of course, it would take a long time for them to grow into the larger houseplants that most people desire. Therefore, people will mostly purchase Kentia Palms in pots. Often, the plants that are purchased are actually several seedlings all in the same pot to give a lush and bushy appearance. Common Problems While Kentia Palms are not particularly prone to pest or disease problems, they can have issues with red spider mites, thrips, scale insects and other common indoor pests. Despite this, Kentia Palms are not prone to problems if they are grown in the right environmental conditions and provided with the right care. References 1. Howea forsteriana (F.Muell.) Becc. (n.d.). Kew Royal Botanic Gardens. Retrieved June 20, 2023, from https://powo.science.kew.org/taxon/urn:lsid:ipni.org:names:667434-1 2. Downing, A., Atwell, B., Marais, K., & Downing, K. (n.d.). Lord Howe Island Palms. Macquarie University. Retrieved September 12, 2023, from https://www.mq.edu.au/__data/assets/pdf_file/0007/1217293/Plant-of-the-week-Lord-Howe-Island-Palms-Howea-spp.pdf 3. Hutton, I. (2002, August 23). The History of Howeia. The European Palm Society. Retrieved June 14, 2023, from http://www.palmsociety.org/members/english/chamaerops/013/013-05.shtml
Learn more
Fixing Leggy Kalanchoe Plants - Keep An Eye Out For These Warnings Signs
IN THIS GUIDE About Kalanchoes Early Warning Signals How To Fix The Problem 1) Trim Correctly 2) Move The Plant Say Goodbye To Legginess! References Where light is concerned, Kalanchoes can be quite fussy. When it’s too bright, the plant can wilt or get leaf scorch, but when it’s too dark, that’s when the real trouble begins and the plants may become leggy. Simply put, insufficient light causes a Kalanchoe to stretch toward the weak or transient light source and it does so by elongating its stems as the days pass. Ergo, legginess. Be aware that even if a poorly-lit room is well-lit from a single strong source of light, such as a single window or single set of grow lights, a Kalanchoe’s growth may well be biased towards that light source. Since Kalanchoes are usually treated as indoor plants, their light needs can go unmet. So, let’s look into how you may be able to catch the onset of legginess before it really begins, and what to do about it if you’re a little too late. About Kalanchoes Kalanchoes are succulents with shimmering green leaves and an abundance of small, rigid, long-lasting flowers in bright pinks, oranges and reds. The word Kalanchoe technically refers to a Botanical genus.1 This genus includes many dozens of species but only a few of these are grown by gardeners, perhaps the most widely grown being K. blossfeldiana. These are informally subsumed within the same generic name – Kalanchoe.2 Because these denizens of the tropics are not tolerant of the cold, they are commonly grown as houseplants in the UK, and, of course, that’s where the trouble begins – sub-optimal light. Early Warning Signals Before your Kalanchoe actually becomes a leggy, unsightly mess, it may well send out a few early warning signals, and these will occur most likely in the following order: Multiple growing tips will point towards the light source. The upper leaves will start to curl downward though note this can occur due to lack of water or sun-scorch too. The leaves will lose their rich green shade and adopt a sickly yellowish colour. Plant growth overall will become unbalanced, becoming biased toward the light source. Keep an eye open for these signs so that you make that proverbial stitch in time. How To Fix The Problem What you need to do is to correctly trim the leggy plant and shift it to a spot where it gets the right kind of light and the right amount of light. 1) Trim Correctly Sterilise a pair of secateurs to trim the plant. Target those stems that are straggly, sagging or dangling off the rim of the pot. These will have open stems between sets of leaves. Trim off anything from one-third to two-thirds of the lengths of such stems, cutting to just above a pair of leaves which are near the centre of the plant. The section that is left behind should still have at least one set of leaves. Do not discard the trimmings – Kalanchoes propagate easily from cuttings! Those stems that are getting elongated but are not exactly leggy don’t need to be trimmed. Simply pinch or cut off the tips to halt further elongation. Kalanchoes can re-flower surprisingly soon after a trim. 2) Move The Plant Put the trimmed Kalanchoe in a spot where it gets a little direct sunlight and plenty of indirect light from multiple sides. A spot where the plant gets a few hours of morning sunlight in a spacious, well-lit room with multiple windows is ideal. You can utilise gauze curtains (to diffuse harsh, direct sunlight) and reflective materials in your room, such as windowpanes and glass cabinets, to best position that struggling Kalanchoe. Be careful not to reflect bright light back at a Kalanchoe or scorching will occur. If all else fails, there are always grow lights, under which Kalanchoes do very well. If you take this route, we have a hot tip for you in the final section. Finally, do not suddenly move the plant from a dark or low-light spot to a sunlit spot. Make the adjustment gradually, similar to the process of hardening. Say Goodbye To Legginess! The remedial course of action spelt out above will bush-ify your leggy Kalanchoe in good time. To summarise, only a few hours of early morning direct sunlight, ample indirect sunlight, non-directed diffused lighting and protection from the afternoon sun or harsh sunlight will work wonders for Kalanchoes. Here’s a final tip. I had this problem with my trailing Crassulas and thought up an easy preventive: simply rotate the pot (in the same direction) by a quarter circle once or twice a week or do so every time you water the plant. This way, even if there is a single strong source of light, the ill effects will be reduced or ameliorated. “Even with good light levels, these plants will eventually become leggy, so I tend to prune them – following the advice above – twice a year,” explains Peter Lickorish, a Horticultural Consultant. “For mine, I do this after the spring flowering, with a harder prune in late spring. I then do a light prune again in late summer, after any re-flowering over the summer.” References 1. Petruzzello, M. (1999, May 4). Kalanchoe | Description, Major Species, & Facts. Encyclopedia Britannica. Retrieved March 29, 2023, from https://www.britannica.com/plant/kalanchoe 2. Kalanchoe: An Overview. (n.d.). Science Direct; Elsevier BV. https://doi.org/10.1016/b978-0-12-437651-9.50022-1
Learn more
This Is Where You Should Keep Your Aloe To Help It Survive Winter Successfully
IN THIS GUIDE Where To Place Aloe During Winter Watering Aloe In Winter Does Aloe Need To Be Fed In Winter? Aloe vera is a popular houseplant and is very easy to grow. It can be placed out into a garden in summer or kept indoors all year round but cannot survive winter outdoors in most of the UK. The good news is that even if you’re not always the most careful and conscientious houseplant gardener, Aloe vera can take some neglect and withstand even the least green-fingered of attendants. In winter, the care required by these plants is even lower and less demanding than it is during the summer months. However, while you won’t need to do much when caring for an Aloe vera plant in winter, you will have to make sure that you place it in a suitable location. Below, we’ll clarify where to place an Aloe vera in winter and confirm what you do and do not have to do when you have one of these plants in your home during the colder months of the year. Where To Place Aloe During Winter Aloe vera plants can be placed outside in a garden for summer or kept indoors even during the warmest part of the year. However, over the coldest months, they do need to be kept indoors or under cover in a frost-free and relatively warm location. “They require some heat in winter,” says Les Pearcy, Chairperson for the Haworthia Society. “I grow my Aloe plants in a greenhouse which is kept a few degrees above 0°C, but this means that I tend to keep them dry in the colder months.” Temperature Aloe vera needs temperatures that do not regularly drop below 10°C and 5°C is their absolute minimum. The temperatures should ideally be a little warmer than this and care should be taken to position Aloe vera so that the temperatures in the vicinity do not fluctuate too greatly. This means that you should not place an Aloe vera in a cold draft or too close to a heat source. Make sure you do not place your plant too close to an oven, stove or radiator and look out for cold draughts from windows and doors. Light Requirements These plants also need a good amount of light, which can sometimes be challenging to provide during the winter months. When not using grow lights, it is important to make sure that you place an Aloe vera on a bright windowsill or another sunny spot over the winter months. Humidity It is best to keep an eye on the humidity; around 40% is ideal for your Aloe vera plant. An Aloe vera will not enjoy being in too humid an environment in your home but nor should you allow humidity to drop too low in winter. “Signs that the humidity is too high include browning of the leaves, which can eventually turn mushy, or raised white spots on leaves, known as oedema,” shares Master Horticulturist Peter Lickorish. Watering Aloe In Winter Overwatering an aloe in winter is one of the most common mistakes that people make. It is always important to remember that Aloe vera has only very modest water needs in summer and requires even less water over the winter months. Over the winter, an Aloe will not grow and enters a state of dormancy. It will only need watering around once a month, maybe even less. Simply begin watering more frequently again in the spring. Does Aloe Need To Be Fed In Winter? Aside from checking the plant and watering very occasionally, Aloe will be the ultimate low-maintenance houseplant over the winter months. You do not need to feed it through the coldest part of the year and will only need to worry about this and other potential jobs in the spring when the plant returns to active growth.
Learn more
These Are The Incredible Varieties Being Grown By Orchid Societies And Nurseries
IN THIS GUIDE 1) Cymbidium ‘Dorothy Stockstill’ 2) C. erythraeum 3) C. lowianum 4) C. ‘Nagalex’ 5) C. ‘Tiger Tail’ 6) Dendrobium ‘Berry’ 7) D. kingianum 8) D. nobile 9) Miltonia ssp. 10) Oncidium naevium 11) Paphiopedilum ‘Clair de Lune’ 12) P. insigne 13) P. ‘Leeanum’ 14) P. ‘Pinocchio’ 15) Phalaenopsis amabilis 16) P. ‘Dover’ 17) P. ‘Picasso’ 18) P. ‘Sunshine’ 19) P. ‘White Apple’ 20) P. ‘Yellow Lightning’ Orchids are notorious for being fussy plants, but some are easier to grow as houseplants than you might think. “When selecting an orchid, your uppermost considerations, other than aesthetics, should be its season of flowering, whether it’s terrestrial or epiphytic, its light preferences, and its temperature needs,” shares Peter Lickorish, a Master Horticulturist. “Although most orchids need differing day and night temperatures, they can be broadly classified as warm-growing, intermediate-growing or cool-growing. For light levels, some prefer longer durations of less bright light, while others need brighter conditions.” Moth orchids, Phalaenopsis, are the most commonly grown as houseplants in the UK. However, as you can see from the list below, there are not only many of these orchids to choose from but also many other orchid varieties that you might grow. Spotted in Kew Gardens “It is indeed challenging to choose a favourite orchid type or variety, as they each possess their own unique characteristics and charm,” says Daniel Toor, Owner of the specialist nursery The Dark Orchid. “I am constantly enthralled by the vast array of orchid shapes, sizes and colours, as well as the intricacies of their leaves, bulbs, roots, growth patterns and preferred environments. “To me, each orchid is like a character with its own distinct appearance, requirements and personality. “All in all, it is their diversity and beauty that ignites my passion for growing these fascinating plants.” Let’s explore just some of the highly regarded species and hybrid cultivars to help you find the right orchid for you and your home. 1) Cymbidium ‘Dorothy Stockstill’ COMMON NAME(S): boat orchid ‘Dorothy Stockstil’ HARDINESS RATING: H1C FLOWERS: red FLOWERING SEASON(S): winter / spring SIZE: 0.5-1m in height, 0.5-1m spread This is a highly floriferous boat orchid which bears reddish-brown flowers with a maroon lip from winter into the spring. It should be grown in a neutral and well-drained loam, in a reasonably bright location out of direct sunlight, and needs minimum temperatures of 16°C during the day and 10°C at night. This hybrid variety, with its pendulous flower spikes, looks good growing in a basket. 2) C. erythraeum COMMON NAME(S): Indian cymbidium HARDINESS RATING: H1C FLOWERS: red, green and white FLOWERING SEASON(S): autumn / winter SIZE: 0.5-1m in height, 0.1-0.5m spread Requiring around the same temperatures and conditions as the above, this boat orchid has bright green leaves that sometimes have dark spots. In autumn and during the winter, it has long arching stems that carry around a dozen blooms. These are around 8cm across and have 5 narrow outer petals that are green with red spots and a tubular centre that is green with dark red markings and a white lip. 3) C. lowianum COMMON NAME(S): low’s boat orchid HARDINESS RATING: H1C FLOWERS: green and red FLOWERING SEASON(S): autumn / winter SIZE: 0.5-1m in height, 0.5-1m spread This boat orchid is a large epiphytic species that grows to around 90cm in height. It will grow best in cooler conditions. The flowers are a vivid shade of apple green, with deep red edges to the lip, and these bloom on long, arching stems from autumn through to the winter and sometimes into early spring. Again, these are houseplants, with a hardiness rating of H1C. 4) C. ‘Nagalex’ COMMON NAME(S): cymbidium ‘nagalex’ HARDINESS RATING: H1C FLOWERS: green and white FLOWERING SEASON(S): summer SIZE: 0.5-1m in height, 0.5-1m spread Another option which can bloom over a long period of time, this boat orchid is extremely floriferous and can bloom continuously for more than three months. This is another potential houseplant that needs daytime temperatures of 16°C and 10°C during the night. The flowers are a yellowy-green hue with a white lip and they have a sweet fragrance. 5) C. ‘Tiger Tail’ COMMON NAME(S): tiger tail cymbidum HARDINESS RATING: H1C FLOWERS: yellow and purple FLOWERING SEASON(S): winter SIZE: 0.1-0.5m in height, 0.1-0.5m spread A dwarf, free-flowering terrestrial orchid that grows to around 30cm in height and spread, this option has long linear leaves and produces yellow to olive green flowers with white tinted peachy lip on gently arching spokes. These flowers bloom in the early winter. 6) Dendrobium ‘Berry’ COMMON NAME(S): rock orchid ‘berry’ HARDINESS RATING: H1B FLOWERS: pink FLOWERING SEASON(S): spring / summer / autumn / winter SIZE: 0.1-0.5m in height, 0.1-0.5m spread “At our nursery, we love to grow many of the species, especially dendrobiums,” shares the owner of Burnham Nurseries, Sara Rittershausen. “We have some that flower in any season and enjoy the cooler temperatures, and many have a lovely scent which is a real bonus!” This small, terrestrial orchid is a hybrid of D. kingianum (see below) and D. ‘Mini Pearl’. It grows around 38cm tall and 30cm wide. It has leathery green leaves and purplish pink flowers which are 2cm across, borne on sprays which grow upright from the pseudobulb tips in the spring. Daytime temperatures of 18-25°C and nights above 12°C are required. 7) D. kingianum COMMON NAME(S): pink rock orchid HARDINESS RATING: H1B FLOWERS: pink, purple and white FLOWERING SEASON(S): spring SIZE: 0.1-0.5m in height, 0.1-0.5m spread This orchid is slightly larger than the hybrid listed above. It is an epiphytic orchid with erect stems and fragrant flowers in purple, pink or white, with a veined or blotched lip that features hints of red or purple. These flowers are borne in racemes up to 15cm long in the early spring. 8) D. nobile COMMON NAME(S): noble dendrobium HARDINESS RATING: H1C FLOWERS: pink FLOWERING SEASON(S): winter / spring SIZE: 0.1-0.5m in height, 0.1-0.5m spread Another epiphyte, this orchid is often evergreen in cultivation. It grows 30cm in height, with ovoid leaves around 5-8cm long. From winter into spring, these orchids bear trusses of fragrant flowers with a rose pink hue and a deep maroon lip. Grow in well-drained acidic or neutral soil in a suitable orchid compost, with temperatures between 18-25°C by day and a minimum of 10°C at night. 9) Miltonia ssp. COMMON NAME(S): pansy orchid HARDINESS RATING: H1B FLOWERS: varies FLOWERING SEASON(S): spring SIZE: 0.1-0.5m in height, 0.1-0.5m spread If you are looking for something different to try, one of the pansy orchids within the Miltonia genus might be an option to consider. These have large, open blooms in a range of different shades from white through yellow and pink. Often, they are marked attractively in contrasting colours. They can be grown in cool to intermediate temperatures and should be kept in bright but indirect light indoors. 10) Oncidium naevium COMMON NAME(S): spotted oncidium HARDINESS RATING: H1B FLOWERS: white and red FLOWERING SEASON(S): spring / summer SIZE: 0.1-0.5m in height, 0.1-0.5m spread This is another orchid that might be grown inside the home in a bright conservatory greenhouse. It is an epiphytic orchid that has a pseudobulb from which new growth emerges. The leaves that come from the pseudobulb are around 20-30cm long and the flowers, borne on longer, arching stems in winter and spring, are sweetly scented. These blooms are white and star-shaped, with little red spots and a yellow spot at the centre. Six or more blooms may develop on mature plants. The maximum daytime temperature is 25°C and 8°C is the minimum at night. 11) Paphiopedilum ‘Clair de Lune’ COMMON NAME(S): slipper orchid ‘Clair de Lune’ HARDINESS RATING: H1A FLOWERS: green and white FLOWERING SEASON(S): spring / summer / autumn / winter SIZE: 0.1-0.5m in height, 0.1-0.5m spread Slipper orchids are another type to consider if you want to grow orchids at home. “I have a mixed collection of a number of genera but specialise in Paphiopedilum,” shares Ken Griffiths, the Chairman of the Bournemouth Orchid Society UK. “I particularly like them for their form, variety of colour and, in some, the beauty of the leaves. “There is a very active specialised Paphiopedilum Society in UK, which is the only one of its kind devoted to a particular genus.” This slipper orchid has leaves that are mottled and dark green, and single flowers up to 10cm across, which are carried on upright stems that are between 15-20cm tall. The apple green ‘slipper’ largely hides from sight in the green and white fused sepals. The petals are also green and white, while the upper sepal is white with dark green striping. 12) P. insigne COMMON NAME(S): splendid paphiopedilum HARDINESS RATING: H1A FLOWERS: gold and yellow FLOWERING SEASON(S): autumn / winter / spring SIZE: 0.1-0.5m in height, 0.1-0.5m spread “Paphiopedilum orchids are a little tricky to grow but come in a wonderful array of colours, look extremely exotic and are one of only a few orchid types that cannot be mass-produced,” says Malcolm Moodie from the Solihull & District Orchid Society. The splendid paphiopedilum is an evergreen semi-terrestrial orchid. It has long, narrow, pale green leaves in a rosette form that are around 20-30 cm in length and solo flowers appear from the centre of the rosette. These flowers are on upright stems that are 15-30cm long and, like other slipper orchids, they have flowers with a pouch that traps insects and allows for pollination. The petals are yellowy-bronze and the upper sepal is yellow with red spots with a white upper margin. 13) P. ‘Leeanum’ COMMON NAME(S): slipper orchid ‘leeanum’ HARDINESS RATING: H1B FLOWERS: green, white and red FLOWERING SEASON(S): winter / spring SIZE: 0.1-0.5m in height, 0.1-0.5m spread Another slipper orchid to consider, this option grows around 30cm tall. It has single flowers borne on long stems in winter and early spring that can sometimes appear during other seasons when grown indoors or in a greenhouse. The flowers are 10cm wide, with a dark reddish-brown pouch, pale green-yellow petals with burgundy markings and an upper sepal that is pale green with burgundy speckles, fading into white at the top. 14) P. ‘Pinocchio’ COMMON NAME(S): venus slipper orchid ‘Pinocchio’ HARDINESS RATING: H1A FLOWERS: green, pink and yellow FLOWERING SEASON(S): spring / summer / autumn SIZE: 0.1-0.5m in height, 0.1-0.5m spread The Venus slipper orchid is a hybrid made by crossing P. glaucophyllum and P. primulinum. The flowers, borne successionally, can appear on the plants and remain in bloom over several months. They are borne on single spikes and have pink pouches, whitish green side petals with burgundy markings and a lime green sepal up top. 15) Phalaenopsis amabilis COMMON NAME(S): moth orchid / East Indian butterfly plant HARDINESS RATING: H1A FLOWERS: white FLOWERING SEASON(S): SIZE: 0.5-1m in height, 0.1-0.5m spread Now we turn our attention to the popular moth orchids that you might grow. Sometimes referred to as the East Indian butterfly plant, Phalaenopsis amabilis has fleshy, ovoid leaves up to around 50cm long and, from autumn to early spring, bears long-lasting and nicely scented white blooms up to 10cm across on stems that can be up to 1m tall. Grow indoors in a bright location out of direct sunlight in a spot that receives consistently warm and even temperatures. 16) P. ‘Dover’ COMMON NAME(S): moth orchid ‘dover’ HARDINESS RATING: H1A FLOWERS: white FLOWERING SEASON(S): spring / summer / autumn / winter SIZE: 0.1-0.5m in height, 0.1-0.5m spread This upright, epiphytic moth orchid is an abundantly flowering hybrid option, often producing three flowering stems, around 30cm tall, at the same time. The flowers are large and white, with mauve colouration at the throat and a yellow lip. Grow in well-drained neutral soil, ideally with temperatures of around 17°C at night and 20-25°C during the day. 17) P. ‘Picasso’ COMMON NAME(S): moth orchid ‘Picasso’ HARDINESS RATING: H1A FLOWERS: pink and white FLOWERING SEASON(S): spring / summer / autumn / winter SIZE: 0.1-1m in height, 0.1-0.5m spread Another upright-growing epiphytic orchid, this option often also bears a couple of flowers at the same time, each flowering stem growing around 60cm in height. The flowers are interesting, being of a harlequin type, and no two flowers are exactly identical. However, they are broadly white with a dark burgundy heart and scattered burgundy spotting, a burgundy-orange lip and a whitish-yellow edge on the side lobes. 18) P. ‘Sunshine’ COMMON NAME(S): moth orchid ‘sunshine’ HARDINESS RATING: H1A FLOWERS: yellow and orange FLOWERING SEASON(S): spring / summer / autumn / winter SIZE: 0.1-0.5m in height, 0.1-0.5m spread This is an upright and relatively compact orchid that grows around 30cm tall. It has long-lasting blooms which are mostly yellow in hue, with maroon freckles scattered across them and an orange lip. These orchids can also thrive in warm, even temperatures in bright but indirect light. 19) P. ‘White Apple’ COMMON NAME(S): moth orchid ‘white apple’ HARDINESS RATING: H1A FLOWERS: white FLOWERING SEASON(S): spring / summer / autumn / winter SIZE: 0.1-0.5m in height, 0.1-0.5m spread Another upright, epiphytic orchid, this one has ovoid, dark green leaves that are 15cm long and numerous long-lasting flowers on semi-pendulous branched racemes around 30cm in length. Each flowering stem carries around 15 flowers which open in succession. These blooms are white with a blush of pink and some mauve on the reverse side. The lip is yellowish and spotted in the centre. 20) P. ‘Yellow Lightning’ COMMON NAME(S): moth orchid ‘yellow lightning’ HARDINESS RATING: H1A FLOWERS: yellow and red FLOWERING SEASON(S): spring / summer / autumn / winter SIZE: 0.1-0.5m in height, 0.1-0.5m spread This moth orchid has broadly oval leaves and arching stems which boast a series of yellow flowers that have reddish tips towards the edges and purple at their centres. These flowers bloom over a long period and can appear at any time of the year.
Learn more
Orchid Nurseries Reveal The 6 Key Factors For Reblooming
IN THIS GUIDE 1) Create A Temperature Difference 2) Maintain Temperature Within A Set Range 3) A Deadheading & Pruning Regimen 4) Choose The Right Orchid 5) Find The Correct Sunlight Levels 6) Other Factors Orchids have won a reputation as ravishing flowering plants that put on a one-time extravaganza and then fail to rebloom. Well, I’m here to tell you that this bad rap is ill-deserved. The reason for failing to re-bloom is simple: these demanding plants have very particular needs and requirements, and if these go unmet, they will not rebloom. Very many factors come into play and it is the combination of these factors that influence reblooming. “The key to encouraging orchids to bloom is to focus on the fundamentals of their care,” says Daniel Toor, Owner of the specialist plant nursery The Dark Orchid. “By providing the appropriate amount of light, maintaining consistent temperatures throughout the year, and ensuring proper watering and humidity levels, you can help your orchids reach their full potential. “Often, part of the necessary environment can be naturally provided, making it easier to concentrate on meeting the other requirements. Simply put, following the basics of orchid care will help you achieve blooming success.” Underneath I lay out the various factors that influence whether an orchid reblooms or not, ordered from most important to not-quite-as-important: The temperature difference in the day versus the night. An orchid’s optimal temperature range. Deadheading and pruning regimes. Your choice of genus. The sunlight levels. Other, less common, factors such as humidity. 1) Create A Temperature Difference Just about all Orchid plants require a difference in daytime and nighttime temperatures to stimulate blooming. This is the single most important factor for reblooming. Nighttime temperatures need to be 5-10°C lower than daytime temperatures. Be aware that a required nighttime low for one genus could cause orchid plants of some other genus to die. For specifics please see the following section. Very broadly, daytime temperatures should remain between 21-27°C and nighttime temperatures between 14-20°C. Such temperature differences between day and night are not exactly easy for the hobbyist gardener to regulate. The most straightforward and trouble-free way to achieve the objective is to keep your orchids in a particular room where you can install a programmable thermostat. 2) Maintain Temperature Within A Set Range “The correct temperature range for the type of orchid will help your orchid to rebloom, as some cooler varieties will not flower if kept too warm,” shares Sara Rittershausen, the Owner of Burnham Nurseries. Orchids are divided into three categories depending on the optimal temperature range in which they will re-bloom: warm-growing, intermediate, and cool-growing. Warm-growing orchids need temperatures between 19-29°C during the day and 16-18°C during nighttime. These include Phalaenopsis orchids, most Paphiopedilums and most Vanda varieties. Intermediate-temperature orchids do best in temperatures typically between 21-25°C during the day and 13-15°C during the night. These types include Cattleya, Odontoglossum, some Miltonias, some Paphiopedilums and Brassavola. Cool-growing orchids are most comfortable in daytime temperatures of about 20°C through the day and only 10°C by night. The genera include Cymbidium, Dendrobium, Oncidium and most Miltonias. “Some species, such as Dendrobium lindleyi, need late autumn and early winter temperatures at the bottom of their range, with warmer temperatures to follow. This cooler, dry winter rest triggers flowering. 3) A Deadheading & Pruning Regimen Deadheading and pruning have significant impacts on re-blooming, for better and for worse, depending on what you do and to which orchid genus. This matter is perhaps the least straightforward and more of a judgement call for Phalaenopsis orchids and this is because, unlike all other orchid types, it may well rebloom from the same spike, even in the following season. In contrast, pruning is straightforward for Cymbidium. When you deadhead Phalaenopsis, you have a choice. Allow the flowers to fade and, when a faded flower can be twisted off, do so. Leaving behind the whole stalk in this way may result in fresh buds near the tip. Alternatively, trim the spike to just above the first node below the lowermost flower on the spike or to just above the second node from the base of the spike. This type of trimming may stimulate a branch from the trimmed spike. After the growing season has ended, if the spike has yellowed, it should be pruned, but if the spike has stayed green, it may bloom the following year, so there’s another judgement call! Paphiopedilum orchids ought to be deadheaded during the flowering season. After a flower has faded, cut its stalk a very small distance away from the spike, making sure that you do not injure the spike. Dendrobium orchid flowers may be deadheaded as they fade or you can wait until all of them on a spike are spent at which point the spike may be trimmed, but not from the base. Trim the spike some distance above the bulge, unless it has yellowed and shrivelled in which case you should prune the spike from the base. For Cymbidium and other types of orchids, prune the spike from the base after the plant has gone dormant. It may be hard to do so, but if you use mini-secateurs and use the bottom blade with which to hook the spike from the middle and slide the secateurs down the spike, you’ll get a clean cut from near the base. Whichever pruning implement you use, the blades should be sharp. 4) Choose The Right Orchid Some genera just bloom and re-bloom more readily than others, while others are known to be quite fussy. Oncostele, Phalaenopsis and Paphiopedilum orchids are all good at reblooming. Of course, there are other orchids that can rebloom, but the types identified here are the ones that will most reliably bloom again and again. 5) Find The Correct Sunlight Levels Information and opinions as to orchids’ light needs can be very conflicting and contradictory. One reason for this is that in different geographical regions, the strength and intensity of sunlight vary. A second reason is that, just as orchids are divided into three groups by temperature, they are divided into three groups by light needs, low-light, medium-light and high-light, and even this rule is somewhat generalisation. This considerable variance in light preferences is a natural outcome of the various native habitats of these plants, which range from open prairies and grasslands to low-light forests and bogs. Vanda, Brassavola, and Oncidium orchids all love 6-8 hours of direct sunlight every day, as do Cymbidium, Dendrobium, most Cattleya and some Epidendrum. Meeting these daylight requirements is especially important for most species in winter; this is when many species initiate their flower buds. During summer, however, avoid too much direct sun in the middle of the day for genera like Dendrobium – opting for a west-facing windowsill could be a good option. As for orchids with lower light preferences, 4-6 hours of sunlight is favoured by most Miltonias, whilst Paphiopedilum and Ludisia types prefer 2-4 hours a day. With these orchids, the light should also be less intense. Phalaenopsis is difficult to classify because these orchids’ light needs vary by variety and by the type of light they receive. Depending on these variables, moth orchids may be placed in any of the three categories. Some growers recommend shorter bursts of bright, indirect light, and others favour longer durations of less intense light. The exposure should be east-facing, otherwise east-facing to south-facing. In general, orchids should be placed in indirect sunlight that is dappled, filtered or diffused. You can also place orchids under grow lights where intensities and durations are controllable. “If your orchid is reluctant to re-flower, give it a holiday!” adds Mark Riley, the Technical Manager at Love Orchids. “Moving your plant to a brighter, cooler position in the house could be just what it needs to encourage a new flowering response.” 6) Other Factors Humidity and seasonal temperature variation also have an effect on whether an orchid reblooms. All orchids will be comfortable with a humidity between 50-60%. However, Paphiopedilum and Odontoglossum will be happiest with humidity nearer 70%. Orchid pots should be placed on orchid humidity trays; a humidifier is a very useful accessory if you grow orchids. Orchid dormancy periods differ from genus to genus, but they are all dormant during the winter. During dormancy, the day and night temperature levels should be kept about 5°C lower than the growing season levels. “Orchids also need correct nutrition to flower well,” adds Peter Lickorish, a Master Horticulturist. “Too much nitrogen later in the season and not enough potassium could hinder flowering, so check the N:P:K (Nitrogen:Phosphorus:Potassium) ratios in liquid feeds used.”
Learn more
Feeding Orchids: 'Use A Good Fertiliser That Does Not Contain Urea' Says Society Chairman
IN THIS GUIDE The Wrong Growing Medium Repotting Considerations Feeding Your Orchid Periodic Flushing References Orchids, so often mistakenly considered native to a particular type of tropical ecology, grow in an incredibly diverse array of ecologies and regions. Though a very large number of species are found in cloud forests, such as those of Costa Rica (whose national flower happens to be an orchid), these plants grow in the sparse ground at sea level, on treetops in rainforests and everything in between.1 Perhaps this is not too surprising because the Orchid Family includes 850 genera and nearly 30,000 species.2 So how do you set down fertilising and feeding guidelines for such a diverse plant family? Ifs and buts out of the way, please bear in mind that what follows are general guidelines that are suitable for most orchid varieties grown by hobbyist gardeners. However, other factors will certainly influence how well or how poorly your orchid plants respond to fertilising, as laid out below. Difficulty Easy Equipment Required Low-nitrogen, high-potash formula or a balanced formula When To Feed Once a week in the flowering season, every 20 days in the off-season The Wrong Growing Medium Before going into the particulars of feeding orchids, I need to cover a necessary preliminary: the growing medium. If you have obtained your orchid plant from a professional grower or an established nursery, you can skip this section, but if your orchid was purchased from a supermarket’s plant department or from your corner garden centre, read on. Purely commercial operations may or may not root a plant in the most suitable type of medium. For the large majority of plants, this horticultural inexactitude does not matter much and a multi-purpose compost usually works out fine. This is not the case for orchids. First off, free-draining medium is a non-negotiable for these plants. Any waterlogging or constant damp can bring about root rot. Next, these unusual plants by far prefer to be rooted in poor, low-nutrient media, though at the same time, they respond wonderfully well to regular feeding! So, if your orchid plant came from a garden centre or a supermarket, I’d suggest you play it safe and re-pot it in a suitable medium. Repotting Considerations Do not repot an orchid plant when it is in bloom, which will almost surely be the case when you buy it. Wait until it has finished flowering or until spring when fresh growth is emerging. In other words, repot your orchid when it is in active growth but not during its flowering season or during winter dormancy. You can purchase a specialised medium such as Westland Orchid Potting Mix or Miracle-Gro Orchid Potting Mix or you can make your own. A good medium for a potted orchid would be composed of fir bark, perlite and sphagnum moss. Other components that could be added or used as substitutes include grit, pine bark and peat moss. Grit may be needed to give stability to stop top-heavy pots from falling over. In what proportions, though? Actually, the ideal composition varies from genus to genus but you can’t go wrong with a basic mix of 3 parts fir bark, 2 parts perlite and 1 part sphagnum moss. Feeding Your Orchid Perhaps it is somewhat counter-intuitive that a plant that prefers poorish soil benefits greatly from some serious feeding. However, the style of feeding plays a key part. What these plants respond very well to is frequent feeding but in small doses. “Use a good fertiliser that does not contain urea and has many macro and micronutrients needed for orchids,” Malcolm Moodie from the Solihull & District Orchid Society shares. Also, feeding should be done for all twelve months of the year. However, the formula and frequency of the fertiliser that is used differs depending on the season, as Malcolm explains: “Regular feeding using a balanced feed or slightly higher nitrogen feed (Grow Formula) in the summer with a low Nitrogen feed (Bloom Formula) in winter will help.” So in the off-season, use a balanced formula, such as a 20-20-20 once every 20 days. During the blooming season, opt for a low-nitrogen, high-potash formula, such as a 10-20-30, and apply it once every 20 days from winter, increasing to once a week during peak flowering. Use the first type from the time the blooming season winds up until you see the first flowering stalk or the first bud. Then, switch to the second type and use it through the blooming season. Typically, these timeframes will run from sometime in October to sometime in March and vice versa. Feed when you water by adding in the fertiliser and applying in the same way you would water. “Misting water, mixed with fertiliser, to the underside of orchid leaves enables it to be taken in through stomata pores,” shares Peter Lickorish, a Master Horticulturist. “I find a mixture of foliar feeding in this way, and applying fertiliser to the medium and the roots through a watering can with a narrow spout, not a rose, is ideal.” How much fertiliser you use depends on various factors, including the age and size of the orchid plant and the size of the pot. Do not feed an orchid plant at all in its first year. We recommend that you use about 75% of the concentration or volume recommended by the manufacturer. Apply at a lower concentration during winter. Use a liquid formula or make your own liquid using powdered fertiliser, but remember to use rainwater or distilled water. Periodic Flushing It is possible for salts to build up in the growing medium. Therefore, twice in the off-season and twice during the blooming season, skip a scheduled feeding and, instead, drench the medium, allowing the water to flow out from the drainage holes, so as to flush out any built-up salts. Such flushing is critical for some genera that are intolerant of salts build-up, such as pansy orchids. Resume watering and feeding as usual promptly after (but only after) the medium has dried out. References 1. Orchids of the Cloud Forest. (n.d.). Cloudbridge Nature Reserve. Retrieved April 20, 2023, from https://www.cloudbridge.org/wp-content/uploads/2011/11/NatureNotesNo15.pdf 2. Johnston, E. (2022, February 28). Exploring the orchid family tree. Kew Royal Botanic Gardens. Retrieved April 20, 2023, from https://www.kew.org/read-and-watch/orchid-family-tree
Learn more


