

Growing

Verbenas Are Great At Tying Planting Together - Here Are 4 Plants To Grow With Them
IN THIS GUIDE What Is Companion Planting? 1) Marigolds 2) Nasturtiums 3) Zinnias 4) Ornamental Grasses References Gorgeous verbenas are a gardener’s joy. This plucky plant adds colour and interest to any garden and boasts 150 species that flower.1 Known for their long flowering period, there are varieties that bloom every month apart from in winter and are really easy to grow, making them perfect for even the most novice gardeners. Verbena with Echinacea and Rudbeckia These plants are vibrant and versatile and will thrive in beds and borders as well as in pots and containers. “Verbenas are great at tying planting together, particularly in looser naturalistic planting,” says Master Horticulturist Colin Skelly. “I use it a lot for this reason, but also because it is a great plant for pollinators, particularly in late summer.” Thanks to their multi-talented nature, these beauties can really set off other plants, so in this article, we’ll look at the best companion plants for your verbenas to really make your garden pop. What Is Companion Planting? As you can probably guess, companion planting is simply choosing a suitable plant to go beside a plant you already have in your garden – but the reasons to choose a particular plant can be varied. You may choose the companion plant just because it looks nice next to your existing plant. However, you can also pick plants that can repel unwanted pests or attract pollinators. 1) Marigolds Marigolds with their explosive yellow and orange blooms look utterly delightful next to verbena’s more dainty flowers. Verbenas thrive in full sunlight and marigolds are just the same, so these two are a match made in heaven. Marigolds also attract butterflies, bees and other essential pollinators – so this pair really is a win-win. 2) Nasturtiums Like verbenas, nasturtiums are also super versatile with bush varieties, species that cascade and others that climb. Nasturtiums also come in a wide range of colours so there are limitless combinations you can choose from when pairing these two plants together. Nasturtiums are also notoriously easy to grow, so this is a great option for beginner gardeners or if you’re just feeling lazy! 3) Zinnias Perky, peppy zinnias are just so much fun and can certainly keep up with the charm of verbenas and neither one upstages the other. Zinnias also flower from early spring to late autumn so both plants will be blooming in time with each other, filling your garden with whimsical colour. Both plants require the same amount of watering, making them the ideal couple. 4) Ornamental Grasses Ornamental grasses are a great option if you want to create a bit of texture and movement in your garden. Verbenas have an almost wildflower appearance, so pairing them with ornamental grasses can create a real country cottage vibe. There are loads of ornamental grasses to choose from and you will be able to find one to perfectly match any variety of verbena. Including ornamental grass in your garden is also a great way to do your bit for the environment. Ornamental grass helps provide shelter for small mammals and insects. As you can see, there are lots of options when it comes to companion plants for verbenas, whether you are trying to create the right colour scheme, keen to attract pollinators or just want to give your garden that extra wow factor – there is a suitable plant for every occasion. References 1. Verbena. (n.d.). Kew Plants of the World Online. Retrieved August 23rd, from https://powo.science.kew.org/taxon/urn:lsid:ipni.org:names:330551-2#children
Learn more
What Does ‘Deciduous’ Mean? Why Some Plants Lose Their Leaves For Some Of The Year
IN THIS GUIDE What Does Deciduous Mean? Why Do Deciduous Plants Lose Their Leaves? Key Examples Deciduous Plant Care Pruning References In gardening, we often talk about deciduous plants, but what does deciduous actually mean? If you would like more information on this term, this simple guide should help. Some plants we use in our gardens are deciduous, some are evergreen. These terms are simply used to describe what happens to the plants over the winter months (or during other seasons in subtropical, tropical or arid regions). What Does Deciduous Mean? Deciduous plants are plants which lose their leaves for a certain part of the year. In the UK, and other temperate climate areas, leaf loss usually coincides with winter. Deciduous plants lose their leaves in a process which is known as abscission.1 “I’m a big fan of deciduous plants, as you get a lot more change through the seasons, including structural shape in the winter and budding green leaves in the spring,” shares Garden Designer Peter Reader. Evergreen plants are those which, unlike deciduous plants, keep their foliage all year round. Evergreen plants do lose leaves, but not all at once, so they remain green no matter the season. Some plants are semi-deciduous and may lose old foliage as new growth begins. Some other plants are semi-evergreen, and they retain some leaves during winter, even though they shed some before the beginning of the next growing season. Some deciduous trees, notably oaks and beech, may retain dead leaves for some or all of the winter. This is called marcescence and trees which exhibit this are sometimes called ‘everciduous’.2 Why Do Deciduous Plants Lose Their Leaves? The loss of leaves on deciduous plants is a normal part of their life cycles. This is the natural strategy that these plants have developed as the growing season comes to an end and they enter into a period of dormancy. Through the growing season, a plant’s leaves work hard, turning sunshine and CO2 into food to sustain the plant – but with changing light levels and lowering temperatures, deciduous plants prepare to enter a period of rest.3 They shed their leaves, which drop to the ground and break down to cycle nutrients through the natural system. Deciduous plants have evolved to drop their leaves for a range of reasons. In temperate climes, a key evolutionary advantage of leaf loss is that it helps the plants survive winter weather, and conserves water. Losing leaves may also reduce damage from insects and predation. Key Examples In the UK, there are several key types of deciduous woodland, including many native and naturalised deciduous trees, and also small pockets of ancient woodland with plenty of deciduous trees. We can replicate those natural ecosystems in our gardens. Deciduous plants include: Deciduous Trees Deciduous trees include most native trees in the UK, except box, holly, juniper, Scot’s pine and yew. Most fruit trees that are commonly grown in gardens in the British Isles are also deciduous. Deciduous Shrubs Shrubs that are deciduous include many ornamental garden favourites such as: Buddleia Cornus Hydrangea Spiraea Ribes Roses The list could go on! Deciduous shrubs also include fruiting bushes, such as currants, gooseberries and raspberries. Herbaceous Perennials Herbaceous perennials lose their leaves and die back, often entirely, over the dormant period before springing back into life in the spring. Some popular herbaceous perennials include: Achillea Alchemilla Aquilegia Campanula Penstemon Persicaria Salvias Scabious Symphytum Verbena Deciduous Plant Care Deciduous trees, shrubs and herbaceous plants number among them many of the easiest and lowest-maintenance plants grown in UK gardens. Often, when carefully chosen to suit the growing conditions where you live, they will thrive with remarkably little care and attention from you. When choosing deciduous trees and shrubs, it is important to think about the growing conditions, as things like sunlight and shade, wind, water availability and soil will make a big difference in how well these plants thrive. Planting Hardy deciduous trees and shrubs are often planted bare-root over the dormant season. They should be placed into large planting holes and the soil firmed in well around them. Deciduous herbaceous perennials are also planted bare-root over the dormant period or planted at any time if pot-grown. When To Plant Depending on the species, late autumn or early spring can be good times to plant almost all deciduous plants. Watering & Mulching It can be beneficial to mulch well around their bases, though you should take care not to mound mulch around the trunk or stem/stems. In terms of care, most deciduous plants should be well watered during dry spells until they become established and mulch should be replenished each spring. Pruning Pruning deciduous trees and shrubs is usually something to undertake in the dormant period, before sap rises. Though different species have somewhat different pruning guidelines, generally, the goal is to remove dead, damaged or diseased material, and to create an open framework of branches for healthy growth. Pruning can also be used to shape species and make the most of the space available, like when fruit trees are pruned as espalier, fan or cordon trees. Herbaceous perennials which are deciduous will often die back to the ground in winter, though some may leave behind some standing dead foliage and stems. These can be cut back at the end of the season, though leaving these in place for wildlife before cutting back in spring can often be a good idea. As long as you have chosen the right plants for the right places, you should find it easy to care for the deciduous plants in your garden, as Master Horticulturist Dan Ori shares: “It is always a good idea to double-check when and how to prune any plant. For instance, pruning a Prunus in winter could result in poor flowering and disease.” References 1. Gulfishan, M., Jahan, A., Bhat, T. A., & Sahab, D. (2019). Abscission. Senescence Signalling and Control in Plants, 2019, 255–272. https://doi.org/10.1016/b978-0-12-813187-9.00016-0 2. The Essence of Marcescence. (2021, December 13). The Arnold Arboretum of Harvard University. Retrieved March 14, 2023, from https://arboretum.harvard.edu/stories/the-essence-of-marcescence/ 3. Plants In The Food Chain | How do Plants Make Food? (n.d.). The RSPB. Retrieved March 14, 2023, from https://www.rspb.org.uk/birds-and-wildlife/natures-home-magazine/birds-and-wildlife-articles/food-chains/making-food/
Learn more
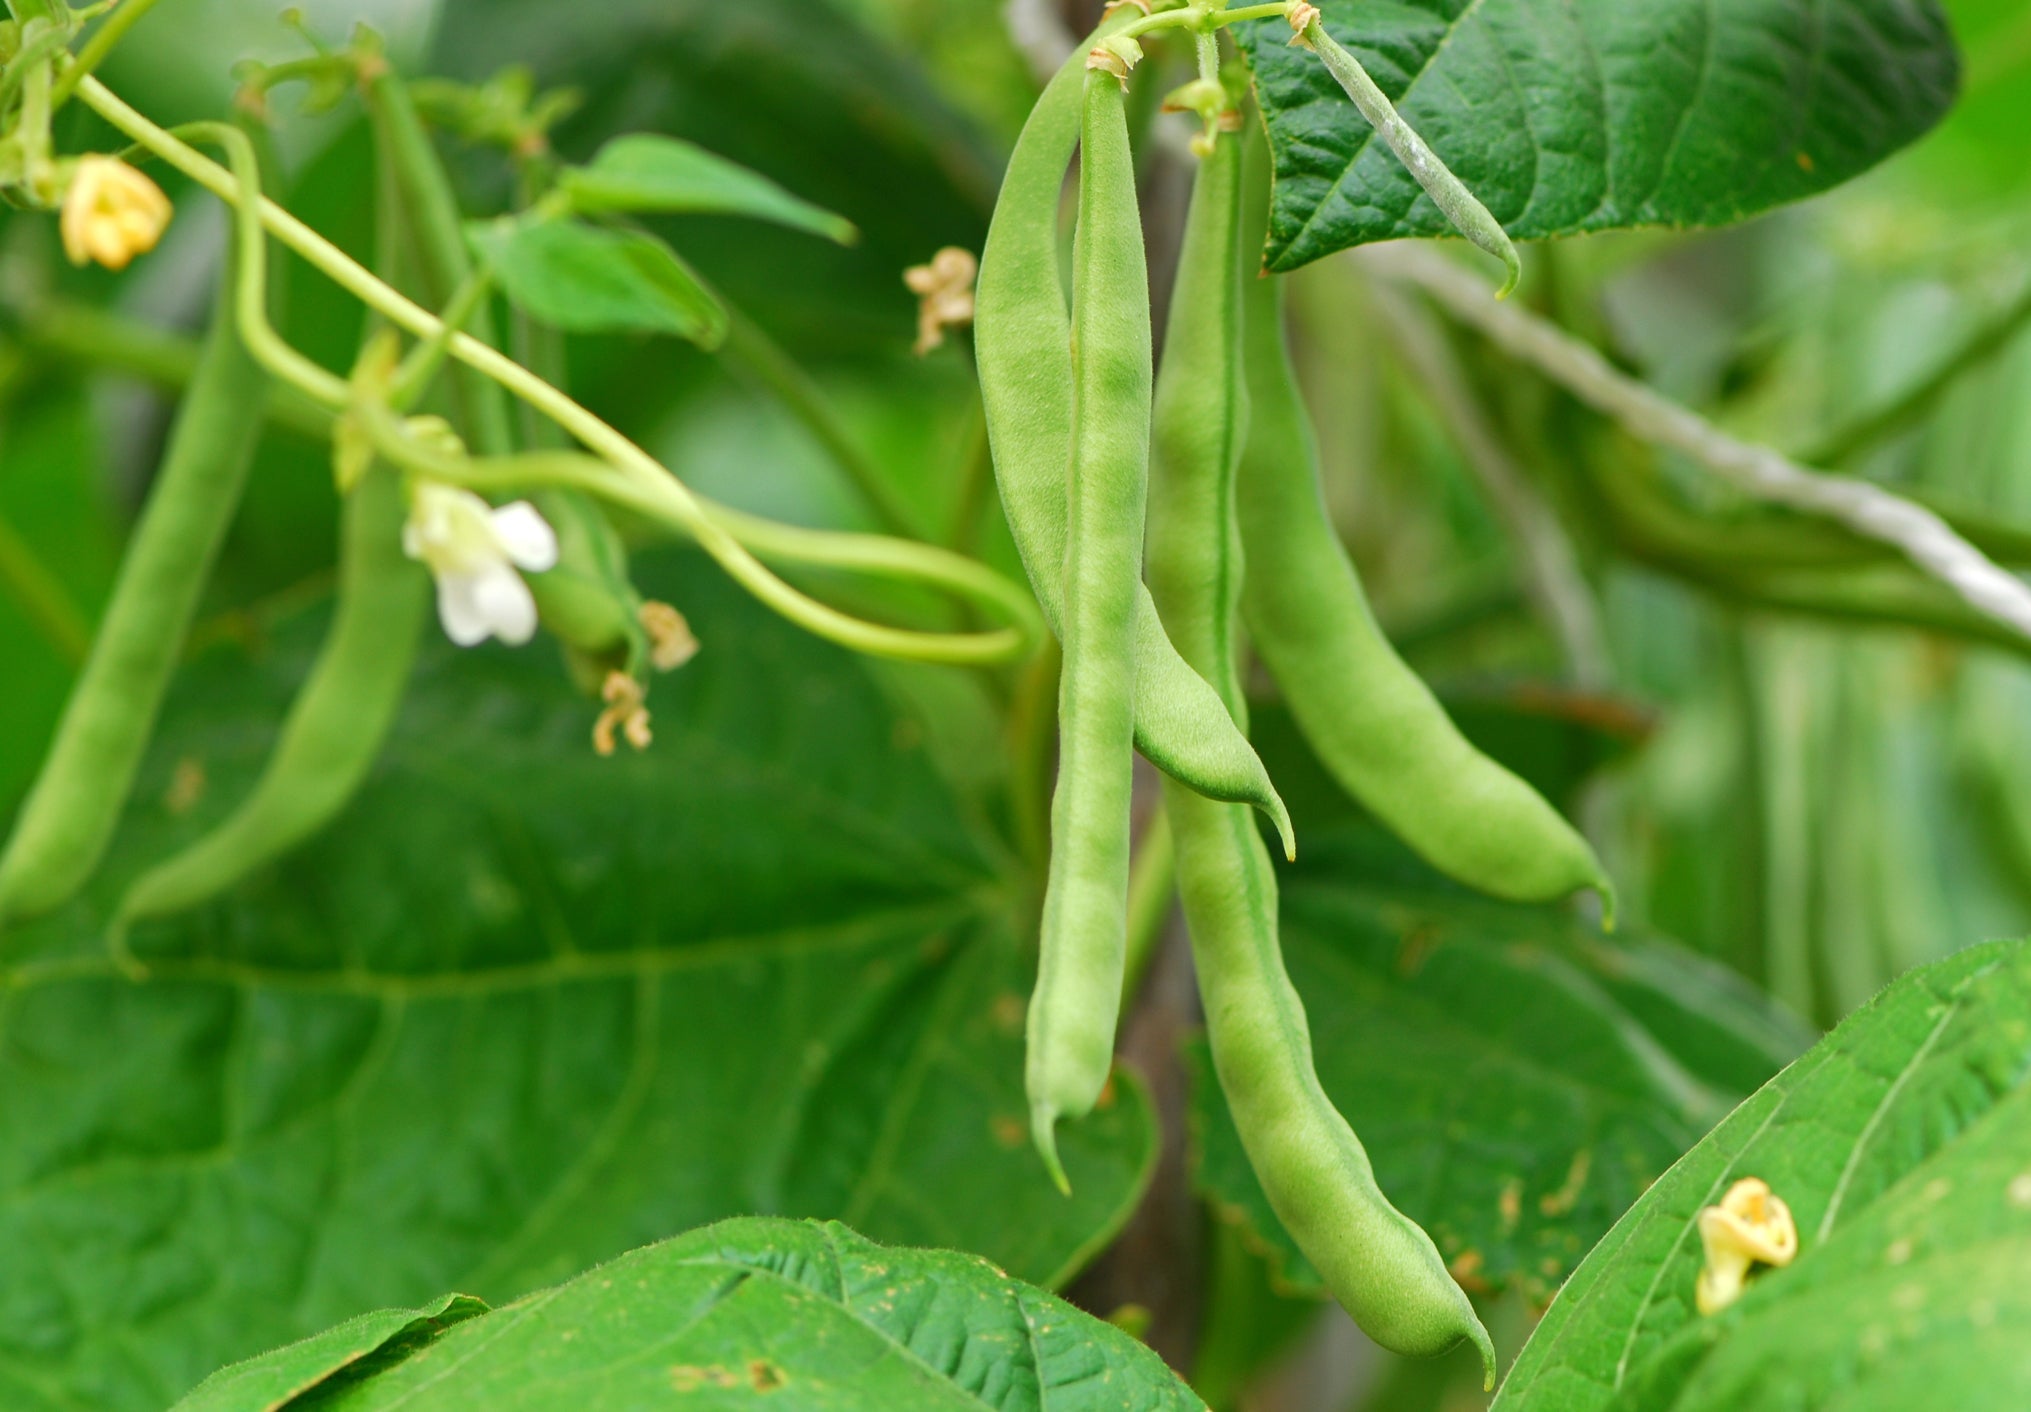
Growing Raspberries: Best Planted As Bare-Root Canes Over The Dormant Period
IN THIS GUIDE Overview Common Growing Varieties How To Grow Raspberry Bushes Ongoing Plant Care Pruning Harvesting References Raspberries are one of the most delicious fruits and they can be grown relatively easily in many UK gardens. Learn more about these plants and everything you need to know to grow them successfully where you live in this simple guide. Raspberries are a delicious crop which can provide you with abundant yields while taking up a relatively small amount of space. Most are cane fruits, which are grown vertically, usually on supports, for summer or autumn harvest. Though, interestingly, there are also some related ground-cover raspberries to consider. Planting perennial fruiting plants like raspberries can be a wonderful choice for home growers as they provide an excellent return for the effort you expend, and take a lot less work than an annual food-producing garden. Overview Botanical Name Rubus idaeus Common Name(s) Raspberry Plant Type Perennial Fruit Native Area Europe and North Asia Hardiness Rating H6 Foliage Deciduous Flowers 5-petalled flowers When To Plant October – April Harvesting Months Varies depending on type grown When To Prune August to October or February Raspberries most commonly grown are of the species Rubus idaeus. Rubus idaeus var. idaeus is known as the European red raspberry and these raspberries are the focus of this guide. However, it is worth noting that there are also other species and varieties within the Rubus genus, such as the American red raspberry, R. idaeus var. strigosus, and Asian raspberry types.1 Many modern cultivars are actually hybrids between these two naturally occurring varieties. Of relevance to some UK growers are some ground-cover Rubus species, such as R. tricolor, which can be used as ground cover, even in more shady spots. In this guide, we will focus on the most common domestic cultivars of raspberry. Common Growing Varieties Raspberry cultivars are commonly divided into early-summer fruiting, mid-summer fruiting, late-summer fruiting and autumn-fruiting varieties. For their care requirements, they are grouped more broadly into summer and autumn fruiting cultivars. Common early-summer fruiting cultivars include: ‘Glen Clova’ ‘Glen Moy’ (AGM) ‘Malling Jewel’ (AGM) ‘Willamette’ ‘Malling Jewel’ Common mid-summer fruiting cultivars include: ‘Glen Ample’ (AGM) ‘Newburgh’ ‘Ripley’ ‘Valentina’ ‘Zeva’ Common late-summer fruiting cultivars include: ‘Cascade Delight’ ‘Glen Magna’ (AGM) ‘Malling Admiral’ (AGM) ‘Tulameen’ (AGM) ‘Tulameen’ Common autumn fruiting cultivars include: ‘All Gold’ (AGM, yellow fruits) ‘Autumn Bliss’ ‘Fallgold’ (yellow fruits) ‘Joan J’ (AGM) ‘Polka’ (AGM) For container growing, there are dwarf cultivars in the Lowberry series such as: ‘Baby Dwarf’ ‘Goodasgold’ ‘Little Sweet Sister’ How To Grow Raspberry Bushes Raspberries are best planted as bare-root canes over the dormant period. It is best to choose a mild day, ideally in late autumn or early winter, though you can also plant any time before March. Planting Out Raspberries can be grown in dedicated beds or borders, or integrated into mixed perennial schemes – you might place them on the sunny fringe of a forest garden, for example. Give them room to roam as they can freely sucker. Raspberries are typically grown in the ground, but you might be surprised to learn that you can also grow them in containers in small spaces, and even potentially grow them indoors if you do not have any outside space at all. If growing in containers, choose a container for each plant which is at least 38cm wide. The larger a container you can accommodate, the easier you will find it to maintain. Light & Exposure The ideal spot is one with plenty of sun. Raspberries can tolerate light or dappled shade but will fruit best when grown in full sun. Windy locations can reduce the efficacy of insect pollination, so bear this in mind when planting. Branches can also bend and whip about, and may break in strong gusts or storms. Spacing Raspberry plants should be placed around 45-60cm apart, and if you are planning on creating more than one row, the gap between rows should usually be 1.8m. Depth Plant raspberries to the depth that they were previously planted, going by the soil mark on bare root canes. The top roots should be 5cm below the surface of the soil at a maximum push. If the soil is heavy clay or prone to waterlogging, it is a good idea to plant raspberries on a ridge raised around 7cm above the surrounding ground level. Alternatively, you can also plant into raised beds. Height The height of supports for your raspberries should be determined ahead of time, and supports should be placed before planting. Usually, support structures should be around 1.7-2m tall above the ground, though dwarf cultivars can be grown with shorter supporting structures. Ongoing Plant Care Caring for raspberries involves, first and foremost, choosing the right options and placing these in the right places to provide optimal growing conditions. As long as these conditions are met, you should then find it relatively easy to continue to care for your raspberries over time. Preferred Soil Raspberries will do best in fertile and moisture-retentive yet well-drained soil with plenty of organic matter. The soil should be relatively deep, weed-free, and should not become waterlogged. A slightly acid soil with a pH of between 6.5-6.7 is ideal. If growing in containers, the optimal mix recommended by the RHS is one with 80% peat-free multi-purpose compost, and 20% loam-based potting mix to increase weight for stability.2 However, raspberries should thrive in a homemade mix with sufficient levels of organic matter, which is moist yet free-draining. Staking Or Trellising There are a number of different support options for raspberries. 1-3 plants (in the ground or in a container) can be supported by a single post, stake, bamboo canes or natural branches in a wigwam shape. A single row of summer fruiting raspberries in a small garden can be supported on a single fence, with sturdy posts 3m apart, with galvanised metal wire stretched between these posts 60cm apart. A double fence with additional support can be a good choice for autumn fruiting raspberries. Place posts 3m apart as above in two rows either side of your plants. Place the rows around 60cm apart and attach short horizontal beams to each post. Stretch galvanised wire at 60cm intervals working up the posts to form a rectangular pen. Watering Raspberries (especially those growing in containers) need to be watered well during dry spells, but you do need to be careful not to overwater or create waterlogged conditions. If you live in a hard water zone, try to make sure that you water raspberries with rainwater wherever possible. Ensure that you have a nearby rainwater harvesting system set up. When watering, make sure that you water the soil and not the foliage, flowers or fruits. Wet foliage can increase the risk of fungal diseases taking hold and watering at or below the soil level where the water is actually needed will conserve water too. Installing a drip irrigation or soaker hose system can be ideal. Feeding Raspberries should be mulched well upon planting, with at least a 7-8cm layer of organic material, which should be replenished each spring. This mulch will boost nutrients in the soil, improve soil structure, suppress weeds and help retain moisture. A mulch of good quality homemade compost or well-rotted manure is ideal, and this can be topped with comfrey leaves or the leaves of another potassium-rich dynamic accumulator plant to give a potassium boost. If you are growing in a container, you should also use an organic liquid feed like compost tea or a comfrey liquid feed once a month or so. Pollination Raspberries are insect pollinated, so they will benefit if you create a wildlife-friendly garden filled with bees and other insects. While it is best not to plant beneath raspberries, growing plenty of flowering plants in the vicinity is highly recommended. Tansy, rue, yarrow and alliums are some good companion plants to consider. Container & Indoor Growing As mentioned above, choose dwarf varieties for container growing. Try to choose a container which is as large and deep as possible, as larger containers will require less watering and feeding over time. Growing container raspberries indoors can be challenging, largely because it can be difficult to provide enough light for successful fruiting. But it is possible, as long as you have a light bright window which allows the plants to get at least 6-8 hours of unobstructed sunlight a day. Keep your plant in a cool, bright room, away from heat sources and protected from extreme temperature fluctuations. The other main thing that is different with indoor growing is that without bees and other pollinators around, you will have to pollinate your plants by hand. As soon as the flowers open, use a small paintbrush to transfer pollen in the blooms to the centres of the flowers. Common Pests & Diseases Some common pests of raspberries are: Birds, which eat the berries before you get the chance (netting your canes or growing in a fruit cage can help prevent this). Raspberry beetle, which causes dry patches to develop on stalk ends and little white maggots are found inside the fruit. Attract plenty of predators to your garden, like birds, hedgehogs and ground beetles to keep their numbers down. Some raspberry diseases are: Raspberry cane blight – a serious fungal disease that causes canes to turn brittle and snap off at the base. Make sure plants are well spaced, well watered and mulched well to reduce incidence and remove all infected material promptly to reduce spread. Raspberry spur blight – another fungal disease that will weaken raspberries, though it does not usually kill them. Again, avoid overcrowding and cut out of and dispose of any infected canes. Verticillium wilt – make sure environmental needs are met and plants are as healthy as possible. Avoid growing raspberries near other susceptible crops. If it develops, destroy the raspberries present and replace with a plant that is rarely affected. Pruning “Even with correct pruning, well established patches of raspberries can become dense thickets and you have to be careful they don’t become a victim of their own success,” shares Master Horticulturist Peter Lickorish. “Rooted suckers can be lifted in February by gently forking the ground to loosen it and slicing through any connecting growth underground with a spade or secateurs. “I would suggest lifting any dense clumps of suckers, separating them and transplanting them elsewhere to give their parent plants space for good air-flow. This helps in the fight against fungus. “Raspberry suckers growing outside of their allotted space can be transplanted elsewhere too.” Harvesting Raspberries are ready to harvest once the berries have reached their mature colouration and are plump, glossy and full. Mostly, mature raspberries will be bright red, though some varieties are yellow and there are also black cultivars. When the fruits will be ready to harvest depends on whether you are growing an early-summer, mid-summer, late-summer or autumn fruiting variety. How To Harvest Simply pull the ripe berries off the central white rasps. It is best to do so on a dry and sunny day if possible. Average Yield It is normal to obtain yields of around 9kg from a 3m row. Though some of the best cultivars can deliver a yield almost as high, or even higher, from a single plant. Storing Raspberry Fruits Raspberries are delicious when eaten fresh. They can be stored in your fridge for a few days, or frozen for later use. If storing, wash before eating rather than prior to storing, to reduce the likelihood of fruit becoming mouldy. Of course, you can also preserve them in a range of other ways, such as by making raspberry jam, for example. You should have no difficulty in finding ways to use up all your delicious berries. References 1. Rubus idaeus var. idaeus. (n.d.). North Carolina Extension Gardener Plant Toolbox. Retrieved March 23, 2023, from https://plants.ces.ncsu.edu/plants/rubus-idaeus-var-idaeus/ 2. Raspberries. (n.d.). Royal Horticultural Society. Retrieved March 23, 2023, from https://www.rhs.org.uk/fruit/raspberries/grow-your-own
Learn more
Identifying Blue Mint Beetle: Are They A Problem And Do They Need Removing?
IN THIS GUIDE What Is The Blue Mint Beetle? Identification What Else Might Be Eating Mint Leaves? Is Blue Mint Beetle A Problem In The Garden? Removing Blue Mint Beetle References According to the RHS, the blue mint beetle was first found breeding in the UK in 2011 – but is this what is eating your mint, and if so, what should you do?1 These blue beetles are widespread in mainland Europe and have been spotted in several locations in South and East England and in parts of Southern Scotland.2 They might spread elsewhere in the British Isles as our climate continues to alter. “The Blue Mint Beetle is widely distributed in mainland Europe and, as with other plants and animals, its range is spreading northwards as the global climate heats, including into the UK,” says RHS Master of Horticulture Colin Skelly.3 Spotting a glimmering dark blue beetle in your mint is honestly more likely to be interesting than alarming. Though a pest, its threat to your plants is only minor. What Is The Blue Mint Beetle? The blue mint beetle is scientifically known as Chrysolina coerulans. It is a species often found in damp meadows and riverside habitats. Chrysolina coerulans are related to the British native Chrysolina herbacea, the green mint beetle. As larvae and as adults, they feed on the foliage of Mentha species. The green mint beetle is rarely an issue for gardeners as it more commonly feeds on wild mint species. Identification While the blue and green mint beetles are related, the two cannot usually be confused as adults. As the common names suggest, the blue mint beetle has a dark blue hue, while the native green mint beetle is emerald green. Adult blue mint beetles are 7mm long.4 Blue mint beetle larvae grow to around 1cm in length and they have black, soft, rotund bodies. At this stage in their lifecycle, they are very similar to the larvae of the native green mint beetle. What Else Might Be Eating Mint Leaves? Mint is also eaten by several other pest species. As well as providing food for green and blue mint beetles, mint leaves are also eaten by the caterpillars of several moth species in the Pyrausta genus. You may see their silk threads loosely twined around the shoot tips and upper leaves. Slugs and snails also can be found on mint leaves, though this is not usually a problem. Is Blue Mint Beetle A Problem In The Garden? Blue mint beetle is not really a problem in the garden. While these and the green mint beetles will eat mint, mint is such a prolific and vigorous plant that their feeding will not usually pose any threat to the plants. This species will probably not be able to fully decimate a mint crop, so their presence can usually be tolerated. Both the larvae and the adult will feed on mints and tansies in the spring and summer months, creating small irregular holes in the leaves, but these will not be a major problem in most instances and there should still be plenty of mint for you to harvest if you have a reasonably well-established clump. Mint is usually one of the more trouble-free plants in a garden. In fact, in certain settings, it can become too successful, crowding out and out-competing other herbs or other plants grown close by. Where mint is used as a ground cover plant – in a forest garden for example – its tendency to spread quickly and easily can be an advantage. In such settings, you will likely be unconcerned about a beetle taking some nibbles here and there. Where mint is grown in a garden bed or dedicated herb garden, it is often kept in check by placing it within a pot sunken in the ground. Of course, you might also simply grow some mint in its own pot in a container garden. In such settings, you may wish to remove pests like blue mint beetles which settle on your smaller plants. Removing Blue Mint Beetle It is usually perfectly possible to find and remove both the larvae and the adults by hand. If you would rather not kill these beetles, then you might instead consider tolerating their presence and perhaps planting more mints to act as trap crops so you do not lose too much of your harvest. Remember, blue beetles, like other beetles, are food for garden wildlife and though they are relative newcomers to our shores, their presence is not considered to be much of a problem. References 1. Blue mint beetle. (n.d.). Royal Horticultural Society. Retrieved March 9, 2023, from https://www.rhs.org.uk/biodiversity/blue-mint-beetle 2. Mint Leaf Beetle. (n.d.). Nature Spot. Retrieved March 9, 2023, from https://www.naturespot.org.uk/species/mint-leaf-beetle 3. Salisbury, A., Halstead, A. J., & Malumphy, C. (2012, January 1). First record of blue mint beetle Chrysolina coerulans (Scriba, 1791) (Chrysomelidae) breeding in Britain. ResearchGate. https://www.researchgate.net/publication/280921405_First_record_of_blue_mint_beetle_Chrysolina_coerulans_Scriba_1791_Chrysomelidae_breeding_in_Britain 4. Blue mint beetle. (n.d.-b). Project Noah. Retrieved March 9, 2023, from https://www.projectnoah.org/spottings/673486003
Learn more
Smaller Lavatera Cultivars Can Make Perfect Container Plants - This Gardener Explains All
IN THIS GUIDE Containers For Lavatera Compost For Potted Lavatera Potting Up Tree Mallow Ongoing Potted Lavatera Care Lavatera is a genus of attractive flowering plants commonly grown in UK gardens. There are many different options to choose from if you are interested in growing a lavatera in your outside space. Of course, these are common and popular choices for beds and borders, in traditional cottage gardens, and for gardens in a range of other styles. But if you don’t have a lot of room, you might be wondering whether you can grow lavateras in pots. The good news is that lavateras can be grown in pots, and are actually quite a good choice for container growing. However, note that larger lavateras may be too large and sprawling for comfortable container cultivation. Smaller lavatera types can make a good choice for containers because they are reasonably drought tolerant and thrive in the free-draining conditions that can fairly easily be provided in a container garden. Smaller and more compact lavatera varieties such as ‘Barnsley Baby’ are particularly well suited to container growing. Containers For Lavatera When choosing a container for a lavatera, drainage is the most important factor. Lavateras require reasonably free-draining conditions, so it is important to choose a pot from which water can drain freely at the base. The size of the container that you choose will of course depend on the size of the lavatera you are growing. You might use smaller pots when growing lavateras from seed or when propagating the plant through cuttings, but it is important to remember that the plants should only stay in these pots for a while before they are transferred to larger ones or planted out into a garden. If you plan on keeping a lavatera in its container for longer, you will typically need to choose a container that is just a little larger than the current plant. If the container is too large for the specimen, waterlogged soil may be more likely to occur. Compost For Potted Lavatera The compost or potting mix you will choose when growing lavateras in pots will depend on whether you are growing them in pots temporarily, or planning to keep them in their containers longer term. When growing from seed or propagating from cuttings, free-draining seed compost or cutting compost is recommended. When growing lavateras in containers for the longer term, it is a good idea to choose a peat-free soil-based compost that can provide fertility and retain some moisture while also helping to ensure good drainage for the plant. Potting Up Tree Mallow When potting up a lavatera, it is important to plant them to the same depth they were at in their previous pot. Remember to make sure that you know how large the lavatera you have chosen will grow, and make sure it fits in the container with just a little space around each side to allow it to grow. Pot up your lavatera to a larger container when it seems congested and before roots block drainage holes at the base. How Many Can You Plant Per Pot? How many laveteras you plant per pot will of course depend on the size of the plant you are growing, and on the size of the pot. Smaller pots can contain a single plant, while you might plant multiples in a larger container or planter. “I always use the biggest pot I can for the size of the plant or use a smaller plant in combination with others in a larger pot,” shares Horticultural Consultant Colin Skelly. “This is because small pots dry out very quickly in warm weather, probably more than once a day on the hottest days.” You might also consider creating mixed container displays in larger containers which might contain lavatera and other plants which enjoy similar sunny and relatively free-draining conditions. Ongoing Potted Lavatera Care Place containers in full sun, as lavatera requires sunny and ideally sheltered conditions. Taller types of lavatera may require some support, and care should be taken to ensure containers do not tip or blow over. Once established, lavateras are reasonably tolerant of dry conditions, but you will still have to water lavateras growing in pots. Remember, plants in containers will dry out more quickly than those in the ground, however, take care not to overwater, and ensure good drainage. Waterlogging can become an issue for these plants. Lavateras do not have particularly high nutritional needs, but it can be a good idea to mulch around the top of containers when planting with good-quality compost or other organic mulch. You might also feed with a potassium-rich feed to encourage good flowering. These basic tips should help you grow lavateras successfully in pots.
Learn more
How You Prune Your Lavatera (Mallows) Will Depend On The Type You're Growing
IN THIS GUIDE Pruning Sub Shrubs Pruning Herbaceous Types Pruning Woody Shrub Varieties Malvas (until recently known as Lavateras) are, generally speaking, pretty easy plants to grow. This genus of plants, commonly also referred to as ‘Mallows’ can be annuals, biennials, herbaceous perennials or woody shrubs. All Malvas have beautiful flowers similar to Hollyhocks, great for attracting bees and other wildlife to your garden, but the gardening jobs can differ throughout the year depending on the specific type or types you have chosen to grow. Difficulty Easy Equipment Required Secateurs or gardening knife When To Prune Spring or autumn Learning how to prune the Malva you are growing is one key thing to consider. Although each variety will need slightly different care, here are the general guidelines for pruning Malvas: Tidy up sub-shrub cultivars (those with a woody base and tender stems) in autumn, then cut back hard in the spring. Cut back herbaceous lavateras to the base in winter. Prune lavatera shrubs with a permanent woody framework in spring. Deadhead in summer to encourage new growth and flowers. Pruning Sub Shrubs Sub-shrub type Malva, including M. cachemiriana and M. x clementii, can be tidied up a little with a light prune in autumn if desired. However, the main pruning is best left until the spring. In spring, you can cut back hard to the new shoots that emerge from the base of the plant. Pruning Herbaceous Types The faded and dead foliage of herbaceous types of Malvas can be cut down to the base in winter. If you prefer, you can cut off the soft foliage at the beginning of winter to tidy things up in your garden. However, in a wildlife-friendly space, it is best to leave the prune until the end of winter or very early spring, since the dead foliage can provide good shelter and habitat for wildlife, especially during the coldest months. Pruning Woody Shrub Varieties If you are dealing with shrub Malvas with a permanent woody framework, usually only minimal pruning will be required. However, you should also aim to prune these species in the spring, and can take softwood cuttings at the same time. Your goal should be to maintain a woody framework with an attractive shape and form – and to encourage the fresh growth on which the flowers form. If in doubt about which type of Malva is growing in your garden, deadheading the plant through the summer to encourage more flowers is typically a good idea, and pruning in early spring to encourage flowers on the growth of the new season is also advisable for many types.
Learn more
Achieve A Charming Cottage Garden Aesthetic With These 14 Tree Mallows
IN THIS GUIDE 1) M. arborea 2) M. x clementii ‘Barnsley Baby’ 3) M. x clementii ‘Bredon Springs’ 4) M. x clementii ‘Burgundy Wine’ 5) M. x clementii ‘Candy Floss’ 6) M. x clementii ‘Lavender Lady’ 7) M. x clementii ‘Mary Hope’ 8) M. x clementii ‘Rosea’ 9) L. maritima 10) M. thuringiaca 11) M. trimestris ‘Beauty Series’ 12) M. trimestris ‘Mont Blanc’ 13) M. trimestris ‘Silver Cup’ 14) M. trimestris ‘Twins Hot Pink’ Malvas (until recently known as Lavateras) are popular cottage garden plants that can work well in many different garden schemes, but choosing a variety means wading through a whole raft of different options. This genus contains numerous different plants, which can be annuals, biennials, herbaceous perennials or shrubby plants. When choosing which Malva varieties to grow, I would argue there are a number of different things to think about. You should consider not only the colour of the blooms, but also the size to which the plants will eventually grow, their growth habit and form – and how hardy they will be in your particular area of the UK. In my area of Northern Scotland, I would only ever grow herbaceous perennial or shrubby types that are hardy to at least H5 (tolerant to -10°C to -15°C). Here are fourteen of my favourite varieties – remember every variety in this list must be grown in full sun: 1) M. arborea COMMON NAME(S): Tree Mallow HARDINESS RATING: H4 FLOWERS: Pink FLOWERING SEASON(S): Summer This tree mallow is a biennial or short-lived perennial with a bushy habit. It will typically grow to around 2m in height and 1-2m in spread. It has semi-evergreen foliage, and flowers in pink to deep pink shades, with darker pink veining appearing closer towards the throat. The blooms appear all summer and are around 4cm across. This is not a native but has naturalised in some coastal areas of the UK. 2) M. x clementii ‘Barnsley Baby’ COMMON NAME(S): Tree Mallow ‘Barnsley Baby’ HARDINESS RATING: H4 FLOWERS: Pink FLOWERING SEASON(S): Summer This Malva is a particularly popular variety, which can work equally well in pots or in the ground. It is more compact than many other lavateras, growing to around 70cm tall, with a spread of up to 60cm. The flowers are pale pink with darker pink veining and are borne throughout the summer. 3) M. x clementii ‘Bredon Springs’ COMMON NAME(S): Tree Mallow ‘Bredon Springs’ HARDINESS RATING: H5 FLOWERS: Pink and purple FLOWERING SEASON(S): Summer This tree mallow is a vigorous semi-evergreen shrub type lavatera which grows to around 2m tall. It has greyish-green leaves and funnel-shaped flowers which are 5-7cm across and have a lovely pink hue. The flowers bloom throughout the summer months. This variety has been awarded the RHS Award of Garden Merit. 4) M. x clementii ‘Burgundy Wine’ COMMON NAME(S): Tree Mallow ‘Burgundy Wine’ HARDINESS RATING: H5 FLOWERS: Pink FLOWERING SEASON(S): Summer This is another Malva with an Award of Garden Merit from the RHS. It grows to around 2m and has deep pink flowers in the summer months borne above greyish green leaves. The pink flowers are streaked with darker veins. H5 hardy. 5) M. x clementii ‘Candy Floss’ COMMON NAME(S): Tree Mallow ‘Candy Floss’ HARDINESS RATING: H5 FLOWERS: Pink FLOWERING SEASON(S): Summer With a height and spread of around 1.5- 2.5m, this is another attractive Malva to consider. It is also semi-evergreen and has grey-green leaves and pink flowers 5-7cm across are borne in summer. However, the flowers of this cultivar are a lighter, pale pink. This Malva holds the Award of Garden Merit from the RHS. 6) M. x clementii ‘Lavender Lady’ COMMON NAME(S): Tree Mallow ‘Lavender Lady’ HARDINESS RATING: H4 FLOWERS: Purple FLOWERING SEASON(S): Summer A tall and rather striking tree mallow, this variety can grow up to around 1.8m tall. The flowers, as the name suggests, are a pale pink verging to a lavender hue. They are streaked with deeper purplish veins and, again, are borne throughout the summer. H4 hardy. 7) M. x clementii ‘Mary Hope’ COMMON NAME(S): Tree Mallow ‘Mary Hope’ HARDINESS RATING: H4 FLOWERS: Pink and white FLOWERING SEASON(S): Summer Growing to around 1-1.5m tall, this lavatera is another popular and award-winning option, holding the Award of Garden Merit from the RHS. It has white and pale pink flowers with darker pink veining, which are saucer-shaped and borne in profusion through the summer months. 8) M. x clementii ‘Rosea’ COMMON NAME(S): Tree Mallow ‘Rosea’ HARDINESS RATING: H5 FLOWERS: Pink FLOWERING SEASON(S): Summer Though often short-lived, this lavatera is enchanting, with its light pink flowers 8cm across that bloom in summer. It is a fairly vigorous option, which can grow to between 1.5-2.5m in height and spread within 2-5 years. It is H5 hardy and holds the Award of Garden Merit from the RHS. 9) L. maritima COMMON NAME(S): Tree Mallow HARDINESS RATING: H3 FLOWERS: Pink and purple FLOWERING SEASON(S): Summer / Autumn Lavatera maritima is another type of tree mallow to consider. It grows to between 1-1.5m in height, with a spread of up to 1m or so. The flowers are beautiful pink or lilac shades, around 7cm across, with purple veining and deeper purple colouration towards the centre. However, note that this is a slightly less hardy option with a hardiness rating of H3 and is particularly suited to coastal areas without hard frost where it withstands salty sea breezes. 10) M. thuringiaca COMMON NAME(S): Tree Lavatera HARDINESS RATING: H5 FLOWERS: Pink and purple FLOWERING SEASON(S): Summer / Autumn Tree lavatera, as it is sometimes also called, is a large upright herbaceous perennial. It has downy, grey-green foliage and funnel-shaped pinkish-purple flowers up to 8cm across that appear in the summer months. It can grow to around 1.8m in height and is H5 hardy. 11) M. trimestris ‘Beauty Series’ COMMON NAME(S): Tree Mallow Beauty Series HARDINESS RATING: H3 FLOWERS: Pink and white FLOWERING SEASON(S): Summer Among the many M. trimestris that you may consider, those of the ‘Beauty Series’ stand out. This series offers a range of compact, upright options around 60cm tall, great for containers as well as growing in the ground. There is a range of options colour-wise within this range, with flowers in shades of pink and white, often with darker veining. H3 hardy and holds the Award of Garden Merit from the RHS 12) M. trimestris ‘Mont Blanc’ COMMON NAME(S): Tree Mallow ‘Mont Blanc’ HARDINESS RATING: H3 FLOWERS: White FLOWERING SEASON(S): Summer / Autumn These large and bushy plants are superb lavatera, highly regarded for their huge, white, trumpet-shaped blooms that are beloved by bees. These plants tend to grow to around 1m tall, with a spread of around 45cm. They work well in the middle of a south or west-facing sheltered border and their pure white flowers really stand out and look wonderful in many garden schemes. 13) M. trimestris ‘Silver Cup’ COMMON NAME(S): Tree Mallow ‘Silver Cup’ HARDINESS RATING: H3 FLOWERS: Pink FLOWERING SEASON(S): Summer Another attractive tree mallow, L. trimestris ‘Silver Cup’ has light pink flowers deeply veined with reddish-purple, a hue which becomes more prominent towards the centre of the blooms. These flowers are 7-10cm across, and the plants grow to around 70cm tall. This cultivar has an RHS AGM and is H3 hardy. 14) M. trimestris ‘Twins Hot Pink’ COMMON NAME(S): Tree Mallow ‘Twins Hot Pink’ HARDINESS RATING: H3 FLOWERS: Pink FLOWERING SEASON(S): Summer This compact Malva cultivar has a height of around 50cm with a similar spread. It has pretty hot pink flowers with a satin sheen and has been specially bred for good disease resistance. It works just as well in containers as it does in the ground at the front of beds or borders. These are just some of the excellent Malvas on offer that you could consider choosing to grow in your garden.
Learn more
Lavatera Are Susceptible To Fungal Issues - Overcoming 4 Common Problems
IN THIS GUIDE 1) Lavatera Rust 2) Stem Rot 3) Soil-Borne Fungal Diseases 4) Insect Pests Lavateras are generally healthy and trouble-free plants to grow in your garden. However, many types can be prone to a number of fungal issues, including: Rust Stem rot Soil-Borne fungal diseases Certain pests can also be attracted to Lavatera, though this is admittedly less common. Keep reading to find out how these issues could affect your plants and also what you can do about them. 1) Lavatera Rust Rust is a problem to which many plants within the Malvaceae plant family can be susceptible. Rusts are a series of common fungal diseases which can infect a wide range of different plants. This is fortunately not usually a major issue. Rust can sometimes affect the vigour of a plant and can look unsightly, but they rarely kill the plant. Lavatera rust manifests as pustules on the leaves and other parts of the plant. You will mainly see this problem later in the summer, or in autumn. Often, the problem can be nipped in the bud by carefully removing and disposing of any infected leaves as soon as they are seen. So, remain vigilant and you can often prevent the issue from spreading too far! However, if the rust is more widespread, removing too much foliage can do more harm than good. In general, if rust is widespread on your lavateras, you should simply do all you can to make sure that they are as happy and healthy as possible. Make sure there is enough water, though not too much, and adequate fertility, but take care not to use too much nitrogen fertiliser and always garden organically. 2) Stem Rot One other problem that can occasionally occur when growing lavateras is stem rot. Stem rot can be caused by waterlogged soil or by a fungal infection that is often a result of waterlogged conditions. Lavateras like free-draining conditions and can tolerate drier sites than many other plants. They can be grown in heavier, clay soils but they will tend not to live as long and this problem can be more common since soils will tend towards sogginess in the winter months. “If soil conditions aren’t right but you really want to grow a particular plant, grow it in a pot or container,” shares Master Horticulturist Colin Skelly. “That way you can create the right moisture, drainage and nutrient levels rather than trying to coax a plant to thrive in conditions it will not like.” Ensuring adequate drainage in planting sites or in containers will help you to avoid encountering issues such as stem rot with a lavatera plant. 3) Soil-Borne Fungal Diseases As mentioned above, stem rot can be caused by fungal diseases that are more likely in wet conditions and waterlogged soil. Occasionally, other soil-borne fungal diseases that affect plant roots and stems can also occur in lavatera. These might include wilts, for example. Ensuring that the drainage is good wherever you are growing lavateras, whilst also remaining vigilant to any issues, can reduce the chances of losing plants due to fungal issues. If you use organic mulch, this can also help to prevent fungal spores from splashing up from the soil onto the leaves and above-ground portions of the plants. 4) Insect Pests Aphids These insects suck from the plant’s juices and affect its appearance (rather than its structure). In this sense, the damage is more cosmetic. It’s possible to get rid of them using a water hose, gardening oil or insecticidal soap if there’s a lot of them. Spider Mites Resembling little black dots, two-spotted spider mites sit on the plant’s foliage and can usually only be spotted for sure by using a magnifying glass. That way you can tell if the dots are stagnant (so part of the leaf) or moving (a certain spider). These are dangerous to Lavateras because they suck plant juices from the foliage and young stems. The result is that the leaves turn yellow and deformed. A garden hose sprayed directly onto the flowers and leaves (and underside of the leaves) is a great way to get rid of these tiny spiders. You can carry this out for several mornings in a row and then every few days. If there are lots of the little blighters then try spraying the leaves with insecticide soap or, in the event there are just too many spider mites, then consider employing a miticide formulation. Most of the issues that are likely to be encountered when growing lavateras are due to some problem with the environmental conditions in which they are grown – most commonly due to poor or inadequate drainage. So to keep your lavateras in good health, placing them in the right location is the first and most important thing.
Learn more
Gerbera Plants In Pots: 'I Find I Need To Control Their Position Quite Precisely'
IN THIS GUIDE Choosing A Container Where To Grow Choosing A Potting Mix How To Plant Gerberas Potted Gerbera Care While gerberas appear to be just one flower, they are in fact made up of hundreds of little flowers all clustered together, making them a unique little plant. While many gardeners choose to grow their gerberas in flower beds, if you don’t have the space or want to brighten up an urban courtyard, porch or decking, planting them in containers or pots is the way to go. “I grow Gerberas in pots because I find I need to control their position quite precisely and move them inside if it becomes wet for prolonged periods,” shares Colin Skelly, a Horticultural Consultant. “I can also change the location as the year progresses to ensure maximum sunlight.” Choosing A Container Depending on the species, gerbera daisies usually grow between 15-45cm, so to grow a single plant you will want to choose a pot at least 15cm deep and wide to provide them with adequate room to grow. Gerberas also require well-drained soil, otherwise they will be in danger of developing root rot, crown rot and powdery mildew. This means you will need to choose a container with drainage holes at the bottom. Where To Grow Gerberas thrive in sunlight, so you must choose a sunny spot for them. If you are keeping them indoors, choose a south or west-facing windowsill. If this isn’t an option, in dark and gloomy rooms, artificial light will give them the boost they need to survive. If you are keeping your gerberas outside, be sure to place them somewhere that will provide shelter from strong winds. Choosing A Potting Mix Light potting mix is best for gerberas and should be free from contamination. Including sharp sand will aid with the drainage as it will create channels for excess water to drain through. You will also want to mix in organic matter such as garden compost or peat-free multi-purpose compost. How To Plant Gerberas You can find ready-to-plant gerberas in garden centres. Planting gerberas in containers is super easy, just follow these simple steps and you can’t go wrong. Fill the container or pot with potting mix. Dig a hole big enough for the root ball and place the plant in the hole, making sure the crown lies just above soil level. Cover the base with more potting mix and water until the soil is moist, avoiding saturating the soil. Potted Gerbera Care You do not need to water gerberas too frequently, just water them when the topsoil is a little dry, taking care not to splash the leaves. To encourage healthy blooming periods, you can feed your gerberas every 2-3 weeks with a well-balanced fertiliser. Once the flowers have died, it’s important to deadhead them. That should be everything you need to know about growing gerberas in containers or pots. We hope you found this article useful and that you feel ready to get cracking and pot up your plants.
Learn more


