

Growing

Growing Lemon Trees: Choose A Greenhouse Or Conservatory For Regular Fruit
IN THIS GUIDE Overview Why Grow Lemons? How To Grow A Lemon Tree Lemon Tree Care Harvesting Common Problems References If life gives you lemons, you make lemonade – everyone knows that. But what if life hasn’t given you lemons? In this instance, you have to take it upon yourself to grow your own lemons. This way you’ll have a steady supply of the tangy citrus fruit we all love so much – yours to do whatever you want with, lemonade or not. Overview Botanical Name Citrus x limon Common Name(s) Lemon Tree Plant Type Tree Native Area South Asia Hardiness Rating H2 Foliage Evergreen Flowers White or pink-tinged blossom When To Sow Year-Round (move outside in June; bring indoors in September) Flowering Months Year-Round When To Prune February, June, July, August The word ‘lemon’ refers to the familiar yellow fruit, and to the small evergreen tree that gives rise to it. Both are native to India and other parts of South Asia but have since journeyed around the world to be commonplace almost everywhere.1 This tree grows well in the UK despite its warmer origins, and is a popular choice for British gardeners looking to bring an exotic feel into their home or garden. Why Grow Lemons? Admittedly, a lemon tree probably isn’t on the top of your list of characteristically British plants. And that’s OK. Part of the fun of gardening is trying new things, exploring different influences, and creating exciting combinations. “One of my favourite plants would have to be my lemon tree,” says Laura from The 3 Growbags. “It flowers and fruits all year round, the flowers smell gorgeous, as do the crushed leaves, and a freshly picked lemon is just one of life’s perfect things.” A lemon tree framed by some typically British plants like hydrangeas, honeysuckle, or forget-me-not creates an interesting and rewarding aesthetic. And not only that: the fruit you’ll harvest from your lemon tree is almost reason enough to grow one. Lemons are delicious. While very few people can tolerate lemon by itself, the juice, flesh, and zest feature in thousands of recipes from around the globe, including sweet and savoury. Growing a lemon tree guarantees you easy access to the culinary delights offered by this citrus superhero. How To Grow A Lemon Tree Right, let’s get down to the practicalities of growing a lemon tree in your garden. This section will explore the wheres, whens, and hows of lemons. Outdoors Growing This type of tree is more sensitive to cold than other fruit trees, and to other citrus trees. In fact, growing outside in the UK is generally not recommended unless you’re able to ensure that your plant won’t be subjected to frost – a tough ask in most regions! For that reason, most people that grow lemon trees outdoors tend to overwinter them in either a greenhouse or conservatory. Choosing a south-facing aspect best positions the tree to enjoy sunlight and the warmer temperatures that accompany it. Lemon trees aren’t fussy with soil type, but will appreciate a position with good drainage. Mildly acidic soil is best, but it’s not a disaster if you plant your tree in a spot with different pH levels. Indoors Growing With an expected height of around 1.5m, these trees are definitely a viable size to grow indoors. Growing indoors gives you more control over the soil as well, meaning you can provide your lemon tree with the perfect conditions. To recap: that’s moist, well-drained, slightly acidic soil. A temperature range of 13-21°C is optimal. Indoors, it’s easy enough to rig up some specialised growing lamps to supplement the natural light they receive over winter. Pollination If you’re growing outdoors, bees and other pollinators will take on the task of pollinating your lemon tree. Grow indoors, however, and you either need to pollinate yourself (fiddly: not typically recommended!) or move your plant outside for a spell during summer. Pollination is a vital part of the fruiting process, so if you’re aiming for a big citrus bounty, make sure to factor this in. Planting Our recommendation would be to buy and grow an established lemon tree, as this gives you all the benefits without the need to grow from seed, which can be fiddly. Lemon trees from seed also take over a decade to start fruiting – so prepare yourself for the long haul! If you opt for an already-established plant, you can buy them in containers from garden centres and other plant shops, and it’s just a case of transplanting into your garden or moving the pot into your house. Growing From Seed If you decide to grow a lemon tree from seed, however, here’s how to do it – Allow the seeds to dry for a couple of weeks. Plant into potting soil to a depth of 2-3cm. Use cling film or a similar transparent plastic to cover the pot: This seals the heat in. Place the pot in a spot with plenty of sunlight. Wait until there’s at least 15-30cm of growth before planting out. After reading this section, maybe you’re wondering whether you can grow a lemon tree from a seed taken directly from a lemon? The answer is yes! You’ll want to find a plump, tasty lemon. Remove and thoroughly wash the seeds, making sure to dislodge all flesh: the sugar inside can cause damage to your seed by providing ideal conditions for fungal growth. While the first step with bought seeds is to dry them out, seeds taken directly from a lemon should be planted straight away to best facilitate growth. Lemon Tree Care Once your seeds are planted, you’ll want to keep them in ideal conditions to maximise the chance of germination. Here’s how to do that – Aim for four hours or more of direct sunlight every day. Aim for temperatures of 15-21°C. You should see growth within a few days to a week. If not, this may mean that your seeds haven’t germinated, and that you might need to try again. Once you see growth, remove the plastic cover and move to a position with more light, if possible. Once they begin to establish, you can move your lemon sapling to larger pots containing potting medium. Fertilising with high-potassium fertiliser every few weeks will provide your lemon tree with optimal nutrition and stimulate healthy growth. Transplanting Lemon trees should be planted slightly higher than the surrounding soil, so dig a hole that’s a little less deep than the root ball. Place the lemon tree in the hole, cover over, then water lightly and leave to establish. If leaving outside over winter (not recommended) be vigilant and cover the base of your lemon tree with fleece or other similar garden material on particularly cold nights. While lemon can tolerate UK weather, extreme cold will cause damage, and maybe even kill it. So keep a lookout! Feeding This citrus is a ‘fussy eater’, requiring regular nitrogen compost from late spring to early autumn, and winter feed tailored specially to citrus. “Typically, citrus feed is sold as two distinct products, usually as a powder to be mixed in a watering can,” shares Horticultural Consultant Colin Skelly. “There is a feed for autumn and winter and one for spring and summer with different balances of nutrients. “Follow the instructions for amounts and dilutions, as you can easily cause more harm than good with too much.” Ask at your local garden centre if you’re unsure which type to use – they’ll be able to point you in the direction of the ones most beneficial to your plant. Pruning Citrus trees generally don’t need much pruning, but your lemon tree will benefit from a little TLC. You can prune back crowded branches with secateurs, or pinch the end of particularly enthusiastic branches to slow them down. Harvesting Once your tree is mature it will start to fruit. Lemon boasts a long harvest season as well, with fruit available between July and April. With such a long harvest period it’s often best to only pick lemons as and when you need them, as they’ll remain healthy and fresh if kept on the tree. Common Problems We’ve already written about insulating the base of your lemon tree during cold snaps, as extreme cold can damage or kill the plant. You also need to water carefully, as over-watering is a frequent cause of issues for lemon trees. Make sure water can drain away, and that the plant is in a position which allows excess water on leaves to evaporate away. Lemon is generally easy to grow, making it a great all-rounder for budding British gardeners. Whether you grow indoors or outdoors, from seed or from a container, a lemon tree will make a fine addition to your garden credentials. References 1. Lemon. (n.d.). New Crop Resource Online Program. Retrieved March 21, 2023, from https://hort.purdue.edu/newcrop/morton/lemon.html#Description
Learn more
Growing 'Gardeners Delight' With Dan Ori (One Of The Sweetest Tomato Varieties)
IN THIS GUIDE Overview How To Grow ‘Gardener’s Delight’ Ongoing Care Harvesting References This tomato is often described as one of the sweetest and tastiest tomato varieties around. Lycopersicon esculentum ‘Gardener’s Delight’ is a popular heritage variety and (at least historically) one of the most highly regarded types of tomato. This makes it a popular choice, and has long been a popular choice, for many UK gardeners. “‘Gardener’s Delight’ is a great variety for growing outside in the UK, even up North!” shares Hannah Reid, a Gardener and Content Creator. ‘Gardeners Delight’ was first introduced to British gardeners by breeders and seed producers Benary.1 They sold it to a number of seed suppliers in Britain over thirty-five years ago. After its introduction it quickly gained favour and was adopted as a favourite by many horticultural experts and home growers. Overview Botanical Name Lycopersicon esculentum ‘Gardener’s Delight’ Plant Type Fruit Native Area N/A (Cultivated) Hardiness Rating H1C Foliage Cordon type tomato Flowers Yellow When To Sow Indoors January, February, March, April When To Plant Out May, June Fruiting Months June, July, August, September, October ‘Gardener’s Delight’ is an open-pollinated variety, not an F1 hybrid, so should come true from seed. As a heritage variety, saving your own seeds should yield plants that are the same as the parent, evolving just slightly. Saving your own tomato seeds is basically evolution at work – over time, you can create tomato strains better suited to growing in your specific garden. The small cherry tomatoes of this variety are produced on trusses and reach around 2cm across; they have a sweet and pleasant flavour. It is the flavour of these tomatoes that is the main reason for their success and popularity with home growers. While, in recent years, there has been some discussion over whether this old favourite is still as good, reliable and well-flavoured as it once was, it is still a favourite for many and is certainly one of the most popular varieties for UK gardeners to grow in their greenhouses or polytunnels, or outdoors. How To Grow ‘Gardener’s Delight’ Like other tomatoes, ‘Gardener’s Delight’ is usually sown indoors or under cover between late January and April. Sowing earlier, in late January or February, can be a good choice, as it can mean that you will be able to harvest more ripe tomatoes before the end of our relatively short growing season. Growing From Seed Early sowings can sometimes get leggy due to the low light levels – LED grow lights can help avoid any such issues. I grew mine in a heated propagator with LED grow lights and the temperature set to 21°C. Sowing is very straight forward: Sow the seeds into seed trays, wood flats or other containers. They should germinate within a week or two. Then prick out and pot up into their own pots, or other containers, once they have developed their first true leaves and are large enough to handle. With my heated propagator (and clearly some very good quality seeds) I had no issue with getting these to germinate. Be sure to pot up your tomatoes as required as they grow – and when you do, bury them a little deeper in the growing medium each time. This will help ensure that your plants develop good, strong root systems. Planting Out ‘Gardener’s Delight’, like other tomatoes, is planted out from May and into June when all risk of frost has passed. If you are planting in a greenhouse or polytunnel, then you can plant out a little earlier than you would if you are growing your plants outdoors. Indoor-grown plants, it is important to remember, should always be hardened off before you plant them out into their final growing positions. This basically means exposing them gradually – and for increasingly lengthy periods – to outdoors conditions. Remember, tomato plants like plenty of sun, and plenty of warmth – the more the better. If not growing under cover make sure you are growing them in a sunny and sheltered location. Providing Support ‘Gardener’s Delight’ is an indeterminate tomato, best grown as a cordon variety. “A cordon is a single stem trained up a cane or string, whilst an indeterminate means it will just keep heading up or wherever you manipulate it,” shares Master Horticulturist Dan Ori. “It is common practice to pinch or cut the top of an indeterminate tomato when it gets the height you want. “Side shoots are not the ones you would identify as going sideways! To identify these work your way down the stem and you will find thick branches, often at a right angle to the stem, which are not side shoots. “Instead look where the branch meets the stem and in a crevis between them (what I call the upside-down armpit), you may see a leaf shoot coming out of the armpit – this is a side shoot. “In cordon-trained tomatoes, the main reasons we remove side shoots are so energy goes into flower and fruit development and removing them also helps increase airflow, increases light to ripen fruit, and makes it easier to harvest your tomatoes. “Bush tomatoes are not normally pruned of their side shoots as it is particularly fiddly to do so.” Though they can also be left to bush out, you will get larger, better fruit more quickly if you cordon them. It is best to get your cordon system ready and in place before you plant out your tomato plants. You should also make sure that you have soil that is fertile and rich in organic matter. When planting your tomato plants, it is a good idea to spread a good quality organic mulch around your plants. A good quality compost or well-rotted manure, for example. Ongoing Care Watering Water well and consistently, and remember to direct water to where it is needed – at the roots – and not from above. Wet foliage can increase the likelihood of disease. Ideally, water early in the day so that there is no risk of the plants being wet at night. Feeding Provide plenty of fertility. Use a good organic liquid feed as soon as the flowers form, and every couple of weeks throughout the summer. A tomato feed should be high in potassium, without too much nitrogen. Ventilation Make sure (if growing under cover) that the space remains open and pollinators can get inside. Ensure adequate ventilation and make sure your plants are not overcrowded. Companion Planting Choose appropriate companion plants to help tomatoes – basil, oregano, marigolds, borage, and alliums (e.g. garlic, spring onions) can all be great options for a polyculture guild, for example. Make sure you have a good crop rotation plan in place and don’t grow ‘Gardener’s Delight’ in the same place year after year. Remain vigilant for pests, and diseases – especially tomato blight – and remove diseased material as quickly as possible. Harvesting ‘Gardener’s Delight’ cherry tomato plants tend to fruit between July and October. They will obviously be further ahead and earlier to fruit if you start your tomato plants indoors. Growing these undercover in a greenhouse or polytunnel means that you will get a somewhat earlier harvest, and may be able to continue to harvest for a little longer at the end of the year. References 1. Solanum lycopersicum L. Gardener’s Delight. (n.d.). Benary. Retrieved March 27, 2023, from https://www.benary.com/products/solanum-lycopersicum-l-benarys-gartenfreude/benarys-gartenfreude-p9971
Learn more
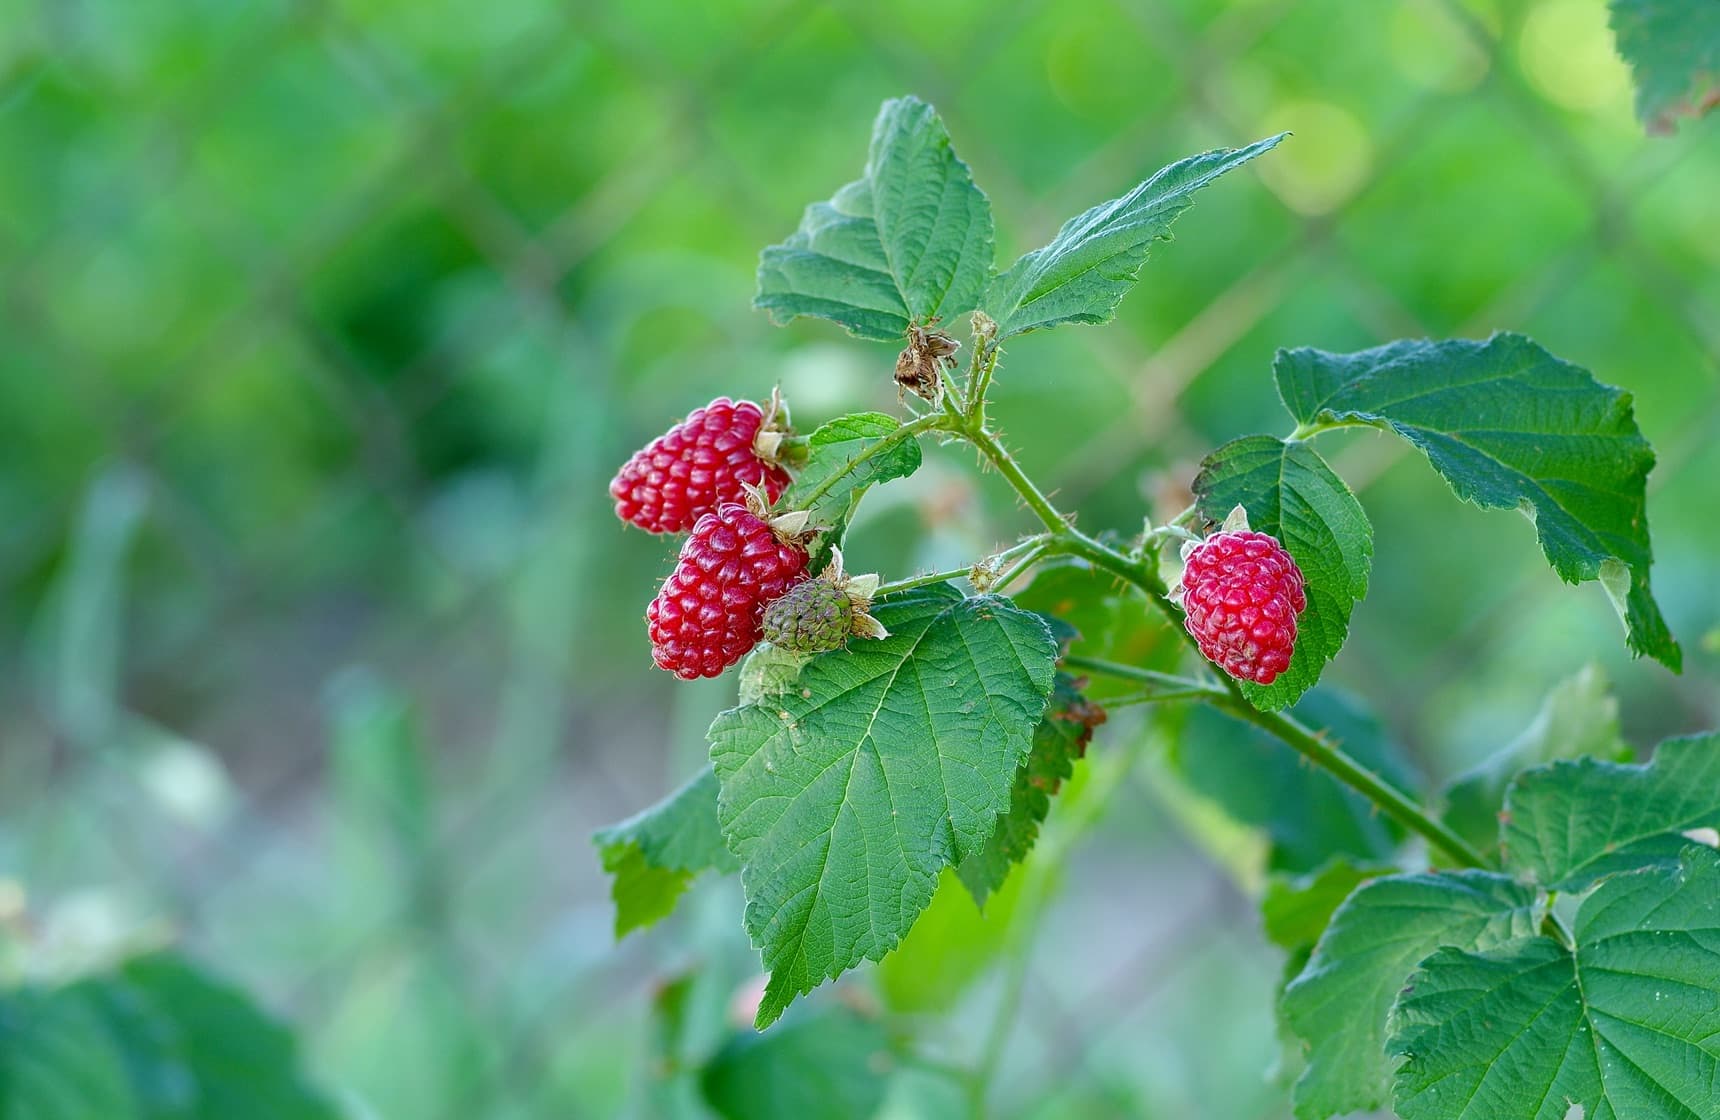
20 Robust Patio Fruit Trees And Plants Recommended By Garden Designers
IN THIS GUIDE 1) Apple 2) Pear 3) Plum 4) Cherry 5) Quince 6) Mulberry 7) Apricots 8) Peaches 9) Figs 10) Citrus Trees 11) Raspberries 12) Grapes 13) Kiwi Fruit 14) Gooseberries 15) Blackcurrants 16) Redcurrants 17) Blueberries 18) Cranberries 19) Honeyberries 20) Strawberries Bare-Root Vs Pot Grown Choosing Patio Fruit Trees Patio fruit trees, fruiting canes, fruiting vines and fruit bushes can provide abundant yields for a small space gardener. If you want to grow at least some of your own food this year, dwarf fruit trees or other fruiting plants that can be grown in containers on a patio are a great place to start. Growing these perennial options often involves a lot less work than tending an annual vegetable garden – and once the trees are established, you should get a reliable yield not just for one season but over a number of years. “Every garden patio needs a tree and you can grow it in a pot if you need to because it gives you the possibility of moving things around.,” shares Flo Headlam, Garden Designer and Presenter. “If it is a fruit tree, you’ll get blossom in the spring, fruit that follows, and autumn colour. “Alternatively, a seasonal deciduous tree keeps you in touch with the seasons which is great.” Many fruit trees are easy and relatively trouble-free to grow in the UK. And when they are grown on dwarfing rootstocks, they can take up a lot less space than you might imagine. When you plan and make the right choices, you can grow an abundant fruit-producing garden in a surprisingly small amount of space. “I’ve got lots of soft fruit trees and plants growing in my garden,” shares Designer Ann-Marie Powell. “Even though my children hate gardening, they like eating straight from the fruit trees!” Below, you will find a list of fruit trees that can potentially make great patio fruit trees in the UK. But remember, the type of fruit is just one of the things to think about. You also need to think about the variety, and the rootstock on which it is grown, in order to make the right decision for you. 1) Apple BOTANICAL NAME: Malus domestica HARDINESS RATING: H6 PREFERRED POSITION: FULL SUN OVERWINTER INDOORS: NO Apples are definitely one of the most popular choices for temperate climate gardens. They need fertile soil or growing media which is neither prone to waterlogging nor particularly free draining. Dessert apples need full sun, ideally, while cooking/cider or crab apples can cope with less sun and can often cope well in a more shaded spot. Apple trees (depending on variety) fruit within a few years, provided they don’t encounter any growing issues. When growing apples as patio fruit trees, often, extreme dwarfing rootstocks are used. One example in the UK is called M27, while dwarfing rootstocks called M9 and M26 are also commonly utilised – so these are the ones to look out for. “My recommendation for a robust rewarding small patio tree would be an M26 Cox orange pippin self-fertile apple,” shares Dan Ori. “It should survive if you forget to water it for one week, it can deal with the cold, it doesn’t need pollinators and the fruit tastes good.” 2) Pear BOTANICAL NAME: Pyrus communis HARDINESS RATING: H6 PREFERRED POSITION: FULL SUN OVERWINTER INDOORS: NO Pear trees can be great trees to plant in many regions of the UK. Pear trees will do well in sheltered and sunny spots that are not prone to frost and do well as individual specimen trees or as part of a larger garden system. Depending on the variety, the tree you plant as a sapling in the dormant season will fruit within a few years and can continue to fruit reliably, in the right conditions, for many years. One interesting thing to note about patio pear trees is that they often come on rootstocks that are not even from a pear. They are frequently grafted onto quince rootstocks (such as Quince C) to keep them small. Sometimes an additional third section of a pear variety that works well with the rootstock from the quince is spliced in. Quince C is also used for a number of other fruit trees to be grown in containers. 3) Plum BOTANICAL NAME: Prunus domestica HARDINESS RATING: H5 PREFERRED POSITION: FULL SUN; SHELTERED SPOT OVERWINTER INDOORS: NO Plum trees are also an excellent and popular choice for UK gardens. They will tend to fruit prolifically in fertile and moist yet free-draining growing conditions. Some varieties can be grown in containers, while others will grow much larger. You must check whether the plum you buy is self-fertile as sometimes you will need more than one plum tree to get fruits. Related damsons and gages are also worth considering. You should note that there are no extreme dwarfing rootstocks for plum as there are for apples. But semi-dwarfing rootstocks (‘Plumina’, ‘Pixy’ and ‘VVA-1’ for example) are available. These help to limit the size of the trees where this is required and their growth will be further restricted when they are grown in containers. 4) Cherry BOTANICAL NAME: Prunus avium HARDINESS RATING: H6 PREFERRED POSITION: FULL SUN OVERWINTER INDOORS: NO With beautiful blossoms and lovely fruits, cherry trees are also popular and good choices for UK gardeners. There are two main types – sweet cherries and sour cherries. Sweet cherries sometimes require a companion for fertilisation, while sour cherries are typically self-fertile. Sweet cherries require a sunny spot, while sour cherries are more tolerant of shade. Cherry trees can be kept smaller through the use of the ‘Gisela 5’ rootstock. And again, their growth can be restricted by growing them in containers, and through careful summer pruning. 5) Quince BOTANICAL NAME: Cydonia oblonga HARDINESS RATING: H5 PREFERRED POSITION: FULL SUN; SHELTERED SPOT OVERWINTER INDOORS: NO Quinces are a more unusual option to consider. They have a high level of pectin which makes them ideal for making a range of jams and jellies and other preserves. Quince can be grown in many UK gardens, even in northern areas when placed in a sheltered and sunny position – against a south-facing wall for example. As mentioned above, you can get dwarfing rootstock for quince, which is used not only on these trees but on pears and other patio fruit trees too. 6) Mulberry BOTANICAL NAME: Morus nigra HARDINESS RATING: H6 PREFERRED POSITION: FULL SUN; SHELTERED SPOT OVERWINTER INDOORS: NO Mulberries are already small trees, and you can restrict their growth further by growing them in containers. Growing these fruits can be a great option because the fruits are difficult to source in stores, and also because mulberry leaves are also an additional edible yield. 7) Apricots BOTANICAL NAME: Prunus armeniaca HARDINESS RATING: H4 PREFERRED POSITION: FULL SUN; SHELTERED SPOT OVERWINTER INDOORS: NO (MAY NEED FROST PROTECTION) Apricots thrive in moist and fertile soil, though it must be well-drained and ideally slightly alkaline. They will not tend to thrive in colder regions or in locations where the soil is shallow or lacking in nutrients. In the right conditions, however, they can be grown in the ground or in containers, which, as with peaches, can allow them to be grown where the season in shorter and temperatures lower. Hand pollination may be necessary for successful fruit formation. Wavit, a plum rootstock, is sometimes also used for apricots. 8) Peaches BOTANICAL NAME: Prunus persica HARDINESS RATING: H4 PREFERRED POSITION: FULL SUN; SHELTERED SPOT OVERWINTER INDOORS: NO (MAY NEED FROST PROTECTION) Peach trees will need protection from frost in cooler climes but will do well in a sunny, sheltered spot and can be grown in containers which would allow them to be brought inside in the winter. Make sure containers are of sufficient size – at least 45cm across, and you must choose a dwarfing variety. In more southerly, sunny and sheltered gardens, peaches can thrive when trained against a wall. Hand pollination may be necessary for fruit to form. Peach patio fruit trees are also sometimes also grown on ‘Wavit’ rootstock. 9) Figs BOTANICAL NAME: Ficus carica HARDINESS RATING: H4 PREFERRED POSITION: FULL SUN; SHELTERED SPOT OVERWINTER INDOORS: NO (MAY NEED FROST PROTECTION) Fig trees also need warmth and plenty of sunlight. In more northerly and chillier climes, certain hardy fig varieties can be grown outdoors in a suitable spot. In some colder areas, even less hardy figs can be grown in containers, as long as they are brought inside or given protection in the winter months. Figs will actually fruit better if grown in containers, since this will help to restrict foliage and root growth and encourage the trees to focus on fruit production. 10) Citrus Trees BOTANICAL NAME: Various HARDINESS RATING: Various PREFERRED POSITION: FULL SUN; SHELTERED SPOT OVERWINTER INDOORS: YES Citrus fruit is mostly grown in warmer climes. However, fruits like oranges, limes and lemons can be grown in containers in the UK as long as they are brought into a heated greenhouse or indoors over the winter months. No matter what type of citrus tree you would like to grow, it is possible to find examples of almost all varieties suitable for container growing. In addition to considering the trees mentioned above, there are other fruiting perennial shrubs and canes to consider growing on your patio. These might not be technically classified as ‘trees’, but can be grown just as effectively. These include: 11) Raspberries BOTANICAL NAME: Rubus idaeus HARDINESS RATING: H6 PREFERRED POSITION: FULL SUN; SHELTERED SPOT OVERWINTER INDOORS: NO The best way to grow raspberries and other cane fruits in containers is to choose (or make) a container of at least 75-litre capacity. Then create a wigwam with 3-5 supports and plant one bare root plant per support in winter. Be sure to tie in the canes as they grow, and prune over time to maintain fertility. 12) Grapes BOTANICAL NAME: Vitis vinifera HARDINESS RATING: H5 PREFERRED POSITION: FULL SUN; SHELTERED SPOT OVERWINTER INDOORS: NO Choose a container of at least 60-litre capacity and you should also be able to successfully grow a grape wine in a small garden or on a patio. Just remember that the vine will need support and something to climb as it grows – so place the container against a trellis or fence. 13) Kiwi Fruit BOTANICAL NAME: Actinidia deliciosa HARDINESS RATING: H4 PREFERRED POSITION: FULL SUN; SHELTERED SPOT OVERWINTER INDOORS: NO (MAY NEED FROST PROTECTION) Kiwi fruits need a sheltered sunny position, ideally against a south- or west-facing wall or fence. They can be grown in containers of at least 60-litre capacity. Note that you will need a male and a female unless you choose a self-fertile variety. 14) Gooseberries BOTANICAL NAME: Ribes uva-crispa HARDINESS RATING: H6 PREFERRED POSITION: FULL SUN OR PART SHADE OVERWINTER INDOORS: NO Gooseberries are an excellent choice for growing in pots, and will do well even on a more shaded patio, as these are one of the more shade-tolerant fruits. Unlike many other fruiting plants, they will usually fruit well even without full sun. 15) Blackcurrants BOTANICAL NAME: Ribes nigrum HARDINESS RATING: H6 PREFERRED POSITION: FULL SUN OR PART SHADE OVERWINTER INDOORS: NO Blackcurrants are also a little more tolerant of light shade than other fruits, and can also do very well in containers. Choose a container at least 45-50cm in diameter and repot in late winter every 2-3 years. 16) Redcurrants BOTANICAL NAME: Ribes rubrum HARDINESS RATING: H6 PREFERRED POSITION: FULL SUN OR PART SHADE OVERWINTER INDOORS: NO A similar container can also be used to grow redcurrants. These too will tolerate some shade, but will fruit better, with sweeter currants, if planted in the sun. 17) Blueberries BOTANICAL NAME: Vaccinium corymbosum HARDINESS RATING: H6 PREFERRED POSITION: FULL SUN OR PART SHADE OVERWINTER INDOORS: NO Blueberries are another great choice for pots. Since blueberries need acidic conditions, growing in containers is the best way to grow them if you do not have acidic soil where you live. Remember to use ericaceous compost to fill your containers. 18) Cranberries BOTANICAL NAME: Vaccinium subgen. oxycoccus HARDINESS RATING: H6 PREFERRED POSITION: FULL SUN OR PART SHADE OVERWINTER INDOORS: NO Grow cranberries in pots that are at least 35cm in diameter. Though since they have shallow roots, that extend typically no more than 15cm into the growing medium, depth is not as important. Remember, however, that these are bog plants, so the growing medium must be kept moist. A self-watering container could therefore work well. 19) Honeyberries BOTANICAL NAME: Lonicera caerulea HARDINESS RATING: H7 PREFERRED POSITION: FULL SUN OR PART SHADE OVERWINTER INDOORS: NO Honeyberries are another more unusual fruit to grow on your patio. This is an edible member of the honeysuckle family and taste like a mix between a blueberry, a grape and a plum. Simply plant up in a container 4cm in diameter wider than the pot it came in, then pot up as required. 20) Strawberries BOTANICAL NAME: Fragaria HARDINESS RATING: H6 PREFERRED POSITION: FULL SUN; SHELTERED SPOT OVERWINTER INDOORS: NO Of course, last but not least, you could go for this tried and trusted favourite. Strawberries are, of course, another fruit that is very easy to grow on your patio in pots or other containers. These are not the only choices, of course, but they should give you a place to start when trying to choose the right, fruitful options for you, your family, and where you live. Bare-Root Vs Pot Grown Fruit trees are typically bought as either bare-root or pot-grown examples. As you can no doubt guess from the name, pot grown examples come in containers. Bare-root trees are, as the name suggests, delivered out of pots, with their roots bare. Patio fruit trees (along with many fruit trees commonly purchased for gardens) are usually grafted trees. This means that they are ‘Frankenstein’ trees, made up of a rootstock (the base section with root system) and a scion (the top section). The rootstock typically determines the size, vigour, disease resistance and hardiness of the tree, while the scion determines the abundance, characteristics and taste of the fruit. Understanding this can help you to make the best choices when it comes to choosing patio fruit trees for you. Rootstocks are typically categorised in reference to the size of tree they make. You can find: Standard (full size) Semi-dwarfing (somewhat smaller, often ideal for mid-sized gardens) Dwarfing (suitable for step-overs and trees grown in pots, for example). Of course, it is the last of these three, the dwarfing rootstocks that are usually used on trees marketed and sold as ‘patio trees’. When choosing a fruit tree, try not to just go for the varieties that are commercially grown in your area. Consider also the wider range of interesting heritage varieties that will do well where you live. Heritage varieties can taste a lot better than ordinary store-bought fruits. They may just have not been suitable for large-scale commercial use due to their being bruised easy, or not storing well, for example. It is very important that we retain as much diversity as possible in our food, and keeping heritage fruit tree varieties alive is one great way to play your part in your garden. “I am keen on planting fruit trees because we need to plant more of them, they give us fruit and they are great for pollinators,” shares Sara Venn, the Founder of Edible Bristol. “There’s really nothing to be scared of, but lots of people are afraid of planting trees, especially in pots.” Choosing Patio Fruit Trees Before you decide which patio fruit trees and other fruiting plants to buy, there are a number of things to consider. You need to consider: The climate in your area and general weather conditions. Whether your patio area is sunny or rather shaded throughout each day and throughout the year. How much rain it receives, and how windy or sheltered the location is. (The micro-climate in your particular garden.) How much care and attention you are willing/able to give your new trees/ plants. Which fruits you and your family actually enjoy eating. Whether the fruit trees you are considering need a pollination partner. (Some trees can self-pollinate while others will need to be purchased along with another tree in order to produce fruit.) The eventual size of the patio fruit tree or other fruiting plant you are growing. It is also worth thinking about whether or not growing in containers is the right thing for your space. In certain cases, in-ground growing may be a better option – in some small gardens, fruit trees can be grown in the ground and trained against a wall or fence to make the most of the space, for example. Step-over apple trees, pleached trees and other small fruiting plants can also be squeezed in as bed or path edging, as a type of fencing, or between other elements in your garden – this could be another way to make the most of your space. Remember, trees and other plants grown in containers will typically need more watering than those grown in the ground. The most common reason why these trees are lost is due to issues in this regard. Fertility is also something that will have to be more closely monitored when plants are being grown in pots or containers. So if you are looking for a low-maintenance scheme, then container growing may not always be the best option for you.
Learn more
These Special Plum Cultivars Can Be Grown For Culinary, Cooking Or Dual-Purpose Use
IN THIS GUIDE Culinary Plums (For Jams, Sauces & Preserves) 1) P. domestica ‘Belle de Louvain’ 2) P. domestica ‘Czar’ 3) P. domestica ‘Marjorie’s Seedling’ 4) P. domestica ‘Purple Pershore’ Desserts Plums (For Eating Right Away) 5) P. domestica ‘Cambridge Gage’ 6) P. domestica ‘Jefferson’ 7) P. domestica ‘Mirabelle de Nancy’ 8) P. domestica ‘Opal’ Dual-Purpose (For Cooking & Eating) 9) P. domestica ‘Avalon’ 10) P. domestica ‘Blue Tit’ 11) P. domestica ‘Oullins Gage’ 12) P. domestica ‘Victoria’ Planting Considerations References While all types of plum trees will perform best in warm and sheltered gardens, the fruit they bear can vary significantly in taste and purpose. Do you like nothing more than taking a bite of a sweet and succulent plum? Or perhaps you prefer to whip them up into a mouth-watering preserve? Whatever your chosen method of consuming plums, there are plenty of varieties out there to suit all palates and preferences. In this guide we share some of the different plum varieties to choose from, how to coax the best performance from them and the practical considerations to take into account. Here is a selection of some of the most popular types of plums that can be grown in the UK, subdivided into cooking, culinary or dual-purpose cultivars: Culinary Plums (For Jams, Sauces & Preserves) 1) P. domestica ‘Belle de Louvain’ NAME: BELLE DE LOUVAIN FRUIT COLOUR: DARK RED HARDINESS RATING: H5 DISEASE RESISTANCE: STRONG SELF-FERTILE: PARTIALLY The dry flesh of the ‘Belle de Louvain’ makes it an excellent choice for crafting pie fillings, since its lack of moisture means the bottom of your pastry won’t turn into a soggy mess. It’s also exquisite when converted into jam, with a rich dark colour that catches the eye. It’s also a hardier variety of plum tree than many on this list, meaning it’s more capable of withstanding colder and windier conditions and will fight off disease more successfully than others.1 It is partially self-fertile and though it may take longer to bear fruit than others, this gives the tree time to strengthen its branches and prove more reliable in the long run. 2) P. domestica ‘Czar’ NAME: CZAR FRUIT COLOUR: BLUE HARDINESS RATING: H6 DISEASE RESISTANCE: AVERAGE SELF-FERTILE: YES ‘Czar’ plum trees produce decent quality fruits on a remarkably reliable basis. The tree will produce dazzling white flowers in the spring, while the fruits themselves – a devastatingly attractive dark blue – will appear in late August onwards. Growing to a very maximum of four metres in height (but normally shorter), the ‘Czar’ is a compact and self-pollinating specimen which is ideal for locations where space is at a premium. Its ability to withstand more inclement conditions and its unfailing ability to yield fruit means it’s best suited for northern locations. 3) P. domestica ‘Marjorie’s Seedling’ NAME: MARJORIE’S SEEDLING FRUIT COLOUR: BLUE HARDINESS RATING: H5 DISEASE RESISTANCE: AVERAGE SELF-FERTILE: YES Another hardier strain that is suitable for colder gardens, ‘Marjorie’s Seedling’ produces heavy, blue fruits which can be harvested from September onwards. However, a fuller, richer taste can be obtained if they are left to ripen on the vine, since the fruit itself will not be damaged by dropping to the ground. As such, it can be left to ripen fully until late October. To achieve the best results, it’s essential to thin out the fruit in late June to ensure that the tree devotes the requisite attention to those remaining on its branches. It is self-fertile and invariably returns a good yield when cropping time arrives. 4) P. domestica ‘Purple Pershore’ NAME: PURPLE PERSHORE FRUIT COLOUR: RED / PURPLE HARDINESS RATING: H5 DISEASE RESISTANCE: STRONG SELF-FERTILE: YES ‘Purple Pershore’ is a favourite culinary plum for its durability, dependability and resistance to disease. It’s one of very few plum cultivars which can fend off silver leaf fungus and the fact that it blossoms later in the year means it normally escapes the most serious effects of spring frost.2 It’s also self-fertile, making it fairly easy to cultivate. On the other hand, ‘Purple Pershore’ can be particularly susceptible to over-cropping; if that occurs, the tree is likely to produce no yields at all the following year. Therefore, it’s a good idea to thin it out in summer before reaping the fruits in mid-August. It’s also quite a large specimen, making it unsuitable for smaller gardens. Desserts Plums (For Eating Right Away) 5) P. domestica ‘Cambridge Gage’ NAME: CAMBRIDGE GAGE FRUIT COLOUR: BLUE HARDINESS RATING: H5 DISEASE RESISTANCE: AVERAGE SELF-FERTILE: PARTIALLY As a greengage, ‘Cambridge Gage’ produces smaller fruit than some other plum cultivars – but what it lacks in size, it makes up for in its delectably sweet taste. With yellow-green flesh that falls easily away from the stone, it’s been a favourite for desserts for centuries. The tree itself is a slightly sensitive creature, doing best in warmer and more sheltered climates. It takes its time to crop and is vulnerable to spring frosts, while it’s self-incompatible, meaning it will require pollination. Even in the best conditions, it produces only a modest yield on a semi-reliable basis – but the fruit itself is well worth the struggle. 6) P. domestica ‘Jefferson’ NAME: JEFFERSON FRUIT COLOUR: YELLOW HARDINESS RATING: H5 DISEASE RESISTANCE: AVERAGE SELF-FERTILE: NO The ‘Jefferson’ cultivar is about as good as it gets for taste and texture. With unparalleled sweetness and juiciness, the robustness of the fruit’s skin is helpful in keeping most of it in your mouth and not on your chin! It produces average-sized fruit of a dull greenish-yellow colour and crops over a ten-day period in mid-to-late August. Its susceptibility to spring frosts makes it unsuitable for northern locations, but anywhere in the Midlands or further south will nurture its needs more adequately. It won’t self-pollinate, so planting it with a partner (‘Czar’, ‘Marjorie’s Seedling’ and ‘Victoria’ are all advisable) returns the best results. 7) P. domestica ‘Mirabelle de Nancy’ NAME: MIRABELLE DE NANCY FRUIT COLOUR: YELLOW HARDINESS RATING: H5 DISEASE RESISTANCE: AVERAGE SELF-FERTILE: YES Hailing from the Lorraine region in France, ‘Mirabelle de Nancy’ trees produce such bountiful crops of cherry-sized yellow plums that they were traditionally harvested by laying a large sheet under the branches, then shaking them for all they are worth.3 The fruit is tasty but drier than many other dessert varieties, meaning it can work as a cooking plum, too. With an early flowering pattern, the ‘Mirabelle de Nancy’ produces its yields in mid-to-late August and requires minimal maintenance due to its self-pollinating capabilities. However, its French heritage means that it doesn’t like colder temperatures and can be decimated by late spring frosts, while its abundant yields also mean that overcropping can be a problem. 8) P. domestica ‘Opal’ NAME: OPAL FRUIT COLOUR: GREEN / RED HARDINESS RATING: H6 DISEASE RESISTANCE: STRONG SELF-FERTILE: YES The ‘Opal’ is a mix between a plum and a gage, meaning it has inherited the best of both worlds. On the one hand, it has the delicious sweetness of the gage family, but with the slightly bigger dimensions of a plum. When ripe in late July and early August, its exterior is a very appetising yellow adorned with swirls of red and purple. Due to the fact that the ‘Opal’ crops earlier in the year than some of its counterparts, it is a little susceptible to spring frost and therefore does best in full sunlight in warmer parts of the country. On the other hand, it is self-fertile, resists disease fairly well and produces generous yields – so much so that overcropping can become a problem on occasion. Dual-Purpose (For Cooking & Eating) 9) P. domestica ‘Avalon’ NAME: AVALON FRUIT COLOUR: PINK / PURPLE / RED HARDINESS RATING: H5 DISEASE RESISTANCE: STRONG SELF-FERTILE: PARTIALLY A relatively novel cultivar, ‘Avalon’ was originally bred to offer a more attractive option than the Victoria variety. If picked when the skin is a pinkish red, it’s ideal for making jams or other preserves. However, it’s possible to leave the fruit on the tree until it turns a darker purplish red, at which point it becomes an excellent choice as a dessert plum. ‘Avalon’ might take a little longer (a year or more) than other cultivars to bear its first fruit, but once it has done so, it’s a fairly reliable option. It’s partially self-fertile, meaning it will benefit from another plum variety in its vicinity, while it does have a tendency to overcrop – which can not only impact upon the quality of this year’s yield, but also endanger the emergence of any fruits whatsoever the following year. Appropriate pruning can prevent such an eventuality. 10) P. domestica ‘Blue Tit’ NAME: BLUE TIT FRUIT COLOUR: DEEP PURPLE HARDINESS RATING: H5 DISEASE RESISTANCE: STRONG SELF-FERTILE: YES An offspring of ‘Old Green Gage’ and ‘Czar’, the ‘Blue Tit’ has inherited the succulent taste of the former and the hardiness of the latter. Its fruit will first appear on the branch as light green, but will darken to a deep purple over time. Pick a week or so before it’s fully ripe in order to use for culinary purposes, or wait until it drops to the ground to eat right away. A good choice for novice gardeners, the ‘Blue Tit’ has strong disease resistance and is self-fertile. Having said that, you can improve the crop yields by introducing a second similar species nearby (Victoria is a particularly apt choice). It handles spring frosts reasonably well and should survive in all but the most intemperate parts of the country. 11) P. domestica ‘Oullins Gage’ NAME: OULLINS GOLDEN GAGE FRUIT COLOUR: GREEN / YELLOW HARDINESS RATING: H5 DISEASE RESISTANCE: AVERAGE SELF-FERTILE: PARTIALLY ‘Oullins Golden Gage’ is one of the most reliable gage varieties going, producing relatively large fruits every summer. It serves the dual purposes of culinary and cooking plums, meaning you can eat it right away or whip up a delicious jam with it. The fruits, ready for picking in mid-August, are a greenish-yellow colour. Due to its late flowering nature, the ‘Oullins Golden Gage’ is suitable for almost all locations in the country, proving fairly frost- and disease-resistant. That includes northern spots which suffer from colder drops in temperature, though it’s advisable to cultivate it in a sheltered location that is protected from the worst of the wind to achieve the best results. It is self-fertile but, once again, will benefit from the presence of a partner cultivar nearby. 12) P. domestica ‘Victoria’ NAME: VICTORIA FRUIT COLOUR: ORANGE / RED HARDINESS RATING: H5 DISEASE RESISTANCE: HIGHLY SUSCEPTIBLE SELF-FERTILE: YES Undoubtedly the most popular variety of plum tree grown in the UK, ‘Victoria’ is one of the oldest species and one of the easiest to grow, to boot. It’s equally suitable for cooking or eating; simply pick the fruit when it is an orangey-red for the former, or wait until it develops into a purplish red to enjoy it via the latter method. ‘Victoria’ is self-fertile and will produce generous yields even without the presence of another plum variety nearby. On the flipside, it is highly susceptible to disease and pests, with bacterial canker, brown rot, plum moth and silver leaf all notable concerns. “I used to have a ‘Victoria’ plum tree that produced delicious but declining numbers of fruit as it slowly succumbed to canker and silver leaf, despite my best efforts to create the conditions for it to thrive,” shares Colin Skelly, a Master Horticulturist. “A couple of years after its removal I planted ‘Czar’ on a dwarfing rootstock and this seems to be healthy so far (fingers crossed).” Its high yields can also lead to overcropping and irreparable damage to the branches, so be sure to thin it out in mid-June. Planting Considerations Plan in advance to achieve the best results There are several things that you should ponder before deciding which type of plum to introduce in your garden. These include (but are not limited to): Purpose – In general, plum trees come in three distinct varieties: dessert plums, which are best suited to eating uncooked; culinary plums, which are ideal for cooking and converting into sauces and jams; and dual-purpose plums, which can fulfil both roles. Your preferred purpose for the plums will dictate the type you should choose, so the varieties below have been divided into those three categories. Siting – All varieties of plum tree invariably perform best in a warm, sheltered location in your garden – and none of them are impervious to spring frosts. With that in mind, it’s advisable to plant the plums in a south-facing or west-facing site in the garden which is not exposed to the elements. On the other hand, you could try to fan train the tree(s) against a wall or fence which receives a lot of sun. Region – As mentioned above, no plum variety in the UK is completely immune to spring frosts. However, there are specific species of the fruit which are regional to each county of the UK and are better equipped to cope with the unique climatic conditions of their geographic location. Bear that in mind when researching the type of plum which might be best suited to your home. Pollination – Some plum trees are self-pollinating, others are partly self-fertile, and others still are self-incompatible cultivars. While the former category is the easiest to grow, all types will benefit from having another tree in the same or an adjacent pollination group planted nearby. For that reason, it’s advisable to plant at least two different plum varieties at once, even though a single tree will normally produce a good yield. Disease resistance – Unfortunately, plum trees are generally more susceptible to disease than certain other types of fruit trees. Bacterial canker and silver leaf are the two most serious ailments which can befall them, though some regional (and some modern) cultivars are more resistant to those blights than others. Armed with that foreknowledge, you should now be better placed to select a plum variety that serves your needs and suits your circumstances best. References 1. Prunus domestica “Belle de Louvain.” (n.d.). Royal Horticultural Society. Retrieved March 23, 2023, from https://www.rhs.org.uk/plants/81932/i-prunus-domestica-i-belle-de-louvain-(c)/details 2. Purple Pershore. (2020, June 26). Suffolk Fruit and Trees – the Fruit Tree Specialists. Retrieved March 23, 2023, from https://realenglishfruit.co.uk/purple-pershore/ 3. Prunus d. “Mirabelle de Nancy.” (n.d.). Majestic Trees. Retrieved March 23, 2023, from https://majestictrees.co.uk/fruit-nut/1608-prunus-d-mirabelle-de-nancy
Learn more
Yes, You Can Grow An Avocado Stone Indoors - But Here's Why May Never Bear Fruit
IN THIS GUIDE 1) Know Your Avocado 2) Preparation 3) Germination 4) Potting 5) Patience! 6) Pay-off? References The avocado is a delicious fruit jam-packed with healthy fats and nutrients. While a little tricky to grow in the UK, it’s not impossible – though your plant may never bear fruit. Native to Central America, the avocado plant (Persea americana) thrives in hot, humid and sunny climes. “I come from California where the plants are so different from here in the UK,” shares Alley Marie Jordan. “I grew up planting avocado seeds and watching them grow.” In the right conditions, they can grow up to a whopping 20m in height… but the UK is definitively not an environment conducive to those conditions. “Growing avacados is great fun and an ideal project for children,” shares Colin Skelly, Master Horticulturist. “It’s a longer game than simply sowing cress, but checking the water and the wonder when the seed finally opens is brilliant for engaging little people. “Unfortunately, our seedling at home succumbed to going out into the garden in summer but there’s always next time!” While it does require careful attention, a warm home and a stack load of patience, it’s not actually that challenging an endeavour once you get the hang of it. For any budding horticultural enthusiasts keen to try their hand at growing this colourful plant, here’s a step-by-step guide to bringing an avocado plant to full maturity from the seed. Happy growing! 1) Know Your Avocado While it is possible to coax a standard Hass avocado that you’d find in your local supermarket to life from its seed, this strain of the species is pretty much guaranteed that it will never bear fruit for you. That’s because Hass avocadoes are more comfortable in the sultry climes of Southern California, so a switch to the British climate won’t bring much more than attractive foliage.1 As mentioned above, fruit-bearing avocado plants in the UK are rare – but not unheard of. If you are intent on encouraging your stone to eventually bear fruit, source a variety of the plant that’s hardier in nature and can withstand colder temperatures. Despite also being bred in the scorching conditions of Florida, the Brogdon avocado is a more resilient type and can handle temperatures near freezing.2 2) Preparation The next step is to prepare your avocado stone for the journey it is about to undergo. Very carefully remove it from the fruit and clean it of any mushy residue, ensuring you don’t damage it or remove the brown skin from its surface. It may help if you soak the stone in a cup of cold water for a few minutes, before gently brushing off any fruit which may cling to its surface. Next, locate which end of the seed is up and which is down. The top is where the sprouts will shoot from and is generally pointier in appearance, while the bottom will spread roots and has a flatter contour. Top = pointy, bottom = flat You need to know which is which so that you can position it correctly for the next step of the process. 3) Germination Now, you want to encourage the stone to germinate. The best way to do this is to pierce it on four sides with cocktail sticks, creating a kind of scaffolding which will suspend the avocado in your chosen receptacle. A glass or a plastic cup makes a great option for this, since it’s transparent and you can visibly see when the seed is beginning to sprout roots. With the stone skewered, place it atop a cup filled with water so that the bottom of it is completely submerged, but the top is open to the air (as demonstrated above). Over time, the water will become dirty and must be changed regularly (every five days or so) to prevent the spread of bacteria, mould and fungal growth. Eventually, you will notice the brown skin on the outer surface of the seed slough off, while a tiny crack will appear at its apex and spread all the way down to the bottom. From the bottom, a teensy taproot will emerge, potentially branching into multiple prongs as it grows. This taproot must never be allowed to dry out or become unsubmerged! The whole process varies from plant to plant, but generally takes at least two months to occur. 4) Potting As the taproots appear at the bottom of the stone, so too will a sprout make its entrance from the top. When this sprout has turned into a stem around six inches tall, cut it back down to half its size to encourage new growth. When it reaches six inches in height once more, it’s time to transplant it to soil. Place it in a pot with a diameter of around 10 inches with plenty of soil that is rich in humus, leaving the upper surface of the stone exposed. Position your plant in a location that receives plenty of sunlight, since avocadoes thrive in warm conditions. In the summer, it’s okay to leave them outdoors, but you must bring your babies inside as soon as the temperature begins to drop. Water the plant frequently, treating it to an occasional soak, but ensure the soil doesn’t become saturated. If the leaves begin to turn yellow, that’s a sure-fire sign that you’ve overwatered the plant. In that case, leave it to dry out completely for a few days before watering again. 5) Patience! Now it’s time to play the waiting game! Cultivating an avocado plant to a fruit-bearing stage requires a lot of patience and careful maintenance, so keep an eye on its progress on a regular basis. Once the stem reaches a foot in height, you should pinch out the upper foliage, thus encouraging it to grow more offshoots and become a bushier specimen. Repeat that process every time the plant gains another six inches in height. It’s likely that you might encounter a pest problem over the course of your plant’s life, since mites, aphids, flies and other bugs all can’t get enough of their brilliant green leaves. If you do find you have a pest infestation, wash all the critters off the plant with a hose, then spray it with a combination of warm water, a small amount of washing up liquid and a teaspoon of neem oil. This will ensure they don’t return – but if they do, simply repeat the process until they have been vanquished. 6) Pay-off? As we said at the outset, it’s a very tall order to produce fruit from an avocado houseplant, though it can certainly be accomplished. Even if you are successful, it will take years to reap results; the quickest turnaround you can expect is three to four years, but some plants don’t bear fruit for 10 or even 15 years, while others never do! As such, it’s a long game that you’ve engaged in. If your plant does begin to bear fruit, it will require pollination. To facilitate that process, it’s a good idea to grow several trees all at once, since they can provide pollinators with easy crossover options. But even if you do manage to pull off the remarkable feat of enticing avocados from your homegrown plant, remember that they will not resemble the fruit from whence the original stone came in the slightest! Store-bought avocadoes are cultivated in industrial farms, where everything from the ambient conditions to the branches themselves are minutely controlled. All the same, you should still have plenty of fun growing your avocado stone to full maturity regardless. References 1. California Avocado Society. (n.d.). California Avocado Society. Retrieved March 9, 2023, from https://californiaavocadosociety.org/mother-hass-tree.html 2. Evaluation Of Cold-Hardy Avocados In Florida. (n.d.). Proc. Fla. State Hort. Soc. Retrieved March 9, 2023, from https://www.avocadosource.com/Journals/FSHSP/FSHSP_VOL_83_PG_382-386_1970.pdf
Learn more
Maximise Your Courgette Yield With These Growing Tips From Roy Nicol
IN THIS GUIDE Overview Where To Grow Courgettes When To Grow Courgettes Courgette Plant Care Common Problems References A tasty and delicious treat, courgettes are an ideal addition to your vegetable patch. With sunlight and regular watering, your family will be adding courgettes to every meal in no time! Courgettes, also known as Zucchini, are a ‘summer squash’ that was originally cultivated in North America. Overview Botanical Name Cucurbita pepo Common Name(s) Courgette / Zucchini Plant Type Fruit (commonly believed to be a vegetable) Native Area N/A (Cultivated) Hardiness Rating H2 Foliage Large edible leaves Flowers Yellow, edible, followed by the edible fruit When To Sow April, May, June When To Prune August, September, October They can reach up to 1m in length and are part of the Cucurbitaceae family which also contains familiar plants such as squash, pumpkins and gourds.1 If you’ve not seen a courgette before, they are green in appearance and sometimes have streaks of yellow. They’re a firm fruit (often mistaken for a vegetable) and while the outside has a thick green skin, the inside of a courgette is lighter, with a very light yellow interior. In this guide we explore some of the reasons to grow your own courgettes at home, some tips and tricks to grow a bountiful crop and some advice on caring for your delicious green veggies. Growing your own vegetables sounds daunting but, once you get started, can become a really enjoyable and exciting activity! Watching your seeds grow into full-sized vegetables can be very rewarding. Below, we look at some tips for growing your courgettes at home. Where To Grow Courgettes Initially, you will want to sow your seeds in an indoor pot or module tray. It’s important that you sow courgette seeds on their sides initially, to help them push through the soil a little easier. A veg patch is a perfect spot for growing your courgette seeds outside as they enjoy positions in full sun with moist soil. If you don’t have the luxury of a vegetable patch, find a sunny spot in your garden with plenty of space for your courgettes. Remember to acclimatise your veggies first with some shorter periods outdoors (for between ten to fourteen days) before leaving them out in the warm sun permanently. For optimum growth, use free-draining soils enriched with natural materials such as horse manure and homemade compost – courgettes thrive in moist soil conditions, so regular watering is important. “Courgettes will even happily grow in an old compost heap that’s rotted down but not yet spread around the garden,” shares Roy Nicol, a Professional Gardener and Horticultural Consultant. “This is a perfect way to make use of an otherwise unused area of the garden.” When To Grow Courgettes After sowing indoors, you can plant outside once the last frost has been and gone – late May/early June is usually safe. If you’re unable to grow them inside initially, you can plant the seeds directly into your veg patch or outdoor space in June. If (in the typical unpredictable fashion of British weather!) the air suddenly turns cool after you’ve planted them outside, cover them with a cloche or a fleece to protect them from the colder overnight temperatures. Doing so can also help prevent one of the most common diseases that courgettes face called ‘Powdery Mildew’ – more on this later in the article. How Long Do They Take To Grow? If you’ve started with seeds in April, your courgettes should be ready to pick in late July or early August, ideal for a summer salad! It’s important to check them regularly in that time, to stop them from growing too large. Unfortunately, courgettes left to grow bigger than 10cm or so can lose their delicious flavours and smooth textures, so regular picking is important to preserve crop health and flavour. Courgette Plant Care Now you’ve learnt some top tips on getting started with your courgettes, there are a few things to think about when caring for your tasty summer vegetables. As mentioned above, it’s important that they’re kept in full sunlight and covered if the weather suddenly turns cold. Courgettes need plenty of space to grow, so space each plant 60-90cm apart for maximum growth. It’s important that their soil is kept moist at all times, so be sure to regularly water the soil to keep the environment optimal for growth. “It helps to plant courgettes in a concave hole improved with plenty of organic matter such as manure,” shares Roy. “This feeds the plant and encourages water to funnel down to the roots of the plant.” However, when watering, don’t water the courgettes themselves – instead, water the soil around them to keep their environment moist and nutritious. Common Problems Slugs & Snails There are a couple of common pests and diseases that might affect your crop of courgettes. The most common enemies of outdoor plants in general are slugs and snails, particularly so for young courgettes. The best way to deal with this on a vegetable patch is by using slug pellets (take care to use pellets certified for organic use made with ferric phosphate which beneficially breaks down into the soil) and/or a physical barrier to deter them (such as sheep wool or broken egg shells), especially in the crucial early growing stages. “Another effective organic method of slug control is applying nematodes to the soil, as these kill slugs and deter snails,” Roy adds. Once the courgettes are older and stronger, these can be removed and the courgettes will be able to handle slug and snail damage. Powdery Mildew One of the most common diseases that affects courgettes (as well as other plants and trees) is the ‘Powdery Mildew’ fungus, which looks exactly as it sounds! It will be obvious if your plants are affected, as the fungal disease appears with white spots or patches on the leaves. It mainly attacks when there are uneven temperatures and water levels, often caused by cooler nights and warmer days in the summer months. It’s important also to check that your soil is draining freely and that each of your courgettes have enough space to grow, and aren’t overcrowded. Once you’ve removed the affected leaves, add some additional grass clippings or compost to your soil to retain moisture, and keep up-to-date with your regular watering schedule! Fusarium wilt Another common garden fungal disease is Fusarium Wilt. It’s particularly attracted to plants and vegetables as it survives indefinitely and spreads by contaminating soil – this means that it can quickly spread between plants in close proximity, such as those in a vegetable patch. The Furasium works its way into the roots of young vegetables and plants and blocks the vessels which absorb and transport nutrients and water to the plant. Generally, it manifests as wilting initially, followed by a lack of plant growth which may then lead to the plant dying. Although it sounds scary, it can be prevented with good hygiene practices – rotating plants and sterilising any new plants which are added to the garden or vegetable patch. Blossom End Rot Courgette rot or ‘Blossom End Rot’ will turn one end of your vegetables a yellow or brown colour. If only a small portion is affected, you can safely cut off the end and enjoy the rest of the vegetable. However, if the entire plant is yellow or brown in colour, there’s no going back. Blossom end rot tends to happen if the courgettes are low on calcium, which is usually a result of irregular watering. A lack of water also means a lack of calcium, so the plant won’t be able to draw up the calcium through its roots – this is another reason why regular watering is so crucial for a healthy crop. “As soils almost always have sufficient calcium, some adjustments to the watering regime will ensure the plant can absorb this nutrient adequately,” shares Roy. Luckily, it’s not contagious! Simply pick the affected courgettes, and keep a closer eye on your watering schedule and pH levels to prevent it from happening again. References 1. Courgettes: King of the summer veg. (n.d.). Kew Royal Botanic Gardens. Retrieved March 14, 2023, from https://www.kew.org/read-and-watch/summer-veg-courgette
Learn more
How To Grow Banana Plants (And Why You Might Not Get An Edible Crop)
IN THIS GUIDE Overview Habitat & Growing Conditions Choosing A Banana Plant Variety How To Grow Banana Plants Banana Plant Care Banana plants can give any garden, polytunnel, greenhouse or conservatory a tropical feel. When you think about gardening in the UK, banana plants are not likely to be one of the first plants that spring to mind. So you may be surprised to learn that there are several that can be grown successfully in our climate – and though they are tender plants, some can even be left outside all winter long. “Banana plants have always been one of my favourites to grow,” shares Will Purdom, owner of Botanico. Unfortunately, the banana plants that can be grown successfully in the UK won’t usually yield an edible crop of fruits. Musa basjoo Sadly most will not fruit at all, and even when they do, those fruits are usually inedible – so don’t expect to give up buying bananas for your household any time soon! That said, it is sometimes possible to achieve a small yield of edible fruits with certain varieties, as long as you understand what they need and provide the right conditions. And even when you don’t get any bananas from your banana plants, they can still be very worthwhile additions to your garden – they can have great ornamental appeal, and give your garden or undercover growing areas an exotic look and feel. Overview Botanical Name Musa / Ensete Common Name(s) Banana Plant Plant Type Fruit Native Area India, South-East Asia, Northern Australia, Africa Hardiness Rating H2 Foliage Large, deep green leaves When To Plant May, June, July, August Flowering Months July, August When we refer to ‘banana’ plants, we are referring to Musa and Ensete species. Banana plants in the UK are usually grown for their ornamental appeal, they have large, dramatic leaves that can make them stand-outs in a garden scheme. They can also look grand in the corner of a conservatory, or in a greenhouse or polytunnel. Some types also have attractive flowers and will flower successfully in the right conditions once established. A few even have the potential to produce fruits (though, as mentioned above, these are not usually edible, there are a few exceptions that will potentially produce a few edible fruits). Habitat & Growing Conditions When choosing and growing banana plants in Britain there are a number of important considerations. Foliage Or Fruit? First of all, you should think about what you would like from your banana plants. Are you interested in growing them purely for their ornamental foliage? Would you prefer a variety that will flower and fruit? If fruits are produced, are you keen to try for an edible harvest? Growing Conditions Another important consideration is the conditions where you live. There is likely a banana plant that you can grow successfully where you live, but in more exposed and more northerly areas, it is likely that you will only be able to do so undercover or inside. Think about how sheltered a position you will be able to provide, and make sure you understand the climate and microclimatic conditions in your particular garden. Choosing A Banana Plant Variety In order to make a decision about whether a banana plant is right for you, and where you might be able to grow one where you live, it will be helpful to take a look at some common varieties that you could consider. “A houseplant sure to command attention would be Musa x paradisiaca ‘Variegata’ which has some of the most striking variegation I have ever come across,” shares Master Horticulturist Peter Lickorish, when discussing his favourite banana plant varieties. Here are some other types of banana plants that can potentially be grown in the UK: Musa x paradisiaca ‘Rajapuri’ This cultivar is relatively hardy and can cope with light winds. It will grow to an ultimate height of around 2.4m (8 ft) and if it is grown in optimal conditions, is one of the few varieties of banana plants that may produce edible fruits. M. x paradisiaca ‘Orinoco’ The related cultivar ‘Orinoco’ is another banana plant that may produce edible fruits when grown undercover or indoors. It is somewhat taller however, and can reach a height of around 4m (13ft). While it will do best in a warmer environment, it is hardy down to as low as -1°C. M. basjoo If you want to try to grow a banana plant outdoors, then this (Japanese banana) is often said to be the best, hardiest option. It is commonly grown successfully outdoors in milder and more southerly parts of the UK, and has even been known to survive in sheltered gardens further north. It is an attractive and dramatic plant that can grow to an ultimate height of around 3-4.5m (10-14ft). Fruits may form, but these are inedible and usually less than 5cm or so long. M. lasiocarpa Known as ‘Chinese yellow banana’, this type of banana plant can also produce inedible fruits, though this is rare in the UK. It is more typical for flowers to form, but fruits rarely set. The plant can be very attractive, however, with lush green foliage; it will typically grow to around 1.5m (5ft) in height. M. acuminata ‘Zebrina’ This is a relatively low-growing cultivar that is another good choice if you are growing in containers, but the main reason to choose this type is for its highly decorative leaves, which are striped with red. M. acuminata ‘Dwarf Cavendish’ If you are growing indoors year-round, or only have a very small garden, this could be a good option. This cultivar grows to only 2-3m, and yet still gives a dramatic impact with its red-striped leaves. Ensete ventricosum ‘Maurelii’ One final option, of the Ensete variety, is the Abyssinian banana. Though sensitive and tender, this is increasing in popularity as a summer bedding plant. It is ideal for tropical garden schemes, with its huge paddle-like reddish bronze and green leaves, which emerge from its thick trunk. In autumn, after being left out in summer, these are cut down and taken indoors until late spring, when they can be re-bedded and should quickly re-grow. How To Grow Banana Plants As mentioned above, where you live and which variety you choose will dictate where you can grow banana plants and where these should be placed. If you are in a more southern and sheltered location, hardier banana species (such as Musa basjoo, mentioned above) can find a permanent home in a suitable growing area in your garden. It is essential that the spot you choose is sheltered from strong winds that could shred the leaves – and it is also important to choose a site that does not become a frost pocket over the winter months. The soil or growing medium into which the banana plant is planted should be free-draining and well-drained, with good quantities of organic matter. When growing even the hardiest banana plants outdoors, it is usually essential to provide winter protection. Container Growing For most gardeners, however, and most types of banana plant, it is best to grow them in containers. Containers can be placed outdoors, in a polytunnel or greenhouse, or in a conservatory or another sunny and warm room inside your home. It is sometimes possible to place containers outside during the summer before bringing them indoors or under cover throughout the colder months. Planting Banana plants are best planted into containers or a suitable outside spot in late spring. Containers should be filled with a loam-based potting mix with extra grit to improve drainage (add around 30% grit by volume). Usually, Musa species are propagated by offsets or suckers, which are detached from the parent and placed into their own individual pots, though many gardeners will choose to purchase a larger banana plant for more immediate impact. The planting hole or container should be just large enough to take them. Choosing Suitable Containers Do not be tempted to give a banana plant a larger container than it needs, as this can create problems with waterlogging. Instead, pot on into larger pots in spring every year or two, as the plant grows. Increase pot size by around 5cm at a time to begin with, then, once the plant is vigorous and well established, increase the container by around 10cm each time. Banana Plant Care Sunlight & Temperatures Banana plants need plenty of warmth and sun, wherever and however they are grown. “If you live in one of the warmer areas of the UK, you may find your outdoor banana plant getting impressively large – even too large,” adds Peter. “If so, you can cut it down to around 60cm with a sharp pruning saw in late spring or early summer.” In order to thrive (and potentially produce fruit in the case of some cultivars), they will need temperatures above 15°C for 9-15 months. Ideal temperatures however, are around 25-29°C. After this, a further 2-4 months will be needed for the fruit to ripen. Of course, these conditions cannot be met outdoors in the UK. Soil Requirements Though banana plants need a free-draining soil or growing medium, they also need to be watered well over the spring and summer months. Watering should be reduced in autumn, and you should only water when containers dry out during the winter months. Feeding Fertility should also be considered. Feed banana plants in the ground or containers with a general-purpose organic liquid plant feed every couple of weeks over the spring and summer. “Feeding with a high-potassium fertiliser can improve cold-hardiness in a range of tender plants, but this is only one of many tools needed to get them through the winter,” Peter says. If you wish to get fruits, feed with a potassium-rich feed (such as comfrey tea, for example) when flowers and fruits begin to form. Overwintering Though some cultivars can be grown outdoors, they will need some protection. It is best to wrap M. basjoo or other hardy banana plants if you plan on keeping them outdoors over the winter. “Large leaves can be cut off and dry straw can be packed around the stem, which can then be wrapped in hessian or horticultural fleece,” shares Peter. Tender banana plants should be brought indoors when temperatures drop below 14°C, as Peter explains further: “This can be challenging with their large size, so you can cut off the foliage and place them in a dormant state somewhere dark and frost-free.”
Learn more
Tomatoes In Hanging Baskets: A 9 Step Space-Saving Solution For Home Growing
IN THIS GUIDE Why Choose Hanging Baskets? How To Grow Tomatoes In Hanging Baskets 1) Choose Your Variety 2) Sow Your Seeds 3) Choose Your Hanging Basket 4) Line Your Basket 5) Prepare Your Compost 6) Plant Your Tomatoes 7) Hang Your Toms In Their New Home 8) Water Regularly 9) Harvest! Which Tomatoes Can You Grow In A Hanging Basket? Companion Plants For Tomatoes Let It All Hang Out! References There’s nothing tastier than a nicely ripened home-grown tomato. They’re juicier, stronger tasting, and more vibrantly coloured than the ones you find in supermarkets which – let’s face it – are sometimes bordering on anaemic. But how do you grow tomatoes in hanging baskets? What’s required to achieve your own tumbling cornucopia of juicy garden goodness? We’ve written this guide to answer all the questions you might have about growing tomatoes in a hanging basket. Learn how to grow your own bountiful harvest Why Choose Hanging Baskets? Not everyone with a green thumb has access to a garden, or even to an allotment or other shared gardening space. For those amongst us with balconies or whose front doors open right onto the street, the solution lies elsewhere. A hanging basket is a great space-saving gardening solution. You can grow a surprising amount in a compact space. You can hang baskets from purpose-built hooks mounted on walls, or from existing surfaces like beams, branches, rafters, and more. If you’re a more casual gardener and you don’t want to commit to hardcore gardening, hanging baskets are less prone to weeds and pests. Slugs and snails find it harder to reach the tasty morsels growing within, and although flying pests can find their way up, you can grow scented plants alongside your tomatoes to put them off. More on that later! How To Grow Tomatoes In Hanging Baskets Maybe you’ve not grown an edible hanging basket before? Fret not: It’s quick and cheap to set up, and it’s easy enough to be accessible for gardeners of any level. Here are nine steps to growing tomatoes in a hanging basket: 1) Choose Your Variety It’s important you choose a variety of tomato that is well suited to hanging baskets. Ordinary tomatoes such as ‘Gardener’s Delight’ are typically staked and will need support as they grow upwards, meaning they are not suited to growing in hanging baskets. Varieties that are best for hanging baskets include ‘Tumbling Tom’, ‘Hundreds & Thousands’, ‘Garden Pearl’ and more. These are bush or indeterminate varieties. For the purposes of this guide, we decided to grow ‘Tumbling Toms’, which are widely available here in the UK. 2) Sow Your Seeds Your seeds will need to be grown indoors in the UK – with February being the best time to get started. Tomatoes love a lot of light and a humid, moist environment, so a propagator with LED lighting will provide the best results. Sow multiple seeds per plug and thin these out as they begin to grow, choosing to spare the strongest seedlings. 3) Choose Your Hanging Basket There are tons of hanging baskets available to buy online. Many are semi-spherical and made of thin metal wiring. We recommend a basket of 35cm in diameter or above to give your tomato plants the space they need to grow. Choose a deeper basket too, if possible, as this will help with moisture retention – as long as your brackets are strong enough! In this example, we chose a wicker basket suited for indoor growing. 4) Line Your Basket Some baskets come with lining already. If your basket has a solid brown layer on top of the metal frame, for example, this is probably coconut coir (or fibre). If this is the case, you don’t need to add anything else. If your basket doesn’t come pre-lined, you can use a compost or soil bag that’s been cut to size. Make sure to add some small holes to give your tomatoes the chance to drain. 5) Prepare Your Compost Potting soil will do the trick here. Make sure it’s good quality. Preparing the compost can be as simple as checking you have enough to fit in your basket. A 35cm basket will hold just under 8 litres of compost and a 40 litre bag of potting soil will fill about five baskets. There are a few optional extras at this step, too. Each of these will give your tomatoes an easier time: Water retaining gel: This will allow water to be released more slowly than otherwise, ensuring your plants stay hydrated Rotted leaf mould: A natural alternative to the above. Slow-release fertiliser: To add a steady stream of nutrients to the soil while your tomatoes are growing. 6) Plant Your Tomatoes Here’s the main event! In this step, we’ll plant out the tomatoes into their lovely new home. Gently remove the tomato plant from its pot, along with the soil and roots. Tease the roots away from the clump of soil to prevent cramping and promote healthier root growth. Next, create a hollow in the soil with your fingers and pop the tomato inside. Firm up the soil around the roots, so that your tomatoes are firmly in place but not squashed. You can add more soil at this stage if needed. Tomato plants will do well if they’re planted reasonably deep, as they’re prone to put out strong roots. You can safely fit one or two plants into a 35cm hanging basket, although Master Horticulturist Peter Lickorish does not recommend this: “Besides other companion plants, one tomato plant is probably the maximum for most hanging baskets, unless the diameter is nudging 50cm, where a triangle of three could be planted.” 7) Hang Your Toms In Their New Home Use the chain or similar method of attachment to hang your basket – and take a moment to appreciate your handiwork. (You can also use this moment to make sure the hook is definitely strong enough to hold the completed basket..!) 8) Water Regularly Once planted, give your tomato plant a generous amount of water. The roots will be thirstiest at this stage, so you’re giving them the best chance of a healthy start in life. For the first week or so, we recommend watering your tomato plant every day. Also, keep an eye out for flowers, and add tomato feed once they begin to appear. Reapplying feed each week will give you healthy and delicious tomatoes in no time. 9) Harvest! Once your tomatoes are ready to eat, it’s just a case of picking them as and when you fancy. They last quite a long time on the plant so don’t feel rushed to pick your tomatoes. Generally, it’s better to leave them ripening on the plant than sitting in the fridge. However, they will ripen further after picking, if harvested early, and this may reduce the chance of fruit splitting. If it’s the first time you’ve grown your own tomatoes, savour each bite and enjoy how juicy and succulent they are. Which Tomatoes Can You Grow In A Hanging Basket? Regular tomato plants won’t thrive in baskets. For the best results, choose a cherry tomato variety. Tomatoes that lend themselves best to hanging baskets have been bred to tumble, meaning they don’t need to be supported while growing. Some types also crop earlier in the year than ground equivalents, meaning you can enjoy tomatoes for more of the year. Here are a few varieties to consider: ‘Hundreds and Thousands’: Sweet and noted to be particularly flavoursome by a trained panel of tomato tasters, this variety is a good bet for hanging baskets. Just understand that ‘thousands’ is a name, not a promise of yield. ‘Tumbling Tom’: Whether you choose ‘Tumbling Tom Red’, Yellow, or both, you can expect a flavourful and confident crop. Mixing the two varieties together gives the excellent potential for a particularly colourful display. ‘Maskotka’: Renowned for deep-red fruits that tumble elegantly over the sides of a basket, ‘Maskotka’ is a great choice for vertical gardeners. You can expect a fairly large yield, too, especially compared with some other types. ‘Garden Pearl’: The heart-shaped fruits win plaudits from the tomato-tasting panel who liked ‘Hundreds and Thousands’ so much. If you want a tomato with its own brand of visual interest, ‘Garden Pearl’ could be for you. Tomato plants will grow best in baskets when they’re planted in early summer. Frost can be fatal for fledgeling flowers, so planting them out when the weather is warmer gives the best chance for a healthy start in life. A hanging basket is more exposed to the weather than a plant in the ground, so if there are particularly chilly winds when you’re thinking of planting, maybe wait a few days. Companion Plants For Tomatoes You can add other plants to your hanging basket, too. If the intent behind your basket is to bring colour and visual interest to an outdoor space, there are aesthetic considerations. Plants with complementary colours will look great alongside your tomatoes. Oranges, yellows, and reds will create medleys of colour that are a pleasure to behold. If you’re motivated mainly by the culinary eventualities, though, then taste and scent considerations will probably be a priority. You can choose plants whose flavours work well with tomato when cooking. Basil, for example, or any of myriad salad leaves. In terms of scent, I will commonly grow French Marigolds alongside tomatoes grown outside, as these are a very good match. They carry the additional benefit of deterring flying pests, too. Let It All Hang Out! As you can probably tell, there are a lot of options when growing tomatoes in hanging baskets. You need to decide which variety to grow and whether to grow them alone or with other plants. You need to decide the best place to hang your basket, and the type of basket you want in the first place. Hopefully, after reading this guide, though, you’ll realise that the underlying methodology for growing tomatoes in baskets is simple. It’s quick, cheap, and the return on investment is potentially enormous. We hope you’ve found this guide useful, and that you enjoy many a bountiful tomato harvest from your newly planted baskets.
Learn more
Blackcurrant Bush Growing Guide For Summer Berries (And Keeping The Birds Away)
IN THIS GUIDE Overview Common Varieties Habitat & Growing Conditions How To Grow Blackcurrants Pruning Guidelines Propagation Common Problems Harvesting Container Growing Blackcurrants References Blackcurrant bushes make a tasty addition to your garden, producing a crop of deliciously sharp berries in the height of summer. As well as the famous berries, blackcurrant plants also produce aromatic foliage and small flowers which will attract pollinators into your garden. This woody shrub is native to northern Europe, and therefore fully hardy and easy to grow in the UK climate. If you’re short on space, some of the more compact cultivars can also be grown in containers. There’s really no drawback to adding this fruity little number to your garden, so read on for our full care and growing guide, for everything you need to know about successfully growing blackcurrants. Overview Botanical Name Ribes nigrum Common Name(s) Blackcurrants Plant Type Fruit Native Area Northern and Central Europe, North Asia Foliage Deciduous Flowers Small flowers followed by berries When To Sow February, March, October, November Flowering Months May, June, July, August, September When To Prune January, February, November, December The Ribes nigrum plant, better known as the blackcurrant, is part of the Grossulariaceae family.1 It is native to northern and central Europe, and northern Asia, and has been cultivated in Russia since the 11th century, and in Europe since the late 17th century.2 Today, blackcurrants are grown commercially in many parts of the world, including eastern Europe and New Zealand. The blackcurrant bush is a medium-sized, woody shrub, with broad, aromatic leaves of approximately 4cm, and racemes of small flowers. “I love the smell of Blackcurrant leaves almost as much as the taste of the fruit,” shares Master Horticulturist Colin Skelly. “Brushed past on a warm spring or summer day, the scent released takes me right back to my childhood. “I also leave my bushes unnetted but try to get a good harvest before I share them with the birds!” Flowers appear in spring and are followed by dark purple berries in mid-summer. Most established blackcurrant plants reach an approximate size of 1.5m in height and spread. Common Varieties There are many cultivars available, each showcasing different sizes, flavours and flowering times. Some popular cultivars include ‘Ben Connan’, which flowers early, and produces lots of large berries. ‘Big Ben’ is a good all-rounder, with easy-to-pick fruit, whilst ‘Ben Hope’ is hardy in unfavourable growing conditions. ‘Ben Sarek’ is a compact variety, suited to small gardens and container growth, and ‘Ben Tirran’ flowers late, which is great if you prefer to pick your berries in late summer. Many of the modern cultivars were developed in Europe in the 20th century, with the intention to build pest resistance and improve yields. The leaves, bark and roots of the blackcurrant plant have been used for centuries in traditional herbal remedies, whilst the tart berries are a popular choice for flavouring jams, desserts, juices and cordials (Ribena, anyone?). Habitat & Growing Conditions The natural habitat of blackcurrant is northern and central Europe and northern Asia. Thanks to its relatively cold natural habitat, the plant is hardy and can tolerate low temperatures – in fact, it requires a period of chilling in order to produce new growth in spring. The ideal growing conditions of the blackcurrant plant are a sunny or partially shaded spot, with moderate temperatures and moist, fertile soil. It likes to be sheltered from cold winds, and it is not drought-tolerant. How To Grow Blackcurrants Blackcurrant bushes prefer a position with full sun if possible, although they will tolerate partial shade – try to find an east, west or south-facing spot for them in your garden. Although the plant is hardy, it prefers to be in a sheltered location, away from cold winds. Soil Requirements Add garden compost to the soil upon planting, to get your plant off to the best start. As far as soil is concerned, blackcurrant will tolerate most types, but its preference is for fertile soil, and this has to be kept moist, but fairly well-drained. Planting The best time to plant blackcurrants is in late autumn or early spring – October and November, or March. Try to avoid planting in mid-winter when the ground is frozen. Multiple plants should be spaced 1-1.5m apart, depending on the variety; it is advisable to purchase young bushes of around 2 years in age. To plant a young bush, you should first clear the soil of weeds, and mix garden compost into the top layer. Bare root and container-grown plants should be planted 2cm deeper than previously, to encourage new shoots to grow from the base. If it’s a young plant and you’re planting in winter, you should also prune it back hard upon planting, to around 3cm above soil level, to further encourage new growth. Although this will prevent fruit production in the first year, it will help the plant in the long term. Watering & Feeding It will require watering during hot summers, or during periods of dry weather – although be careful not to overwater it. The plant flowers in spring, so you can add a general well-balanced fertiliser in late winter, to help it out, along with a layer of mulch, to assist the soil in retaining moisture and repressing weeds. Pruning Guidelines Blackcurrant plants should be pruned annually, as well as upon planting, to encourage plenty of new shoots for berries to grow on. The best time to prune a young bush is in autumn or winter. If the plant is growing well, you can get away with simply removing any weak or damaged shoots. However, if your blackcurrant bush is not proving fruitful, you will need to prune it back hard, to stimulate more growth. In this case, aim to trim at least half of the shoots back to ground level. For more established plants, you can conduct a light pruning at the time of berry picking. The main pruning should still take place in winter, when you can remove any dead or unproductive wood and weak shoots. If you’ve got an old blackcurrant bush that’s growing out of hand, prune it back hard, reducing the majority of branches to ground level, and leaving just a few young branches. The plant should recover well, in time. Propagation Hardwood cuttings can take a while to take root but are generally successful in creating new plants. Take cuttings from young, healthy shoots from the current season. Cut lengths of 20-30cm, making the cut just below a bud at the base. Dip the bottom of the cutting into a rooting hormone, and then plant it straight away into a container, or outside into a pre-prepared trench. If planting outside, make sure to choose a sheltered area, and use a garden compost dug into the soil. Plant the cuttings with two-thirds of the material in the soil, and add sand at the base. Keep the soil moist, and leave them to root until the following autumn. Common Problems Unfortunately, there are a few pests common to blackcurrant bushes. Blackcurrant Gall Midge One of these is blackcurrant gall midge, which affects the foliage of the blackcurrant bush in spring and summer. The larvae of these tiny, yellow-brown flies feed on the leaves, causing them to become distorted. Light infestations can be tolerated, and some cultivars, such as ‘Ben Hope’, are resistant. Blackcurrant Big Bud Mite Another pest to watch out for is blackcurrant big bud mite. These strike earlier, usually in late winter; they are microscopic bugs that suck the sap from embryonic leaves, causing buds to swell. Infested buds will usually not flower or produce foliage – remove infected buds as soon as you notice them. Currant Blister Aphid Currant blister aphid is another pest that can cause distorted, blistered and discoloured leaves, often turning them red or yellow. Infestations are most common from April to June. The plant can usually tolerate them, and it will not affect vigour or crop yield. Gooseberry Mildew Blackcurrants are also vulnerable to gooseberry mildew, which can cause white, powdery mildew to develop on foliage and fruit during summer, which turns brown in time. Good ventilation is key to preventing this, so try to keep plants well-spaced, and thin them out by pruning. Remove the ends of any affected material as soon as possible. Birds Birds are another consideration, as they like to eat most parts of the plant. Make sure to pick berries as soon as they are ripe, or else birds will take them all! If you can’t beat them to it, you might need to cover your plant with netting. Hot Periods Berries can be damaged by too much direct sun in hot periods, causing them to develop orange patches. Conversely, cold areas and late frosts can damage spring flowers – try to prevent this by choosing a sheltered spot in the garden for your blackcurrant bush. Harvesting You should pick blackcurrants as soon as the berries appear black and ripe. This will usually happen in July, but depending on the cultivar, can also occur anytime from late June through to August. To pick blackcurrants, you can either pick the berries individually, or in the case of modern cultivars such as ‘Ben Sarek’ and ‘Ben Hope’, you can cut off the berries in bunches, as soon as they’re ready. If blackcurrants are being grown commercially, they will usually be picked by machine, using a straddle harvester, which shakes the branches and strips the fruit from the shoots. It is perfectly fine to freeze blackcurrants – in fact, this is what you should do if you don’t plan on eating them within a few days, to prevent them from spoiling. Simply pop them in the freezer in a tub or bag; you can use frozen blackcurrants to make jams or puddings. Container Growing Blackcurrants Most blackcurrant plants do not do well in containers, due to their expansive size. However, there are some smaller, modern varieties that can be grown successfully in containers – these include ‘Ben Gairn’ and ‘Ben Sarek’. If you’re growing blackcurrants in this way, choose a large container filled with a soil-based compost, and feed your plant a liquid fertiliser every summer. The plant will need to be re-potted approximately every 3 years, in late winter, at which time you should trim the roots, and replace it in fresh compost. References 1. Blackcurrant – Ribes nigrum. (n.d.). University of Minnesota. Retrieved March 13, 2023, from https://trees.umn.edu/blackcurrant-ribes-nigrum 2. Ribes nigrum. (n.d.). Kew Royal Botanic Gardens. Retrieved March 13, 2023, from https://powo.science.kew.org/taxon/urn:lsid:ipni.org:names:792873-1
Learn more


