

Growing

Grow Spring Cabbage: Typically The First Vegetable You Can Harvest At The Break Of Spring
IN THIS GUIDE Overview How To Grow Spring Cabbage Growing Conditions Essential Varieties Other Varieties Common Problems Mildly flavourful and with a smooth, soft texture, Spring Cabbage or Spring Greens are a popular vegetable to grow at home. Early Spring Cabbage is more like a leafy green than like cabbage; the smooth, loose leaves are tender and sweetish. In fact, when picked in early spring the more apt name is Spring Greens because the vegetable is loose-leafed as it has not firmed up and developed a head (of whatever shape), which one expects in a cabbage. Even when picked late in the harvesting season this type of ‘cabbage’ does not have the solid heart that ‘cabbage proper’ does. Call it Spring Cabbage or Spring Greens, this crop will probably be the first fresh vegetable you will get, and that too at ‘break of spring’. Perhaps more of a rolled-up leafy green than a cabbage as such, it has a leafier, smoother mouth-feel and texture and does not have the crunchy succulence of cabbage, yet it usually has a stronger, sweeter flavour than most ‘cabbages proper’. Spring Cabbage leaves are a darker shade of greyish-green than those of the vast majority of ‘regular’ cabbage varieties. Varieties are mostly conical or egg-shaped but rounded forms are also available. Like all cabbages, they are a member of Genus Brassica which belongs to the Cabbage and Mustard Family (Brassicaceae). This includes vegetables like cauliflower and broccoli. Spring Cabbage varieties, as plants that mature over the winter, are very hardy plants. They have been and are much-valued in Northern Europe and Northern Russia where they are a key ingredient for a variety of springtime recipes. Overview Botanical Name Brassica oleracea (Capitata Group) Common Name(s) Spring Cabbage Plant Type Vegetable Native Area Cultivated Hardiness Rating H5 When To Sow July to August Harvesting Months March to May Lonely and rugged in the mist on chalky, limestone coastal cliffs – it is in such inhospitable and wild regions that Spring Cabbage’s ancestral parent grew and still grows, appropriately named ‘Wild Cabbage’ – the original Brassica oleracea. It also grows in the sandy, scrubby grassland found along coasts and shorelines. Wild cabbage in its native environment – chalky cliffs, salt, and sea-spray! Wild Cabbage is indigenous to Western and Southern Europe, including the British Isles. It is the (ultimate ancestral) parent of the Spring Cabbages listed underneath, and also of other cabbages and cauliflowers. How To Grow Spring Cabbage Sowing In July or August, sow Spring Cabbage seeds in the bed you have prepared or you may sow them in a seed module tray indoors. Late summer is a hospitable time to sow seeds outdoors; the reason that Spring Cabbage is typically started in a tray is to allow you to use your vegetable garden for other crops that you would harvest by September. Instead of the additional trouble and the usual (small) risk of transplanting seedlings to save only two months, and also to keep the soil fertile and nutrient-rich for this heavy-feeding vegetable, if you live in a region that is not overly blustery and not infested with cabbage pests, sow the seeds directly in the soil. Sow Spring Cabbage seeds 20-30cm apart, across and deep. This will allow you to thin the plants and choose the best ones, and also cover for seeds that fail to germinate and seedlings that do not thrive. The seed should be sown about 1cm beneath the soil. Watering & Feeding Water well after sowing. If you are getting some rain, drizzle the growing plants now and then. If the weather is dry soak the bed once a week or water well twice a week. Add some slow-release 10-5-5 fertiliser in January. Cold Protection You could cover seedlings overnight with horticultural fleece in the winter. You should also do so during frigid winter nights if you think your variety of Spring Cabbage is insufficiently hardy. As and when necessary you could also cover them up with the fleece for a short period during the day to prevent small birds from descending on your growing Spring Cabbage. Better yet, protect your seedlings and young Spring Cabbages with Agfabric or other garden netting. If you live in a blustery area compress the ground and protect the seedlings with a barrier made from horticultural windbreak netting. As the plants grow, you could also pack up some soil around the base of the stem. Thinning Out Thin the young plants on an ongoing basis. You can do so from one month after germination through to end-Winter. Ideally, you will eventually be left with growing plants that are 40-60cm apart but in fact, you will end up with a few plants only 25cm apart while a few others will be 75cm apart. Give preference to the clearly healthier plant regardless of spacing but if it is nip and tuck between adjacent plants, select for spacing. Experienced gardeners may wish to sow and germinate the seeds indoors in a seed module tray. If you do so, ensure that seedlings get enough sun, start hardening them after a month, and transplant selected seedlings in mid-late-October in an outdoor bed, first soaking it in water. Growing Conditions The habitat and growing conditions of Wild Cabbage, the (ancestral) parent of Spring Cabbage, are rocky cliffs and other coastal settings with limestone and chalky soil. This is very far from the habitat and growing conditions you will need for Spring Cabbage! Preferred Soil Spring Cabbage feeds heavily on nutrients in the soil so it needs very rich and fertile soil. The best soil would comprise of ’standard’ loam with organic manure and garden compost added. Soil pH should be right around neutral – 6.0 to 7.5. Aspect Prepare the bed one to two months before you will sow seeds (or transplant seedlings) of Spring Cabbage. The bed should be sited in a sunny spot. It should be well-drained but the soil itself should retain moisture. Soil should be firmed up; it should not be light or loose. Crop Rotation Do not plant any Brassica, that is Mustard-Family crops, in soil or land in which Brassica crops were grown the year before to avoid soil depletion. Such soil must be left fallow or recycled via crop rotation. Beans, peas, and other legumes are a top choice to alternate with Brassicas. “Such crops are ideally grown immediately before Brassicas, as they fix nitrogen in the soil, which is a nutrient which benefits the leafy growth of the spring green,” shares Roy Nicol, a Professional Gardener and Horticultural Consultant. Essential Varieties The following hybrids and cultivars are sequenced in an order that seeks to combine two criteria. Ease of growing and caring, especially for beginners, and classic or ‘proper’ Spring Cabbage attributes. ‘Durham Early‘ is a heritage variety of Mid-Nineteenth Century British origin. It is a tried and trusted variety. It has a classical conical shape and the dark green leaves are appreciated for both taste and texture. It produces sweet-tasting, tender Spring Greens as early as late February. A classic Spring Cabbage. ‘Winter Jewel F1‘ is a newer variety that is flexible and does dual duty. It is a proper spring cabbage in that you sow in autumn and harvest in spring. It produces dark, leafy Spring Greens early in the season but can be left to grow and it will ‘dense up’ into a proper head. It is very disease-resistant, but as with all cabbages, can be susceptible to the fungal infection club root. ‘Spring Hero‘ is one of the newer varieties and, unlike most Spring Cabbages, is a mini ballhead. In fact, it is very similar to regular cabbage in that it has solid heads with a crispy, cream-coloured heart, and like regular cabbages it does not need to be consumed soon after it is harvested. But like Spring Cabbages you sow seeds in August and harvest in March. ‘Advantage F1‘ is also a newer variety and also does dual duty, affording flexibility in sowing and harvesting seasons; thus, it reliably grows as not only a Spring Cabbage but also as a Summer or Autumn Cabbage. Left to mature it will grow a heart and become denser. ‘Wheelers Imperial’ is a British heritage variety dating to the mid-1800s. It is less loose and firms up quicker, producing conical hearts that are relatively solid but tender. The head can also be fairly dense. Leaves are dark green. This is another tried and trusted variety that overwinters very well. Hispi Cabbage ‘Hispi F1‘ is not exclusively a Spring Cabbage, having been developed for multi-season sowing. However, it is a remarkable hybrid that competes with and even outdoes the best of Spring Cabbages in the short time within which it is ready for harvest, and reliably so. It is of conical form, is robust, and is valued for its sweet taste. It is bolt-resistant. ‘Pixie‘ is of comparatively recent vintage but is not a new variety. It has a medium green colour and is smaller than average. It is more like a baby cabbage than Spring Cabbage. If not harvested early the leaves will become dense and it will grow a compact head. It is a little crisper than other Spring Cabbages. Other Varieties Innumerable varieties of Cabbage exist. In fact, Spring Cabbage is only one type or grouping of cabbage. This vegetable can be divided into five further main groupings: Summer Cabbage, Winter Cabbage, Savoy Cabbage, Red Cabbage, and Heirloom or Heritage Cabbage. Though each grouping has its own specific varieties, one variety may fall in more than one grouping. For example, Summer Cabbages, which are mostly ball-heads, include Stonehead, Golden Acre, Greyhound, Napa, and Hispi. And these are only the varieties that are well known and popular in Europe and America! Eastern Europe and Russia, for example, have other Summer Cabbage varieties. Many other, very different, varieties make up the other Cabbage groupings. Common Problems Spring Cabbage is susceptible to Cabbage root fly and Cabbage white caterpillars. You can guard against root flies by growing your crops under fine garden netting, which should also prevent cabbage white butterflies from laying eggs with the resulting caterpillars, but the netting should not touch the plants’ leaves. If you see caterpillars, pick them off to begin with. Instead of using Bacillus thuringiensis products on your food crop, try a homemade organic formula. Make a solution of vinegar and garlic by mixing one teaspoon of vinegar and two of garlic powder into a litre of water and spray on and around the cabbages. Prepare a more concentrated solution if necessary.
Learn more
How To Grow Sorrel: Why This Versatile Herb Is Best Grown Close To The House
IN THIS GUIDE Overview How To Grow Sorrel Sorrel Ongoing Care Common Problems References Sorrel may have been flying under your Herbs-and-Spices Radar but once you grow and use this very versatile herb, it will stay on your radar for a long time. This plant is not difficult to grow, it is quite easy to care for, and you can use it for soups, salads, and sauces, and even as a leafy vegetable. If you’re into multi-cultural cuisine and like to prepare dishes from all round the world, the herb you have to have is Sorrel, sometimes incorrectly called ‘Dock’. Unlike rosemary, thyme, and such, Sorrel is what you make of it – or, in fact, what various nations make of it. There’s one word that best describes this tangy-citrusy leaf: versatile. It can be a veggie, an appetiser, a soup, a salad, a sauce, and…well, a herb! Overview Botanical Name Rumex acetosa Common Name(s) Sorrel Plant Type Herb / Perennial Native Area Europe / Central America Hardiness Rating H3-H7 Foliage Some retain leaves all year Flowers Tall spikes reddish flowers When To Sow February, March, April, May, June, July, August Rumex of some species or another occurs in nature from Sub-Tropical to Tundra Zones. Rumex arcticus grows in the Arctic and is relied upon as a foodstuff by many people who live there.1 Rumex vesicarius is likewise used as a culinary ingredient except that it grows in the heat and dust of India.2 Many other Rumex species grow wild in forests, fields, meadows, roadsides, and poor and gravelly land virtually through the length and breadth of all continents. Sorrels, therefore, span the gamut of Hardiness Zones. Though most prefer full sun, a few varieties grow in partial shade or even full shade. Rumex acetosa is a perennial and is hardy in RHS Zones H3-H7 (USDA Zones 3 to 9) – making most varieties suitable for all areas of the UK. The majority of Rumex species are invasive to some or another degree and many, particularly R. acetosella or Sheep Sorrel, are considered weeds in North America. How To Grow Sorrel R. acetosa, R. scutatus, and R. sanguineus are available through many sellers, brick-and-mortar nurseries as well as online. Other species of sorrel may be harder to find at nurseries. However, many Sorrels can be propagated by root division. If you allow the flowers to wither and go to seed, you will automatically get new Sorrel plants. These plants spread rapidly and can be hard to control – to prevent them from spreading, cut off the flower stalks – a side benefit will be the renewed production of the useful part of the plant, the foliage. “I recommend growing sorrel near the house where you can easily harvest leaves and cut off any flowering stems that appear,” says Dan Ori, a Horticultural Consultant. “Don’t underestimate one flower’s ability to propagate numerous plants; I would advise cutting off any flower stalks that appear and, if you wish to propagate new plants, the safest way is to divide.” Growing From Seed Prepare a bed with a good mix of soil that is organic but not rich. It should have good drainage and be in a sunny location, preferably full sun. Plant R. acetosa or Common Sorrel seeds in April, sowing them 15-20cm apart and about 1cm under the soil. Keep the soil moderately moist. After the plants germinate, water them in moderation twice a week though in an area with ample rainfall you may not need to water them for days on end. Sorrel Ongoing Care As the plants grow, you may need to thin them if they were planted too closely. Weed the bed as you would for any other plant. Overwintering As a perennial, Sorrel will become dormant in the winter but will re-emerge in spring. As a cold-hardy plant, Common Sorrel varieties do not need protection but it would be wise to lightly cover or mulch it with organic compost if you anticipate frost. Propagation Besides growing from seed, Common Sorrel may be propagated by dividing the roots. Other Sorrels may be grown in the same way with minor variations; after all, Sorrels are easy-grow and no-care plants. As for plant care, if there is one thing that Sorrel doesn’t need and doesn’t even want, it is TLC treatment. Indeed, it can be said that Sorrels flourish on neglect. Common Problems Sorrels, growing as they do wild in nature all around the world, are tough and robust plants and in general are worry-free. The only problem you need to keep an eye open for are slugs and snails, which are not too difficult to repel or eliminate. Infrequently Sorrels get attacked by aphids or leaf miners. Sorrels are disease-resistant plants. References 1. Rumex arcticus Arctic. (n.d.). Plants for a Future. Retrieved March 24, 2023, from https://pfaf.org/User/Plant.aspx?LatinName=Rumex+arcticus 2. Rumex vesicarius. (n.d.). India Biodiversity Portal. Retrieved March 24, 2023, from https://indiabiodiversity.org/species/show/266390
Learn more
Shallots Are Different From Growing Onions And Need Their Own Plant Care Regimen
IN THIS GUIDE Overview Why Grow Shallots? How To Grow Shallots Harvesting Common Problems References Although they’re similar, shallots and onions lend very different nuances to dishes. Whereas onion brings a distinct heat, shallots offer something sweeter, and more delicate. If you’re already familiar with shallots you’ll know how much they can bring to your cooking, and if not, then now’s the time to get acquainted. Overview Botanical Name Allium cepa var. aggregatum Common Name Shallots Plant Type Vegetable / Bulb Native Area Central & South-West Asia Hardiness Rating H4-H5 When To Sow January, February, March, April, November, December Harvesting Months July, August You may be wondering, are shallots onions? Technically they are, as they’re a member of the same botanical family.1 But in terms of the vegetable we commonly refer to as “an” onion, there are a few key differences – Size – shallots weigh in a lot smaller than onions, usually around 20g a piece compared to over 100g per onion. Shape – onions are round, but shallots can come in elongated oval shapes. You do get round shallots as well, however. Flavour – shallots and onions bring very different characteristics to a dish. If you’re looking for a gentler, sweeter variation on the onion theme, then shallots are for you.2 Why Grow Shallots? When it comes to gardening, shallots are easy to grow and perfectly suited to British gardens. There are plenty of varieties, too, meaning you can choose the one(s) best suited to your gardening skills and eventual culinary plans. How To Grow Shallots Like most vegetables that have become staples in British cuisine, shallots are easy to grow here. They’re not fussy about soil type, location, or anything else. One day, all this could be yours Planted properly and with a vigilant eye, you should have no problem between sowing and harvesting your crop. Where To Grow For best results, try to find a spot with moist but well-drained soil that gets full sunlight during the day. You can use a rake to get particularly big lumps out of the top layer of soil just before planting: this will reduce obstruction for your growing shallots, helping them to grow better. Planting You have two choices when growing shallots: to grow from seed, or from sets. Seeds don’t need an introduction, but if you’re not familiar with sets, they’re bulbs that haven’t reached full maturity, and which can be planted out to start a new crop. Received wisdom when growing shallots is that starting from sets is easier and, usually, will lead to a better harvest. This is because they mature more quickly, are more resilient to cold, and are less appealing to garden pests. When sowing your shallot sets, you’ve got a wide time window to work with. You can sow any time between mid-November and mid-March. From seed, you’ve only got mid-March to mid-April to work with. You’ll want to plant your sets in rows at least 40cm apart, with individual sets between 25-30cm apart in each row. This may seem like too much space when you plant them, but it gives the set space to mature and flourish without disturbing nearby growth. Planting shallots is easy: just poke the set gently into the ground so that the tip is just visible, then pat down the topsoil to keep them secure. Fertilising Before planting your shallots, fertilise the ground where they’ll be planted with one or two buckets of compost, manure, or similar. Then, after planting, add a small amount of fertiliser to the topsoil. Watering Shallots thrive when they get 2-3cm of water per week, especially at the height of growing season. Unless you’ve had an unusually dry spell, they should be OK with minimal watering. Using a rain gauge to check is one way to be sure they’re getting enough. Harvesting Because of the long planting season, you can harvest shallots at different times of the year. Generally, shallots planted in autumn will be ready to harvest early the following summer, and those planted in spring should be ready when autumn rolls around. “I live in an area with relatively mild winters and shallots tend to do better over winter than when planted in spring,” shares Master Horticulturist Colin Skelly. “I expect this would be different in colder winter regions and that hotter, drier summers in the southeast would also produce a better spring-planted crop.” Expect to wait around 90 days. You can tell when your shallots are ready to harvest because the vibrant green foliage starts to wither, turning brown and drying out, then, eventually, drooping down from their previously erect stature. When they’re ready to pick, gently remove your shallots from the ground. You can do this by hand or by using a fork or similar implement to shimmy them out of the soil. It’s easiest to harvest when the soil is dry, so unless you’re forecast for a lot of rain, wait until the weather is conducive. Storage We figure you’re not planning to eat your entire harvest in one go, so unless you’re feeling generous and intend to give them all away, you’ll need to learn about shallot storage. The first step is to dry them out – the ideal way to achieve this is by leaving your harvested shallots on top of the soil they came from for a couple of days, so they can dry out in the sun. If wet weather is forecast, leave them to dry indoors instead. Then, once dried, trim any remaining foliage from the top of your shallots, and store them in a cool, dry place. Stored properly, you can expect your shallots to keep for at least two months. If they start to look mouldy or dishevelled, or they begin to sprout, this can indicate that they may have passed their best. Common Problems Shallots are prone to a few problems, but by staying vigilant and familiarising yourself with the risks, you should be able to avoid anything particularly disastrous happening. As a general rule, try to keep the foliage on your shallots dry when watering them. Lots of the common problems they face arise from getting wet and staying damp. Weeds Any gardener knows that weeds will find their way into pretty much any part of your garden, whether ornamental or edible. And while shallots are no exception to this avarice, you can grow them beneath weed suppressing membrane to reduce the chance of invasion, and effort required to hold an invasion at bay. Shallots will grow stronger and healthier if kept free of weeds, so try your best to keep on top of the weeding. Birds Inquisitive beaks love nothing more than to pull up bulbs in an attempt to determine whether they’re edible. If they are, say goodbye to your bulbs. And if not, don’t expect the birds to plant them again for you. To stop potentially disruptive bird visitations, grow your shallots beneath a layer of netting. Birds won’t be able to get a purchase, but the plant will still get enough sunlight and moisture – win-win! Onion White Rot This fungus damages the above-ground foliage as well as the roots and bulb, causing a lot of damage to your fledgling shallots. Unfortunately there’s no cure for infected soil, so be very careful to plant your shallots in fresh soil, or in spots you’re certain are free of infection. Onion Mildew This is another fungal disease which can wreak havoc upon foliage and bulbs. Unlike white rot it’s possible to curb the damage in an infected plant by removing affected areas, but you need to act early to avoid too much damage. Onion mildew is particularly prone to affect shallots growing in overly-damp conditions – an important reminder to only water when necessary, to only water the soil (rather than the entire plant), and in allowing proper drainage. References 1. The Editors of Encyclopaedia Britannica. (1998b, July 20). Amaryllidaceae | Definition, Examples, Foods, & Facts. Encyclopedia Britannica. Retrieved March 23, 2023, from https://www.britannica.com/plant/Amaryllidaceae 2. Anderson, P. (2019b, October 19). Yin and yang: what’s the difference between a shallot and an onion? The Guardian. Retrieved March 23, 2023, from https://www.theguardian.com/food/2019/oct/20/yin-and-yang-whats-the-difference-between-a-shallot-and-an-onion
Learn more
Easy To Grow And Bountiful Yields - Here's How To Grow Carrots Successfully
IN THIS GUIDE Overview Carrot Varieties Why Grow Them? How To Grow Carrots Where To Grow Them How To Plant Carrots Propagation References Carrots are cheap, versatile, and delicious. Originally hailing from Asia and since taking the entire world by storm, carrots can be found at the heart of almost every global cuisine.1 Whether used as a centrepiece in a salad, or as an aromat, like in a mirepoix at the heart of a rich spaghetti Bolognese, carrots bring a unique and distinct flavour to any dish they grace with their presence. “Although biennial, this plant has a delicate lacy flower that changes in colour from white to red once it’s completed flowering, turning inwards,” says Garden Designer Anca Panait. “It self-seeds and is best used in naturalistic wild combinations along grasses, chicory and cornflower.” They’re easy to grow, too – as you’d expect from a plant which has been a staple in cuisine around the world and within all socioeconomic levels for generations. Getting carrots established in your garden requires minimal time and effort, and practically guarantees a bountiful harvest. This guide will tell you everything you know to get your carroty cornucopia overflowing. Overview Botanical Name Daucus carota subsp. Sativus Common Name(s) Carrot Plant Type Vegetable Native Area Europe, South-West Asia Hardiness Rating H2 Foliage Rosette of edible leaves When To Sow March, April, May, June, July These root vegetables, most often orange but also available in an exciting array of other colours, are formally known as Daucus carota subsp. sativus. They hail from the Umbelliferae family, making carrots close genetic cousins to celery, parsley, and other such aromatic plants.2 The name ‘carrot’ derives from the ancient Indo-European word ker, meaning horn: Implying that their most identifying characteristic is a vague resemblance to an animal’s horn.3 Carrot Varieties Most people think of the standard orange carrot when the vegetable is mentioned. These are far and away the most commonly encountered carrot here in Britain, but don’t let that fool you into thinking it’s your only option when growing your own. “I love growing Daucus carota ‘Dara’,” says Horticulturist Ann-Marie Powell. “It is such an amazing plant for growing in pots.” Growing carrots at home gives you access to many exciting varieties in an array of colours that will impress your friends and liven up your cooking. Below we’ll introduce a few of these, along with the only carrot to receive the Royal Horticultural Society’s Award of Garden Merit. D. carota ‘Flyaway’ ‘Flyaway’ is a proud recipient of the RHS Award of Garden Merit: recognition that it grows exceptionally well in the UK.4 These compact orange carrots pack a sweet punch, and are a fantastic introduction to gardeners looking to grow their own carrots. They enjoy full sun, a west- or south-facing aspect, and shelter. In terms of soil, they won’t thrive in chalk, but aren’t fussy with pH. D. carota ‘Purple Haze’ Jimi Hendrix sang about purple haze, but it’s unlikely that song alluded to the joys offered by carrots. While this variety probably won’t make you want to kiss the sky, it will make a fine introduction to growing carrots that aren’t orange. The bold purple colouration is even brighter when you peel away the skin, making these great for cooking. ‘Purple Haze’ enjoys the same growing conditions as ‘Flyaway’, but avoid clayey soil as well as chalk. D. carota ‘Nutri-Red’ Here’s another variety offering a slightly different colour to the default orange. The red tint found in ‘Nutri-Red’ intensifies when cooked, giving an exciting visual element to any dish that contains them. Conditions are the same as ‘Purple Haze’. D. carota ‘White Satin’ We’ve had orange, purple, and red – why not white? These carrots are low in carotenoid, the chemical that gives carrots their familiar hue, making them great for people with allergies, or for people just wanting yet another colour of carrot to play with when cooking. Why Grow Them? While carrots are cheap to buy, growing your own is fun and rewarding. They’re easy to grow, making them a great introduction for fledgling gardeners. They’ll last a long time once harvested, giving you a plentiful supply of carrots to use in your kitchen. How To Grow Carrots The first step when growing carrots is to prepare the soil, to ensure their roots can grow unobstructed into the ground. You’ll want to till about 30cm of topsoil, taking care to remove rocks, clumps, and other obstacles. “My top tip is not to apply manure to the soil you grow roots like carrots, as it can cause them to grow misshapen normally with multiple tap roots,” says Dan Ori, a Horticultural Instructor. “This misshaping of roots is called forking.” If it’s not possible to till this much soil because of obstructions, consider growing our carrots in a raised bed. “Carrots can be grown outside year-round, but they will need some protection from frost,” adds Dan. “You may get away with just horticultural fleece, but something more substantial might be required if you expect snow. “The soil will need to be warm for seeds to germinate, but the plants themselves can normally survive during winter. “My favourite thing is to sow carrots between 12-20 weeks before Christmas, then on Christmas day, like an excited child running downstairs to open their presents, I run into the garden and pull up my carrots to prepare for Christmas dinner. “Plant out 4-10 weeks before the last frost of spring for harvests throughout the summer and autumn.” Where To Grow Them Grow your carrots in a spot with well-tilled soil, full sun exposure, shelter from wind, and with a south- or west-facing aspect. Make sure the soil is loamy (a small amount of sand is tolerable, but avoid chalk or clay). How To Plant Carrots Simply sow seeds into the soil you’ve just tilled. There’s no need to start carrots off indoors, and this disruption to their roots can actually hinder their growth. Use a dibber to make holes about 1-2cm deep and 5-8cm apart, then place a carrot seed in each and cover back over. Grow carrots in rows, with about 30cm between rows. This spacing will give each carrot space to thrive – remember that while this may seem like excess space for the slim carrots you’re familiar with in the supermarket, the ones you grow will likely be much less consistent in shape and size. Leaving enough space lets carrots grow into whatever shape they desire. Home-grown carrots don’t conform to artificial supermarket norms Propagation Lots of kids will tell you that if you cut the top bit off a carrot and place it in shallow water, the shoots on top will grow. Many parents have used a tupperware box with a carrot top in water vainly trying to grow into a new plant as a mini science project to demonstrate the principles of propagation to their children. In terms of propagating carrots at home, however, this is as close as most people get. Because adult carrots don’t produce easily-gettable seeds, the most viable option for growing carrots next season is simply to buy another packet of seeds. References 1. Praciak, A. (2015). Daucus carota (carrot). CABI Compendium. https://doi.org/10.1079/cabicompendium.18018 2. Family Album: Carrot. (n.d.). Wild Flower Finder. Retrieved March 14, 2023, from https://wildflowerfinder.org.uk/Menu2/Family/FamilyInfo/Info_Apiaceae.htm 3. Origin and meaning of carrot. (n.d.). Etymonline. Retrieved March 14, 2023, from https://www.etymonline.com/word/carrot 4. Daucus carota “Flyaway.” (n.d.). Royal Horticultural Society. Retrieved March 14, 2023, from https://www.rhs.org.uk/plants/139299/daucus-carota-flyaway/details
Learn more
Plant These Vegetables In August Says Kitchen Gardener Stephanie Hafferty
IN THIS GUIDE 1) Chicory 2) Radish 3) Lettuce 4) Cabbage 5) Turnips 6) Overwintering Onions 7) Green Manures 8) Bonus Crop: Strawberries Go Forth & Garden References August may not seem like a month to plant crops. At the heat of summer, it’s the time you’d expect to be out in the fields – or, more likely, the garden – harvesting the fruits (and vegetables) of your spring labours. In fact, in native cultures of the Canary Islands, August is called Beñesmer – a word that signified the annual harvest festival and held tremendous importance in their annual calendar.1 If you’ve found this article, though, you’re probably aware that you can actually plant things out this late in the year. A selection of quick maturing veggies, for example, along with rooted strawberry runners and various green manures. In this article we’ll dig a little deeper into each (if you’ll pardon the pun), telling you what you need to know about planting out crops in August. “At this time of year, I am sowing plants for cropping during autumn and over winter, including cabbages, kales, chard, spinach, radishes, salads, mustards and overwintered onions,” shares Organic, No-Dig Gardener Stephanie Hafferty. For the enthusiastic gardener trying to shoehorn a few more plants into their annual growing schedule, vegetables are a more rewarding August avenue than fruits. You’ll see the best results if you live in the south of England or in a region elsewhere with an equivalent climate. Folks in the northern reaches of Scotland, for example, may not see as much growth (or any at all), so keep this in mind before you build your hopes too high. 1) Chicory This member of the dandelion family isn’t a frequent fixture in our kitchens, but it is a surprisingly versatile ingredient. Chopped and raw it makes a fine (if bitter) addition to salads. Grilled or poached it provides an interesting starter or accompaniment. And you can even use the dried and grounded plant as a coffee alternative! Sowing season for this intriguing plant ranges from April to August, depending on the variety, so double-check you pick up the right seeds for the job. Then find an open site with full sun or mixed shade, with well-draining soil. 2) Radish These bright red mustard relatives bring a distinct and delicious crunch to any dish that includes them – most usually salads. If you enjoy a slightly peppery flavour without threatening the integrity of your taste buds, then a home-grown bushel of radishes is just the ticket. August is the tail-end of the long radish sowing season, which begins in February. Both summer and winter cultivars can be sown in August, as it’s the end and beginning of their seasons, respectively. Find a spot with well-draining soil and watch your radishes shoot out of the ground. You’ll be surprised at how quickly they mature! “Radishes are a great fast crop, perfect for an August sowing,” shares Master Horticulturist Colin Skelly. “Winter radishes will stand longer as the weather gets colder, so a sowing of both now will keep you in radishes well into autumn.” 3) Lettuce There are myriad different types of lettuce, each with its own distinctive appearance and quality of crunch. Many varieties lend themselves well to planting in August (or even September!) although there are a few things to keep in mind. Firstly, check that the variety you’ve got is suited to sowing this late in the year. If it is, plant out seeds in a spot that gets full sunlight, and where the soil can retain moisture. Then, from September onwards, cover your seedlings with a closed cloche to prevent chilly weather or persistent pests from wreaking havoc on your baby lettuce plant. 4) Cabbage One of our unsung kitchen heroes, the humble cabbage has been pushed out of the limelight by other, trendier vegetables. Things like butternut squash, sweet potato, asparagus, and even kale now feature more prominently in recipes than this mainstay of British gardening. But if, like us, you know just how delicious and versatile cabbages are, then you need to know that you can plant them in August, giving yourself another opportunity to harvest a crop before the year ends. You can either take the traditional approach of sowing cabbages in a seedbed then transplanting to your veg bed when they’re ready, or plant them straight into the veggie bed. If the former, your cabbages should be transplanted to their final spot in September or October. 5) Turnips August marks the end of the growing season for the humble turnip, another vegetable whose prominence has waned in recent years. There’s a reason turnips were a staple in British cuisine, though. These sweet and earthy veggies are tasty and versatile in equal measure, working just as well in rustic recipes as fine dining ones. Maincrop turnips can be sown until the middle of August, and turnip tops can be planted out in August or September. Simply pop the seeds a centimetre or so into the soil, and wait. 6) Overwintering Onions You’ll be hard-pressed to find a cuisine that doesn’t have onion in a fairly central role. This vegetable is the head honcho of a family of plants that includes garlic, chives, shallots, leeks, and a bunch of other ingredients that impart flavour and interest into literally thousands of recipes. Growing your own onions is a way to ensure a regular supply, and a depth of flavour that simply blows away anything you’ll find at the supermarket. You’ll be amazed at how piquant and flavourful a freshly-chopped onion from your garden can be. It may very well change the way you cook. Over the years many onion cultivars have popped up, many of which are well-suited to growth in August, and even later in the year. 7) Green Manures Mustard is a popular green manure “What’s green manure?” you may be asking. These handy plants are favoured by gardeners as a way to cover bare soil whilst it’s not being used for growing. They grow quickly, prevent as many weeds from being able to grow, and help to avoid soil erosion. Then, when you’re ready, you can dig them into the ground where they’ll break down and replenish the soil nutrients. In short, they’re something of a miracle cure for tired and bare sections of your garden. Italian Ryegrass This hardy winter annual has plenty of benefits for your garden. It’s easy to grow, firstly. It’s less bulky than some other green manures, while being just as effective at drowning out weeds. The long and sturdy roots are good at pulling nutrients from deep in the soil, meaning that when you work it back into the soil later on, the nutrients are more readily available to the short routes of fledgling plants. This green manure is noted for its ability to pull nitrates from soil, meaning you can incorporate it into a crop rotation by planting something that’s hungry for nitrates into the treated soil. Crimson Clover This green manure pairs especially well with Italian ryegrass, with a 75:25 ratio considered to be most effective at creating a balanced soil. Spreading crimson clover seeds over bare soil in August and leaving them to grow until November or December, before working them back through the soil, will improve conditions and strengthen the plants you grow next season. 8) Bonus Crop: Strawberries Not a plant that has ever been considered a vegetable. But done properly, planting out your rooted strawberry runners should pave the way for a bountiful harvest of many fruits later down the line. If you’re not familiar with rooted strawberry runners, let us fill you in. This is a way to propagate a strawberry plant which involves isolating a runner – the tendrils that emerge from the main plant – and encouraging it to put forth its own root system. It’s possible to tame these tangled tendrils The runners are the red stems in the picture above, sprouting forth from the mature plant. When the runner finds a suitable spot in the soil it puts forth its own roots, spreading the plant and extending its capacity to fruit. If you capture one of these tendrils and use an upside-down U-shaped piece of wire to hold it in place over a pot of soil, the leaves at the end of it will eventually send out roots. Once the root system is strong enough to support the fledgling plant, you can cut the cord linking it to its mother. Then the young strawberry plant is ready to be planted out, soon to be its very own bush! Go Forth & Garden There you have it: eight plants suited for planting out in August, a month that many people would write off as harvest season. After reading this guide, though, you can now count yourself among the hallowed few who know that August is still a time for sowing, further increasing the size of your total annual harvest. It’s our hope that you now feel inspired and able to get some last-minute growing into your gardening calendar. Enjoy, and good luck! References 1. The history of the Canary Islands natives. (2020, September 17). Hola Islas Canarias. Retrieved March 27, 2023, from https://www.hellocanaryislands.com/experiences/the-history-of-the-canary-islands-natives/
Learn more
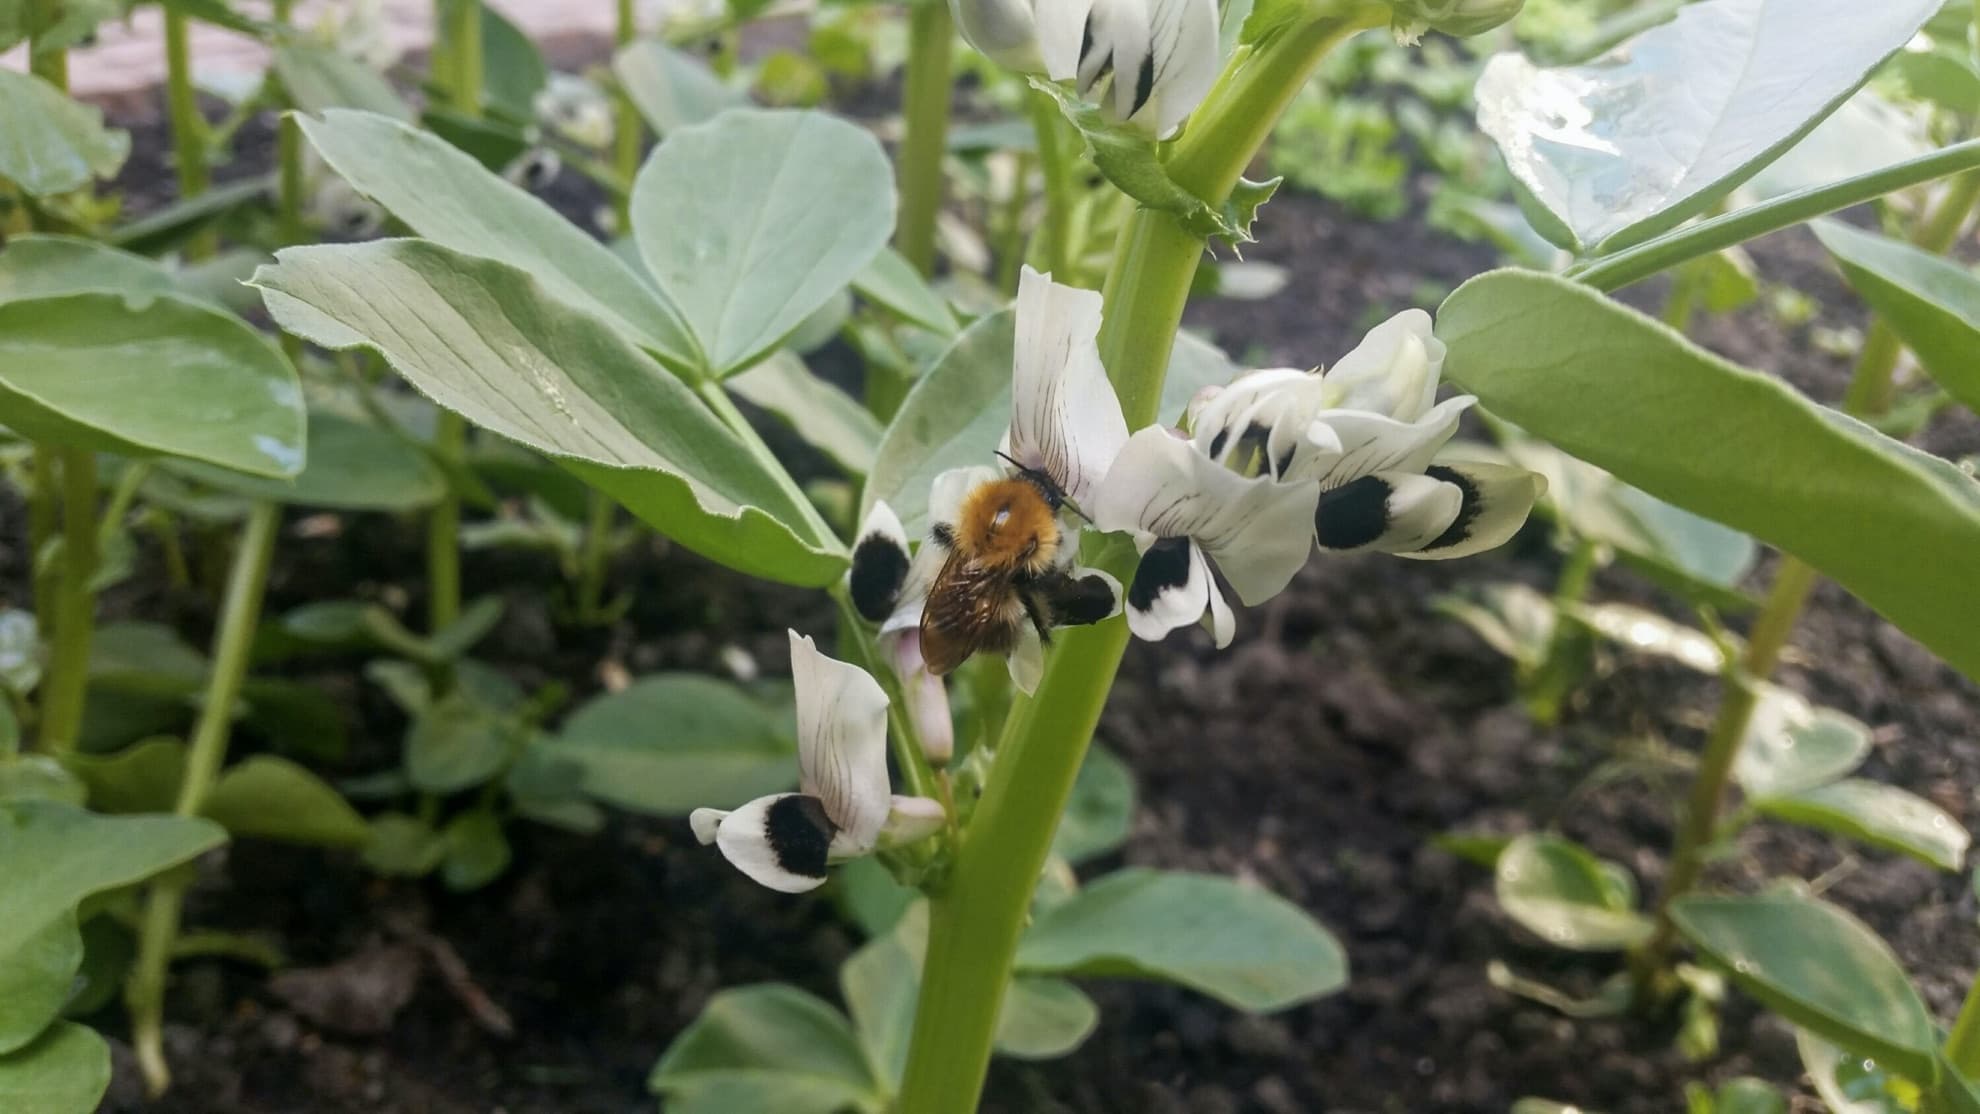
8 Wholesome Vegetables To Plant In September According To Horticulturists
IN THIS GUIDE Improving Soil Fertility 1) Broad Beans 2) Garlic 3) Kale 4) Onion 5) Radish 6) Spinach 7) Turnip 8) Winter Lettuce References Planting a selection of overwintering vegetables in September will reward you with a bountiful harvest come springtime. As soon as the cold snap sets in from November onwards, you can kiss goodbye to any growth in your vegetable patch. That doesn’t mean you should shut up shop after summer, however; taking the time to seed overwintering vegetables in September will give them a good window to establish themselves before winter begins, meaning they’re well-placed to flourish when the temperature starts to rise once more. Ironically, many vegetables that are considered “winter” varieties – like brussels sprouts, leeks and parsnips – require planting earlier in the calendar, which catches out a clutch of novice gardeners every year.1 If that sounds familiar, don’t worry – there are still plenty more overwintering options to choose from that will reward your autumn diligence with a delicious bounty come the following spring. Indeed, September is not too late to reap the benefits of a late harvest in the same year if you opt for faster-growing varieties among your selection. Improving Soil Fertility As well as salvaging the last growth of the current year and getting a jump on the coming one, planting winter vegetables is also a great way to provide protection and nutritional benefits to the soil in December, January and February.2 Even if you don’t end up opting for vegetables, it’s an idea to cover bare areas with green manures like crimson clover or Italian ryegrass, which will improve the soil’s texture and enrich its nitrogen content. However, the same job can be done by vegetables while simultaneously providing a supply of food for your household, so we’d personally favour going the latter route every time. Here’s a handful of suggestions to get your autumn planting odyssey underway, along with a few pointers on how to handle them in order to produce the best results possible. 1) Broad Beans BOTANICAL NAME: Vicia faba RECOMMENDED VARIETIES: ‘Aquadulce Claudia’ HARDINESS RATING: H5 WHEN TO PLANT: SEPTEMBER – NOVEMBER Depending upon the variety of bean you go for, you can either plant Broad Beans in the autumn or the following spring. However, we prefer opting for an overwintering strain such as Aquadulce Claudia and getting your hands dirty in September (or even as late as November). This will help to provide coverage and protection to a soil that would otherwise be at the mercy of the elements through the most extreme parts of the year. Broad bean seeds should be sown at a depth of around 5cm, with spacing of approximately 15cm between plants and 45cm between rows. You should also provide support for your beans in the shape of stakes and twine, since the buffeting blasts of wintry winds can overwhelm them. 2) Garlic BOTANICAL NAME: Allium sativum RECOMMENDED VARIETIES: ‘Cristo’, ‘Germidour’ HARDINESS RATING: H4 WHEN TO PLANT: LATE SEPTEMBER – NOVEMBER Since garlic cloves require around six weeks of cold (below 10°C) temperatures to multiply into a bulb, they’re the perfect vegetable to plant in autumn. In fact, it’s possible to plant them at any point between September and spring, though you’re likely to receive a better yield if you get them in the ground sooner rather than later. Resilient and resourceful, garlic is among the easiest overwintering vegetables you’ll come across. Simply stick a clove in the soil and a bulb will take its place with minimal input from your side. Child’s play! The biggest potential obstacle to a hearty harvest come springtime is waterlogged soil, so if your home is in a particularly wet part of the UK, it might be an idea to plant the garlic in raised beds so as to allow plenty of opportunity for the moisture to run off. 3) Kale BOTANICAL NAME: Brassica oleracea var. sabellica RECOMMENDED VARIETIES: ‘Black Magic’, ‘Starbor’ HARDINESS RATING: H7 WHEN TO PLANT: AUGUST – SEPTEMBER Kale is one of the more under-appreciated members of the vegetable kingdom. Its extreme hardiness makes it incredibly simple to grow, requiring next to no maintenance and brushing off the inclemency of the British winter with ease. Larger varieties of kale will even produce edible yields all the way through the calendar year, with a single plant providing enough weekly sustenance for one person. However, it’s when springtime rolls around that this leafy green vegetable really comes into its own, with leaves the size of sheaves and vibrant foliage that’s really quite aesthetically pleasing. 4) Onion BOTANICAL NAME: Allium cepa RECOMMENDED VARIETIES: ‘Radar’, ‘Electric’ HARDINESS RATING: H4 WHEN TO PLANT: SEPTEMBER – MARCH Onions are such versatile ever-presents in the kitchen that esteemed Chilean poet Pablo Neruda famously penned a poem about them.3 While most onion sets are normally planted in springtime, there are many varieties (like Radar or Senshyu Yellow) which lend themselves well to seeding later in the year. For best results, plant them in modules with up to 10 seeds per module, spacing them at a distance of 25cm between each other and 30cm between rows. When it comes to harvesting in May, simply rip the whole lot up by their foliage and trim their ends to roughly the same length. Hey presto! Homegrown onions made easy. 5) Radish BOTANICAL NAME: Raphanus sativus RECOMMENDED VARIETIES: ‘Daikon’ HARDINESS RATING: H3 WHEN TO PLANT: JUNE – SEPTEMBER For those gardeners who want to squeeze one last harvest from the year before winter begins in earnest, a September seeding will see you feasting on radishes before October is over. Most varieties of this rapid-growing little specimen will go from seedling to sprouting to finished article in under a month, meaning it’s a great option if you prioritise a quick turnaround time on your produce. Radishes are also very versatile and can be incorporated into salads, roasts or even solo as a standalone snack. Their peppery punch and crispy crunch make them a favourite among culinary enthusiasts, while their laid-back, low-maintenance growing demands ensure they’re equally popular among the horticultural community. Plant them at 2.5cm intervals and with 1cm depth of soil and you’ll be snacking on these tasty autumn vegetables in next to no time. 6) Spinach BOTANICAL NAME: Spinacia oleracea RECOMMENDED VARIETIES: ‘Giant Winter’ HARDINESS RATING: H4 WHEN TO PLANT: MARCH – SEPTEMBER Spinach is a slightly more delicate plant than its cousin kale. That’s because the plant is susceptible to germination issues whichever season its planted in, but opting for an autumn seeding could enhance your chances. When planting in September, you should expect one mini-harvest at the end of October or beginning of November, before the plant goes into virtual hibernation for the colder months. When the temperatures do plummet, spinach will also require a little more in the way of protection than some other options on this list. Ensure it’s not ravaged by the worst of the frost by using fleecing from October onwards or, better yet, use a polytunnel to protect it from the elements. But with a little bit of TLC and some good-quality soil, your spinach plant will produce impressive yields when spring rolls around once more. 7) Turnip BOTANICAL NAME: Brassica rapa subsp. rapa RECOMMENDED VARIETIES: ‘Oasis’, ‘Atlantic’, ‘Tokyo Cross’ HARDINESS RATING: H6 WHEN TO PLANT: JULY – SEPTEMBER First thing’s first: it’s important to clarify that when we talk about planting turnips in September, we’re referring to the white variety (as opposed to swedes). Pick a fast-growing Japanese strain like ‘Tokyo Cross’ and get it in the ground early enough in the month and you’ll be able to take advantage of a final bumper yield before the nights draw in and the temperatures drop too low. As a quick and easy crop to cultivate, turnips are the ideal option to replace a spring or summer plant that has recently been harvested. Create 2cm-deep well and drop a single seed in each, leaving a 10cm interval between them. Alternatively, you can sow them in seed trays and transplant them into the Earth once they’ve begun to take root – but just ensure you leave more space for them to develop if taking this route. 8) Winter Lettuce BOTANICAL NAME: Lactuca sativa RECOMMENDED VARIETIES: ‘Winter Density’ HARDINESS RATING: H2 WHEN TO PLANT: AUGUST – NOVEMBER Lettuce has always been a favourite in British gardening circles, but what newbies might not realise is that this leafy salad crop can be cultivated right through the winter, as well. In fact, growing certain strains of lettuce is even easier later in the year, since the worst of the summer heat and drought will have passed. To take advantage, plant winter varieties of lettuce all the way up until October, then reap the rewards even in the depths of winter. “Winter lettuces will stand longer than summer lettuces, which tend to bolt if left too long unharvested,” says Master Horticulturist Colin Skelly. “‘Winter Density’ is a great choice and I use mini cloches in the coldest months to keep them harvestable.” Seeds should be dropped into drills with a depth of just 1cm, while spacing should be between 15cm and 30cm depending upon the particular strain you settle upon. The job will become even easier if you use a polytunnel or something similar to provide some insulation through the colder months, but it’s not necessary if you don’t have one to hand. Cloches and fleeces will do the same job just as well. References 1. Vegetables: growing for winter. (n.d.). Royal Horticultural Society. Retrieved March 27, 2023, from https://www.rhs.org.uk/vegetables/growing-for-winter 2. 5 Ways To Protect Soil this winter. (n.d.). Soil Association. Retrieved March 27, 2023, from https://www.soilassociation.org/causes-campaigns/save-our-soil/5-ways-to-protect-soil-in-the-winter/ 3. Giardino, A. (2018, October 9). Ode to an Onion: Pablo Neruda and His Muse. GoodReads. Retrieved March 27, 2023, from https://www.goodreads.com/en/book/show/38748272-ode-to-an-onion
Learn more
These Are The Easiest Vegetables To Grow Says Gerald Stratford
IN THIS GUIDE Satisfaction In Easy Growing Our Selection Criteria 1) Potatoes 2) Tomatoes 3) Carrots 4) Beetroot 5) Runner beans 6) Chard 7) Onions A little more inspiration 8) Jerusalem Artichoke 9) Salsify 10) Asparagus 11) Courgettes 12) Cucumbers 13) Peppers 14) Turnips 15) Fennel 16) Shallots 17) Chillies Get ready to enjoy your harvest! Gardening offers many joys. There’s the cascade of colourful floral blooms which, done right, can bring vibrant flourishes to your garden year-round. There’s the gentle buzz of bees and flutter of butterflies as they survey the scene, eyeing up any particularly appealing sources of pollen. There are the smells – of flowers, leaves, cut grass, and the general outdoors. And, sometimes, there’s the blue skies and bright sunshine that practically demand you pull up a comfy chair and just relax. Satisfaction In Easy Growing Then, when you start to think about growing things you can eat, you open up a whole new layer of garden satisfaction. Instead of just looking at the beautiful colours and shapes, you can start to plan a delicious harvest. A whole new set of smells appear, as well as the new sensations of handling seeds, feeling soft soil run through your fingers, and picking hearty vegetables from the ground. Grow your own to open up a whole new layer of gardening excellence Gathering your first harvest is one of the most rewarding parts of being a gardener. Seeing each subsequent harvest improve in size and quality is just as good, and it’s a feeling you get to re-experience every year. “I love tending to vegetables because I love the marriage of gardening with cooking,” shares Garden Historian Alley Marie Jordan. If all this sounds delightfully inviting, then read on. We’ve pulled together seventeen of the easiest vegetables to grow at home, to give you the opportunity to create your own bountiful harvest. Our Selection Criteria “I get asked a lot about what you should start growing and what’s easy for beginners,” says Lucy Hutchings, a Garden Designer. If you’re going to make the effort to grow food, what is more rewarding is to grow something that you eat regularly. “Rather than starting with people’s recommendations on what are the easy plants to grow, look in your fridge and see what you eat all the time.” “That’s going to make a way bigger impact on your life and your diet and lifestyle than just growing what’s easy.” With that said, we’ve tried to ensure that all the plants in this list meet a few other criteria, as well as being typically easy to grow. Each should – Have cheap seeds: Growing your own produce needn’t be expensive, so we’ve gone for veggies whose seeds won’t break the bank. Be readily available: We don’t want you to have to hunt around specialist stores to find the seeds, either. All the seeds for the crops in this list are easy to get hold of. Be low-maintenance: As a general rule you can plant these crops and not have to think about them too much until they’re ready to harvest. There’ll be a little bit of weeding, but nothing too demanding. Require no specialist gear: Aside from a trellis for the beans, you won’t need any expensive or esoteric gear to get these vegetables growing. Useful in many delicious recipes: Let’s face it; the main reason to grow vegetables is to subsequently eat the vegetables. So we’ve prioritised produce that’s tasty, versatile, and easy to prepare. Now that’s out the way, let’s move onto our list of easy to grow vegetables. 1) Potatoes GROW: OUTDOORS / GROW BAGS SOW: MARCH – APRIL HARVEST: JUNE – OCTOBER “Boil ‘em, mash ‘em, stick ‘em in a stew…” Samwise Gamgee, the unsung hero of the Lord of the Rings trilogy, knew about the versatility of potatoes. This crop can be used in hundreds of different ways, whether as a sidekick or centrepiece. “My two favourite vegetables have got to be the potato and the onion,” shares Vegetable Expert Gerald Stratford. “They’re basic vegetables that we all eat most days and I do love growing both of those, followed closely by the tomato.” It’s a staple in cuisines around the globe, and for good reason. “Potatoes were the first vegetable I ever grew and the wonder of harvesting them, particularly getting my hands into the warm summer soil, has never waned,” shares Master Horticulturist Colin Skelly. “I live in a potato growing area, so the risk of potato blight means that I’m restricted to first early potatoes (harvested before the main risk of blight) but there are still plenty of delicious options.” Potato Growing Guidelines What’s more, growing potatoes couldn’t be simpler – Choose a sunny spot that won’t get hit by late frosts (potatoes are sensitive to frost damage!). Plant out your spuds at the right time for the variety: First earlies in late March, second earlies up to mid-April, and maincrops from mid-April onwards. Dig compost through the soil in advance of planting, ideally at the end of the previous season. Plant them in a trench about 10-12cm deep, and space them out according to variety: Earlies about 30cm apart, maincrops about 35-40cm. Leave about 60cm between rows for earlies and 75cm for maincrops. Harvest your potatoes between June and October, depending on the variety. First earlies, June – July; seconds, July – August; maincrops, late August to October. To store potatoes, leave them in the ground until the foliage yellows, trim it down, leave for 10 days, then harvest. Dry them out indoors, then put them in storage. 2) Tomatoes Wait until fully ripened for maximum taste GROW: INDOORS / OUTDOORS IN POTS OR GROUND SOW: FEBRUARY – APRIL HARVEST: JULY – OCTOBER There are many types of tomatoes to choose from, ranging from miniature cherry tomatoes, right up to unbelievably big beef tomatoes. They fall into two categories, too: cordon and bush. Cordon tomatoes need staking to support their vertical growth, while bush tomatoes grow as you’d expect: In a bush. Tomato Growing Guidelines For best results – Whack your tomato seeds in some compost pots, and cover with a plastic bag. Keep them there until two leaves have sprouted. When they start to flower, transplant the seeds into larger pots, grow bags, or into the ground. (Harden off your tomatoes if you’re growing them outdoors, and leave about 50cm between them). For indoor tomatoes, sow from February to March. For outdoors, sow from March to April. Outdoor tomatoes like a sunny spot. If you’re growing cordon tomatoes, put a sturdy cane or trellis in the ground, and use cloth ties to attach the main stem. This will support the plant and encourage good growth. Keep your tomatoes well-watered! They’re thirsty plants, and will do best when kept moist. Harvest your tomatoes when they’re ripe, then keep them in a warm, dark spot to ripen more. 3) Carrots GROW: OUTDOORS SOW: FEBRUARY – MARCH (EARLIES) / APRIL – JULY (MAINCROPS) HARVEST: 3-4 MONTHS AFTER PLANTING Will carrots provide a bounty of fresh, crunchy, deliciousness? Resoundingly yes. Carrots are one of our favourite things to grow, just because of how effortless and plentiful they are. Carrots Growing Guidelines Here’s what you need to do to join the fun – Find an open spot in your garden with lots of sun, where the soil can drain well. If you’ve got stones or other detritus in your soil, go for short-rooted varieties, unless you’re happy with carrots with lots of bumps and funny shapes. Like potatoes, carrots are either earlies or maincrops. Sow earlies in February or March, and maincrops from April to July. Pop seeds a centimetre or so into the ground, and keep at least 15cm between rows. Try to get about 5-7cm between each seed, to give all your carrots the space they need to grow. Carrots are nowhere near as thirsty as tomatoes, so you only really need to water during dry periods. Be vigilant with your weeding: Carrots can quickly get suffocated under particularly enthusiastic weeds. If you’re being bothered by flies, surround your carrots with gauze or some similar barrier. Look to harvest your carrots 3-4 months after planting. Pick them when they’re big enough to use, and don’t leave them in the ground much longer after that as you risk losing flavour. 4) Beetroot GROW: OUTDOORS SOW: MARCH – MAY HARVEST: JUNE – AUGUST This is a strangely divisive vegetable. Put beetroot on some people’s plates and they’ll flat-out refuse to eat it, which is, in our opinion, sacrilege. If you’re one of the converted who sees beetroot as a vegetable with a lot to offer, then join us in growing a few in your garden. Beetroot Growing Guidelines Here’s how to do it – Choose a spot in your garden that can drain well, and work some compost through the soil ahead of planting. Plant out your beetroot seeds in clusters of three, with 10cm between them. Push them about 2cm into the soil, and leave about 30cm between rows. After your seedlings sprout, thin out the clusters of three so that each individual seedling has about 10cm between. (If this sounds like too much work, just plant them out individually from the outset). Water fortnightly if the weather is particularly dry. One of the best things about beetroots is that you can stagger planting through the planting season (March to May), meaning you’ll have a staggered harvest at harvest season! Pick your beetroots when they’re between 5-8cm. If you pick alternating beetroots, you’ll give the ones in the ground a little more space to grow. 5) Runner beans GROW: OUTDOORS WITH SUPPORT FRAME SOW: APRIL – MAY HARVEST: AUGUST – OCTOBER Whether or not you believe them to be a magical fruit, beans are definitely an appealing addition to your garden. Seeing them strive magnificently upward from the ground is always a pleasure, and their bountiful annual harvest guarantees beans for days. Runner Beans Growing Guidelines Here’s what you need to do to grow them – If you want to grow them in spring, start them off indoors. Beans do not tolerate frosts: You’ll need a propagator or a pot on a windowsill, and to harden off each plant before eventually planting out. If you’re happy waiting until after the frosts, expect to sow from late May onwards. Start your outdoor beans in pots, in a sheltered spot in your garden. When they’re just shy of 10cm tall, move them into the ground – expect to do this in June onward. This spot should be sunlit and warm, with well-draining soil. Beans need support to help them grow, so erect a bamboo A-frame for them to climb. Use loose ties to attach stems to frame: Anything too tight will restrict growth. When your beans are about 15cm long, they’re ready to harvest. Try to harvest before the internal beans begin to grow, as this is when the flavour is best. Picking too late also prevents the plants from flowering, and means you won’t get any more beans that season. 6) Chard GROW: OUTDOORS SOW: MARCH – JULY HARVEST: OCTOBER / NOVEMBER (OR FOLLOWING SPRING) Chard is another unsung hero of gardening, and another veggie that can put off the uninitiated. These bright green leaves streaked with purple, though, work wonders in myriad recipes. Whether you’re a fan of chard looking to grow your own, or a sceptic bravely looking to try something new, we’re sure you’ll enjoy growing this crop in your garden. Chard Growing Guidelines Here’s how to grow chard: Find an open and sunlit spot in your garden. Some shade is OK, but there needs to be sun for most of the day. Work some compost through the soil at the end of the season before you plan to plant out your chard. Sow your chard seeds about an inch deep, about 10cm apart, and in rows at least 40cm apart. Optimal sowing season is from March to July, with March chard ready to harvest that autumn, and July chard ready to harvest next spring. If it looks like drought is setting in, water your chard generously. Cover July plantings for winter, either under cloches, fleece, or similar. To harvest, simply cut away the outer leaves when they’re mature. Leaves will regrow, giving you access to plenty of chard throughout the season. 7) Onions GROW: OUTDOORS FROM SETS SOW: MARCH – APRIL HARVEST: AUGUST – OCTOBER Where would we be without the onion? This humble vegetable sits at the heart of pretty much any recipe you can think of, providing a flavour base that all the other ingredients build upon. We think there’s no better way to celebrate the enduring versatility of the onion by growing your own crop, and opening up the full vibrancy of their flavour. Onions Growing Guidelines Once you try an onion from your garden, you’ll never buy them from the supermarket again. Most people grow onions from sets rather than seeds. This is quicker and easier. Find a sunny and sheltered spot with well-draining soil. Avoid acidic soil where possible. Dig compost through the soil ahead of growing to give your onions optimal nutrition. Plant out your sets with at least 10cm between them, in rows at least 30cm apart. You can sow in March and April, or again in September. When the shoots above ground start to discolour and wilt, your onions are ready to harvest. Expect this to happen from late summer in your spring crop, or in June for your September crop. Pick your onions, then leave them somewhere outdoors to dry and ripen (make sure it’s a sheltered and well-ventilated spot!) A little more inspiration Don’t be fooled into thinking the list above is exhaustive – far from it! For those of you excited about growing your own produce, there are a ton of other options to explore. Here’s a small sample – 8) Jerusalem Artichoke GROW: PLANT TUBERS OUTDOORS SOW: OCTOBER – APRIL HARVEST: 4-5 MONTHS AFTER PLANTING An unsung hero of many delicious recipes. Artichokes get bad press because they can be tricky to prepare, but their sumptuous flavours make them more than worth getting acquainted with. “Globe artichokes are also great because you can chuck anything at them and they will survive,” shares Edible Bristol’s Sara Venn. “I’m a huge fan of these plants.” 9) Salsify GROW: OUTDOORS IN RAISED BEDS SOW: MARCH – APRIL HARVEST: OCTOBER – FEBRUARY If you’ve ever watched Masterchef: The Professionals, you’ll know that the presence of salsify on a plate signals class and sophistication. 10) Asparagus GROW: OUTDOORS SOW: INDOORS IN MARCH HARVEST: APRIL – MAY A powerhouse of fine dining, asparagus makes a great addition to any plate where you’d normally use a broccoli garnish. 11) Courgettes GROW: OUTDOORS / GROW BAGS / CONTAINERS SOW: MAY – JUNE HARVEST: JUNE – OCTOBER Some consider them to be bland, but used correctly, courgettes can bring a measured and delicious element to your cooking. They’re very versatile, too, featuring in cuisines from all over the world. 12) Cucumbers GROW: GREENHOUSE / SHELTERED OUTDOORS SOW: FEBRUARY – MARCH HARVEST: JULY – OCTOBER Similar to courgettes but different enough to be interesting, fresh-grown cucumbers have unparalleled flavour when compared to their store-bought cousins. 13) Peppers GROW: GREENHOUSE / INDOORS / SHELTERED OUTDOORS SOW: FEBRUARY – MARCH (INDOORS) / MARCH – APRIL (OUTDOORS) HARVEST: JULY – OCTOBER Whether you like them green, yellow, orange, red, or even purple, peppers are easy to grow and go well in hundreds of different recipes. 14) Turnips GROW: OUTDOORS SOW: MARCH – JUNE (EARLIES) / JULY – AUGUST (MAINCROP) HARVEST: MAY – SEPTEMBER (EARLIES) / OCTOBER ONWARDS (MAINCROP) A British staple for centuries, whose prominence has now been usurped by more exciting vegetables brought over from foreign shores. 15) Fennel GROW: OUTDOORS SOW: MARCH – JULY HARVEST: MAY – SEPTEMBER An unusual flavour but one that rewards the curious chef. Fennel is great raw or cooked, and will add a bit of je ne sais quoi to any dish. 16) Shallots GROW: OUTDOORS SOW: MARCH – APRIL HARVEST: JUNE – JULY Onion’s smaller sibling, packing a sweeter and more refined flavour. Perfect for any dish where onion would overpower. 17) Chillies GROW: INDOORS / GREENHOUSE SOW: JANUARY – FEBRUARY HARVEST: JUNE – OCTOBER Do you like it hot? Then grow a chilli plant, and guarantee yourself an endless supply of these spicy boys. We have to stop there, but there are so many more veggies to get familiar with if you’ve caught the home-growing bug. Just make sure to keep in mind the amount of space you have available! Growing veg can easily take up your entire garden Get ready to enjoy your harvest! Whew – there you have it. Seventeen delightful veggies to get you started with your home-grown gardening adventures. “Obviously, there are certain things that are tricky, but generally, there’s always a trick or two with every crop,” adds Lucy. “Rather than just trying to go for beginner’s crops, go with what is going to make a big impact on your life and what you are actually going to eat.” Whether you opt for these easy to grow options, or decide on something a little more “out there”, we’re sure you’ll have a great (and tasty) time.
Learn more
Grow Food In A Small Space With These 10 Vegetables For Containers
IN THIS GUIDE 1) Tomatoes 2) Lettuce 3) Kale 4) Potatoes 5) Carrots 6) Courgettes 7) Cucumbers 8) Peas 9) Beetroot 10) Radishes References Edible gardening is all the rage right now – and by growing vegetables in pots, you don’t even need a garden to do it! Plenty of vegetables lend themselves well to cultivation in pots and containers, meaning you don’t need a huge amount of space for your crops to flourish. A terrace, balcony, greenhouse or conservatory is all that’s required to coax delicious edibles from the soil. Another strong advantage of growing in pots is the soil itself; while the idea of a foolproof vegetable patch is a total myth, containers offer the closest thing to it. That’s because you have far greater control of the concentrations of compost, nutrients and water which go into the terrain, while the enclosed nature of the cultivation will also protect your plants from unwanted critters and blights. Finally, growing your vegetables in pots gives you the opportunity to quickly and easily move them into shadier or sunnier spots as the circumstances warrant. You can even bring them inside or move them outdoors as the thermometer dictates! This means you can prolong yields for as long as possible and reap the benefits far later into the calendar year. Here are ten plants to help get you started: 1) Tomatoes PREFERRED ASPECT: FULL SUN SOW: FEBRUARY – MARCH HARVEST: AUGUST – SEPTEMBER Yes, we know they’re technically a fruit! However, providing you get the species and the conditions right, tomatoes are easy to grow and very satisfying to watch develop. To make your life easier, select a bush or determinate variety, which will grow to a predetermined size and won’t take up too much space. Having said that, it’s eminently possible to grow other strains as well, but they may require more room and support in the shape of staking or a tomato cage. Tomatoes love the sun, so start out your seedlings in February or March on a windowsill that receives plentiful UV. They’ll also work well in greenhouses, conservatories or polytunnels, but be wary of transplanting into garden soil unless you enjoy warm temperatures, lots of sun and little to no frost. They also thrive with plentiful nutrients, so keep the plants well fed and watered in sizable containers (at least 10 litres in volume per plant). 2) Lettuce PREFERRED ASPECT: PART SHADE SOW: JANUARY – FEBRUARY HARVEST: MAY – JUNE A durable vegetable, lettuce is perfect for the Great British climate in that it doesn’t require as much sun or warmth as some others on this list. In fact, it actually prefers a bit of shade, so the fact that it’s in a container means you can move it around the garden to receive more or less sun as is required. This will also allow you to better clamp down on the weeds and pests which can often disrupt lettuce yields. Most lettuce varieties crop in spring, but some may continue to produce yields later into the summer, especially if you move them to cooler climes. They’re also fast-growing; seed them in January to harvest in June. Simply sprinkle a few seeds on the surface of the soil, before dusting them over with compost, since they thrive on light during the germination stage. Miniature varieties like Little Gem and Tom Thumb are perfect for pots, as they require less space. 3) Kale PREFERRED ASPECT: FULL SUN SOW: APRIL – JUNE HARVEST: YEAR-ROUND If lettuce is easy to grow, kale is positively child’s play. This robust plant is almost bulletproof in terms of the climatic conditions it can withstand; only the very worst extremes of winter will make a dent and it should otherwise flourish for the rest of the year. “Watch out for the Cabbage White butterfly,” warns Master Horticulturist Colin Skelly. “If you see it, cover your kale with netting to prevent the butterflies from laying eggs on your crop. “They lay their clusters of yellow eggs on the underside of leaves and can strip a kale plant in a matter of hours. “If you find the eggs or caterpillars, you can remove them from the leaves, but prevention is easier than cure.” It makes an excellent addition to your smoothies or a tasty sauteed side dish for breakfast, lunch or dinner. For best results, ensure you plant kale in a spacious pot with a diameter of at least 30cm, while the soil mixture should be free-draining and packed with nutrients. Nero di Toscana and Russian Kale are especially recommended for growing in pots due to their manageable size and the fact that their taste will actually improve as the temperatures drop. Expect one plant to feed one person on a weekly basis all year round. 4) Potatoes PREFERRED ASPECT: FULL SUN SOW: VARIES BY TYPE HARVEST: VARIES BY TYPE Though potatoes might require a little more space than other vegetables, if you provide them with enough soil and water then you’ll be well rewarded. That’s because the earthiness of freshly picked potatoes, alongside their higher water content, make them a far more appetising prospect than ones you might pick up in the supermarket. The importance of irrigation can’t be stressed highly enough, however; insufficient watering is the number one reason for poor crop yields. For best results, seek out seed potatoes that are specifically designed to be grown at home. You can plant the seeds in March or April, placing them at around half the depth of a pot at least 30cm in diameter and topping up with more soil or compost as the shoots begin to develop. One key advantage of planting in pots is the protection it affords against blight, a big killer of crops in late summer. You can also avoid this by harvesting in June or July. 5) Carrots PREFERRED ASPECT: FULL SUN SOW: VARIES BY TYPE HARVEST: VARIES BY TYPE All types of carrots adapt well to pot life, though standard varieties have extensive root systems, meaning you’ll need to use a container that is both deep and wide. If space is at a premium, baby carrots are an ideal choice in smaller points and come with the added advantage of their sweet taste. That’s thanks to the fact that they’re harvested before they have reached full maturity. Larger varieties should be sown in February, while smaller ones can wait until April or later. You should always ensure that the container is covered with a fine fleece or mesh, since carrot flies are a significant issue once the mercury begins to rise in late spring and summer. Another advantage of cultivating your carrots in a pot is the greater control you’ll have over the soil composition; carrots struggle in terrain with a lot of stones or clay, so a fine compost will produce markedly better results. 6) Courgettes PREFERRED ASPECT: FULL SUN SOW: MAY – JUNE HARVEST: JULY – OCTOBER Courgettes are summer crops that will produce more vegetables the more they are harvested! Rigorous picking will ensure that a single plant can easily satisfy the needs of a small family all throughout the warmer months. They are quite delicate, however, so avoid planting out until May if you plan to keep them outdoors; otherwise place them in a sunny spot inside the house, greenhouse or conservatory. They’re also hungry and thirsty plants, so make sure you give them enough room to develop. The seeds can be sown individually in smaller pots, but once a single large leaf has appeared, they must be transferred to a receptacle of at least 10 litres in volume. Once in position, make sure they’re fed and watered on a regular basis. You can make the process of ensuring they have enough nutrients that much easier by using a slow-release fertiliser in the compost composition. 7) Cucumbers PREFERRED ASPECT: FULL SUN SOW: APRIL – MAY HARVEST: AUGUST – OCTOBER Have you ever heard that a cucumber is 96% water?1 If you have, it should come as no surprise that these vegetables are incredibly thirsty and demand constant irrigation. That makes growing them in pots slightly easier than in the ground, since the pot will retain moisture better, while container cultivation is also conducive to warmer soils. Cucumbers love the heat and warmer air penetrates pot soil much more effectively than it does compacted ground soil.2 Cucumbers are also tender plants, meaning you should avoid growing outside unless your garden enjoys respectable ambient temperatures. For best results, cultivate them in a conservatory or greenhouse, while you should also use supports in the form of canes or strings to ensure the weight of the vegetable doesn’t impact the growth of the plant. Follow the same seeding, transplanting and picking process as the one outlined above for courgettes and you’ll be rewarded with a similar bountiful harvest each summer. 8) Peas PREFERRED ASPECT: FULL SUN SOW: MARCH – JUNE HARVEST: JUNE – SEPTEMBER As one of the easiest vegetables to grow in a pot, peas make for an excellent project with younger members of the household. Although bush varieties are available, most pea plants (including sugar snaps and snow peas) will need some form of support to hold them up. One or more bamboo canes set in the middle of the pot and fastened with twine will be adequate to ensure they don’t collapse under the weight of their own deliciousness. As well as providing a tasty snack or side dish, pea plants are also attractive additions to the garden in their own right, especially after flowers have begun to blossom but before the seedpods appear. What’s more, they’re also excellent enrichers of soil, imparting plenty of nitrogen which will help subsequent plants.3 Seed them in March, harvest them in June and replace them with salad leaves or other delectable veggie produce in late summer for round two of crop yields from that nitrogen-rich soil. 9) Beetroot PREFERRED ASPECT: PART SHADE SOW: APRIL – JUNE HARVEST: JUNE – AUGUST Beets are fairly adaptable plants that will fair well in potted environments – providing they are given enough ground clearance. The roots like to grow deep into the soil, so make sure you plant them in a pot with a depth of around 25cm to 30cm. You should also bear in mind that a single beetroot seed contains a cluster of five or so individual seeds, so planting just one seed could produce multiple plants, depending on how many germinate.4 Look to bed the beetroot seeds in March, before harvesting their early leaf growth as a stand-in for spinach. Come late summer, you’ll have plenty of delicious beets to incorporate into your salads and sandwiches. A little know fact about beetroot is that it comes from the same family as Swiss chard, too, with the former grown for its roots and the latter for its leaves. Both do very well in pots, as long as they have enough good quality compost and regular irrigation. 10) Radishes PREFERRED ASPECT: FULL SUN / PART SHADE SOW: MARCH – AUGUST HARVEST: 4-6 WEEKS AFTER SOWING There’s nothing quite like the satisfying crunch and the subtle spiciness of a ripe and ravishing radish. Incredibly versatile, these eye-catching red vegetables will make do in even the smallest containers; all that’s needed is a sprinkling of soil and enough water to slake its thirst and you can enjoy radishes almost year-round. Be mindful that they don’t enjoy full sun, however, so remember to move them to a shadier spot when the temperature rises. Another huge selling point of radishes is their rapid turnaround time. Most strains will go from seed to harvest in well under a month, meaning you’ll have to wait hardly any time at all to enjoy their unique flavour and texture. With many different types available, you can pick and choose the ones that best suit your palette, while the fact that both the pods and the leaves are also edible means there is very little waste from this robust, dynamic and supremely efficient potted plant. References 1. Jaarsma, C. (n.d.). 10 water-rich foods to help you stay hydrated. BUPA. Retrieved March 16, 2023, from https://www.bupa.co.uk/newsroom/ourviews/ten-water-rich-foods-hydration 2. Soil compaction. (n.d.). University of Minnesota. Retrieved March 16, 2023, from https://extension.umn.edu/soil-management-and-health/soil-compaction 3. Wallace, J. (n.d.). Make the most of legumes to fix amd keep nitrogen in your soil. Conition. Retrieved March 16, 2023, from https://eap.mcgill.ca/MagRack/COG/COG_E_97_02.htm 4. Beets Beta vulgaris. (n.d.). Hamilton University. Retrieved March 16, 2023, from https://academics.hamilton.edu/foodforthought/Our_Research_files/beet.pdf
Learn more
Vegetable Planting Guide By Month: Gardeners Choose Their Favourites To Grow Year-Round
IN THIS GUIDE Vegetable Planting Throughout The Year January February March April May June July August September October November December A vegetable planting guide can only ever give you a rough idea about what you should be doing in your garden and when. It is important to remember that planting is only one of the important garden tasks to think about – and when exactly you undertake garden tasks will depend, to a large degree, on where exactly you live and the conditions in your area and your particular garden. This vegetable planting guide is designed to help you work out where your attention should be directed each month. We’ve given some tips not only about what to sow and plant when, but also about other garden jobs you should be undertaking. Vegetable Planting Throughout The Year We have only given a few guidelines about what you should be doing when, because there are a lot of variabilities – even just within the UK. It is important to treat this list as a guide rather than a rule book. Most crops have a planting window of several months, and you can vary when you plant based on a wide range of factors. When deciding what to plant when in your vegetable garden you need to think about: The weather in a given year as well as the climate zone in your area and microclimate in your particular garden. Spreading out the work so you do not give yourself too much to do at one time. Making sure you can harvest food over as long a period as possible. Your year-round planting schemes and when crops need to be harvested and removed to make way for the next round of planting. Whether you are sowing indoors, undercover in a greenhouse or polytunnel, under cloches or outdoors in the open. Bearing these things in mind then, here is a list of sowings, plantings and other jobs that you might consider doing each month: January Tomato seedlings You might not think about the gardening year beginning in January. Spring is still some time off, even in the warmest parts of the UK, but there is already plenty to be done this month. Order your annual fruit, vegetable, herb and flower seeds for early spring planting if you have not already done so. If you do not yet have a garden plan in place, now is a great time to start working on your design and plans. Decide what, where and how you intend to grow, plan out any new growing areas, and devise plans for crop choices, companion planting, crop rotation etc. for the coming year. If you plan to start growing vegetables for the first time this year, make sure you have a composting system and rainwater harvesting system in place. Think about adding a greenhouse or polytunnel in your garden to prolong the growing season and make it easier to grow food year-round in the UK. Consider starting to chit your potatoes on a cool windowsill so that they will develop shoots before it is time to plant them out in your garden. This month, you may also consider sowing tomatoes and peppers indoors. Doing so can give you a head start and help you ensure you get a worthwhile crop by the end of our short growing season. Consider placing cloches or row covers over the soil/growing areas outdoors to help warm up the area before you start planting your earliest crops outdoors. “It is easy to over commit when planning in winter,” says Master Horticulturist Colin Skelly. “Get a calendar or diary specifically for your vegetable growing plans and then work out what your time commitment will be, particularly at peak times. Be realistic about how much time you will have and prioritise if necessary.” February Pepper seedlings indoors Spring is not yet here, and in most areas, the garden will still be well and truly in winter’s grip. However it is not too early to get things prepared for the year ahead, and you can potentially even start sowing too. Order all your seeds for spring if you have not already done so. Make sure your composting system and rainwater harvesting system are up and running. Consider constructing your undercover growing area if you have not done so already. Take the chance to create new growing areas before the main growing season gets underway. Decide whether you will be growing only annuals, or a range of perennial crops. Make choices regarding whether you will grow in the ground, in raised beds or in containers. Consider taking a ‘no dig’ approach and building up new growing areas on top of the soil so you disturb this precious ecosystem as little as possible. Prepare existing beds and growing areas ready for planting. (Mulching with good quality organic matter such as homemade compost, leaf mould or well-rotted manure, or chopped and dropped green manures that were in place over winter.) Think about starting chitting potatoes if you have not already done so. Sow tomatoes and peppers indoors if you have not already done so. Start sowing some seeds such as leeks and onions indoors now. Consider sowing broad beans and peas indoors to plant out (sowing indoors rather than direct sowing can avoid issues with rodents and other pests). Sort out all your seeds and tools and get organised for the busy spring period ahead. Take the time to learn more about your garden before the spring, and think about how you can attract more wildlife throughout the year. March Sowing seeds indoors In March, it can still be rather chilly, but the first hints of spring are definitely in the air. It is a little to early to sow most crops outdoors – but there is still plenty to think about this month: Make sure garden beds are ready for spring planting. Ensure that you know when the last frost date is in your area, which will determine exactly when you should sow different crops. Prepare existing beds, weed, and mulch if you have not already done so. Chit first early potatoes and towards the end of the month, consider planting them in a polytunnel or outdoors in milder areas. As long as soil is not waterlogged or frozen, plant alliums such as onion (sets), garlic and shallots. Direct sow such plants as early carrots, parsnips, lettuces and other leafy greens, radishes, peas, and broad beans, under cloches or under cover in more southern or protected warmer areas. Consider sowing lettuces and leafy greens, peas, broad beans, brassicas crops (members of the cabbage family,) indoors or under cover, to plant out after the last frost date in your area. This is a good time to think about making a wildlife pond, or creating other wildlife-friendly features in your garden. April Planting potatoes April, for many of us, is a busy time in our gardens – the weather is starting to warm, and we may well have our last frosts this month. “Now is a busy time for gardeners!” adds Hannah Reid, a Gardener and Blogger. “The busy months of Spring and crazy mass sowings are almost done, but now there are so many seedlings to look after. “I have a lot of seedlings to look after this year, not just my own allotment and Träkol, but I also have seedlings for our community allotment garden at Hampton Court to keep alive.” As things begin to warm up, here are some of the jobs for the vegetable garden: Direct sow many cool season crops as soon as the weather warms, including radishes, carrots, parsnips, beetroot, lettuces, brassicas, broad beans, peas and more. Harden off seedlings of these crops sown indoors or undercover before planting them out. Continue to sow lettuce, radishes and other quick crops under cover for successional harvests. Sow companion crops like herbs and marigolds indoors and plant out once the weather warms where you live. Prick out seedlings and pot up or plant out when they get their first true leaves. Pot up indoors sown tomatoes and peppers as required. Plant out potatoes this month if you have not already done so. Use sticks or other supports to provide a structure for peas to climb as they grow. Thin carrots/radishes/parsnips/beetroot that were direct sown to give the remaining roots space to grow. Keep on top of the weeding as the weather warms up. Apply mulches to cut down on weeding. If you have a polytunnel or greenhouse, make sure it is clean, water more frequently as the weather warms, and start leaving the doors open for ventilation on sunny days. May Young cucurbit plant “As I write this, we are enjoying spring and all the excitement it brings,” says Joe Harrison, Garden Writer & Blogger. “The frantic period of sowing, potting on and planting out is in full swing and it’s so much fun and very rewarding. “At this point in the year, we have sown leeks, parsnips, beetroot, pumpkins, sweetcorn, beans and planted our potatoes to name a few.” In May, there may already be a few lettuce leaves and bits and pieces to harvest in your garden. “It’s May and I’ve just planted in my courgettes and squashes now the frosts are over,” shares Ann-Marie Powell, award-winning Garden Designer. “I’m growing various types of squashes and tromboncinos this year.” Here are some jobs to think about doing in your vegetable garden this month: Make sure you water well as the weather warms. Consider setting up an efficient drip irrigation system in dry areas or undercover. Plant out brassicas, leeks and other crops or companion crops started indoors into their final growing positions. Sow runner beans, French beans, summer squash, courgettes, cucumbers, sweetcorn, and other summer crops indoors or under cover and harden off and plant out from the end of the month (depending on where you live). Make frames, trellises or supports for climbing plants like beans so areas are ready for planting. Thin out and eat lettuce, spinach and other leafy greens that were direct sown. Thin beetroots and eat the baby beetroots you thin in a spring salad. Continue to direct sow lettuce, radishes and other quick crops for successional harvests. Earth up and mulch around your potatoes as the plants grow. Weed carefully around onions, garlic and other alliums to reduce competition. Stay on top of weeds around your garden – and remember, many of those provide additional edible yields. Gather weeds and put them in a bucket of water to make a liquid fertiliser or plant feed for your crops. June Tomatoes outdoors Things are warming up, and this is a great time in a vegetable garden. “At this time of the year, you can virtually grow anything,” says Gerald Stratford, author of Big Veg. “We’re almost out of the danger of the frost zone, you might still be unlucky if you live in certain parts of the UK, but we are pretty much clear.” If things have gone well, this is the month when you will likely start harvesting in earnest – a wide range of different crops. “By this point in the year, the list is long for the veggies in my allotment,” says Hannah. “I have multiple different varieties of squash, kale, cabbage, peas, runner beans, french beans, chillies, peppers, cucumbers, onions and garlic.” Kathy Slack, a Food Writer, also has a garden full of veggies at this point in the year: “The courgettes are coming on nicely and nestled amongst them are lettuces, salad rocket in great swathes and some sweetcorn. “My broad beans, peas and green beans are getting tall and in the cold frame, I’m hoping the cucumber will ramble high as well.” The garden should start to fill out with summer crops as these are planted out alongside cool season ones. This month: Consider planting second early potatoes in containers or grow bags under cover (or with protection as winter approaches) from mid-June onwards for a Christmas potato crop. Plant out summer crops such as tomatoes, sweetcorn, squash, beans etc. grown indoors if you have not already done so. Consider direct sowing other flowers or choosing summer bedding plants as companions for your vegetable crops. Pinch out the side shoots from tomato plants and feed with a potash-rich, organic fertiliser when the first trusses begin to form flowers and fruits. Start to harvest lettuce and other leafy greens, peas, broad beans, first early potatoes etc. Continue to sow salad leaves every couple of weeks over summer for a continuous harvest. Replenish mulches and replant as spaces open up. Try to avoid bare soil as much as possible. Make sure to pay attention to water and ventilation in an undercover growing area. Keep doors open and consider damping down paths etc. on really hot days. July Kale seedling After midsummer, there will likely be less sowing to do in your garden, but you may still sow a few crops for the seasons ahead. “If you’re new to gardening, you could potentially jump the gun and skin the sowing process,” shares Gerald. “This will help to give you confidence. I would recommend that you go to the plant section and, instead of buying a packet of seeds, buy a couple of small plants ready to plant out in the summer months.” Your harvesting will likely be in full swing. Here are some vegetable garden jobs to undertake in July: Pinch off the growing tips from squash and courgette plants to encourage them to bush out. Continue to fertilise and pinch off side shoots on tomato plants. Train cucumbers and other crops to grow up their supports. Harvest garlic when the tops start to yellow and flop over on over a third of the crop. Continue to harvest your fruits and vegetables as they mature. You should be able to harvest a much wider range of produce this month. Deadhead companion flowers in your vegetable garden to keep them blooming longer. Tidy up the debris of fallen flowers and foliage, especially in undercover growing areas, to reduce the risk of fungal disease taking hold. Make sure you continue to water well over the warmest summer months. Sow brassicas and other leafy greens for autumn/winter. Turn compost regularly and add water if necessary to keep it aerated and moist throughout the summer. Be on the lookout for pests and diseases throughout your garden, so you can get on top of problems quickly if they occur. August Bright lights chard seedlings August is another abundant month in your garden. However, overabundance can be an issue, and this is a month when certain pests and problems can rear their ugly heads. To stay on top of things in this hot summer month: Harvest maincrop potatoes as leaves begin to yellow and die back. Continue to harvest other crops like root crops, beans, tomatoes etc. as they mature. Feed your peppers and cucurbits with a high potassium organic feed when fruits start to form. Pinch out the growing tips of your tomatoes and runner beans. Make sure that you are making the most of what you grow – deal with any gluts (of runner beans for example) by freezing them, or use other methods such as canning or dehydration to preserve different crops. Continue to sow brassicas and other leafy greens for autumn/winter. Remove spent crops and consider sowing leafy greens or other crops for overwintering. Cut back, divide and harvest companion herbs in the vegetable garden. Consider collecting ripened seed from various crops to sow next year. Continue to look out for pests and disease. Look out for late blight on tomatoes, for example. Keep watering and ventilating undercover growing areas well in hot weather. Make sure there is always a water source in your garden for birds and other wildlife, and make sure your garden is wildlife-friendly to maintain biodiversity, as this can aid in pest control and make a garden easier to care for and maintain. September Pea shoots In September, summer begins to fade, but there is still a lot to do in your garden. For example, you should: Pinch out the growing tips of your tomatoes if you have not already done so. Remove leaves casting shade on squash, pumpkins etc to help them ripen fully. Cut down on watering tomatoes and take other steps to encourage green tomatoes to ripen. Harvest any maincrop potatoes that remain in the ground (or containers). Continue to harvest other remaining summer crops in your garden. Keep saving seeds for next year. Sow winter peas and broad beans for overwintering (in a polytunnel or outdoors in milder areas). Towards the end of the month, consider starting to plant winter onion sets. Plant out winter crops in place of summer ones where you have not already done so. Plan and place protection for growing areas outdoors where this will be required to protect winter crops. Consider sowing green manures or cover crops to protect the soil over the winter months where crops will not be grown. October Planting onion sets Things are getting chillier and the days rapidly shorten, but October brings plenty of new things to think about in your vegetable garden. This month you should consider undertaking these tasks, preparing for and making use of the changes the seasons bring: Plant onion sets for overwintering if you have not already done so. And plant shallots and garlic and mulch with autumn leaves. Harvest and clear summer crops before the first frost. Continue to sow winter leafy green vegetables (and protect with cloches or row covers when frosts threaten). These will feed you through the ‘hungry gap’ next year. Clean and clear as spaces open up in an undercover growing area. Bring tender companion plants under cover before frost threatens. Check over your garden thoroughly and undertake any necessary repairs outdoors before winter arrives. Rake garden leaves and make use of them – you can use them as mulch, add them to your composting system, or keep them in a separate bin or container to make leaf mould. Reduce the amount of watering you do as the days get shorter and the nights get colder. If you have a wildlife pond, consider netting it to keep leaves and debris from falling into it. Store your autumn harvest and make preserves using the produce you have grown. November Planting garlic The first frosts will likely have occurred, and winter will be fast approaching, but the gardening year is not over just yet. Here are some things you might be thinking about this month: Harvest parsnips, brassicas etc. after they have been sweetened by the first frosts. Provide support for top-heavy brassicas so they do not blow over in autumn and winter storms. Plant garlic bulbs if you have not already done so. Think about adding extra protection such as cloches for plants growing in a polytunnel or greenhouse. Consider adding eco-friendly lighting to an undercover growing area so you can check on things after dark. Think about heating your polytunnel or greenhouse if you want to try growing more tender or exotic plants. Take care of winter crops still in active growth, remembering that some watering (though much less than in summer) will still be required. Do any repairs around your garden if you have not already done so. Gather and make leaf mould or compost from autumn leaves if you have not already done this last month. Consider planting perennials, shrubs and trees in planting schemes that could improve your vegetable garden for next year (such as in windbreak hedgerows or shelter belts, for example). December Brussels sprouts Even during the dormant phase, in the depths of winter, there are still some things you can get on with in your garden. Some jobs to think about this month include: Continue to check up on and tend any crops you have growing in an undercover area or beneath cloches. If your greenhouse or polytunnel is covered in snow, remove it to avoid damage and make sure light can shine through. Provide protection for leafy winter greens growing outdoors when cold snaps threaten. Cover brassicas and other leafy greens with netting to protect them from birds. Take off yellow leaves from brassicas to reduce problems and prevent the spread of disease. Harvest winter lettuces and other vegetables from undercover growing areas. Dig up potatoes planted for Christmas, to enjoy during your festive midwinter feast, along with other treats from winter stores. Harvest sprouts and other winter brassicas for winter meals. Uproot parsnips and leeks still in garden beds before the ground freezes solid.
Learn more


