

Growing

Jane Rowlinson Has Been Growing Snowdrops For 25 Years - This Is Her Advice
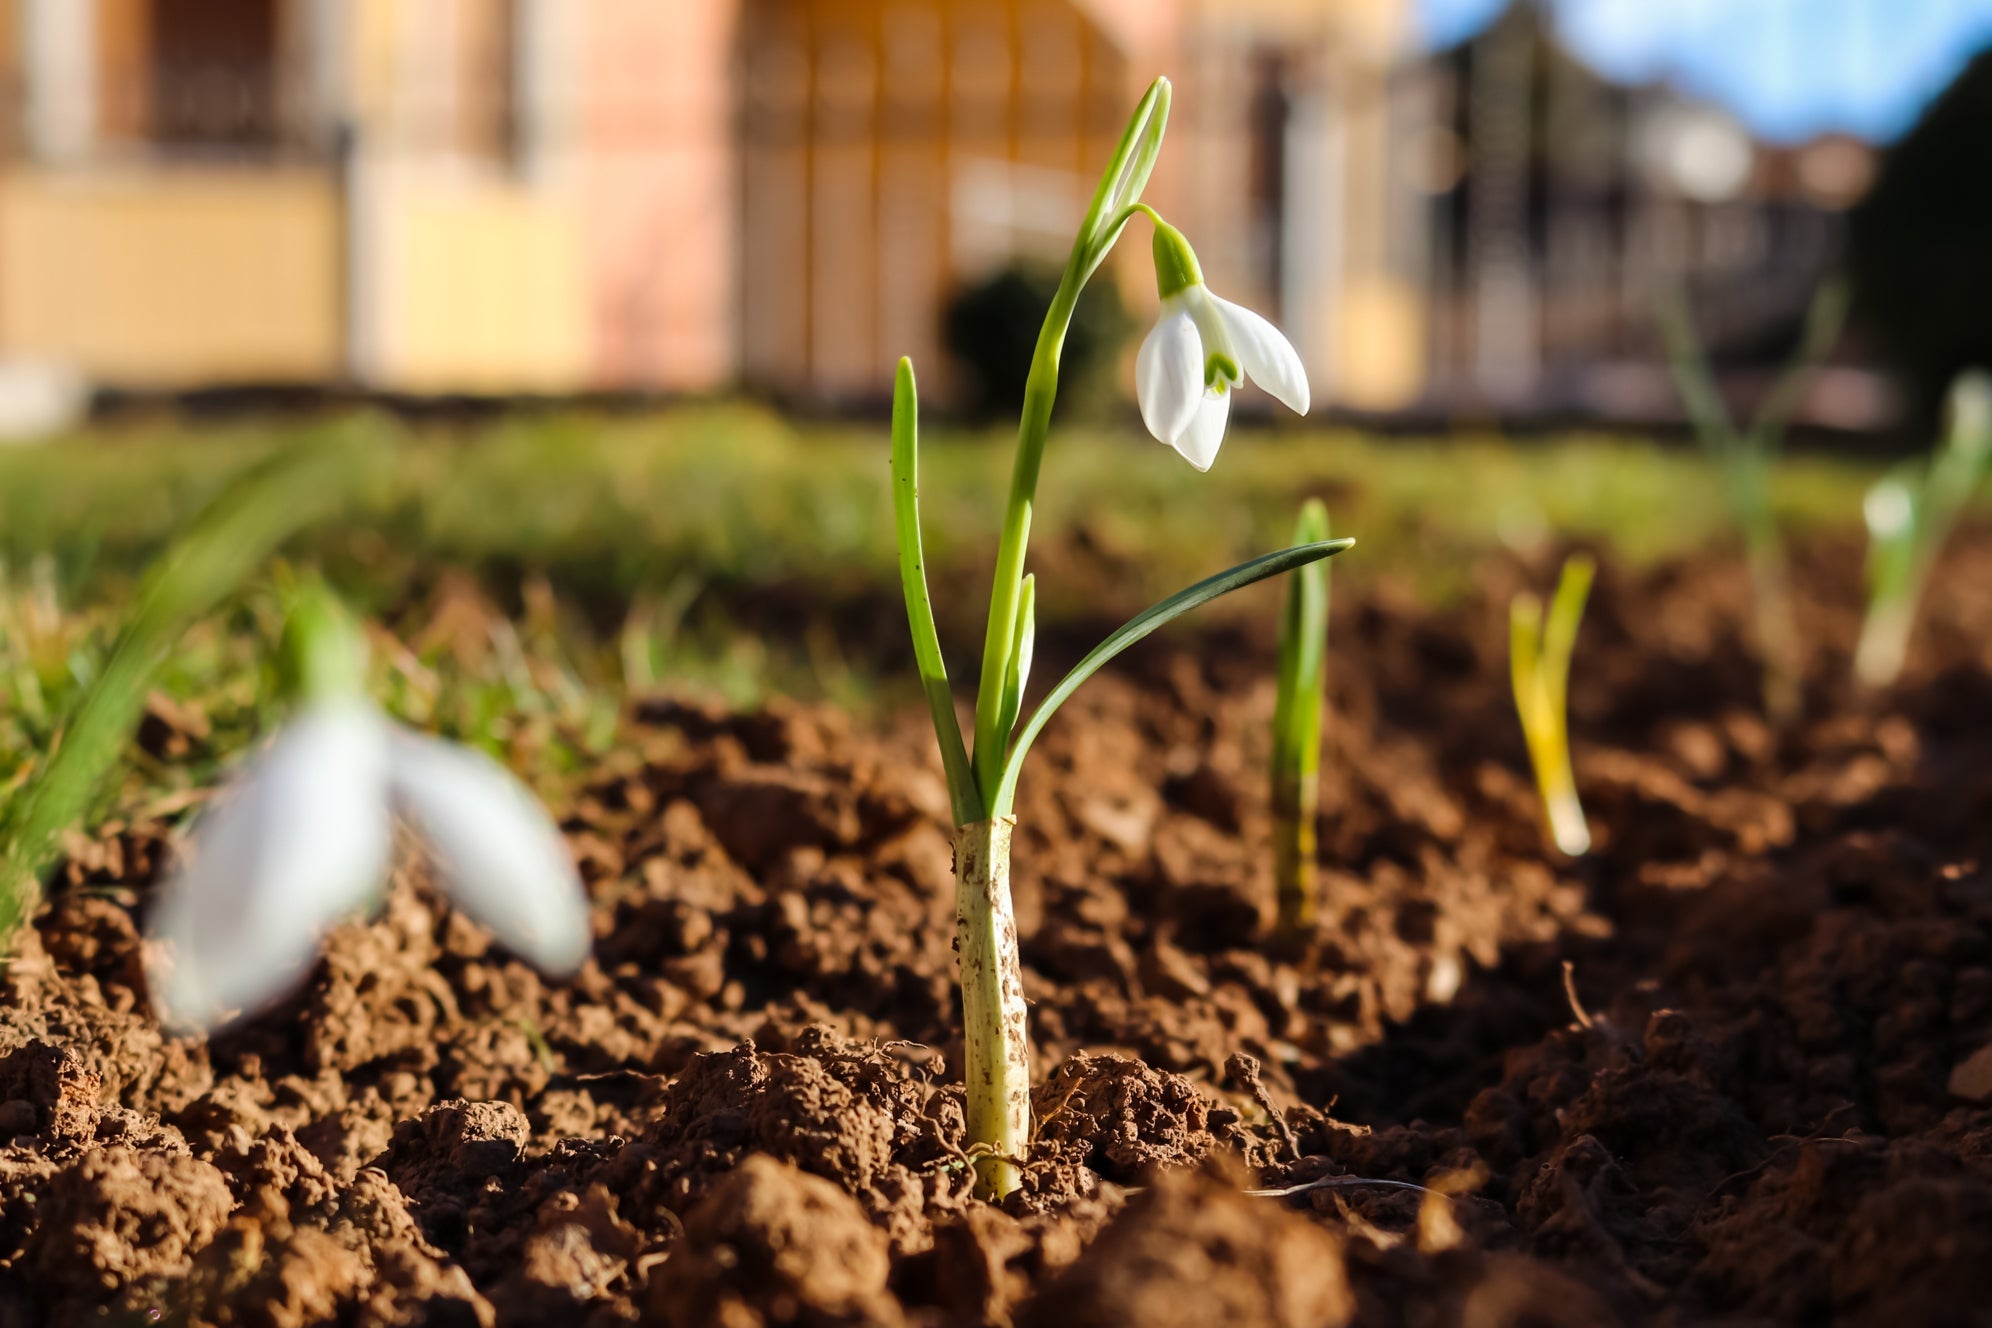
IN THIS GUIDE Overview How To Grow Snowdrops Galanthus Plant Care Snowdrops are among the cutest little plants you can grow, as these bulbous perennials average only about 12cm tall, displaying narrow green foliage. As for those tiny, nodding flowers that are usually a snowy-white shade, they’re the most understated attention-grabbers you’ll ever see! In this guide we feature Jane Rowlinson, who is the Owner of Morlas Plants – a nursery home to more than 500 snowdrop varieties. “From late autumn and through the winter months, the short days can be difficult to get through,” says Jane. “I find growing snowdrops gives me a reason to get excited to go out into my garden during this time of year. “You can grow species and cultivars that will flower from September right the way through to April, so there can always be colour in the garden during the winter months. “Snowdrops are also a very important plant for early raising insects (especially bees) to feed from. “There is nothing better on a sunny winter day than listening to bees buzzing from one flower to another.” Overview Botanical Name Galanthus Common Name(s) Snowdrop Plant Type Bulb / Perennial Native Area Southern and Eastern Europe Hardiness Rating H5 Foliage Deciduous Flowers Solitary, pendent, bell-shaped flowers with 3 outer tepals and 3 inner ones When To Plant October to November for bulbs Galanthus, which is the genus’ scientific name, is probably the earliest of spring bulbs and, for the most part, comes into flower in February. “I love plants that sing of a particular season and snowdrops do just that,” says Val Bourne, expert Garden Writer. “I got a big selection of snowdrops and have around 300 different varieties and cultivars.” Although these plants are small and dainty, they are very hardy, make do in any type of soil and are content with virtually any exposure. The nodding bell-like flowers are made up of six tepals. Only the outer three are clearly visible as apparent petals, each of which, like the flower itself, lazily droops from the plant’s arching stems. The majority of varieties produce white flowers that are often edged or marked with green inside. To top it off, they have a gentle and fresh fragrance. How To Grow Snowdrops Snowdrop bulbs are to be planted as soon as you acquire them from the merchant and luckily, the process couldn’t be simpler. “Look for a spot in the garden where you will easily be able to admire your Snowdrops,” Jane suggests. “Make sure that the ground is free-draining, but still moisture retentive. “Snowdrops will not tolerate sitting in the wet during the summer months, so planting under trees, shrubs or roses is a good idea as they will take up all excess water.” Water the planting area and place bulbs at a depth of 5-7cm in moderately fertile soil. “Dig a hole deep enough for the snowdrop to sit where the leaves are just above the soil and place a small handful of grit in the bottom of the hole before planting for extra drainage,” explains Jane. “Bury a label below the soil, take a photo and make a written note of where any special Snowdrops are planted. It is very easy for labels to go missing and names to be forgotten!” If you propagate snowdrops by division, do so in April. Lift up a clump with a shovel and separate offsets and bulblets carefully, with their roots intact. Re-plant promptly to the same depth as the bulbs originally were, then water in well. “As well as bulbs, snowdrops are also often marketed ‘in the green’ and sold as bundles of plants around February, which should be planted as soon as possible,” Master Horticulturist Peter Lickorish adds. “Plant deeply, ensuring as a minimum that the white areas at the bases of the leaves are covered. “I find they are best divided ‘in the green’ after flowering and I am always amazed at how well they flower the following year and also the speed with which clumps expand.” Galanthus Plant Care Sunlight These plants should be sited in partial shade or filtered sunlight. Planting them under deciduous trees will suit them very well. “Yellow Snowdrops, such as Galanthus plicatus ‘Wendy’s Gold’, need to be planted in a sunny spot in order to give the best colour,” warns Jane. Make sure you check the light requirements for the specific varieties of Galanthus you choose to grow. Soil Requirements A fairly rich, moderately fertile soil is best for Galanthus. “If you have poor soil, good preparation is important before planting,” says Jane. “Clear any excess stones, rocks or roots and add either leaf mould, home-made compost or any good quality loam-based peat-free compost before planting.” A base of a mixed loam augmented with some organic compost or a little well-rotted manure will be perfect. The soil should drain very well but retain moisture, so the addition of grit or perlite is recommended. Watering Snowdrops have modest watering needs. The aim is to keep the soil moist to several centimetres below the surface, though it should never be soaked, let alone waterlogged, as this can cause bulbs to start rotting. As soon as the soil gets dry, water in moderation. Be especially vigilant during the summer and during any unseasonably hot and dry spell. While too much water can cause these bulbs to rot, a lack of water can cause them to dry out. Feeding Other than fertilising the bulbs at planting time, snowdrops do not need regular feeding. Incorporate a conservative amount of phosphor-tending organic fertiliser into the soil when you plant the bulbs, such as fish, blood and bone. “Adding a top dressing of mulch to borders every Autumn will help them,” Jane says. Pruning Snowdrops should not be pruned or deadheaded at all. Yellowing and wilting foliage should not be pruned either, because the leaves generate energy to replenish the bulb for the following year’s blooms until the very end of its life span. Propagating Galanthus bulbs form offsets and multiply, which is how the plants naturally form drifts. The flowers also self-seed, but snowdrops spread less by this method than by multiplying. Though these plants can be grown by seed, this method takes a few years to complete and considering that high-quality bulbs are readily available and are easy to plant, I’d recommend avoiding this method of propagation. Snowdrops are among the bulbs that can be propagated by scaling and chipping, however, these methods are quite challenging and best suited for serious horticulturists. Propagate these plants by dividing offsets and bulblets after flowering has finished but while the plants are still in leaf, which is usually at the end of spring. They may be divided every 3-4 years or when you think that the plants have become overcrowded. Common Problems Snowdrops are remarkably pest-resistant and disease-free, but there are a couple of issues to watch out for. “Don’t allow pots to become waterlogged or frozen, as this could kill your Galanthus bulbs,” says Jane. Squirrels seem particularly drawn to these bulbs and may dig them up, so you might have to protect them with netting. Another thing to look out for is grey mould, a fungal disease that can affect snowdrops. Be especially vigilant for it during a mild winter. It manifests on foliage and flowers as an ugly grey mould that gives the disease its name. It then attacks the bulbs, causing them to rot. Unfortunately, there is no commercially-available treatment for this disease.
Learn more
Carrots Are Susceptible To These 6 Common Issues Says Ed Bowring
IN THIS GUIDE 1) Carrot Fly 2) Aphids 3) Carrot Tops Turning Green 4) Forking 5) Sclerotinia Rot 6) Rodents A firm favourite for home growers, carrots are a biennial vegetable but are usually grown as annuals, as they are harvested in the same season. Carrots grow well here in the UK, although there are some pests and diseases that can try and get to your crop before you do. The most common issues gardeners can experience when growing carrots include: Carrot fly Aphids Carrot tops turning green Carrots forking Stored carrots rotting Rodents See our guidelines for dealing with each of these common problems below. 1) Carrot Fly Carrot flies are possibly the biggest threat and problem for home gardeners when growing carrots. Small and black, the adult flies don’t actually cause any damage, but the female lays her eggs in the carrots’ soil which hatch into larvae that eat the roots and lead to the carrots rotting. Attracted by the scent of the carrots’ foliage when handled and thinned, prevention is important, as once these pests are present near your carrots, there is little to be done. Preventative methods can include growing resistant varieties, covering the crop with a layer of fine fleece or installing barriers at a minimum height of 75cm around the growing site. Sowing thinly can also be of benefit, as this will reduce the need for thinning the carrots. “If you are forced to thin them, this can be done in the evening to reduce the likelihood of attracting the root fly,” Peter Lickorish, a Master Horticulturist, recommends. You can also try growing your carrots near alliums, as these are strong smelling and said to help mask the carrots’ aroma. 2) Aphids Aphids can also be troublesome when growing carrots and are especially prevalent during warm dry spells. Attacking carrots, parsnips and parsley, the carrot-willow aphid feeds off the sap of the foliage, weakening the carrots and sometimes transmitting the motley dwarf virus, which can cause the leaves to turn red and stunt the carrots’ growth. If aphids are identified, they can be controlled by squishing by hand, encouraging predators such as ladybirds and hoverflies through bug hotels and, if a severe infestation is present, the use of plant oil or fatty acid sprays suitable for edible crops. 3) Carrot Tops Turning Green Later in the growing season or when harvesting, you may find that the tops of your carrots have turned green. Albeit unsightly, this is nothing to worry about and has simply been caused by the top of the carrot being exposed to sunlight during the growing period. To avoid green tops developing during the season, the carrots can be earthed up with a thin layer of soil to ensure any light can’t get to the roots. 4) Forking Even though carrots forking isn’t caused by a pest or disease, it can still be an issue when growing carrots. Carrots’ forking can be caused by either the ground being too stony or the level of nitrogen in the soil being too high. Before sowing carrots, it is advisable to prepare the ground by removing any rocks or stones. If adding any compost or well-rotted manure to the soil, make sure to do this several months prior to planting, so that the high levels of nitrogen in the manure can reduce naturally before the carrots are grown. If you garden on particularly stony soil, it can be advisable and less laborious to grow carrots in pots or containers, as the soil can be chosen to specifically suit them and be stone free to prevent any forking. The forking of carrots thankfully doesn’t affect their quality or taste so they can be eaten as normal, but it may mean that they are slightly trickier to peel and prepare. 5) Sclerotinia Rot Usually affecting only stored carrots after harvesting, sclerotinia rot is a fungal disease encouraged by wet weather, but it can sometimes attack a crop whilst still growing. If stored carrots are affected, the carrots develop a white fluffy mould which effectively destroys the crop. If this fungal disease attacks a crop whilst still in the soil it can lead to the foliage and tops turning yellow and subsequently rotting. “Raised beds are a good place to grow carrots, as they can lift the plants above the flight path of the carrot fly and improve drainage, which helps avoid other problems relating to rot,” says Peter. “I like to recommend the cultivar ‘Flyaway’ for carrot fly resistance, as it’s virtually unforgettable!” Although uncommon for the home grower, if sclerotinia rot is identified in the garden, the carrots and any diseased material must be lifted and destroyed as there are no treatments available for home growers. Crop rotation should be practised to prevent this from happening in your future harvests. 6) Rodents All sorts of furry critters will want to eat your carrots, and in this instance, prevention is definitely the best option. Keep your garden tidy, making sure to not leave piles of wood or other material that rodents can nest in. Erecting a barrier around your carrots is another good way to prevent their premature demise. Many options are available, and the best ones will vary depending on the specific rodent visitation you’re experiencing.
Learn more
How To Practice Successional Sowing For Carrots Between February And July
IN THIS GUIDE 1) Prepare The Sowing Area 2) Sow Your Seeds 3) Water The Seedlings 4) Ongoing Plant Care Carrots are delicious vegetables that I would argue taste even better when you grow them in your own garden rather than buy them from a supermarket. You can sow early varieties as early as February until April and maincrop varieties from late April to early July. In most regions of the UK where the weather does not become overly warm, successional sowing can be practised for carrots. You can sow carrots by following these steps: Prepare the soil on the ground for sowing. Sow the carrot seeds. Water the seedlings regularly. Care for the carrot seedlings as they grow. This process is explained in more depth below. Difficulty Medium Equipment Required Gardening gloves, shovel, hoe, rake and fork When To Sow February to July 1) Prepare The Sowing Area About a month before you intend to sow carrot seeds, prepare the sowing area. Select a spot that is in full sun and gets plenty of shelter. Carrots must be grown in light, powdery soil that is well-drained and free of stones, roots and any such impediments. Hard, stony ground will cause forking and restricted growth. Clear the soil to about 25cm, though the depth depends on the particular cultivars you intend to grow. Mix in well-rotted manure or compost to 25-30% of the volume of the natural soil. For carrots, goat manure is best and you should not use chicken manure. Till the prepared ground with a hoe or rake and then water it well before sowing. “For early sowings, you could pre-heat the soil slightly with a sheet of black plastic,” says Peter Lickorish, a Lecturer at Bradford College in Horticulture. 2) Sow Your Seeds About a month after you have prepared the ground, you can sow your carrot seeds. Sow seeds about 1cm deep and 2-3cm apart. Seeds are best sown in rows, which should be spaced apart by about 20cm. “If you’re struggling to sow thinly, there is an art to it, so try thoroughly mixing seed with an equal volume of sand before sowing,” says Peter. “You can then see more clearly how thinly you are sowing.” Lightly cover seeds with soil and pat down, making sure that you do not completely pack in the soil. A heavy, prolonged shower will dislodge and may even wash away the tiny seeds, so avoid sowing carrot seeds when heavy rains are expected or temporarily cover the sowed area with canvas or sackcloth. “For February sowing, a cloche or fleece cover will be needed to protect the seeds and seedlings,” Peter adds. 3) Water The Seedlings Lightly water the seeds every other day, accounting for rain, until they germinate. Earlies typically germinate in about 2 weeks whilst maincrop varieties take 3 weeks. However, germination may occur up to a week earlier or later than expected. Decrease the frequency of watering to once every 3 days or so after the carrots germinate. After a couple of weeks, water only occasionally, and if there is rainfall you need not water at all. With carrots, a little water goes a long way. 4) Ongoing Plant Care Carrots must be weeded regularly as they do not compete well with weeds. Small weeds can be uprooted easily, but if a weed is large and overgrown, it may be better to snip it off near the base. After the seedlings have grown, thin them to 6-7cm apart, making sure to water the ground well before thinning. While thinning, try not to disturb the adjacent root. You can use a mini plastic gardening fork to prise the plant up with one hand while you pull with the other. “Thinning in the evening is preferable as it is less likely to lure in carrot root flies,” advises Peter. After thinning, apply a shallow layer of organic mulch. As the carrots grow and the shoulders emerge from the ground, apply a layer of mulch once again to cover them. Such mulching is necessary to prevent the carrots from greening.
Learn more
Don't Grow Your Onions Without These Companion Plants Argues Dan Ori
IN THIS GUIDE 1) Tomato 2) Spearmint 3) Common Marigold 4) Common Lettuce 5) Parsley 6) Bell Pepper 7) Rose ‘Yellow Meilove’ 8) Alpine Strawberry 9) Borage 10) Garden Nasturtium 11) Dill 12) Carrot 13) Bacon Weed 14) Melon ‘Emir’ 15) Spinach 16) Summer Savory 17) Kale 18) African Marigold 19) Common Beetroot 20) Common Sowthistle 21) Chamomile 22) Potato 23) Mountain Chrysanthemum 24) Parsnip 25) Ornamental Cabbage References Onions are a popular culinary delight and when grown in your garden, you’ll have the benefit of being able to harvest them whenever you like throughout the summer and autumn months. Onions have a strong aroma, and this means that they can be a great companion plant for many different crops and other plants in your garden. They are said to repel or confuse a range of different types of pests. “Before you get overly excited about the potential benefits of companion planting, it is important to highlight that most companion plants benefits or efficacy have not been subject to much or any peer review studies, so we can’t say with absolute certainty that this plant benefits that plant,” says Dan Ori, Master Horticulturist. “However, we can say that in this article the companion plants and benefits listed are most likely to be correct based on observations and applied theory.” Onions can be usefully placed: In mixed pots and planters. In annual vegetable beds over winter with other overwintering crops. Intermixed with other annual crops in kitchen garden beds in summer. In rows intercropped between another main crop. Around the edges of growing areas as a partial pest barrier. Perennial types in particular can also be very useful in fruit tree guilds, forest gardens and other perennial planting schemes. Ideally, annual onions should be part of a crop rotation scheme, so that they are not grown in the same areas over multiple years. So this should be considered along with companion planting when creating your planting plans. Due to crop rotation needs, it can be useful to think about growing onions alongside other alliums (such as garlic and leeks, for example). However, it is important to remember that pests and diseases can pass between them, so it is generally not a good idea to grow only alliums in a particular bed or growing area. In this guide, we share 25 different plants that make good companions for onions, from herbs to flowers to other vegetables – there is definitely an option for everyone. 1) Tomato BOTANICAL NAME: Solanum lycopersicum HARDINESS RATING: H1C PLANT TYPE: fruit FOLIAGE TYPE: deciduous FLOWERS: yellow FLOWERING SEASON(S): spring / summer FRUIT SEASON(S): summer Tomatoes are a great way to kick off this list. This deciduous fruit is one of the most popular kitchen staples here in the UK and is used in a range of different recipes and dishes. It is also frequently grown in gardens thanks to how easy they are to plant and care for once established. Not only are tomatoes a delight in their own right, but they are also great for planting next to onions, as the smell of your alliums can deter pests that might otherwise help themselves to your tomato plants, such as whitefly and moths. 2) Spearmint BOTANICAL NAME: mentha spicata HARDINESS RATING: H7 PLANT TYPE: herb / perennial FOLIAGE TYPE: deciduous FLOWERS: purple FLOWERING SEASON(S): summer Although mint has a reputation for not always being the best companion plant, it grows well with onions, as its scent can help repel onion flies and aphids that are sometimes attracted to different varieties of allium. Also, this full hardy herb produces small purple flowers in the summer that are great for attracting pollinators and other beneficial insects. Just be aware that spearmint can sometimes be considered invasive due to its spreading habit that can reach up to 1.5m wide, but this should not be an issue for your onions once they are established in your vegetable patch. You can always grow your mint in pots nearby if you’re worried about them spreading. 3) Common Marigold BOTANICAL NAME: calendula officinalis HARDINESS RATING: H5 PLANT TYPE: annual / biennial FOLIAGE TYPE: deciduous FLOWERS: orange FLOWERING SEASON(S): summer / autumn The first flower on this list, common marigolds are hardy annuals that bear stunning orange daisy-like flowers from May until October that will look great next to the fuzzy heads of your onion crops. Like spearmint, marigolds are great for pollinators and will help draw beneficial insects towards your alliums if planted close together. Marigolds are also loved by slugs, which you might think is a bad thing, but in reality, these slimy creatures will be too busy munching on their leaves to even notice your alliums. 4) Common Lettuce BOTANICAL NAME: lactuca sativa HARDINESS RATING: H2 PLANT TYPE: vegetable FOLIAGE TYPE: deciduous FLOWERS: yellow FLOWERING SEASON(S): summer Onions don’t take up much room in a vegetable patch, which is one of the reasons why they are so popular with UK home growers. If space is a key factor in your decision-making, lettuce might just be the ideal choice for you. Like allium, lettuce takes up most of its space underground, meaning it can be planted close to other root crops to utilise space and make more room for other plants you might wish to grow. This vegetable is relatively easy to grow, just make sure it receives plenty of sunshine throughout the day, as lettuce thrives in sun. 5) Parsley BOTANICAL NAME: petroselinum crispum HARDINESS RATING: H6 PLANT TYPE: biennial / herb FOLIAGE TYPE: semi-evergreen FLOWERS: green and yellow FLOWERING SEASON(S): summer Onion flies are notorious pests that feast on alliums such as onions and garlic and can cause severe damage to these crops.1 Luckily, parsley is a fragrant herb that, if planted next to your onions, can deter these flies and keep them away from your vegetable patches. Parsley is a small biennial that grows well in most conditions and will also provide you with aromatic foliage that can be harvested and used in your kitchen. 6) Bell Pepper BOTANICAL NAME: capsicum annuum HARDINESS RATING: H1C PLANT TYPE: fruit FOLIAGE TYPE: deciduous FLOWERS: white FLOWERING SEASON(S): summer FRUIT SEASON(S): summer / early autumn Aphids are another pesky pest that can feed on your crops and the bell pepper is one of its favourites. As mentioned previously, onions are good at deterring some insects like aphids, so can be planted around your bell peppers to act as a barrier of protection. This frost-tender fruit produces delicious yields and can grow well in similar conditions to onions, making it suitable for companion planting. Be wary that this plant will struggle to survive once colder temperatures start to move in over autumn. 7) Rose ‘Yellow Meilove’ BOTANICAL NAME: rosa ‘yellow meilove’ HARDINESS RATING: H7 PLANT TYPE: shrub FOLIAGE TYPE: deciduous FLOWERS: yellow FLOWERING SEASON(S): summer / autumn You won’t find a garden flower that loves being planted next to onions as much as the garden rose. As well as deterring pests that can often affect the flowers of a rose plant, onions are also said to improve the aroma of their beautiful blooms and have been planted next to roses for this reason for years.2 I’ve highlighted one of my favourite varieties ‘yellow meilove’ here, but there are lots of unfussy, fully hardy roses for you to choose from that will grow well with onions. 8) Alpine Strawberry BOTANICAL NAME: fragaria vesca HARDINESS RATING: H6 PLANT TYPE: perennial / fruit FOLIAGE TYPE: semi-evergreen FLOWERS: white FLOWERING SEASON(S): spring FRUIT SEASON(S): summer Strawberries are another popular fruit to grow with your onions, as they both thrive in the same conditions and will grow well together in a sheltered position in full sun. In fact, strawberry plants can help provide some shade for your onion’s roots, which like to be kept cool, and in return, your onions can deter fruit-loving pests from going near your berries. Alpine strawberries are a smaller variety and are great for cultivating in pots with some onions if you wish. 9) Borage BOTANICAL NAME: borago officinalis HARDINESS RATING: H5 PLANT TYPE: annual FOLIAGE TYPE: deciduous FLOWERS: blue FLOWERING SEASON(S): summer / autumn A hardy plant that will keep onion flies away from your onions, borage is a wonderful companion plant for alliums. Its blue flowers that grow in clusters on long stems in the summer and autumn months look great amongst the tall, fluffy heads of onion plants and will both create a great display throughout the warmer months of the year. Borage is also a great plant to grow in your garden regardless of its ornamental benefits, as you can use the leaves to make organic fertilisers that can assist in your vegetable’s growth when applied. 10) Garden Nasturtium BOTANICAL NAME: tropaeolum majus HARDINESS RATING: H3 PLANT TYPE: climber / annual / shrub FOLIAGE TYPE: deciduous FLOWERS: yellow, red and orange FLOWERING SEASON(S): summer / autumn Nasturtiums are a great companion plant for many vegetables as they are brilliant at attracting aphids and other potential pests – keeping them from your prized crops. They can also be used as a trap plant in a vegetable patch, encouraging slugs and snails to munch on their foliage rather than that of your onions and other crops. A frost-tender annual, this shrub is easy to grow and will flower throughout the summer and autumn, providing some fiery colour wherever it is planted. 11) Dill BOTANICAL NAME: anethum graveolens HARDINESS RATING: H4 PLANT TYPE: annual / herb FOLIAGE TYPE: deciduous FLOWERS: yellow FLOWERING SEASON(S): summer Anethum graveolens, more commonly known as dill, is an annual herb that enjoys the benefits that being planted next to onions can bring, as it can attract aphids and other bugs which onions are great at getting rid of. However, dill can also help onions in return by means of pest control, as they are particularly good at fighting off red spider mites which can often plague alliums growing in the garden. Dill is also a wonderful herb, most often used in Mediterranean dishes, and can be harvested in spring and summertime for use in your kitchen.3 “Dill is a really nice plant,” says Garden Designer Ann-Marie Powell. “I love plants that grow so quickly you can almost see them growing in front of your eyes. “They sort of explode into these starry flowers that get caught in the wind so you can see them move as well.” 12) Carrot BOTANICAL NAME: daucus carota subsp. sativus HARDINESS RATING: H7 PLANT TYPE: vegetable FOLIAGE TYPE: deciduous One of my favourite vegetables to grow each year, carrots are fully hardy vegetables that are easy to cultivate, fun to harvest and a delight when eaten raw or cooked. Onions and carrots are a particularly effective combination, since the onions will not only help the carrots (by repelling or confusing carrot fly) – the carrots are also said to keep onion flies away. If planting together, just make sure both plants have enough space to grow underground freely so they can reach a desirable size. 13) Bacon Weed BOTANICAL NAME: chenopodium album HARDINESS RATING: H7 PLANT TYPE: annual FOLIAGE TYPE: deciduous FLOWERS: green FLOWERING SEASON(S): summer / autumn You might be wondering why I’ve selected a weed as one of my picks on this list, but hear me out. Although I wouldn’t recommend planting bacon weed from seed, as it is a prolific self-seeder as it is, if this weed is growing in your vegetable patch near your onions, there is no need to panic. In fact, bacon weed, also known as common goosefoot, can actually help to enrich the soil where alliums grow – provided its spread is kept under control. Bacon weed can even be harvested and eaten and is often used as a substitute for lettuce for those who don’t want to waste this weed. So next time you spot this weed growing near your onions, maybe think twice before getting rid of it completely. 14) Melon ‘Emir’ BOTANICAL NAME: cucumis melo ’emir’ HARDINESS RATING: H1C PLANT TYPE: fruit / annual FOLIAGE TYPE: deciduous FRUIT SEASON(S): summer Melons are fruit-bearing annuals that adore onions for their fragrant aroma that helps to deter pests from their fruits. For the purpose of this list, I’ve chosen the cultivar ’emir’, which is a tasty cantaloupe cultivar that is actually best grown under some cover, like a cloche, polytunnel or in a heated greenhouse. They grow best in as much sunshine as possible, and onions are great for planting by their side as they are unlikely to get in the way of the warm rays this fruit needs to grow. 15) Spinach BOTANICAL NAME: spinacia oleracea HARDINESS RATING: H4 PLANT TYPE: vegetable FOLIAGE TYPE: deciduous As we have established, onions are a popular companion plant because their strong scent can help to fend off pests that might pose a problem for other fruit and vegetables – spinach being another of the plants that benefit. However, alliums are also great at bringing pollinators like ladybirds to your garden – beneficial garden predators that might feast on any pests that manage to work their way into your crops. Spinach is often plagued by pests, so planting onions, which also thrive in the same growing conditions as this leafy vegetable, is a great way to naturally repel any harmful bugs. 16) Summer Savory BOTANICAL NAME: satureja hortensis HARDINESS RATING: H4 PLANT TYPE: annual / herb FOLIAGE TYPE: deciduous FLOWERS: white FLOWERING SEASON(S): summer Planting summer savory near your onions is said to improve the taste of your crop by making them sweeter, so, if the taste is your priority, why not try planting this herb?4 Grown as an annual, summer savoury has its own culinary uses and is a popular substitute for salt and pepper or for use in a marinade or meat rub.5 This small herb needs a site in full sun but is otherwise unfussy and also produces dainty white flowers during the summer that will add some colour to your vegetable beds. 17) Kale BOTANICAL NAME: brassica oleracea HARDINESS RATING: H7 PLANT TYPE: vegetable FOLIAGE TYPE: evergreen FLOWERS: yellow FLOWERING SEASON(S): summer / autumn Kale is a versatile vegetable and can be used in smoothies, salads and other culinary dishes – its luscious leaves can be harvested all year round.6 However, as a brassica, it is vulnerable to many pests such as caterpillars and aphids, which is why kale can benefit from the pungent scent of onions that can repel these hungry bugs. Just be aware that this vegetable prefers alkaline to neutral soil pH and will not grow well in anything acidic. 18) African Marigold BOTANICAL NAME: tagetes erecta HARDINESS RATING: H2 PLANT TYPE: annual FOLIAGE TYPE: deciduous FLOWERS: yellow, white and orange FLOWERING SEASON(S): summer / autumn One of the best plants for attracting pollinators, the African marigold can also bring beneficial insects like ladybirds to your nearby plants that will feast on any potential pests. African marigolds bear frilly flowers throughout the summer and autumn months, will look great amongst your onions and add a touch of fiery colour to your garden plot. These plants are easy to grow and only spread to about 50cm wide so they won’t take up too much room – leaving you with plenty of space to grow more vegetables! 19) Common Beetroot BOTANICAL NAME: beta vulgaris HARDINESS RATING: H3 PLANT TYPE: annual / vegetable FOLIAGE TYPE: deciduous Beetroots love the pest-repelling odour that nearby onions can provide and are another easy-to-grow vegetable that thrives in similar conditions as others already mentioned on this list. I love growing beetroots as part of my vegetable garden, as they grow quite quickly and their foliage also looks great, adding some leafy goodness to my plot. 20) Common Sowthistle BOTANICAL NAME: sonchus oleraceus HARDINESS RATING: H7 PLANT TYPE: biennial FOLIAGE TYPE: deciduous FLOWERS: yellow FLOWERING SEASON(S): summer Another weed, I know, but sow thistle is actually really useful to have growing in your vegetable patches near your onions for a couple of reasons – and will not usually become too much of a nuisance. Not only does it add nutrients to the soil it grows in like bacon weed, but this edible weed can also be harvested and used as a natural mulch, or, as it is commonly referred: ‘chopped and dropped’ onto the ground around your plants. So, before getting rid of these weeds entirely, consider how they could benefit your onions, whether that’s in the ground or as chopped-up mulch. 21) Chamomile BOTANICAL NAME: chamaemelum nobile HARDINESS RATING: H7 PLANT TYPE: herb / perennial FOLIAGE TYPE: deciduous FLOWERS: yellow and white FLOWERING SEASON(S): summer With daisy-like flowers and a small, compact size reaching no more than 50cm in height and spread, you might be shocked to learn that this little herb can actually do a lot for your onions and other vegetables. Chamomile’s anti-fungal properties help to prevent lots of vegetables from developing fungal issues such as root rot, rust and mildew, so keeping your onions close to this perennial herb is definitely a good idea.7 It’s also great at repelling some common pests, so planting onions and chamomile around other vegetables in this list can really help protect them from aphids, flies and mealybugs alike. 22) Potato BOTANICAL NAME: solanum tuberosum HARDINESS RATING: H2 PLANT TYPE: vegetable FOLIAGE TYPE: deciduous FLOWERS: purple and white FLOWERING SEASON(S): spring / summer Potatoes are a kitchen staple and make a great addition to any home grower’s garden. Growing them next to onions is a great way to produce as big a yield as possible, as alliums don’t take up much space and won’t harm your potatoes in any way. However, they do not like too much sun, so make sure they are placed in a shaded location or near tall crops that will protect them from the sun’s rays. “Onions and potatoes are quite hungry plants, so you don’t want too much competition with those two,” warns Gerald Stratford, Vegetable Expert. 23) Mountain Chrysanthemum BOTANICAL NAME: leucanthemum graminifolium HARDINESS RATING: H6 PLANT TYPE: perennial FOLIAGE TYPE: deciduous FLOWERS: white FLOWERING SEASON(S): summer The final flower to appear on this list, the mountain chrysanthemum is a daisy-like variety that benefits from onion’s ability to deter aphids with its scent. All chrysanthemums are great pollinators and will reward your onion crops with lots of bees and butterflies that should speed up pollination and help the wildlife in your garden thrive. 24) Parsnip BOTANICAL NAME: pastinaca sativa HARDINESS RATING: H5 PLANT TYPE: vegetables FOLIAGE TYPE: deciduous A delicious vegetable that will pair nicely with your onions when growing in the ground and in the kitchen, parsnips are hardy plants that grow best in similar conditions to onions and the other veggies on this list. Like carrots, parsnips can often be damaged by carrot flies, so planting them near onions will help to keep them protected from these pests. Parsnips prefer acidic to neutral soil, so make sure the spot you choose to grow them in is not alkaline and you will be rewarded with yummy yields. 25) Ornamental Cabbage BOTANICAL NAME: brassica oleracea HARDINESS RATING: H7 PLANT TYPE: perennial / vegetable FOLIAGE TYPE: evergreen FLOWERS: yellow FLOWERING SEASON(S): summer / autumn FRUIT SEASON(S): autumn Most brassicas come from ornamental cabbage, so this delicious vegetable is definitely one you should consider for your vegetable garden. Unfortunately, like the other brassicas on this list, this plant is susceptible to pest damage and will enjoy the luxury of being planted next to pungent onions that will help to deter them. Cabbage is a low-maintenance veggie and will be easy to care for once established. References 1. Onion Maggot. (2016, October). Center for Agriculture, Food, and the Environment. Retrieved March 21, 2023, from https://ag.umass.edu/vegetable/fact-sheets/onion-maggot 2. Garlic Guide. (n.d.). An Herb Society of America Guide. Retrieved March 21, 2023, from https://www.herbsociety.org/file_download/inline/f751abad-cc5c-414f-89a5-b9e6b012ea70 3. Cornish, R. (2022, September 20). Dill: Everything you need to know. Good Food. Retrieved March 21, 2023, from https://www.smh.com.au/goodfood/everything-you-wanted-to-know-about-dill-20220908-h268tf.html 4. Tirrell, R. (1971, March 7). Summer Savory. The New York Times. Retrieved March 21, 2023, from https://Cornish, R. (2022, September 20). Dill: Everything you need to know. Good Food. Retrieved March 21, 2023, from https://www.smh.com.au/goodfood/everything-you-wanted-to-know-about-dill-20220908-h268tf.html 5. Blue, N. (2023, January 30). What Is Savory: All About the Savory Herb and 4 Related Recipes. Recipes.net. Retrieved March 21, 2023, from https://recipes.net/articles/what-is-savory-herb-and-related-recipes/ 6. Kale. (2021, October 19). The Nutrition Source. Retrieved March 21, 2023, from https://www.hsph.harvard.edu/nutritionsource/food-features/kale/ 7. Chamomile – an overview. (n.d.). Science Direct. https://doi.org/10.1016/B978-0-323-85542-6.00003-2
Learn more
Some Ceanothus Forms Work In The Right Sized Containers, But Choose Wisely
IN THIS GUIDE Can You Grow Ceanothus In Pots? Containers For California Lilac Pot-Growing Compost Potting Up Ceanothus Potted Ceanothus Care Ceanothus are attractive shrubs that look lovely in many gardens with their (usually) blue flowers. In the ground, they can look wonderful draped up a wall or in a sunny border. However, if you only have limited space or have soil which is not particularly well suited to growing these shrubs, such as poorly drained soil, you might be wondering if you can grow ceanothus in pots. Can You Grow Ceanothus In Pots? You can indeed grow some ceanothus in pots, as long as the containers are of sufficient size. However, some varieties will be better suited to container cultivation than others, as RHS Master Horticulturist Peter Lickorish shares: “Ceanothus thyrsiflorus tends to be a more compact species, better suited to container growing. "You can see this variety on our nursery floor - completely happy and healthy growing in a pot and flowering profusely. “Most compost is neutral or lightly acidic in pH, whereas this species, and others of Ceanothus, like alkalinity. “Consider adding or using spent mushroom compost, if you have any.” If you would like to grow ceanothus in containers, then it is best to opt for a small and relatively compact option, rather than one of those that grows to a much larger size. “I find that a Ceanothus can be trained against a wall effectively, so planting in a pot gives you that option, even on a patio,” adds Peter. Containers For California Lilac When choosing a container for ceanothus, it is best to choose a pot that is just a little larger than the specimen in question. If you pot up a ceanothus into a container that is too big, it can increase the chances of the soil becoming waterlogged. The key thing to remember is that ceanothus shrubs need free-draining conditions, so any container you choose must allow the water to drain away freely and have sufficient drainage holes at the base. I would also recommend using plant pot feet – small holders placed underneath your container which help to raise them off the ground, thereby promoting better drainage and airflow. Heavier pots, like those made from terracotta or ceramics, are typically better for these shrubs as they are less likely to blow over with a larger plant inside. Pot-Growing Compost Ceanothus need a free-draining growing medium since waterlogged soil can cause major issues for these plants. However, whilst ceanothus plants are pretty drought tolerant, they do need some moisture when growing in pots. Therefore, it is important to choose a growing medium that retains some moisture but allows excess moisture to drain away freely. Choose or make your own peat-free potting mix and amend this with plenty of horticultural grit to improve drainage. Potting Up Ceanothus Remember, not all ceanothus will be suited to container growing. Make sure that the shrub is planted in its new container at the same depth that it was in its previous spot. Mulch around the top of the container to retain moisture and offer a little extra protection. How Many Can You Plant Per Pot? Ceanothus are best placed as individuals in containers where they are the star of the show. They are beneficial for other nearby plants when placed in the garden, but they can be a little fussy in pots and will definitely need space. Potted Ceanothus Care Place container-grown ceanothus in as sunny and sheltered a spot as possible for the summer and note that for some less hardy types or in colder areas, you may need to bring the plant indoors or undercover during the winter months. Plants growing in pots can be susceptible to winter cold to a greater degree than those in the ground. Wind scorch and frost damage are common problems when these plants are left in exposed locations. Since Ceanothus is a fairly drought-tolerant shrub when planted in the ground, some will make the mistake of thinking that they will not need to water frequently when growing in a container. However, it is important to remember that plants growing in containers will need to be watered more frequently than those growing in the ground. That said, it is best to encourage deeper roots, even when growing in containers, by watering deeply rather than shallowly and more frequently. Let the medium dry out between waterings, but make sure that you do water deeply before the medium dries out entirely, especially during hot, dry weather in summer. Always make sure that excess water can drain away freely to avoid issues that can arise due to waterlogged conditions. Ceanothus typically won’t need to be fertilised regularly, but topping up with a balanced fertiliser, such as fish, blood and bone in the spring can be advantageous, or a high-potassium fertiliser in late autumn to improve cold tolerance. However, if you heavily prune a ceanothus, then it is best to encourage it to recover well by feeding it with a balanced organic fertiliser after doing so. Mulching with homemade compost or other organic mulch around the top of the container can also help maintain fertility. Keep an eye out for pests like scale insects. Deadheading is not required for ceanothus, though you can remove spent blooms for neatness if you desire, and pruning will depend on the specific type of ceanothus you are growing. With the right positioning and care, smaller ceanothus shrubs can be wonderful choices for a container garden.
Learn more
Pruning Ceanothus: 'Only Cut Back Into The Green Section Of Stems' Says Horticulturist
IN THIS GUIDE Pruning Evergreen Types Pruning Deciduous Types Renovating Mature Shrubs Pruning Wall-Trained Types Ceanothus are flowering shrubs that can look great and also fix nitrogen, making them beneficial in many gardens. Although they are not native to the UK, they are commonly grown here and can thrive in the conditions that many of our gardens will readily provide. These shrubs are relatively easy to care for when placed in the right position, but pruning is something you should definitely think about when growing a ceanothus. “Ceanothus can become large if not pruned, so pruning long thin stems back by up to half their length, after flowering time, can help keep the plants more compact,” says Horticulturist Peter Lickorish. “Pruning into woody growth, however, is not always a good idea for evergreen Ceanothus, which may struggle to grow back.” You should always at least remove spent blooms or deadhead new growth to keep a healthy appearance. Personally I find that my tree grows so vigorously that I’m forced to prune it at least once a year (sometimes even to prevent it from growing into my neighbour’s guttering!). Difficulty Medium Equipment Required Secateurs or gardening shears When To Prune Varies by type The process for pruning ceanothus depends on whether you are dealing with an evergreen or deciduous shrub and the flowering seasons: Pruning Evergreen Types Spring Flowering Varieties These evergreens don’t necessarily need regular maintenance pruning. However, they are typically lightly pruned immediately after flowering, when flowering stems can be cut back by up to around one-third of their length. “It’s best to only cut back into the green section of stems as the older woody brown stems may not regrow after pruning and could leave the shrub looking bare or worse, they could initiate die-back and lead to larger sections of the shrub having to be removed,” shares Professional Gardener Roy Nicol. When growing these plants in a more confined space or as informal hedging, you can also cut back again later in summer if required to maintain their shape and compact form. Autumn Flowering Varieties Evergreen ceanothus plants which bloom later in the year bear their flowers on the growth of the current season and sometimes also have a flush of spring flowers on shoots that grew the previous season. With these shrubs, it is best to prune them in spring. You should aim to reduce the previous season’s growth by around a third when tidying up is required. Pruning Deciduous Types Deciduous ceanothus shrubs bloom in late summer and autumn and their pruning is a little more complex than that of evergreen types. They do tend to need more regular attention when it comes to this gardening job in order to ensure that they continue to flower well. These shrubs bear flowers on new growth, so it is best to prune them in early to mid-spring in order to encourage the formation of strong, fresh shoots each year. When you first plant a ceanothus of this type, the pruning strategy will be somewhat different from that used for pruning established, mature plants. To develop a good framework of branches: Shorten all the stems by two-thirds in the first year. In the second year, prune the previous year’s growth by around 2/3 and shorten any side shoots to 10-25cm from the main stems. Once the plant is well established in its third year after planting, reduce the length of the main flowering stems by around 50%. Cut back the weaker side shoots fairly hard, leaving a couple of buds from the main stems. You can also consider cutting out congested and unproductive old wood from the centre of the shrub to keep it performing and flowering well. Renovating Mature Shrubs Evergreen ceanothus does not tend to respond well to hard pruning when renovating an older shrub. So, if a plant has become woody and overgrown, it is usually best to replace it rather than attempt to prune it to give it a new lease of life. Deciduous ceanothus shrubs, on the other hand, are generally easier to renovate. These shrubs can tolerate hard pruning and can even recover from being pruned down to the ground in many cases, though the response will be slow. Hard pruning of deciduous ceanothus is usually carried out in late February or March. After cutting back the plant as much as is required, promote strong regrowth by spreading an organic mulch around the base of the plant. Pruning Wall-Trained Types Ceanothus of some types can be trained to cover a wall or fence. Pruning strategies specific to ceanothus used in this way will help to make sure that a well-balanced framework of branches is developed to create the desired effect without the plant outgrowing its location. The pruning times and techniques for wall-trained ceanothus still depend on which type you are dealing with, so you will need to take into account the notes on pruning evergreen and deciduous types given above. However, you will also need to consider specific techniques for training as a wall shrub. You will need to think about supports, ties, placement and about pruning to create a basic framework of branches, whilst also removing any weak, spindly growth. Then, once a wall-trained ceanothus is established, you should shorten side shoots to within 2-4 buds of the main framework of branches – and remove any shoots that are weak, straggly or growing towards the wall or fence. Pruning ceanothus is not complex once you have determined which type you have, but it is important to think about this gardening job to keep your ceanothus, of whatever type, looking its best. “I have found the key to maintaining evergreen Ceanothus is to lightly prune each year after flowering as described above,” shares Roy. “If these shrubs are allowed to become large and leggy, it’s already too late to reduce them as that would require pruning into the older wood which will not regrow. “This is a job to put in the gardening diary!”
Learn more
This Is How To Grow Muscari 'Grape Hyacinth' With Some Favourite Types To Try
IN THIS GUIDE Overview Common Varieties How To Grow Muscari Grape Hyacinth Care Guidelines References Muscaris are useful spring bulbs that can be grown in pots or containers, in a bed or border, or sometimes naturalised in lawn or meadow. There are a number of different species of grape hyacinth to consider, some of which are best suited to specific locations in the garden. They are relatively easy to care for but there are some important rules to follow when growing them in your garden – all of which we cover in more detail below. Overview Botanical Name Muscari Common Name(s) Grape Hyacinth Plant Type Bulb Native Area South Asia and North Africa Hardiness Rating H6 Foliage Deciduous Flowers Dense clusters of grape-like flowers When To Plant Autumn When To Prune After flowering Muscari is a genus of perennial bulbs which contain anywhere between 30-60 species.1 This genus provides us with a number of spring bulbs grown as ornamental plants in UK gardens. These are commonly known as grape hyacinths, named after their flowers, which, held on short dense spires, look a little bit like a bunch of grapes. Although they have the word hyacinth in their common name, they are not closely related to hyacinths at all. The genus originated in central and southern Europe, the Mediterranean basin, northern Africa and central, western and southwestern Asia and has since become naturalised elsewhere, including in Northern Europe and parts of the United States.2 Common Varieties M. armeniacum One of the popular species grown in the UK is Muscari armeniacum, from the east Mediterranean. The flowers of this species can be purple, blue (sometimes with a white fringe), pink or white and they bloom in April and May. M. armeniacum ‘Blue Spike’ M. armeniacum ‘Blue Spike’ is a varietal with larger, double flowers and works well naturalised in grass or alongside other spring bulbs in a container display. M. latifolium Another species commonly used as an ornamental is M. latifolium which is a broad-leaved hyacinth grape that has deep purple flowers in April and May. M. aucheri There is also M. aucheri, another spring bulb from Turkey – also a popular ornamental awarded an RHS Award of Garden Merit. There are a number of named cultivars of this species available too. There are many species and many named muscari bulbs used in UK gardens to choose from if you decide to grow a member of this genus. How To Grow Muscari Muscari is typically grown from bulbs, planted in autumn, though, as you will find out below, it is a plant that can also be propagated in a couple of other ways. These spring bulbs can be planted at the front of a bed or border and look lovely along a lightly shaded pathway. They also work well on a sunny or slightly shaded woodland or forest garden edge. Muscari can be great as part of a wildlife-friendly planting scheme, since growing these spring ephemerals catches water and nutrients in the spring, and provides a nectar source for pollinators early in the year. They spread easily, which can be delightful in some locations, but, of course, is not always wanted. They can also be contained or also work in small spaces, as they are also suited to growing in pots or other containers. You can plant them in containers on their own, but they also work very well planted in displays alongside other spring bulbs. Grape Hyacinth Care Guidelines Fortunately, these bulbs are very easy to care for and are pretty low-maintenance plants, so there is not a great deal that you will have to do. Soil Requirements The most important thing when growing muscari is to make sure that it is grown in moist but well-drained soil. The soil type is less important, as grape hyacinth tends to be relatively unfussy in that regard, coping with a range of soils and pH levels. However, these bulbous perennials will not thrive in waterlogged or overly damp conditions. Watering Grape hyacinths growing in the ground will typically not require watering, except perhaps during exceptionally long dry spells. In containers, of course, you will need to keep up with watering through summer to make sure the growing medium does not dry out entirely. Feeding Muscari tends to do very well and spread without much intervention. You will not usually have to worry about feeding them. If you wish, you can mulch around the plants with organic matter and they should have all they need. Pruning & Deadheading If you wish, you can deadhead your muscari after flowering so that it does not set seed. You should also lift and divide grape hyacinth while it is dormant over the summer months, to maintain the vigour of the plant and to limit its spread where desired. “Without dividing clumps, Muscari would be rampant in my garden,” shares Colin Skelly, a Master Horticulturist. “I tend to remove clumps whilst still in the green, so that I can still see where the bulbs are but after I’ve enjoyed the flowers. “These can be potted on or replated elsewhere. I think they look best where they can be allowed to run free, particularly under deciduous trees and shrubs. “They are also great in pots, either on their own or in a bulb lasagne.” At the end of the season, some people will cut away dead and dying foliage in autumn, but you can simply leave these alone, as this is usually simply for aesthetics on the whole. Leaving perennial foliage in place through the autumn and winter is also better for the wildlife in your garden. Propagating Though muscari is usually grown from bulbs, it can also be propagated by means of division in summer, and also by saving seed and sowing it in spring, though this latter option is not really worthwhile since the other two options are so much easier. Common Problems Grape hyacinth is generally untroubled by pests and disease, as this really is an easy crop to grow. However, it can sometimes be affected by viruses. The most common issues arise not due to a pest or disease, however, but due to unsuitable environmental conditions. These bulbous perennials will not thrive in an area where the ground becomes too wet and waterlogged. If grown in an overly damp location, the bulbs may rot. References 1. Wraga, K., & Placek, M. (2013). Review of taxons from genus Muscari cultivated in Department of Ornamental Plants in Szczecin. Herba Polonica. Retrieved March 21, 2023, from http://www.herbapolonica.pl/magazines-files/4146481-Pages%20from%20Herba_3-47.pdf 2. Mahr, S. (n.d.-d). Grape Hyacinth, Muscari armeniacum. Wisconsin Horticulture. Retrieved March 21, 2023, from https://hort.extension.wisc.edu/articles/grape-hyacinth-muscari-armeniacum/
Learn more
Grape Hyacinth From Seed Will Take Years To Reach Maturity, But It Is Possible
IN THIS GUIDE When To Sow Grape Hyacinth 1) Collect Seeds 2) Decide On A Method 3) Sow Your Seeds 4) Harden Off Plants 5) Plant Out In Autumn Muscari is a bulbous perennial that is typically propagated by means of bulbs planted in autumn or through the division of existing clumps to retrieve bulb offsets in summer. However, should you wish to obtain new plants for free, you could consider saving seeds from your own or a neighbour’s plant to sow. If you are considering growing muscari from seed, remember that, although it is a cheap way to obtain new plants, it will take several years for grape hyacinth sown from seed to reach the point of maturity where it will flower. If you have patience and are not deterred, here is the process involved when growing muscari from seed: Collect seeds from an existing plant. Decide whether to sow the seeds you have collected right away in a cold frame outdoors and grow them on until the following spring or cold stratify the seeds for 3 months and sow them indoors the following spring. Sow your muscari seeds in a suitable growing medium. Place seedlings in a suitable location to harden them off before transplantation. Plant out around a year after sowing in autumn or in spring. Read on as we share each of these steps in greater detail below: When To Sow Grape Hyacinth Muscari seeds can either be sown directly after they are collected and placed in seed trays or flats in a cold frame over winter, or kept in cold storage until they are warmed up and sown indoors in early spring. 1) Collect Seeds After Muscari has flowered in April or May, seed pods will develop on the plants if the faded flower spires are not removed. If you want to simply let the plant self-seed then you can leave these seed pods to mature, split open and spill their seeds. If you want to collect the seeds, wait until the pods are just beginning to split open and collect the seeds within each one to sow. 2) Decide On A Method If you have decided to collect seeds and take matters into your own hands, then you will have to decide which method to use. The first option is to sow the seeds right away after you collect them and place them in a cold frame outdoors. The other option is to opt for sowing the seeds indoors in spring. In this case, you will need to keep the seeds in the refrigerator to mimic the natural period of cold in winter, then sow your seeds indoors into seed trays or seed flats in early spring. 3) Sow Your Seeds Once you have decided which of the above methods to use, you will sow your seeds into a light and moist yet free-draining seed-starting compost, covering them lightly with soil. If you are sowing outdoors in a cold frame, keep the frame closed, watering sparingly over the winter months, and green growth should emerge in spring. If you are sowing indoors, it is best to cover over the seed tray or flat with a clear propagator or cloche until the green shoots emerge, which will usually be in 6-8 weeks. 4) Harden Off Plants If growing in a cold frame, open the lid to an increasing degree as spring arrives and the weather begins to warm to slowly acclimatise the young seedlings to outdoor conditions. If you have sown the seeds indoors in early spring, harden the plants off by moving them outdoors for increasing periods of time. 5) Plant Out In Autumn Keep a close eye on your young plants and keep the medium moist but avoid overwatering. Typically, muscari is planted out in autumn, though you may also plant out your young plants the following spring. 2-3 years after sowing the seeds, your grape hyacinth should have grown to the stage of maturity where it is ready to flower. Remember, you might also simply let the plants self-seed for flowers in the coming years with little to no effort on your part, but growing muscari from bulbs or dividing existing clumps are far easier ways to get more of these plants for your garden. “Muscari is a strong spreader, both from division of bulbs and self-sowing,” says Master Horticulturist Colin Skelly. “I find I have to divide clumps every spring to keep them in check. In doing this, I remove large numbers of self-sown muscari. “Unless you wanted to propagate very large numbers, take advantage and harvest the seedlings to increase numbers or plant elsewhere.”
Learn more
12 Ornamental Oxalis Types With Master Horticulturist Roy Nicol
IN THIS GUIDE 1) O. acetosella 2) O. adenophylla 3) O. articulata 4) O. enneaphylla 5) O. ‘Ione Hecker’ 6) O. massoniana 7) O. melanosticta ‘Ken Aslet’ 8) O. oregana 9) O. tetraphylla ‘Iron Cross’ 10) O. triangularis subsp. papilionacea 11) O. tuberosa 12) O. versicolor Closing Thoughts References Oxalis is a large genus of flowering plants with over 500 species from across the world that belong to the Oxalidaceae plant family.1 Many of those most familiar to UK growers will be the species grown as ornamental plants outside and sometimes as potted plants indoors. There are a huge number of oxalis varieties that you might grow here in the UK. Here are some of the interesting options to consider: 1) O. acetosella COMMON NAME(S): alleluia HARDINESS RATING: H5 FLOWERS: pink and white FLOWERING SEASON(S): spring / summer SUNLIGHT: part shade Oxalis acetosella, the common wood sorrel, is a plant native to the UK. It is a rhizomatous perennial that spreads to make a carpet of shamrock-shaped leaves and bears little funnel-shaped white flowers with fine pink veining between spring and mid-summer. It thrives in fairly fertile, well-drained soil, rich in organic matter, in dappled shade. “In the wild, it grows in woodlands and shaded hedgerows and is an indicator of ancient woodland, where it can be found in large swathes,” shares Master Horticulturist Roy Nicol. 2) O. adenophylla COMMON NAME(S): sauer klee HARDINESS RATING: H4 FLOWERS: pink and purple FLOWERING SEASON(S): spring SUNLIGHT: part / full shade Also known as sauer klee, this is a clump-forming bulbous perennial that grows to around 15cm in width and around 10cm tall. It has greyish leaves and bears bright rosy-pink flowers with purple throats in late spring. This oxalis variety grows well in reasonably fertile, well-drained soil in full or partial shade, and is great for a rock garden or alpine planting. This plant holds the RHS Award of Garden Merit (AGM), meaning it performs reliably in the garden. 3) O. articulata COMMON NAME(S): pink sorrel HARDINESS RATING: H3 FLOWERS: pink FLOWERING SEASON(S): summer SUNLIGHT: part shade / full sun Pink sorrel is another rhizomatous perennial. It is deciduous, forming clumps up to 45cm tall when in flower, with a spread of 0.5-1m. It has clover-like bright green leaves on long stalks and bears its bright pink flowers on long stems through the summer months. This type grows best in moist, well-drained soil, in sheltered conditions in full sun. It can also be grown in a container inside an alpine house. “In dry conditions, O. articulata will become dormant, with its leaves dying back, but it will quickly grow back in wetter conditions and is hard to kill,” shares Roy. “It’s often grown as a houseplant or a border perennial.” 4) O. enneaphylla COMMON NAME(S): scurvy grass HARDINESS RATING: H4 FLOWERS: pink FLOWERING SEASON(S): spring / summer SUNLIGHT: full sun Also known as scurvy grass and holding the RHS AGM, this rhizomatous, mat-forming perennial grows around 20cm wide and up to 10cm tall. It has slightly fleshy leaves and rosy-pink, funnel-shaped blooms, around 2.5cm in diameter, borne in late spring and early summer. Grow this oxalis variety in reasonably fertile, well-drained conditions in full sun. 5) O. ‘Ione Hecker’ COMMON NAME(S): wood sorrel ‘ione hecker’ HARDINESS RATING: H4 FLOWERS: purple FLOWERING SEASON(S): summer SUNLIGHT: full sun This little clump-forming rhizomatous perennial grows around 8cm tall and up to around 10cm wide and holds the RHS AGM. It has blue-grey leaves and funnel-shaped pinkish purple flowers, darker veined, around 3cm across, borne in summer. Grow this variety in full sun in fairly fertile, moist, humus-rich soil or growing medium, or in a container in an alpine house. 6) O. massoniana COMMON NAME(S): masson’s wood sorrel HARDINESS RATING: H2 FLOWERS: orange and yellow FLOWERING SEASON(S): autumn SUNLIGHT: full sun A South African plant, Masson’s wood sorrel is a dwarf bulbous perennial that forms small clumps. It has little delicate leaflets in whorls around fine stems and pale orange flowers with bright yellow eyes which are borne in autumn. Typically grown in a container in an alpine house, this option is H2 hardy. 7) O. melanosticta ‘Ken Aslet’ COMMON NAME(S): oxalis ‘ken aslet’ HARDINESS RATING: H5 FLOWERS: yellow FLOWERING SEASON(S): autumn SUNLIGHT: full sun A small oxalis specimen that grows up to 10cm tall and 10cm wide when in flower, it has pale green, silver-haired leaves and yellow funnel-shaped flowers that appear in autumn. Grow this option in a well-drained, sandy, low-nutrient soil or a very free-draining growing medium, in a sheltered and sunny position, or in an alpine house. 8) O. oregana COMMON NAME(S): redwood sorrel HARDINESS RATING: H5 FLOWERS: pink, lilac and white FLOWERING SEASON(S): spring / summer / autumn SUNLIGHT: part / full shade An interesting option for ground cover in a shady, woodland spot, the redwood sorrel is a creeping perennial with clover-like leaves and bears white, pink or lilac flowers from spring to autumn. This is a native of western North America. Grow in moist but well-drained fertile soil; in full or partial shade below mature trees. 9) O. tetraphylla ‘Iron Cross’ COMMON NAME(S): oxalis ‘iron cross’ HARDINESS RATING: H4 FLOWERS: pink FLOWERING SEASON(S): spring / summer SUNLIGHT: full sun This herbaceous perennial grows to around 15cm tall when in flower. The leaves are clover-like with dark brown crosses at the base of each one that gives this plant its name. The flowers, which emerge from late spring to late summer, are funnel-shaped and bright pink in hue. Grow in a well-drained, nutrient-poor soil or growing medium, either outdoors in a sheltered spot or indoors in a container. “This is a useful plant for those dry, sunny positions such as at the base of a wall where space is limited,” says Roy. 10) O. triangularis subsp. papilionacea COMMON NAME(S): purpleleaf false shamrock HARDINESS RATING: H3 FLOWERS: pink and white FLOWERING SEASON(S): summer / autumn SUNLIGHT: part shade Known as purpleleaf false shamrock, this is a deciduous bulbous perennial that produces purple foliage from spring through to autumn and white or pale-pink star-shaped flowers in the summer, before entering a period of winter dormancy. You can grow this outdoors from spring to autumn and bring indoors for winter, or grow it year-round as a houseplant indoors in a bright, cool space. 11) O. tuberosa COMMON NAME(S): oca HARDINESS RATING: H2 FLOWERS: yellow FLOWERING SEASON(S): summer SUNLIGHT: full sun / part shade If you are looking for new, interesting edible crops to try growing in a greenhouse, oca could be an interesting option to try. The edible tubers are a staple crop in South America and other regions. You can grow oca in containers with a loam-based potting compost with added grit under glass in bright filtered light, with low humidity, and place plants outdoors through the summer. 12) O. versicolor COMMON NAME(S): striped-flowered wood sorrel HARDINESS RATING: H3 FLOWERS: red and white FLOWERING SEASON(S): summer / autumn / winter SUNLIGHT: full sun / part shade Also known as candy-striped wood sorrel, this bulbous perennial grows around 8cm tall and forms clumps of light green leaves, topped with funnel-shaped white flowers with crimson margins, which gives a striped effect when the flowers are in bud. It blooms between late summer and winter. Grow this variety in a humus-rich growing medium in a sheltered spot in full sun or partial shade. Closing Thoughts “Some species of Oxalis are a real nuisance as weeds, so I’d advise to watch out for these and remove them as soon as possible,” says Roy. “In particular, the creeping Oxalis corniculata, an annual with small yellow flowers which develop into exploding seed pods and allow it to spread around the garden, Oxalis debilis with pink flowers which produces lots of small bulbils which are easily spread around the garden by digging, and Oxalis latifolia, again with pink flowers and which has both exploding seed pods and bulbils, making it even easier to spread around!” There are plenty of other oxalis varieties that you might grow in your garden, under cover or indoors, but the above options are a good place to start when looking for the right oxalis for you and your garden. References 1. Oxalis. (n.d.). Kew Royal Botanic Gardens. Retrieved March 21, 2023, from https://powo.science.kew.org/taxon/urn:lsid:ipni.org:names:30000622-2
Learn more


