

Growing

Look Out For These 7 Problems When Growing Agapanthus Says Dan Ori
IN THIS GUIDE 1) My Agapanthus Won’t Flower 2) Sunlight Issues 3) Watering Issues 4) Agapanthus Fertility Issues 5) Issues With Agapanthus Winter Care 6) Gall Midge 7) Plant Diseases References Agapanthus are popular flowers. While native to South Africa, these plants can cope with British conditions as long as you take care of them, especially over the winter. But while they can often do very well in our gardens, there are certain problems to look out for. 1) My Agapanthus Won’t Flower The most common issues gardeners experience when growing Agapanthus relate to flowering. Agapanthus can flower fairly reliably when cared for correctly. However, they can flower poorly, or fail to flower at all. A problem with flowering is usually due to one of the following issues: Too much shade Too little water or too much The wrong sized container Low fertility (especially when grown in pots) Incorrect winter care and protection Agapanthus gall midge Plant diseases Of course, in addition to causing poor or non-flowering, these issues can also cause other symptoms in Agapanthus plants. Read on to explore each one of these issues in a little more depth. 2) Sunlight Issues Most issues with Agapanthus non-flowering relate to some problem with the environmental conditions. One such common issue is a lack of sunlight. Remember, Agapanthus need a spot that is as sunny as possible. Too much shade is one reason why your plant may not be flowering as well as it should. 3) Watering Issues If the weather has been very dry, and especially when growing in containers, a lack of watering over the previous spring, summer and early autumn may be to blame for poor flowering. Once established, these plants can be relatively drought-tolerant. But still have to be watered frequently when growing in pots, and certainly until they are well settled in. However, Agapanthus also needs well-drained conditions. Waterlogging, and excessive watering, can also cause issues. Roots may rot (and fungal diseases, see below, may be more likely to set in) when conditions are too damp. 4) Agapanthus Fertility Issues Agapanthus, especially when grown in containers, can also suffer from a lack of fertility. Low potassium, for example, may reduce flowering, or even mean that a plant does not flower altogether. It is a good idea to feed your plant with a potassium-rich liquid feed from spring through to early autumn. Fertility issues may also cause other symptoms, such as yellowing leaves, in certain cases. 5) Issues With Agapanthus Winter Care Another common issue with Agapanthus is incorrect winter care. Hardier Agapanthus can often overwinter outdoors, but usually need some protection – such as a mulch of straw or autumn leaves piled over the crown. In more northerly gardens, and for more tender cultivars, it will usually be necessary to move plants to an unheated greenhouse or other protected frost-free location over the winter months. Where this is not done, plants will be damaged, and can die. Exposure to cold can also reduce flowering the following year, even when plants do survive the winter. However, poor quality flowering can also be due to being kept in too warm a location over the winter months. Agapanthus spaced in heated conditions over winter may flower earlier, but the flowers will usually be inferior in this case. 6) Gall Midge If the flower buds on an Agapanthus become discoloured and deformed and don’t open, this can be due to Agapanthus gall midge. This is caused by the larvae of a small fly, Enigmadiplosis agapanthi, first observed in the UK in 2014.1 When the deformed buds are opened, little maggots can be seen inside. The affected flower heads should be carefully removed and destroyed. 7) Plant Diseases While Agapanthus are not usually troubled by disease, there are several fungal issues that can occur – such as Anthracnose, powdery mildew, grey mould, and root rot, for example. Ensuring that you have provided the right environmental conditions for your Agapanthus, and are not causing problems through your watering, can help reduce the chances of such problems taking hold. References 1. Agapanthus gall midge. (n.d.). Royal Horticultural Society. Retrieved March 9, 2023, from https://www.rhs.org.uk/biodiversity/agapanthus-gall-midge
Learn more
Want Your Agapanthus To Survive Winter? Use These Tips From Elizabeth Waddington
IN THIS GUIDE Hardy ‘Ground-Growing’ Agapanthus Winter Care Potted Agapanthus Winter Care Agapanthus is an attractive flowering plant, but this South African native is not ideally suited to winter growing conditions here in the UK. In order to make sure that you can enjoy this perennial over a number of years, you need to think about providing it with some protection and some care over the winter months. How you care for Agapanthus over the winter months will depend on which variety you have chosen to grow – one of the hardier deciduous types, or a more tender evergreen. It will also depend on whether you are growing your Agapanthus in the ground, or in a container. Evergreen types are almost always grown in containers, while deciduous types are often grown in the ground. Here’s an easy-to-follow summary explaining how to care for Agapanthus in winter: Mulch hardier deciduous plants growing in a suitable spot. Lift Agapanthus growing in the ground where the conditions do not allow it to remain in place over winter. Remove it to an undercover or more sheltered spot. Move container-grown Agapanthus to a more sheltered or undercover position before frost threatens and take care of your plants until placing them back in their summer growing positions in the spring.. Hardy ‘Ground-Growing’ Agapanthus Winter Care In a reasonably mild, sheltered location, with free-draining soil, hardy deciduous Agapanthus can be left in the ground over the winter months, but the plants will usually need some protection. In autumn, protect the crowns by covering them and surrounding them with a thick layer of carbon-rich, insulating mulch, like straw or autumn leaves. It is also a good idea to leave foliage in place and not cut back, to provide a little extra protection from the cold and wet. If your Agapanthus is growing in a less well-drained spot, or somewhere more northerly or a bit more exposed, or if you have grown a more tender type in the ground, you will have to lift your plant and move it elsewhere to overwinter. You can move the plant into a bed inside a greenhouse or polytunnel, into a bed covered by a cold frame, or into a sheltered spot such as one protected at the base of a wall, where it will not only be protected from cold temperatures but also from excessive winter wet. Water sparingly when there is no access to natural rainfall, but don’t water too much. You can also pot up the plant you have lifted and deal with it as you would other Agapanthus growing in containers – see below for more information. Potted Agapanthus Winter Care Agapanthus growing in containers should be moved into a frost-free but cool location before the first frosts in your area. An unheated greenhouse or polytunnel is ideal, but a very sheltered spot at the base of a wall may also work in some areas and for some types of Agapanthus. While tender Agapanthus should certainly be kept in a frost-free location over the winter, it is also important to note that they should not be kept in a heated space or anywhere that will get too warm. High temperatures over the winter could very well lead to poor flowering the following year. Water sparingly, but consistently over the winter months when growing in a location where the plants do not get any rainfall at all. But remember that water needs are significantly lower over the winter than they are during the spring and summer months. Agapanthus in containers can be moved back outdoors to their summer growing positions once there is no longer a risk of frost where you live, in the spring.
Learn more
Deciduous Agapanthus Are Usually Cut Back Hard In Late Autumn - Experts Share How
IN THIS GUIDE When To Prune Agapanthus Do You Need To Cut Back Agapanthus? Identifying Your Type Pruning Deciduous Agapanthus Pruning Evergreen Agapanthus Agapanthus are tender perennials that need protection over the winter months but can be grown in many UK gardens. They are often grown in containers so they can easily be moved undercover for the coldest months, though they can also be grown in a border in southern, warm, sunny and protected gardens. If you are growing Agapanthus, you might wonder if you should prune your plants. And, if you do, when and how you should do so. Here’s the usual process to follow: Determine whether you need to prune at all by determining if you have a deciduous or evergreen type. Decide whether you will cut back deciduous Agapanthus in autumn or spring. Cut back deciduous Agapanthus to around 10cm above the soil surface Leave evergreen Agapanthus alone, or give it a trim for aesthetic reasons if you wish. When To Prune Agapanthus Agapanthus of the types which are pruned are usually pruned or cut back in October, or in March. Whether you prune in autumn or spring will largely depend on personal preference. Do You Need To Cut Back Agapanthus? Whether or not you should prune Agapanthus at all depends on whether you are growing a deciduous or evergreen type. Deciduous types are usually cut back hard, but evergreen types are usually left alone, unless you wish to give them a little tidy up for aesthetic reasons. Identifying Your Type Deciduous Agapanthus are those which die back over winter; evergreens will keep their foliage year-round. Deciduous Agapanthus tend to be hardier than the evergreen types. Deciduous types are sometimes overwintered outdoors with a thick mulch of straw or autumn leaves to protect the crown, while evergreen types are almost invariably moved undercover for the winter months. Pruning Deciduous Agapanthus If you have a deciduous Agapanthus that you plan to keep outdoors over the winter months, then it is usual to cut back the stalks with spent flowers or seed heads (if these have not already been deadheaded) to around 10cm above the ground. However, I sometimes choose to leave seed heads in place, since these can be rather attractive, and only cut the plant back to the base in spring. However, you may choose to leave the foliage in place to offer a little extra protection for the crown over the coldest months before you cut back straggly old leaves in the early spring to make way for new growth. “I remove the foliage of deciduous Agapanthus in late autumn as I find that it rots quite quickly to a slimy mess,” says RHS Master Horticulturist Colin Skelly. “Unless you are in the very coldest regions in the UK these Agapanthus should be perfectly hardy without additional protection.” If growing in a container and moving under cover over the winter, you may choose to cut the plants right back down to the crown in Autumn (as shown above). “Agapanthus stems can be pruned at ground level when the flower has gone over unless you want to leave them in the garden for winter structure,” says Patrick Fairweather, the Managing Director of Fairweather’s Nursery. “Flower stems should also be removed from young plants to encourage root and shoot development.” Provided you overwinter adequately you will see new shoots of growth in the following Spring. I covered the plant shown in the images above with a layer of mulch and it survived the winter outdoors next to our garden wall. Pruning Evergreen Agapanthus Evergreen Agapanthus should usually not be pruned or cut back. It should be left alone, aside from removing any unsightly leaves or removing particular portions of the plant with a little trim to improve its visual appearance. “I enjoy the foliage of evergreen Agapanthus in the winter when most other perennials have died back,” admits Colin. “I leave the dead flower stems in place for attractive early winter structure but remove these as winter progresses and the stems begin to degrade.”
Learn more
Emily Cupit's Deadheading Regimen For Agapanthus Can Help Boost Their Flowering
IN THIS GUIDE When To Deadhead Agapanthus Identifying Blooms To Deadhead How To Deadhead Agapanthus Agapanthus are beautiful flowering perennials that love a warm and sunny spot with free-draining soil. They not only look good over the summer, but can also bloom into the autumn. If you do not deadhead the later blooms, these will form into attractive seed heads which can also look good towards the tail end of the year. However, deadheading earlier blooms can sometimes be a good idea – deadheading earlier in the season can encourage new blooms to form. And if you do not want to collect and sow the seeds (or allow self-seeding to occur) then deadheading will prevent the plants from wasting energy on seed production. Deadheading Agapanthus could not be simpler: Identify blooms which have passed their peak and begun to fade. Snip off the spent blooms before they go to seed with sharp and clean secateurs, cutting off the stalks close to the base of the plant to keep things neat. Place the dead flower heads into your composting system. When To Deadhead Agapanthus Agapanthus will begin to bloom sometime in the early to mid-summer (depending on where you live, and the specific variety that you have chosen to grow). As soon as these first blooms begin to die back, and before they go to seed, you can start deadheading. Then, as required or desired, you can continue to deadhead all through the rest of the summer and into autumn. However deadheading is not necessary if you’d prefer to acquire some seeds for use in future years. “Choosing not to deadhead some of your blooms to harvest the seed later is a great idea,” says Dan Ori, qualified Horticulturist. “The plants you get from seed are not necessarily going to be like the parent plant you harvested it from; you could get a plant that grows differently or even a totally different colour flower!” Identifying Blooms To Deadhead Just remember that you might not want to deadhead all your blooms. If you want to collect the seeds you will of course have to leave some flowers to form into seed heads. But if you are deadheading for appearance’s sake, and to stop the plants from wasting their energy on seed production rather than foliage and further blooms, then you should easily see when the blooms have begun to wilt and wither. How To Deadhead Agapanthus Once you have decided which flowers need to be removed, simply take a sharp, sterilized pair of secateurs and cut off the flowering stalk close to the base of the plant. It does not really matter where on each stalk you choose to make your cut. Some people will leave the stalks and simply cut off each flower, but it can look neater if you cut lower down – so it is really up to you. So, as you can see, deadheading Agapanthus is a quick and easy job. You might not need to do it at all, but deadheading, at least during the earliest part of the growing season, can prolong the blooming period and keep your Agapanthus looking its best.
Learn more
16 Stunning Agapanthus Varieties With Advice From Patrick Fairweather
IN THIS GUIDE Expert Choices 1) A. ‘Arctic Star’ 2) A. ‘Fireworks’ 3) A. ‘Midnight Star’ 4) A. ‘Hoyland Blue’ 5) A. inapertus ‘Avalanche’ 6) A. ‘Twister’ 7) A. ‘Loch Hope’ 8) A. ‘Northern Star’ 9) A. ‘Peter Franklin’ 10) A. ‘Royal Blue’ 11) A. ‘Snow Cloud’ 12) A. ‘Purple Delight’ 13) A. ‘Peter Pan’ 14) A. ‘Flower of Love’ 15) A. ‘Jacaranda’ 16) A. praecox subsp. orientalis ‘Royal Velvet’ Key Considerations Agapanthus can be great options for a container garden, or for filling gaps with beautiful blooms in a sunny, sheltered and free-draining border. “Agapanthus is a versatile garden plant with foliage that provides structure when not in flower, which then sends out tall flower stems with striking clusters of bell-shaped flowers,” says Horticulturist Colin Skelly, who completed his Master of Horticulture qualification with the RHS. “I have grown different varieties in mixed borders, planted as specimens and more naturalistically and in large and small pots. “In all of these situations, they require minimal maintenance for a lot of horticultural return.” But which variety should you grow? Below, we list some of the excellent options to consider – all of which (except A. ‘Peter Pan’) have been given an RHS Award of Garden Merit. Expert Choices When building our list we spoke with Patrick Fairweather, one of the leading growers of Agapanthus in the UK and MD of Fairweather’s Nursery. We asked him to share his favourite varieties. “I love ‘Northern Star’, as its hardy and deciduous,” said Patrick. “I have it in my flower beds and it comes back year after year with large, striped, dark blue flowers.” You can find more information on ‘Northern Star’ in our detailed list below. “‘Ever White’ is a brilliant reblooming white Agapanthus that is great in a pot or at the front of a border,” Patrick adds. “For a dramatic patio plant in a pot, I would choose ‘Full Moon’. This is a tall variety that has large, rounded, pale blue umbels.” Read on to discover just some of the great Agapanthus varieties that you might consider: 1) A. ‘Arctic Star’ HARDINESS RATING: H4 USUAL HEIGHT: 80CM ‘Arctic Star’ grows to a height of around 80cm, with a 50cm spread. It flowers in July and August, and has creamy buds that open to pale blue/white blooms. These contrast well with greyish-green foliage. 2) A. ‘Fireworks’ HARDINESS RATING: H3 USUAL HEIGHT: 60CM ‘Fireworks’ grows to around 60cm tall. It is an evergreen type of Agapanthus, which bears round umbels of upright white buds which open to reveal trumpet-shaped blooms with purple-blue bases and white, flaring petal tips. 3) A. ‘Midnight Star’ HARDINESS RATING: H5 USUAL HEIGHT: 50-100CM If you are looking for a hardier, deciduous Agapanthus with deeper blue flowers then this is an excellent choice. The deep blue-hued blooms on this cultivar are born from mid to late summer, at a height of between 50cm and 1m. 4) A. ‘Hoyland Blue’ HARDINESS RATING: H3/H4 USUAL HEIGHT: 75CM Another evergreen type, ‘Hoyland Blue’ grows to around 75cm tall. It has broad, strap-shaped foliage above which the white to pale blue flowers tower from the late summer into autumn. 5) A. inapertus ‘Avalanche’ HARDINESS RATING: H4 USUAL HEIGHT: 80CM This herbaceous perennial grows up to around 80cm in height. It has relatively upright foliage and its stiff stems are surmounted by dangling, tubular white flowers in late summer and early in the autumn. 6) A. ‘Twister’ HARDINESS RATING: H4 USUAL HEIGHT: 50CM This compact option grows only around 50cm tall. The trumpet-shaped blooms are a deep blue-purple at the base, with white tips which flare outwards. It is also sometimes referred to as ‘Indigo Frost’. 7) A. ‘Loch Hope’ HARDINESS RATING: H5 USUAL HEIGHT: 120CM A hardier option, ‘Loch Hope’ is another good deciduous Agapanthus to consider. It grows a little taller than options discussed thus far, to a height of around 1.2m. It has beautiful deep blue flowers. 8) A. ‘Northern Star’ HARDINESS RATING: H4 USUAL HEIGHT: 80-100CM This is another great choice if you love including plenty of blue and purple hues in your garden. ‘Northern Star’ grows up to around 1m in height, and its flowers are a deep violet-blue, with delicate purple stripes down the centre of each petal. 9) A. ‘Peter Franklin’ HARDINESS RATING: H3 USUAL HEIGHT: 150CM A tall and dramatic Agapanthus, the stems on this plant can soar up to around 1.5m in height. This is another more tender evergreen option. The flowers on their large round umbels are a pure and pristine white. 10) A. ‘Royal Blue’ HARDINESS RATING: H4 USUAL HEIGHT: 75CM With bell-shaped flowers of a vibrant violet-blue, this is another deciduous Agapanthus to consider. The flowers are born in late summer, and grow to a height of around 75cm. 11) A. ‘Snow Cloud’ HARDINESS RATING: H4 USUAL HEIGHT: 120CM With the synonym ‘Fragrant Snow’, this Agapanthus lives up to its names, bearing beautiful loose balls of snowy white flowers in the summer months. The erect stems on this cultivar can grow to a height of around 1.2m. 12) A. ‘Purple Delight’ HARDINESS RATING: H3 USUAL HEIGHT: 90CM The name rather gives it away – the flowers of this variety of Agapanthus are indeed a lovely purple hue. The purple funnel-shaped flowers in their rounded umbels appear from mid-summer to early autumn. Their stems grow to a height of around 90cm. 13) A. ‘Peter Pan’ HARDINESS RATING: H4 USUAL HEIGHT: 50CM This is a dwarf Agapanthus that will grow to a maximum of half a metre. This variety has beautiful lilac and white striped flowers and contrasting yellow stamen which will stand out in any garden. This is the only type of Agapanthus on our list which has not received the RHS AGM. 14) A. ‘Flower of Love’ HARDINESS RATING: H4 USUAL HEIGHT: 50CM This compact deciduous Agapanthus has lovely deep blue flowers, born on upright stems that grow to around 50cm tall. This Agapanthus is in bloom through the summer months. 15) A. ‘Jacaranda’ HARDINESS RATING: H4 USUAL HEIGHT: 90CM This is an evergreen Agapanthus with purple-blue flowers, with deeper stripes down the heart of each petal. This is an earlier flowering type, and bears its flowers on 90cm high stems between June and August. 16) A. praecox subsp. orientalis ‘Royal Velvet’ HARDINESS RATING: H4 USUAL HEIGHT: 75CM This Agapanthus grows to a height of around 75cm. The rounded flower heads are a deep purple, with a darker central stripe down each one. There is also a purple tinge around the base of the leaves and flower stems. Key Considerations When choosing an Agapanthus, the first thing to consider is the hardiness of the variety you are considering. Hardiness Some can overwinter outdoors with some protection, while others are definitely more tender and will usually need to be brought undercover into an unheated greenhouse for the winter months. They range from half-hardy (H3), requiring a very mild winter or an unheated greenhouse to H5 (hardy through most of the UK even during extreme winters). Deciduous types are generally hardier, and evergreens more tender, but hardiness rating can vary even within each of these two categories. Colour Of course, another key consideration will be colour. Many Agapanthus are in shades of purple-blue, but there are white options. And some have bi-coloured flowers. Height Some larger, taller Agapanthus will work best in a border, while more compact options are often better choices for containers.
Learn more
You'll Need To Re-Pot Agapanthus Every Few Years - Here's How To Spot The Signs
IN THIS GUIDE When Should You Repot Your Agapanthus? 1) Remove The Plant From Its Current Pot 2) Choose & Prepare New Pots 3) Divide The Plant (If You Wish To) 4) Place The Agapanthus In A New Container 5) Add Your Potting Mix 6) Water Your Plant In Well 7) Add Mulch Agapanthus thrives in pots – this is definitely a plant particularly well suited to container growing. It tends to flower better with its beautiful blue, purple or white blooms when its roots are restricted. Growing in containers also makes it easier to care for these plants, especially the more tender evergreen types, over the winter months. Though Agapanthus likes to be a little squeezed and can cope surprisingly well with cramped conditions, it will typically need to be repotted after a couple of years – then every 4 years or so after that. When Should You Repot Your Agapanthus? Signs that could indicate that an Agapanthus needs repotting include: The lack of flowering, or poor flowering, after years of flowering well. Many roots emerging from the drainage holes at the base. Difficulty in getting the roots out of the container. (Because they are crammed in there and pack it so tightly.) Repotting Agapanthus is easy, you just need to follow these simple steps: Pry the Agapanthus out of its existing pot. Ready a new container, just slightly larger than the existing root system. Or, if you wish to divide the plant, find pots of a suitable size for each division. Divide the mature plant if you wish to do so. Place the Agapanthus into the new container. Fill around the plant with a peat-free loam based potting mix with added grit or sand for drainage. Water the plant(s) in well. Add grit, gravel or another decorative mulch around the top of the pots. Read on for a little more information about this process: 1) Remove The Plant From Its Current Pot This is usually the most challenging step of a simple process. Mature Agapanthus that need repotting can be rather difficult to remove from their pots. Run a blade or a flat, thin object around the edge of the pot to loosen it, and make it easier to lift out. If possible, pry and ease the plant out of its current location. Agapanthus that are extremely pot-bound like this one, may need to be cut from their pot to avoid damaging their root system. 2) Choose & Prepare New Pots Agapanthus thrives in terracotta pots, which not only aesthetically fit, but also provide optimal growing conditions. We chose to use an Elho pot made from recycled materials and which was slightly larger than the incumbent container. Whichever pots you choose, make sure that the pot you choose is just slightly bigger than the root ball of the plant that you wish to place in it. 3) Divide The Plant (If You Wish To) Repotting could be a good time to consider dividing a mature plant, rather than simply transferring it to a slightly larger container. This simply involves splitting the plant into sections, which can usually be accomplished with a sharp garden spade. “To avoid having to source a new large pot you can simply divide the plant and replant in the old pot,” says Colin Skelly MHort (RHS). “The divisions can be potted into smaller pots (which gardeners usually have a plentiful supply of) for sharing with friends and neighbours, planted into the ground or discarded on the compost heap.” 4) Place The Agapanthus In A New Container Place the Agapanthus in a new container. Make sure that you will be able to leave some room at the top of the pot, and also allow for a coverage of 5cm of the growing medium over the top of the roots. 5) Add Your Potting Mix Gently ease in your potting mix around the roots. Make sure that you do not leave any air pockets. A peat-free, loam-based potting mix, with some sand or grit added for drainage is ideal for growing Agapanthus. 6) Water Your Plant In Well Agapanthus will need a good drink after repotting. It is also important to check that excess water is allowed to drain away freely. 7) Add Mulch After repotting Agapanthus, it is a good idea to finish off the top of the pots with grit, gravel or other decorative mulch to retain water in the growing medium. This also helps to prevent water from pooling around the base of the plant and causing issues.
Learn more
How To Lift And Divide Agapanthus To Increase Your Collection Of Plants
IN THIS GUIDE 1) Lift Your Agapanthus 2) Knock Off Excess Soil 3) Divide Your Agapanthus 4) Repot Or Replant Each Division 5) Add A Mulch Around The Plants Agapanthus are not native to our shores, but they can be grown either in containers (brought under cover in winter) or in a border in a very sheltered, warm, sunny and protected spot. Learning how to lift and divide Agapanthus will make it easy for you to propagate an existing plant, and increase your collection of these attractive perennials. Dividing Agapanthus can help ease congestion for a very mature clump and make new Agapanthus plants for your garden identical to the parent plant. This is a very easy and simple process. All you have to do is: Gently lift a mature Agapanthus from its container or from the ground. Carefully knock off excess soil or growing medium so you can see more clearly. Carefully separate the plant into divisions. Repot or replant each section. Place a mulch of grit or gravel (or another decorative mulch) around the plants. Below, we’ll talk you through this process in a little more depth. 1) Lift Your Agapanthus Any healthy, mature Agapanthus is a suitable candidate for division. Once you have identified a plant which you would like to divide, the first step is to lift it from the soil or growing medium. An Agapanthus growing in a container can easily be knocked out. One growing in a bed or border can be gently lifted with a spade or garden fork. 2) Knock Off Excess Soil In order to see the root system more clearly, knock off excess soil or growing medium from around the roots. This will make it easier for you to check that the roots are healthy, and will also make the division process a little bit easier. 3) Divide Your Agapanthus Once you can see the roots, your goal is to split the existing root system into a number of sections. Sometimes, you may be able to tease off smaller sections of the plant by hand. In other cases, you may need to cut through the roots. This is easily done by placing the plant on the ground and cutting through it with a garden spade, or by teasing it apart with a garden fork. “For large clumps, I like to press two spades into the roots back-to-back, pushing the handles together levers the roots apart easily,” shares Dan Ori, a Horticultural Instructor and Consultant. “Using an old pruning saw or bread knife can also work well when dividing up a plant that can’t be teased apart.” 4) Repot Or Replant Each Division How many divisions you wish to make will depend, of course, on the size of the plant you are dividing, and on your needs or desires. Just make sure that each section has some strong roots, and some above-ground growth. Try to repot or replant each division as soon as possible. Spring and autumn are the best times for this job because the conditions at these times of year will tend to be conducive to transplantation and the risk of transplantation shock will be reduced. Make sure that you plant Agapanthus into a moist yet free-draining soil or a peat-free loam-based potting mix with added sand or grit. 5) Add A Mulch Around The Plants Finally, once you have replanted your divisions, it can be helpful to add a mulch of gravel or grit, or another decorative mulch, which will help with moisture retention – and also help to ensure that water does not sit around the base of the plants.
Learn more
Fill Pots Or Trays And Sow Agapanthus Seeds With This Simple 5 Step Process
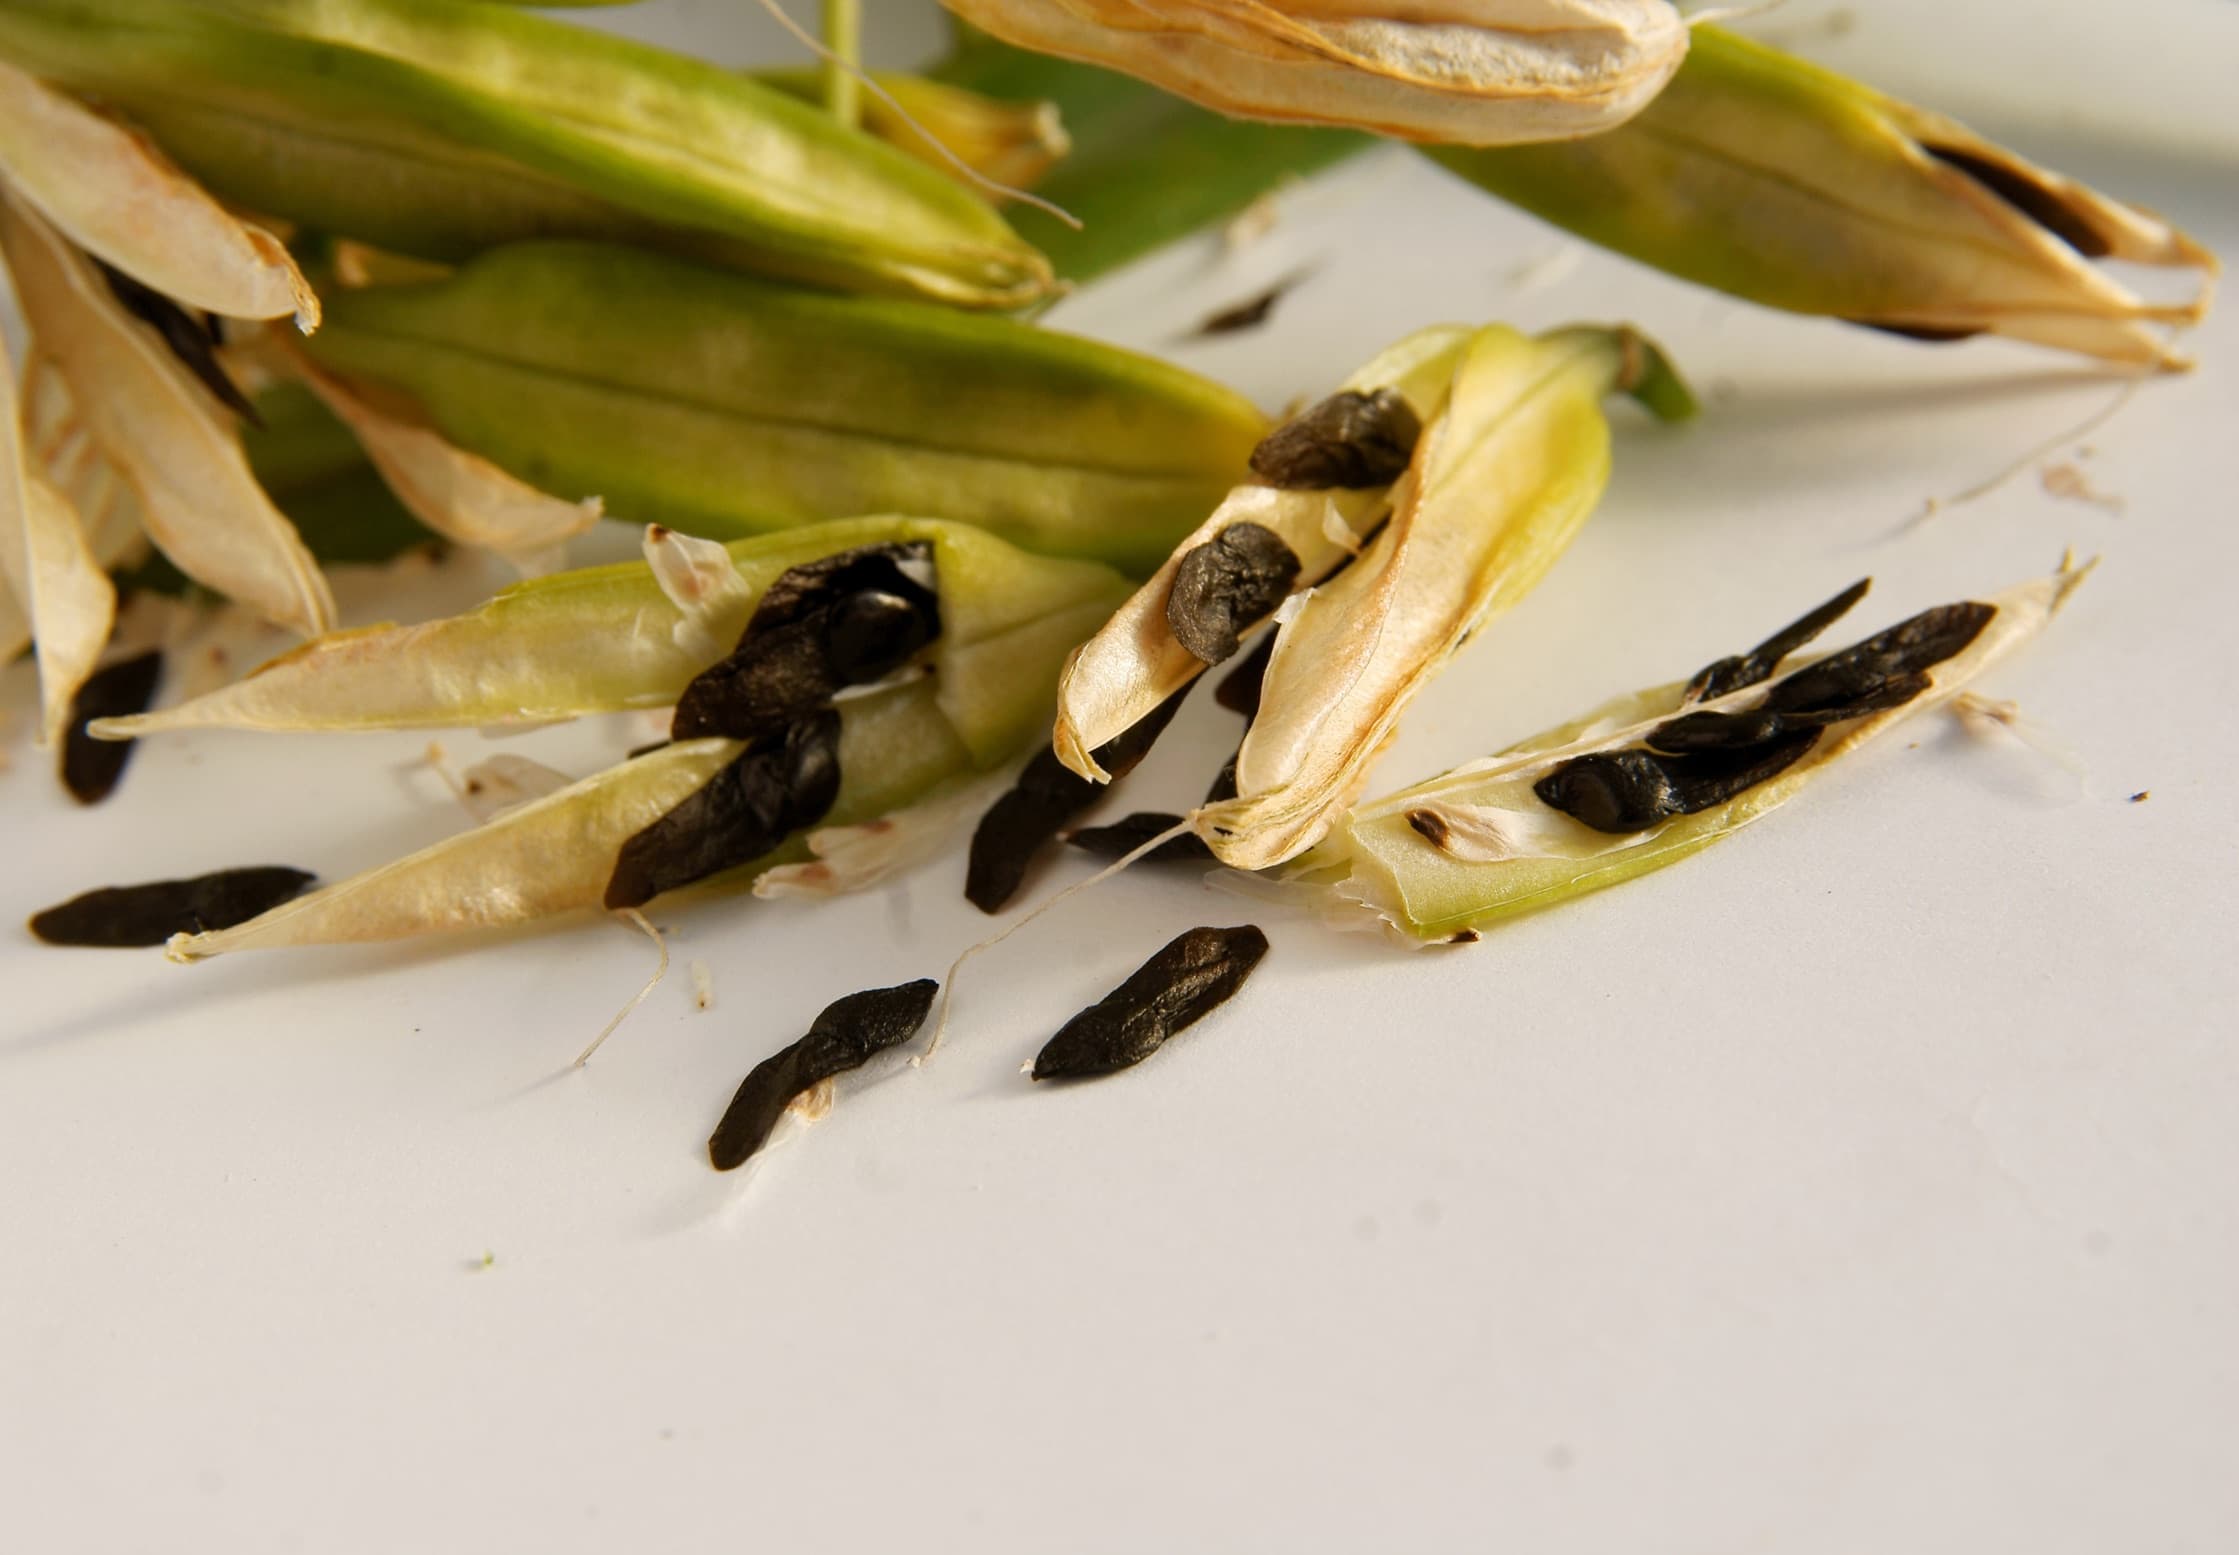
IN THIS GUIDE When To Sow Agapanthus Seeds 1) Harvesting Agapanthus Seeds 2) Fill Pots Or Trays With Potting Soil 3) Sow Your Agapanthus Seeds 4) Wait For Strong Roots & Shoots 5) Plant Into Individual Pots If you are already growing Agapanthus in your garden, in containers or in a sunny and free-draining border, you can easily gain more plants by collecting and sowing the seed. These attractive flowering perennials, also known as African lilies, can easily be propagated in this way. Just remember that it will take a couple of years before you see any of the beautiful flowers. So while it is a pretty easy process, patience is required. You should also note that many cultivars will not come true from seed, so the plants you grow may not look the same as the parent. Sometimes, however, this can lead to some interesting results, so you may still wish to give it a go. A simple five-step process will allow you to grow Agapanthus from seed: Harvest the seeds from an existing plant. Prepare pots or seed trays filled with a suitable growing medium. Sow the seeds by placing them on the surface and pressing them in, then covering them over with a layer of horticultural grit. Place the seeds in a suitable place for germination to occur, and strong roots and shoots to form. Then prick out the seedlings and grow them on in their own individual pots. Read on for a more in-depth description of this process. When To Sow Agapanthus Seeds Agapanthus seeds are usually sown immediately after they are collected from a plant. The seeds will usually reach maturity towards the end of summer, in July or August and should be sown right away. It is also possible to store the seeds and sow in early spring, though germination rates may not be quite as good. 1) Harvesting Agapanthus Seeds Agapanthus seeds are easy to harvest. You can do so once the seed pods are dry and crisp, and the black seeds fall out of them easily. You can simply open the pods and pick out the seeds. You can collect a number of pods to process by rubbing them gently between your hands so that all the seeds fall out, or you can place pale brown pods in a paper bag and place them in a dry location until they split open and the seeds fall out. We had no Agapanthus seeds to hand, so we bought Agapanthus orientalis ‘Blue’ from Chiltern Seeds: 2) Fill Pots Or Trays With Potting Soil Prepare your area for seed starting. Find some shallow pots, seed trays or traditional seed starting flats. Remember, if you do not already have these, that a number of reclaimed materials can be used, so you do not necessarily have to buy anything new. You can see in the photo above that we used pots made from organic and natural materials. These can be composted when it comes to re-potting your new plants. Fill your containers for seed sowing with a seed sowing compost or potting mix. Seed sowing composts are specially formulated to provide the right conditions in terms of structure, moisture and drainage – but you can make your own if you do not wish to purchase a specialist mix. “I would recommend investing in a good quality seed compost for Agapanthus if you want the best germination rates,” says Dan Ori, who has worked in the Horticultural sector for 27 years. “Multipurpose mixes can often be too high in nitrogen which can inhibit seed germination.” 3) Sow Your Agapanthus Seeds Agapanthus seeds must not be sown deeply as sunlight is required for germination to take place. It is best simply to press them gently into the surface of the growing medium, and then to cover them with a thin layer of horticultural grit. Water your seedlings to give them the ideal conditions for germination to take place. 4) Wait For Strong Roots & Shoots Leave the seeds to germinate in a reasonably warm and bright area where they receive at least 6 hours of sunlight per day. Germination should have taken place within around a month or so. Keep the surface of the growing medium moist, but take care not to overwater. Once germination has occurred, move the seedlings to a cool bright spot and continue to water to make sure that the medium does not entirely dry out. 5) Plant Into Individual Pots Once the seedlings have developed strong roots and shoots, carefully separate each one out of the trays of pots in which you sowed the seed, and place each one into its own individual small pot, or place several in a larger container to grow on. Pots should be filled with a peat-free, loam-based growing medium with a little grit or sand added to improve drainage. Again, it can be a good idea to place horticultural grit over the top of the growing medium in each pot. You can plant them out into a garden border in spring, once all risk of frost has passed in your area.
Learn more
Growing Agapanthus In Pots: Restricting The Roots 'A Myth' Insists Dan Ori
IN THIS GUIDE Can You Grow Agapanthus In Pots? Choosing A Container Restricting The Roots Choosing Compost Potting Up Agapanthus Caring For Agapanthus Plants In Containers Agapanthus, also known as the African Lily, is a herbaceous perennial plant, prized for its attractive flowers which come in a range of blueish-purple hues, or in white. Though this plant comes from South Africa, and loves sunshine and warmth, it can be grown outdoors in the UK with winter protection and an appropriate location and care. Can You Grow Agapanthus In Pots? Agapanthus can be grown in pots or other containers. Indeed, this is a popular choice for UK gardeners, since it makes it easier for the plants to be moved to an undercover location in winter. There are deciduous and evergreen Agapanthus. The deciduous type tend to be somewhat hardier, and some can cope with remaining outdoors year-round in a sheltered spot in more southern or coastal regions. Evergreen types (and even hardier types in chillier and more northerly gardens) are almost always grown in containers so that they can be moved into an unheated greenhouse or other protected location over the winter months. Choosing A Container Individual Agapanthus plants are often grown as pot-grown plants over the summer months. But you may also decide to grow Agapanthus from bulbs, which are best planted in around April, after the last frost date in your area. Single plants will usually be grown in a container which is around 20cm in diameter. If your plant came in a pot, do not be too quick to repot it into a larger container than the one in which it came. Restricting The Roots “Experts are split on whether you should restrict the roots of Agapanthus,” shares Horticultural Instructor Dan Ori. “My personal assessment is along with adding iron nails to the soil for iron and eggshells for calcium, Agapanthus doing well when you restrict the roots is a myth! The advice to restrict roots is still widely given by many top garden websites, but scientific understanding is always progressing and I would urge you not to let them become pot-bound. “In fact, living in a pot with little access to nutrients or water is likely to reduce flowering and plant health over time.” The exact size of the container you should choose will of course depend on the specific variety, and the age and size of a plant (or plants) you have selected. If you have purchased several smaller plants, these can be placed snugly into a larger container – as long as the root systems fit into the container, they should be happy in the restricted space. Pots should be deep enough to allow the root systems to sit around 5cm below the surface of the growing medium, and so that there is around 5cm at the top, above the surface of the medium, where water can pool and soak in, and not run off. In terms of materials, a terracotta pot can be ideal. The colour complements the blooms of these plants and the porous material can make for good, free-draining growing conditions. Make sure the container you choose also allows water to drain freely from the base. Choosing Compost The ideal growing medium for Agapanthus is a peat-free, loam-based compost or potting mix, such as John Innes number 2 or 3 (or a homemade equivalent) with grit or coarse sand mixed in to improve drainage. Place your plant or plants into your chosen container, and fill in your chosen potting mix around the roots, taking care not to leave any air pockets. Water well upon planting, then consider adding a decorative mulch across the top of the container to aid in moisture retention and keep things looking neat and attractive. Potting Up Agapanthus Remember, Agapanthus likes to have restricted roots, especially while young. Your plants will not need to be repotted for the first couple of years at least. After this, it may be beneficial to repot your plant or plants into slightly larger containers. How Many Can You Plant Per Pot? You can plant as many Agapanthus plants into a container as will comfortably fit without damage to the existing root systems. The plants can sit snugly together without ‘complaint’ and should thrive even if things seem crowded. If growing from bulbs, these should be spaced approximately their own width apart from one another, at least 5cm below the surface of the growing medium. Caring For Agapanthus Plants In Containers Place an Agapanthus in a container in a sunny, warm and sheltered spot. Water container grown Agapanthus a couple of times a week over the summer months. Feed the plants with a potassium-rich organic liquid plant feed (such as comfrey tea) every week or so during spring and summer for good flower development. Deadhead flowers after a spectacular display over the summer. Prune out any damaged or dead foliage in autumn. For deciduous types (not evergreens), cut back stems to around 10cm above the ground at the end of autumn. Move the container to a frost-free location such as an unheated greenhouse over the winter. (But do not move it anywhere too warm, as this can lead to poor growth and flowering the following year.)
Learn more


