

Growing

Pruning Gladioli Really Only Requires An End-Of-Season Removal Of Dying Foliage
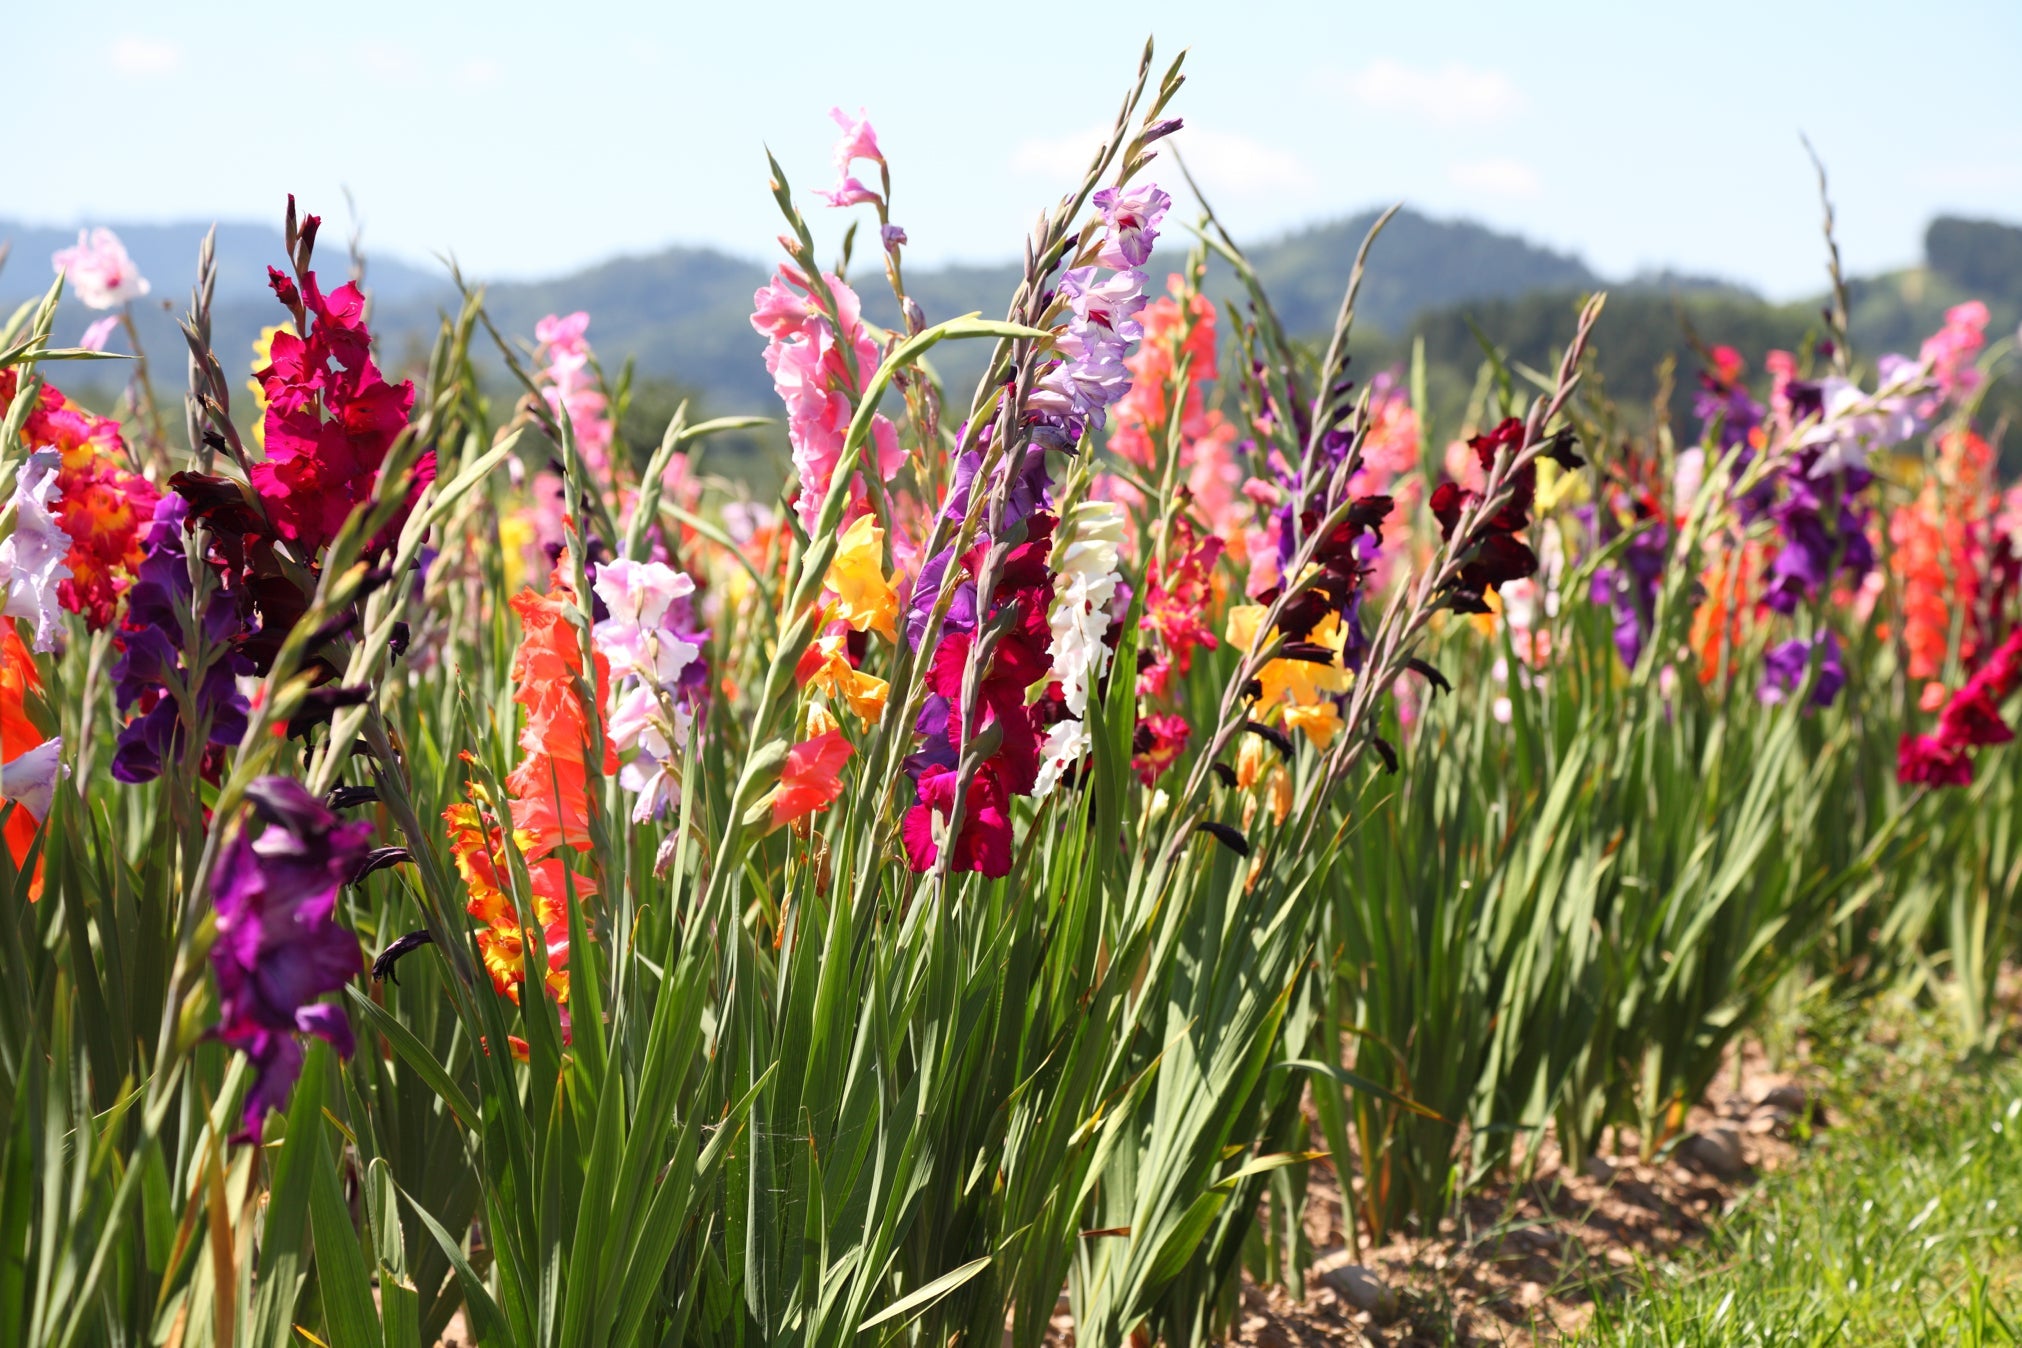
IN THIS GUIDE 1) Pinch Off Wilted Flowers 2) Cut Fading Flower Stalks 3) Remove Withered Leaves If you want to enjoy the summertime in the company of large trumpet-shaped flowers of brilliant hues arranged in thick clusters that often grow to over 1m tall, you’ll hit the jackpot with gladiola plants. Gladioli are long-lived cormous perennials that not only put on a colour show during summer but are very low-maintenance. Because of this, they are among the few plants that do not require pruning for form or shape, nor should they be pruned. They do not produce an overabundance of foliage, and what there is of those bright sword-shaped leaves is neat and tidy to begin with. Where gladioli are concerned, pruning really encompasses routine cleaning up and an end-of-season removal of dying foliage. “Larger flowered cultivars in particular will benefit in appearance for having wilted flowers removed,” says Colin Skelly, Master Horticulturist. “Species types, though, could easily be left without detracting from their impact, particularly if in a mixed perennial border.” You can prune gladioli by following these steps: Pinch off any wilted flowers. Cut the fading flower stalks. Remove withered leaves. This process is explained in more depth below. Difficulty Easy Equipment Required Gardening gloves, secateurs or hand shears When To Prune Continually May through August, then one-time in October 1) Pinch Off Wilted Flowers Shortly after the start of the blooming season, flowers on a given stalk will wilt and wither in ones and twos. These will detract from the beauty of the plant. Fred Miller, long-time Secretary from the Empire State Gladiolus Group, explains how gladiolus blooms from the bottom up, meaning that you should start at the bottom of the plant, removing the wilted florets when necessary. When you spot such dying blooms, gently grasp the stalk with one hand and pinch off the flower with the other by holding it between forefinger and thumb and twist-plucking it off. 2) Cut Fading Flower Stalks Later in the season, on a given stalk, a large number of the flowers will be fading and wilting. Fred argues: “As the gladiolus bloom, they bloom from the bottom up. “If you have them in the garden, remove the spoiled florets as needed. “If you have them in a vase, do the same, and also cut the stem down (a new cut will allow it to drink better, and it will keep a better form).” 3) Remove Withered Leaves Do not prune the leaves after the flowering season is over as they will be producing energy reserves for the corm for the following year’s blooms, so let them remain there as long as possible. It is only after the leaves have yellowed and started to wither, sometime in mid-autumn, that you should cut them off with a pair of secateurs. However, if the first frost arrives before the leaves have fully withered, then cut them off and protect the corm. Now the corm is finally done for the season.
Learn more
Do You Need To Dig Up Gladiolus Corms For Winter? It Depends, Say Gardeners
IN THIS GUIDE 1) Dig Up The Corms 2) Cut The Stems 3) Detach And Separate 4) Store Featuring brilliant columns of funnel-shaped flowers on upright flower stalks, gladioli are among summer’s most ravishing blooms. They occur in innumerable shades, often with very appealing splashes, tongues, bordering, and other types of colourations and markings. Barring a handful of exceptions, they are hardy to H3 and H4. What this boils down to is that gladiolus corms need winter care one way or the other. “An H4 hardiness rating means that plants are hardy down to -10°C, whilst H3 means that they are hardy to -5°C,” explains Horticultural Consultant Colin Skelly. “A hard frost could therefore cause your corms to die off, although a good layer of mulch in autumn (if in the ground) would give some insulation.” Be aware that even if your varieties’ corms are hardy enough to stay in the ground during winter, you should still dig them up every few years to separate the new corm from the old, dead, mother corm, and also to separate cormlets. You can care for gladioli over winter by following these steps: Dig up the existing plant. Cut the stems from each corm. Detach and separate the corms from each other. Store in a cool spot over winter. This process is explained in more depth below. Difficulty Hard Equipment Required Gardening gloves, gardening fork, a gardening trowel or hand spade, brown-paper bags, mesh bags, or newspapers 1) Dig Up The Corms Start the process a few days before the first expected hard frost of the year. Most likely, you will already have cut off the foliage by this point, but if not, do this before you attempt this first step. Using the gardening fork and trowel, loosen the earth and scoop it out so as to dig up the corm. Start several centimetres away from the main stem and go all around it to avoid cutting into the roots, and absolutely do not nick or bruise the corm itself. As soon as the corm is exposed, scoop out the rest of the earth with your gloved fingers and work out the corm. If necessary, prise it out using the trowel. Repeat this step for all the corms. 2) Cut The Stems Cut off the main stem 2-3cm from each corm. Gently remove soil and dust from the corms; you may use a cotton cloth or soft brush to do so. Leave the wafer-like husks intact. Inspect the corms and throw away any that are nicked or show signs of rotting. Lay a few sheets of newspaper on a flat surface in a cool, dark, well-ventilated shed or basement. Put the corms on the newspapers to dry out and cure, but be aware that the corms should not be touching one another. Leave the corms for 20-25 days. 3) Detach And Separate You will notice that each ‘corm’ is actually two corms, one on top of the other. The lower one, which will be wrinkled, is the mother corm and the one on top of it is the daughter corm. In addition to this, there may also be 2-3 very small corms, called cormels, attached to the base of the mother corm. Detach these stuck corms by carefully breaking them off from one another. They should come apart using only gentle hand-and-finger pressure. The daughter corm is the one you should plant the following spring while the wrinkly mother corm can go in the compost bin. As for the cormels, they too should be planted the following spring but it is only in the third year, typically, that they will produce flowers. 4) Store Sprinkle a garden fungicide powder, such as Sulphur powder, on all the corms to protect them from pest attacks over the winter. Put the corms very loosely in a mesh bag or a loose-knit cotton bag. Store in a well-ventilated, cool and dark place with a temperature between 6-10°C. It would be a good idea to inspect the corms a couple of times while they are in storage. If you find that any have gone soft or have started to rot, throw them away.
Learn more
When Propagating Hardy Cyclamen, Dividing Tubers Is Usually The Best Method
IN THIS GUIDE When To Divide 1) Cut Back Any Dead Foliage 2) Lift The Plant 3) Divide The Tuber 4) Replant The Divisions Cyclamen is a popular plant and there are many different varieties to choose from. Some species are hardy and are grown outside in UK gardens, while others, known as Florist’s Cyclamen, are more tender and are typically grown as houseplants indoors. If you wish for more cyclamen plants, it is possible (though sometimes challenging) to propagate new plants from existing ones. Florist’s Cyclamen is usually more difficult for the home gardener to propagate than the hardier types and individual species will differ greatly from one another in how simple it is to do so. However, cyclamens can, with some patience, be propagated from seed, or they can be propagated by means of division of the tuber. Some hardy types will self-seed rather readily outdoors, but sowing the seeds of most cyclamens yourself can take some work. It is usually easier to attempt propagation by division. To propagate cyclamens by division: Cut back any dead foliage. Lift the plant from the soil or growing medium. With a clean knife, cut the tuber into pieces, each one with a point where foliage would grow from (like the eyes in a seed potato). Plant the sections of cyclamen tuber with the growing points just above soil level. Read on for a slightly more in-depth description of this process – When To Divide The best time to divide cyclamens very much depends on which variety you are growing. As a general rule, hardy cyclamens are divided in autumn, around September or October. The more tender types grown indoors are best divided after they enter their period of dormancy after the foliage dies back in spring. April is usually a good time to propagate these cyclamens by division. “If you have a hardy Cyclamen that has established, it will slowly increase into a clump through natural division or self-seeding,” adds Colin Skelly, a Horticultural Consultant. “You can speed up this process by dividing some of the plants and controlling where you want the clump to spread.” 1) Cut Back Any Dead Foliage First things first, cut back any dead foliage on the plant. This will allow you to see things more clearly and handle the plant. 2) Lift The Plant Next, lift the plant carefully from the ground, or from the container in which it is growing. Ease the plant gently from the pot or lift it from the soil. Knock off any excess dirt so that you can clearly see the tuber, which at the mature stage, will resemble a seed potato. 3) Divide The Tuber Take a clean, sharp knife, and divide this tuber into sections. There are no hard and fast rules about how many divisions you can make, but you should not go overboard. Dividing each one into just 2-3 pieces usually offers the best chance of success. Each division that you create should have a small protrusion which foliage would grow from. Look out for these spots, which work like the ‘eyes’ on a seed potato. It is from these spots that new growth should emerge. 4) Replant The Divisions Once you have divided the tuber of a mature cyclamen plant, each division, with its growing point, should be replanted or potted up. If placing in the ground in your garden, it is important to choose a free-draining location in partial shade with good, fertile soil. If growing in containers, be sure that they drain freely and are filled with a suitable loam-based, peat-free medium with added grit and leaf mould for the best results. While this process is fairly straightforward, unfortunately, the divisions will be particularly vulnerable to root rot at this stage. It is important to make sure that they are not in overly damp or waterlogged conditions. If the divisions are successful, they should grow into new plants to increase your cyclamen collection. Be sure to place them in an appropriate place for the type you are growing and make sure to care for them correctly.
Learn more
Looking To Transplant Your Cyclamen? Do It Just Before Their Dormancy Period
IN THIS GUIDE When To Transplant 1) Cut Back Dead Foliage 2) Lift The Plant 3) Divide The Tuber 4) Replant Both hardy and tender cyclamen can be relatively easy flowering plants to grow. Hardy types will remain in a garden year-round, in the ground or in containers. Tender types are typically grown as houseplants over the winter months and placed outdoors or in a cool spot during the summer while they are in their dormancy period. To transplant cyclamen: Cut back any dead foliage in the spring dormancy period. Dig under the plant and lift gently from the soil or growing medium. Divide the tubers (if you wish to do so). Replant or pot up the dormant plants as soon as possible. Difficulty Easy Equipment Required Trowel or spade Preferred Aspect Partial shade, bright but indirect light indoors When To Transplant You can transplant hardy cyclamens in Autumn between September-October after the leaves die back. Tender types should be lifted and transplanted in spring when the plants die back for their summer dormancy. These are generally the best times to transplant cyclamens, though the best time to do so will depend on which particular variety you are growing. 1) Cut Back Dead Foliage Transplantation is easiest when the plants enter their dormant phase. You will be able to tell when cyclamens are entering dormancy because the leaves will be dying back. Before you lift and transplant the plant, it is easier if you cut back all the dead foliage so that you can see and handle the plant more easily. 2) Lift The Plant Once you have decided to move cyclamen, simply dig down below the plant with a trowel or small spade and lift it from the soil, or remove it from its present pot if it is growing in a container. Lift the plant out of the soil and shake off or remove any clods or clumps of soil so that you reveal the tubers. 3) Divide The Tuber If you wish, you can divide the tuber to propagate your cyclamen. 4) Replant Once you have lifted a plant, it is important to replant it as soon as possible. Make sure you are clear about which type of cyclamen you are growing and where it will happily grow. Hardy cyclamens like a partially shaded spot, in fertile soil that is moist but free-draining and is rich in organic matter. They do well in dappled shade below trees or shrubs, especially on slopes. “I always make sure to mark where I have planted out dormant Cyclamen,” shares Colin Skelly, a Horticulturist with almost 15 years of experience in the industry. “This will ensure that I don’t forget and disturb the planting site at a later date. “I simply put a cane where I have planted as a reminder. I also label the planting site so that I have a record of the species or cultivar that has been planted.” They can also be grown in suitable containers. Tender cyclamens need a free-draining container, filled with a free-draining yet fertile medium. This should be placed indoors in bright, indirect sunlight, at temperatures between 10-15°C.
Learn more
Cyclamen Society Advises On Some Common Difficulties And Ways To Fix Them
IN THIS GUIDE 1) Cyclamen Leaves Turning Yellow 2) Cyclamen Not Flowering 3) Collapsed Cyclamen 4) Grey Fuzzy Appearance On Foliage 5) Cyclamen Mite References Cyclamens can be relatively easy and trouble-free plants to grow, especially outdoors hardy varieties. Trevor Wiltshire from The Cyclamen Society explains that “there are very few problems growing them outdoors provided the correct situation is provided for them, some species tolerate and like shade, some are happy in full sun, they do not tolerate very wet soils. “They prefer free-draining soils. Some like growing in raised beds or even in rammed earth stone walls (Cornish hedges).” However, as with any plant, whether you are growing hardy cyclamens outdoors, or tender types indoors, there are certain problems and issues you can encounter, especially if you haven’t been able to provide the conditions mentioned above. Some of the common problems and issues that you encounter include: Yellowing leaves Poor flowering or non-flowering Collapsed or wilted plants Grey fuzzy appearance on leaves or stems Cyclamen mite We’ll take a look at each of these problems and talk through the causes for each one below: 1) Cyclamen Leaves Turning Yellow If Cyclamen leaves are turning yellow, it is important to note that this is not necessarily a problem. As a part of their natural life cycle, cyclamens die back to the ground. When the cyclamens do this will depend on which type you are growing. Hardy types tend to die back in autumn, while tender types usually go dormant in spring. If cyclamen leaves turn yellow when they are not meant to be entering their dormant period, then this is usually due to: A problem with temperatures. Too much or too little water. This problem is more common with indoor-grown cyclamen than it is with types grown outdoors. Indoor cyclamen should be placed indoors from September, until they enter dormancy in spring, in a bright spot with indirect light, at temperatures between 10-15°C. Often, yellowing leaves are a sign that the cyclamen was grown in a location too warm for it indoors. Yellow leaves may also be a sign of under-watering, or of watering too much. Water only when the medium begins to dry out, and make sure excess water can drain away freely. 2) Cyclamen Not Flowering If cyclamen fails to flower, this is usually, with tender types, due to high temperatures, which can send the plant into dormancy too early. Make sure that you are not growing these indoors in too warm a position. Remember, tender cyclamen will stop flowering and enter a period of dormancy in spring. They should be placed into a cool spot and then brought back indoors when growth resumes in around September. Cyclamen growing outdoors may not flower because they are not yet mature enough to do so, or there may be an issue with too little sunlight or poor drainage. Remember, cyclamen need a partially shaded though not deeply shaded position, with a free-draining, yet moist and fertile soil or growing medium. 3) Collapsed Cyclamen If a Cyclamen completely droops or collapses, this is often due to overwatering, or waterlogged conditions. In very damp conditions, the crown can rot and turn mushy and brown. It is important to ensure good drainage, to water the soil and to try and avoid splashing water onto the stems and leaves. Cyclamen which are tender may also collapse due to exposure to cold. Remember that while there are hardier types, some cyclamen cannot withstand cold temperatures and frost. Sometimes, complete collapse can also be a sign of a pest infestation. Vine weevil larvae can eat the roots of these plants, as Master Horticulturist Colin Skelly explains: “Vine weevil larvae are the biggest problem I have with plants grown in pots and they have a particular liking for Cyclamen. “Typically, there are no symptoms until the plant suddenly collapses as the larvae munch through the tuber. “The larvae are most active from autumn into winter, just when Cyclamen come into flower. “Check when planting for signs of vine weevil in the roots or treat the pot with a vine weevil predating nematode in early autumn when the compost is still warm enough for them to be active.” 4) Grey Fuzzy Appearance On Foliage If you spot a grey fuzzy mould on your plants, this is a sign of fungal infection.1 One common fungal issue is Botrytis cinerea – also known as cyclamen grey mould.2 Remove any infected leaves or flowers as soon as you can to prevent their spread. And to avoid repeat problems with a fungal infection, ensure that there is adequate drainage, make sure you do not overwater, make sure excess water can drain away, and ideally water from below, so water is not splashed onto the foliage. 5) Cyclamen Mite Not a lot of plants have their own special type of mite. These guys are one of the worst pests cyclamens can get, and they cause damage to every part of the plant. Prevention includes using a fertiliser that’s not too high in nitrogen or potassium: these elements can create an environment conducive to the mites. Regular inspection of your plants is another way to nip problems in the bud; you can remove mites manually and destroy them. If you find yourself with a full infestation, it’s time to investigate predatory insects (which don’t damage the plant) or pesticide sprays. Again, this warrants further research in the case of an infestation. Most problems encountered with cyclamens are due to the plants being grown in the wrong locations or some problems with the environmental conditions which have been provided. So, make sure you understand the needs and growing requirements of the particular cyclamen that you have chosen to grow. If you do so, you should not encounter many problems. References 1. Botrytis cinerea. (n.d.). Cyclamen.com. Retrieved March 14, 2023, from https://www.cyclamen.com/en/professional/diseases/8/20 2. Control of grey mould (Botrytis cinerea) in container-grown ornamentals: heated glasshouse crops. (n.d.). Horticultural Development Council. Retrieved March 14, 2023, from https://projectblue.blob.core.windows.net/media/Default/Horticulture/Legacy/Ornamentals%20factsheets/n24y02.pdf
Learn more
Both Hardy And Tender Cyclamens Work For Container Growing - Just Follow These Tips
IN THIS GUIDE Can You Grow Cyclamen In Pots? Choosing A Container Choosing Compost Potting Up Cyclamen Potted Cyclamen Care Cyclamen of a range of different types can be grown in many different ways. There are both hardy types suited to growing outdoors, and more tender types which are grown as houseplants over the winter months. Can You Grow Cyclamen In Pots? Both hardy and tender cyclamens are great for container growing. While hardy types are commonly grown in pots which remain outdoors year-round, tender types are typically grown in pots indoors between September-April, before being placed in a cool spot, often outdoors, for their summer dormancy period. Choosing A Container The important thing to remember when choosing a container for any type of cyclamen is that these are plants which like free-draining conditions. Make sure that you choose a pot with drainage at the base and one which will not become waterlogged. A cyclamen which will be grown indoors for only a single season can often remain in the pot it came in, but a cyclamen which you would like to keep for multiple years should ideally be potted into a new container. The size of this container will depend on the size of the specimen, but as a general rule, the pot should be just large enough to leave 2cm of the growing medium around the tuber of the plant you place in it. Choosing Compost Cyclamens should be placed into a growing medium which is rich in organic material, and fertile yet free-draining. Typically, a loam-based peat-free multipurpose compost should be used but it should be amended with horticultural grit and leaf mould to provide the optimal conditions. Potting Up Cyclamen When potting up cyclamen, tubers of hardy types should be planted 3-5cm deep and no deeper. With tender types, the top of the tuber should sit just above the surface of the soil. It can be beneficial, especially with tender types, to add a layer of horticultural grit over the surface of the medium after planting. How Many Can You Plant Per Pot? Thinking about the eventual size of the particular cyclamen you have chosen, you can place just a single specimen in a smaller pot, or group these together in a slightly larger container. “Over the years I have gathered a small collection of hardy Cyclamen in my garden,” shares Master Horticulturist Colin Skelly. “This has largely originated from plants bought for winter pots being planted out in spring. “I normally choose a spot under a mature tree or shrub that provides a sheltered but relatively dry root zone. “I often forget that I’ve planted them until I see them flowering the following autumn and winter!” Cyclamen, indoor or outdoor types, can certainly hold their own in pots and create stunning displays, but you might also consider combining cyclamen in containers with other plants with similar growing requirements and perhaps also a similar season of interest. For example, in a partially shaded spot outdoors, you might fill a container with C. coum, snowdrops, crocuses and primroses for a winter flowering display. Potted Cyclamen Care Keep indoor cyclamens in bright, indirect light, at temperatures between 10-15°C over the winter months. Then, place them outdoors or in a cool spot for the period of dormancy over the summer, bringing them back in when new growth emerges in September. Keep hardy cyclamen outside year-round in a partially shaded spot. Though hardy, it is a good idea to add insulating mulch and insulate the pot to keep them safe over the winter. Trevor Wiltshire from The Cyclamen Society notes the need to keep from overwatering: “More care with watering is required when growing Cyclamen in pots, they must not be overwatered, keep them on the dry side of damp!” Water indoor-grown cyclamen in pots when the medium is dry, ideally watering from below, and always letting excess water drain away. Water outdoor containers sparingly when the weather is dry, but note that natural rainfall should be sufficient. Additional fertilisation is not usually required for outdoor cyclamen, but indoor-grown tender types may benefit from an application of an organic houseplant feed every couple of months. Outdoor containers should be mulched with leaf mould as soon as the leaves die back. Tug away dead flowers or leaves gently if you wish to keep the display looking good. Make sure you look out for mice or squirrels who may uproot your plants when they are growing outdoors. Remember that there are a number of different cyclamens to choose from, which have different needs and which bloom at different times of the year. So, there are plenty of great choices for a range of container displays, inside, and outside your home.
Learn more
Winter Care Guidelines For Hardy Outdoor Cyclamen And Indoor Tender Types
IN THIS GUIDE Winter Care For Outdoor Cyclamen Overwintering Indoor Cyclamen Cyclamen are sometimes grown as houseplants and sometimes as garden plants, with specific varieties suited to both of these options. Cyclamens are usually grouped into hardy types, and tender types, with both requiring very different winter care. “Hardy cyclamen can give you interest through the cold, dark winter months if placed in pots outside,” shares Elliott Beveridge, a Head Gardener at a private estate in the south of England. Before you can understand how to care for cyclamen in winter, it is important to make sure you have identified which type of cyclamen you are growing. Below are some simple guidelines for winter care which should help steer you in the right direction: Ensure that hardy cyclamens in your garden are growing in a suitable free-draining spot, where waterlogging will not occur. Mulch around the hardy cyclamen in winter with a layer of insulating organic material. Keep tender cyclamen indoors from September until leaves naturally begin to die back in spring. Water when the medium is dry, feed every couple of months, and tug away dead flowers and leaves to keep tender cyclamen looking good as a houseplant in your home. Winter Care For Outdoor Cyclamen Hardy cyclamens include C. coum, C. hederifolium, and C. purpurascens. These types require little winter care, but care needs will differ depending on the specific type you are growing. C. coum flowers from January to March and so can actually be in its peak flowering period in winter. C. hederifolium flowers in early autumn, and its foliage, like ivy, provides good ground cover from winter to spring. C. purpurascens flowers from mid-late summer before dying back over the winter months. They are typically H5 hardy, which means they are hardy in most of the UK – even during severe winters. However, wet conditions can be an issue, so it is important to ensure good drainage. It can also be a good idea to mulch around the plants to provide some protection in colder UK gardens with loose, bulky, insulating organic material – like a thick layer of bark or autumn leaves. Overwintering Indoor Cyclamen Tender cyclamen which are grown indoors, like C. persicum and other large-flowered types, make excellent houseplants for the winter months. They should flower indoors over the winter before dying back and entering a summer dormancy period in spring. They are not frost-hardy and cannot survive outdoors over the coldest part of the year. They should be placed in pots indoors. Ideally, they should be kept in a bright location out of direct sunlight in a room which remains between 10-15°C. They should be watered when the medium feels dry, ideally from below, and excess water should always be able to drain away. “To avoid overwatering, fill a tray of water and sit your Cyclamen pot in it,” says Colin Skelly, a Horticultural Consultant. “When you see the colour of the tope of the compost turn darker you will know that the water has penetrated the whole pot. “Remove it and allow it to drip dry. This allows the compost to re-wet whilst avoiding the tuber sitting in wet compost or wetting the leaves. “Allow this to become dry to touch before repeating.” They don’t need much feeding or other care, but to keep your plant going over multiple seasons and encourage it to re-flower, it can be beneficial to feed with an organic houseplant feed every couple of months. Dead flowers and leaves can be gently tugged away to keep the plant looking neat.
Learn more
Propagate Comfrey From Root Cuttings For An Easy Way To Grow New Plants
IN THIS GUIDE 1) Select A Plant For Cuttings 2) Prepare Pots 3) Lift And Divide Existing Plant 4) Pot Up 5) Plant Out Comfrey is an extremely easy plant to grow and propagate. This is great news because it really is a great friend to gardeners. There are several different types of comfreys you can grow, but Russian comfrey is probably my favourite because it is sterile, so won’t spread out of bounds, and is great for maintaining fertility. However, you cannot grow this type from seed – but it can, like other comfreys, be propagated very easily by division, and from crown offsets and root cuttings. Once you have one comfrey plant growing in your garden, you can quickly and easily get many more to plant elsewhere in your garden. To propagate comfrey from cuttings: Select a mature comfrey plant, or purchase crown or root offsets. Prepare pots or growing areas in which to place the root cuttings. If propagating an existing plant, lift and divide the plant to acquire your cuttings. Plant or pot up the root cuttings. Plant out cuttings to their permanent growing positions as soon as new leaves emerge. This is a job that is best undertaken in autumn or early winter or early spring. Read on for a more in-depth explanation of this process. Difficulty Easy Equipment Required Mature comfrey or offsets, spade or fork, knife, gloves, pots When To Take Cuttings Spring, autumn, early winter 1) Select A Plant For Cuttings The first step is to find your cuttings. Of course, you might obtain cuttings from an existing comfrey plant in your garden, but you might also purchase cuttings. If you purchase cuttings, you will find that you can purchase either crown offsets or root offsets. Crown offsets are cuttings from the top part of the root system, with the growing tip attached. These will grow and establish more quickly. Root offsets are small portions of root without the growing tip. Comfrey is so remarkably easy to propagate because it will regrow pretty easily even from a small section of root. This is one of the reasons why it can be so difficult to eradicate from an area once it starts to grow there. 2) Prepare Pots Comfrey cuttings can quite often establish successfully when you place them straight in the ground, but if you place them in the ground, do remember that you should choose the spot carefully, as it will be very difficult to remove the plants once they establish. Comfrey needs a site with moist to damp soil, in full sun or partial shade. If the soil is not ideal where you live, it can be a good idea to choose pots to start out your cuttings. Small pots are fine, as long as you are prompt in planting out your cuttings as soon as new growth emerges and new leaves form. If planting in pots, fill these with any reasonably moist multipurpose peat-free potting mix or a homemade equivalent. If necessary, when planting outside in the ground, enrich the growing area before planting with plenty of organic matter. 3) Lift And Divide Existing Plant Taking cuttings from an existing plant can be done as part of the process of lifting and dividing. Comfrey plants can be lifted and divided in spring, autumn, or early winter. This can help reduce the size of an existing plant, while also providing more plants. You can simply lift and replant a portion of the existing comfrey, or you can also divide the portion up into smaller crown offsets and root cuttings. First, take a spade and slice down through the heart of the clump of comfrey, taking off as large a portion as you require and easing it from the soil. Firm the soil back in around the remaining plant; it will be fully recovered and back to how it was in no time at all. Take the portion you have lifted and shake off excess soil. If necessary, rinse the roots in cold water so that you can see things more clearly. You can then begin the process of dividing this portion of the mature plant into cuttings, or offsets. Cut across the roots using a sharp, clean knife around 5cm below the previous ground level. The area above this cut will become your crown offsets. Remove all the leaves remaining on this portion, leaving just 1cm or so of stem. The area below this cut can be used to create your root cuttings. Divide the crown using your knife into smaller sections. As long as each one has a growing tip and some root, it should get off to a good start and put on new growth more quickly than the root offsets. The remaining root sections from below the initial cut can be cut into short sections of the root, each around 5cm long. Each of these cuttings should also eventually grow into a new comfrey plant. You will soon see that a great many cuttings can be obtained from even a relatively small portion of an existing comfrey plant. “To divide my plants, I take large cuttings with an old pruning saw or bread knife, use a sharp garden knife to cut these into 5-10cm sections,” shares Dan Ori, a Horticulturist Instructor with 27 years of experience. “Unlike a wood (top growth) cutting, where you would have an angled cut at the top of the cutting material, with root cuttings I recommend having an angled cut at the thin end nearest the root tip of the cutting. “This will help you push it into compost when you plant it the correct way up with the pointy-end down.” 4) Pot Up Place crown offsets in the soil or growing medium at the level that they were previously at in the soil, with the growing tip just protruding. Root cuttings should be planted on their sides around 2.5cm below the surface of the soil or growing medium. 5) Plant Out You can plant out your offsets in the ground right away, or keep them in a greenhouse or other undercover area until the following spring before you plant them into their final growing positions.
Learn more
Comfrey Can Be Propagated By Seed, But Make Sure You Choose A Non-Sterile Type
IN THIS GUIDE Can You Grow Comfrey From Seed? When To Sow 1) Sow The Seeds 2) Move To Individual Pots 3) Overwinter 4) Plant Out Comfrey is an incredibly useful plant to grow in an organic and sustainable garden. However, some comfrey that is commonly grown is selected because it is sterile, or, in other words, it will not set seed. Sterile cultivars are often selected because, for all its benefits, comfrey can also become a nuisance in the wrong setting when it can set seed and spread on its own. The deep roots of the plant can make it difficult to eradicate once it has colonised an area. However, some gardeners may still decide to grow comfrey (such as Symphytum officinale) which can be grown from seed. Make sure you choose non-sterile comfrey to collect seeds from or purchase the right type of seeds for your needs. If you would like to grow non-sterile comfrey from seed: Sow seeds in a seed tray undercover or in a cold frame in spring (March-April) or autumn (September-October). Alternatively, you can directly sow comfrey in the garden in spring. Prick out seeds into individual pots once large enough to handle. Overwinter seedlings under cover during their first winter. Plant out the young plants into their permanent positions in spring, after the last frost date in your area. However, consider that other methods of propagation are quicker and easier. Read on for a more in-depth explanation: Difficulty Medium Equipment Required Seeds, pots or seed trays, potting medium, cold frame/ greenhouse or polytunnel When To Sow March-April or September-October When To Plant Out April-May Can You Grow Comfrey From Seed? Symphytum x uplandicum ‘Bocking 14’ is the most common sterile cultivar grown. It is a hybrid of S. asperum and S. officinale. This plant does not set viable seeds and so cannot be propagated in this way. However, species types which do set seed, such as S. officinale can be grown from seed. This is not the easiest way to propagate these plants, and generally, propagating by division or root cuttings is far easier, but sowing seeds can provide you with many new plants at one time. There are also other types of comfrey that you can propagate by seed, but these are nowhere near as common in the UK. When To Sow Comfrey seeds can be sown either in spring or autumn. You can plant your seeds where they are to grow in spring, after the last frost date in your area, but for better results, you should sow them undercover, in a cold frame, or in another unheated undercover growing area. 1) Sow The Seeds Comfrey seeds need a period of cold stratification, so if they have not been exposed to a period of cold, damp conditions over the winter, it can be best to place them in a fridge for a month or two in moist potting soil or a paper towel prior to sowing. However, this may not always be necessary. Sow seeds into a seed tray or flat filled with a suitable seed starting medium and cover them over lightly with the seed-starting potting mix. Seeds should germinate within a couple of weeks or so when grown in the right conditions. Soil temperature for most successful germination should be between around 15-25°C. 2) Move To Individual Pots Once germination has taken place, and your seedlings are large enough to handle, prick each one out and pot it up into its own individual pot filled with a peat-free multi-purpose potting mix. Since comfrey plants have deep roots and grow quickly, choose pots at least 15-20cm deep. “I like to create planting plugs using the cardboard core of kitchen rolls, as this gives you a deep pot without using too much compost,” shares Master Horticulturist Dan Ori. “When it is time to plant out, you can use a bulb planter to make the planting hole and can peel away the cardboard roll, but I plant it with the roll still on as it breaks down in the soil quickly.” 5L pots are usually the right size. 3) Overwinter Comfrey plants should be grown in pots, ensuring that they are watered well and regularly, and it is generally best to keep them undercover in a greenhouse or polytunnel for their first winter so that they become well-established. 4) Plant Out After they have spent their first winter in pots undercover, your comfrey plants can then be planted out into their final growing position the following spring, after the last frosts in your area. Remember, choose your position carefully, as you will find it very difficult to eradicate comfrey from a specific location if you later decide to move it. The roots can delve metres into the soil, and the plants can regrow from root sections.
Learn more


