

Growing

How To Lift And Divide Agapanthus To Increase Your Collection Of Plants
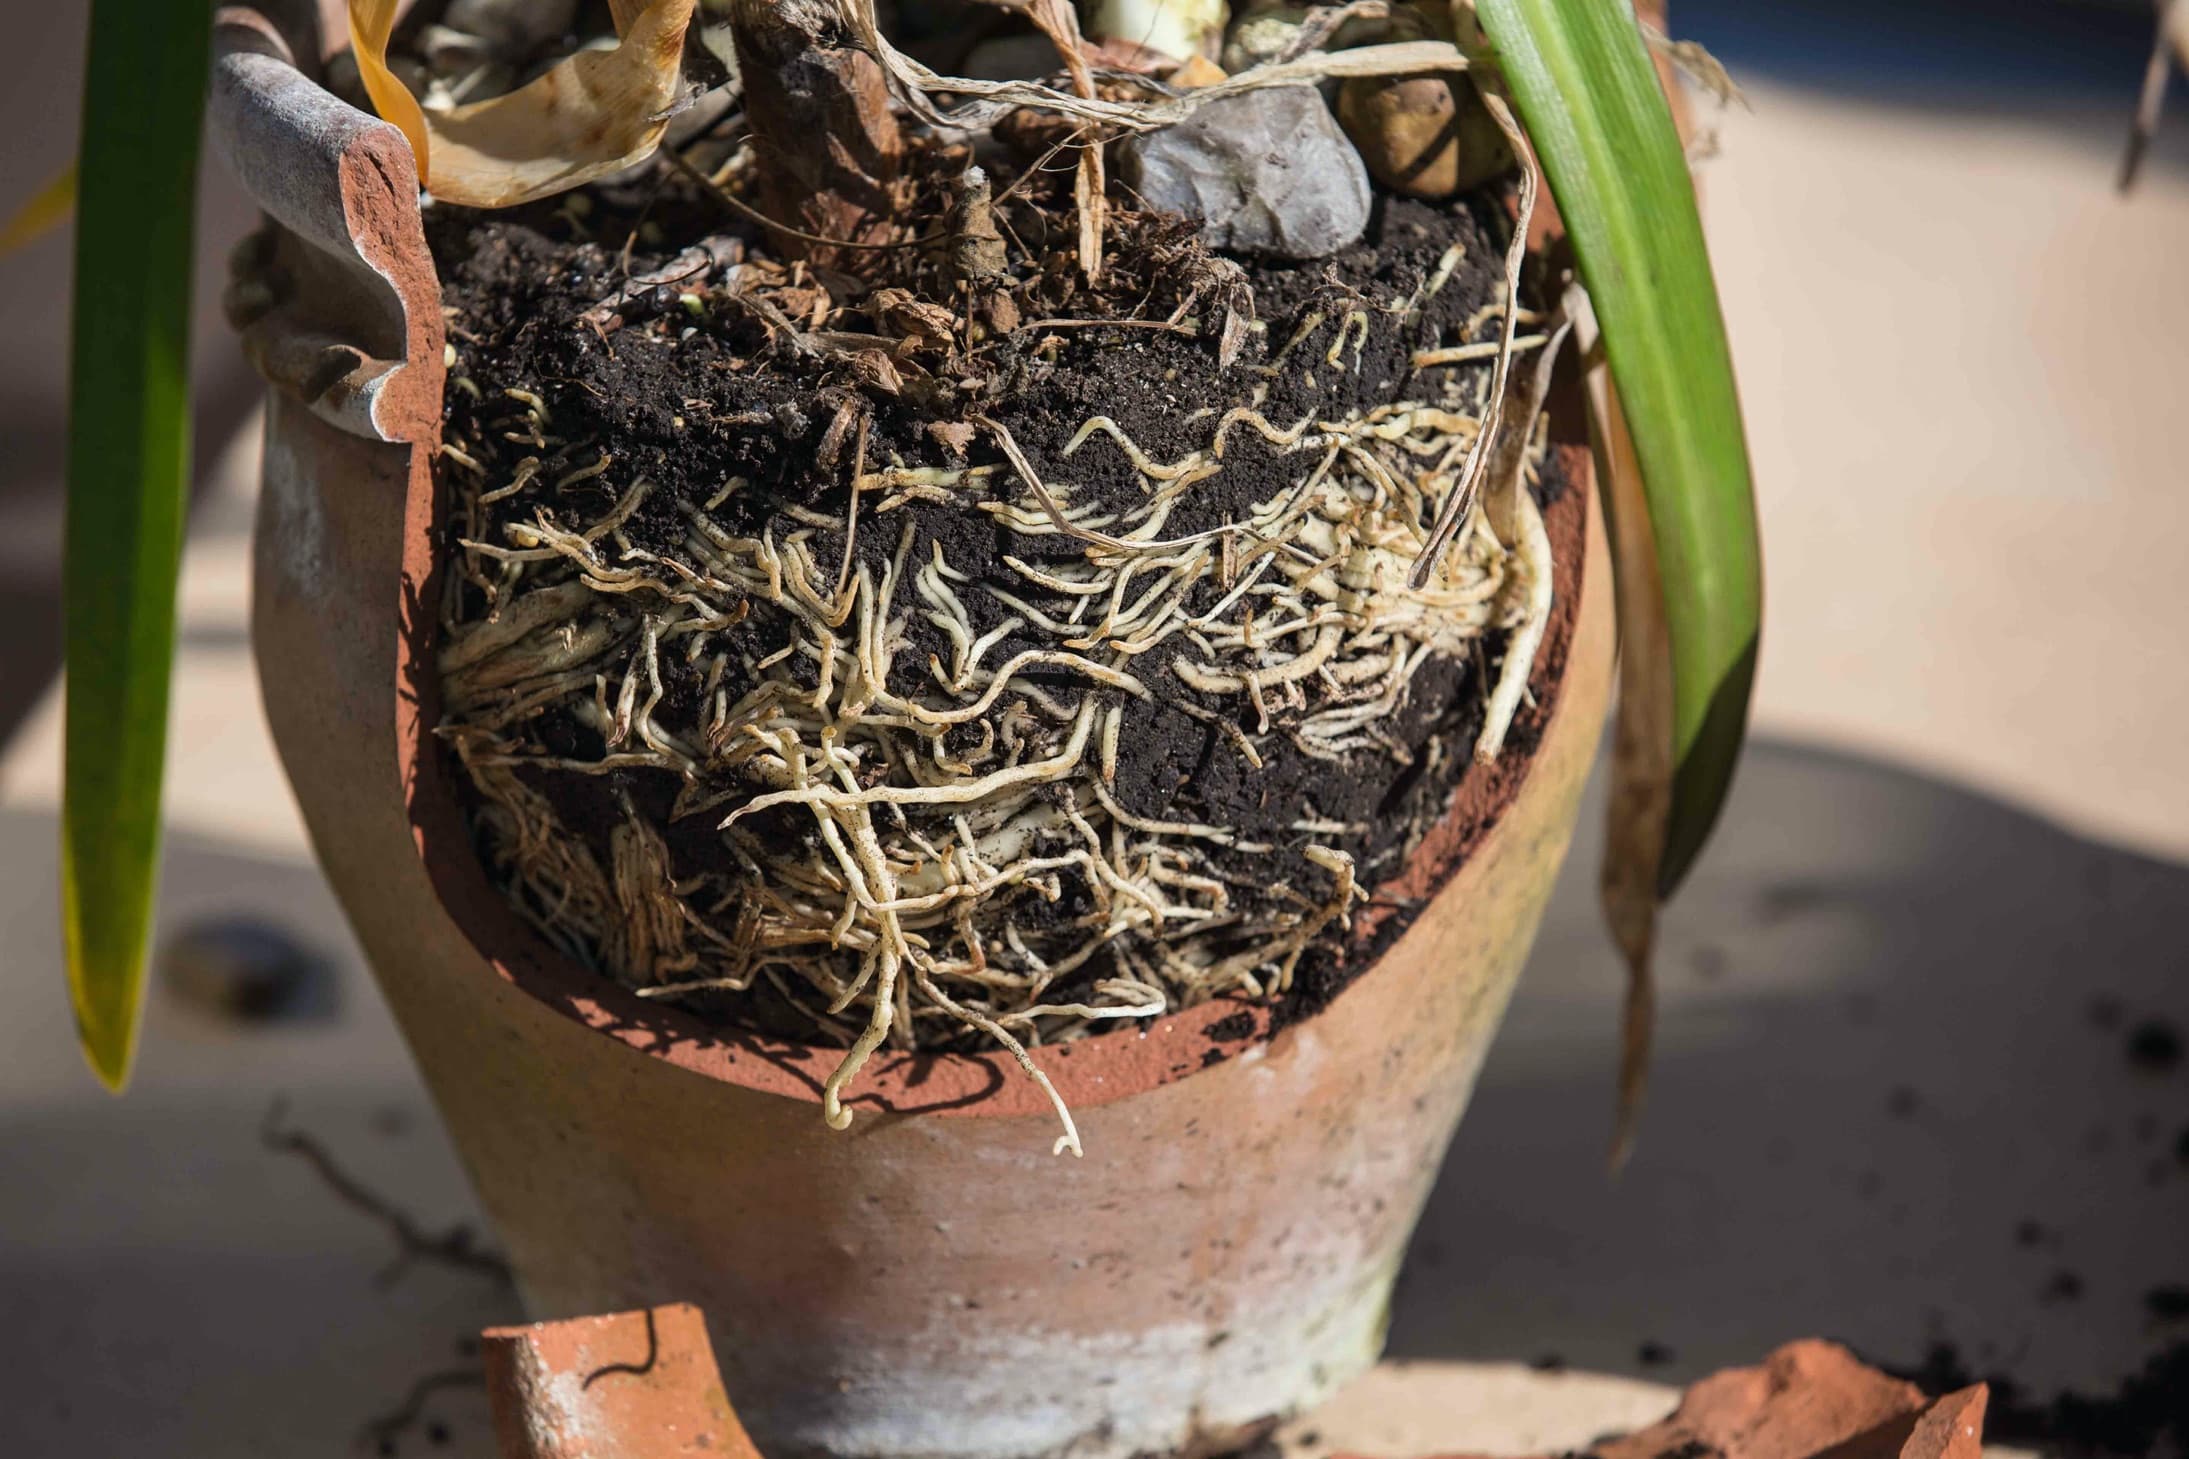
IN THIS GUIDE 1) Lift Your Agapanthus 2) Knock Off Excess Soil 3) Divide Your Agapanthus 4) Repot Or Replant Each Division 5) Add A Mulch Around The Plants Agapanthus are not native to our shores, but they can be grown either in containers (brought under cover in winter) or in a border in a very sheltered, warm, sunny and protected spot. Learning how to lift and divide Agapanthus will make it easy for you to propagate an existing plant, and increase your collection of these attractive perennials. Dividing Agapanthus can help ease congestion for a very mature clump and make new Agapanthus plants for your garden identical to the parent plant. This is a very easy and simple process. All you have to do is: Gently lift a mature Agapanthus from its container or from the ground. Carefully knock off excess soil or growing medium so you can see more clearly. Carefully separate the plant into divisions. Repot or replant each section. Place a mulch of grit or gravel (or another decorative mulch) around the plants. Below, we’ll talk you through this process in a little more depth. 1) Lift Your Agapanthus Any healthy, mature Agapanthus is a suitable candidate for division. Once you have identified a plant which you would like to divide, the first step is to lift it from the soil or growing medium. An Agapanthus growing in a container can easily be knocked out. One growing in a bed or border can be gently lifted with a spade or garden fork. 2) Knock Off Excess Soil In order to see the root system more clearly, knock off excess soil or growing medium from around the roots. This will make it easier for you to check that the roots are healthy, and will also make the division process a little bit easier. 3) Divide Your Agapanthus Once you can see the roots, your goal is to split the existing root system into a number of sections. Sometimes, you may be able to tease off smaller sections of the plant by hand. In other cases, you may need to cut through the roots. This is easily done by placing the plant on the ground and cutting through it with a garden spade, or by teasing it apart with a garden fork. “For large clumps, I like to press two spades into the roots back-to-back, pushing the handles together levers the roots apart easily,” shares Dan Ori, a Horticultural Instructor and Consultant. “Using an old pruning saw or bread knife can also work well when dividing up a plant that can’t be teased apart.” 4) Repot Or Replant Each Division How many divisions you wish to make will depend, of course, on the size of the plant you are dividing, and on your needs or desires. Just make sure that each section has some strong roots, and some above-ground growth. Try to repot or replant each division as soon as possible. Spring and autumn are the best times for this job because the conditions at these times of year will tend to be conducive to transplantation and the risk of transplantation shock will be reduced. Make sure that you plant Agapanthus into a moist yet free-draining soil or a peat-free loam-based potting mix with added sand or grit. 5) Add A Mulch Around The Plants Finally, once you have replanted your divisions, it can be helpful to add a mulch of gravel or grit, or another decorative mulch, which will help with moisture retention – and also help to ensure that water does not sit around the base of the plants.
Learn more
Fill Pots Or Trays And Sow Agapanthus Seeds With This Simple 5 Step Process
IN THIS GUIDE When To Sow Agapanthus Seeds 1) Harvesting Agapanthus Seeds 2) Fill Pots Or Trays With Potting Soil 3) Sow Your Agapanthus Seeds 4) Wait For Strong Roots & Shoots 5) Plant Into Individual Pots If you are already growing Agapanthus in your garden, in containers or in a sunny and free-draining border, you can easily gain more plants by collecting and sowing the seed. These attractive flowering perennials, also known as African lilies, can easily be propagated in this way. Just remember that it will take a couple of years before you see any of the beautiful flowers. So while it is a pretty easy process, patience is required. You should also note that many cultivars will not come true from seed, so the plants you grow may not look the same as the parent. Sometimes, however, this can lead to some interesting results, so you may still wish to give it a go. A simple five-step process will allow you to grow Agapanthus from seed: Harvest the seeds from an existing plant. Prepare pots or seed trays filled with a suitable growing medium. Sow the seeds by placing them on the surface and pressing them in, then covering them over with a layer of horticultural grit. Place the seeds in a suitable place for germination to occur, and strong roots and shoots to form. Then prick out the seedlings and grow them on in their own individual pots. Read on for a more in-depth description of this process. When To Sow Agapanthus Seeds Agapanthus seeds are usually sown immediately after they are collected from a plant. The seeds will usually reach maturity towards the end of summer, in July or August and should be sown right away. It is also possible to store the seeds and sow in early spring, though germination rates may not be quite as good. 1) Harvesting Agapanthus Seeds Agapanthus seeds are easy to harvest. You can do so once the seed pods are dry and crisp, and the black seeds fall out of them easily. You can simply open the pods and pick out the seeds. You can collect a number of pods to process by rubbing them gently between your hands so that all the seeds fall out, or you can place pale brown pods in a paper bag and place them in a dry location until they split open and the seeds fall out. We had no Agapanthus seeds to hand, so we bought Agapanthus orientalis ‘Blue’ from Chiltern Seeds: 2) Fill Pots Or Trays With Potting Soil Prepare your area for seed starting. Find some shallow pots, seed trays or traditional seed starting flats. Remember, if you do not already have these, that a number of reclaimed materials can be used, so you do not necessarily have to buy anything new. You can see in the photo above that we used pots made from organic and natural materials. These can be composted when it comes to re-potting your new plants. Fill your containers for seed sowing with a seed sowing compost or potting mix. Seed sowing composts are specially formulated to provide the right conditions in terms of structure, moisture and drainage – but you can make your own if you do not wish to purchase a specialist mix. “I would recommend investing in a good quality seed compost for Agapanthus if you want the best germination rates,” says Dan Ori, who has worked in the Horticultural sector for 27 years. “Multipurpose mixes can often be too high in nitrogen which can inhibit seed germination.” 3) Sow Your Agapanthus Seeds Agapanthus seeds must not be sown deeply as sunlight is required for germination to take place. It is best simply to press them gently into the surface of the growing medium, and then to cover them with a thin layer of horticultural grit. Water your seedlings to give them the ideal conditions for germination to take place. 4) Wait For Strong Roots & Shoots Leave the seeds to germinate in a reasonably warm and bright area where they receive at least 6 hours of sunlight per day. Germination should have taken place within around a month or so. Keep the surface of the growing medium moist, but take care not to overwater. Once germination has occurred, move the seedlings to a cool bright spot and continue to water to make sure that the medium does not entirely dry out. 5) Plant Into Individual Pots Once the seedlings have developed strong roots and shoots, carefully separate each one out of the trays of pots in which you sowed the seed, and place each one into its own individual small pot, or place several in a larger container to grow on. Pots should be filled with a peat-free, loam-based growing medium with a little grit or sand added to improve drainage. Again, it can be a good idea to place horticultural grit over the top of the growing medium in each pot. You can plant them out into a garden border in spring, once all risk of frost has passed in your area.
Learn more
Growing Agapanthus In Pots: Restricting The Roots 'A Myth' Insists Dan Ori
IN THIS GUIDE Can You Grow Agapanthus In Pots? Choosing A Container Restricting The Roots Choosing Compost Potting Up Agapanthus Caring For Agapanthus Plants In Containers Agapanthus, also known as the African Lily, is a herbaceous perennial plant, prized for its attractive flowers which come in a range of blueish-purple hues, or in white. Though this plant comes from South Africa, and loves sunshine and warmth, it can be grown outdoors in the UK with winter protection and an appropriate location and care. Can You Grow Agapanthus In Pots? Agapanthus can be grown in pots or other containers. Indeed, this is a popular choice for UK gardeners, since it makes it easier for the plants to be moved to an undercover location in winter. There are deciduous and evergreen Agapanthus. The deciduous type tend to be somewhat hardier, and some can cope with remaining outdoors year-round in a sheltered spot in more southern or coastal regions. Evergreen types (and even hardier types in chillier and more northerly gardens) are almost always grown in containers so that they can be moved into an unheated greenhouse or other protected location over the winter months. Choosing A Container Individual Agapanthus plants are often grown as pot-grown plants over the summer months. But you may also decide to grow Agapanthus from bulbs, which are best planted in around April, after the last frost date in your area. Single plants will usually be grown in a container which is around 20cm in diameter. If your plant came in a pot, do not be too quick to repot it into a larger container than the one in which it came. Restricting The Roots “Experts are split on whether you should restrict the roots of Agapanthus,” shares Horticultural Instructor Dan Ori. “My personal assessment is along with adding iron nails to the soil for iron and eggshells for calcium, Agapanthus doing well when you restrict the roots is a myth! The advice to restrict roots is still widely given by many top garden websites, but scientific understanding is always progressing and I would urge you not to let them become pot-bound. “In fact, living in a pot with little access to nutrients or water is likely to reduce flowering and plant health over time.” The exact size of the container you should choose will of course depend on the specific variety, and the age and size of a plant (or plants) you have selected. If you have purchased several smaller plants, these can be placed snugly into a larger container – as long as the root systems fit into the container, they should be happy in the restricted space. Pots should be deep enough to allow the root systems to sit around 5cm below the surface of the growing medium, and so that there is around 5cm at the top, above the surface of the medium, where water can pool and soak in, and not run off. In terms of materials, a terracotta pot can be ideal. The colour complements the blooms of these plants and the porous material can make for good, free-draining growing conditions. Make sure the container you choose also allows water to drain freely from the base. Choosing Compost The ideal growing medium for Agapanthus is a peat-free, loam-based compost or potting mix, such as John Innes number 2 or 3 (or a homemade equivalent) with grit or coarse sand mixed in to improve drainage. Place your plant or plants into your chosen container, and fill in your chosen potting mix around the roots, taking care not to leave any air pockets. Water well upon planting, then consider adding a decorative mulch across the top of the container to aid in moisture retention and keep things looking neat and attractive. Potting Up Agapanthus Remember, Agapanthus likes to have restricted roots, especially while young. Your plants will not need to be repotted for the first couple of years at least. After this, it may be beneficial to repot your plant or plants into slightly larger containers. How Many Can You Plant Per Pot? You can plant as many Agapanthus plants into a container as will comfortably fit without damage to the existing root systems. The plants can sit snugly together without ‘complaint’ and should thrive even if things seem crowded. If growing from bulbs, these should be spaced approximately their own width apart from one another, at least 5cm below the surface of the growing medium. Caring For Agapanthus Plants In Containers Place an Agapanthus in a container in a sunny, warm and sheltered spot. Water container grown Agapanthus a couple of times a week over the summer months. Feed the plants with a potassium-rich organic liquid plant feed (such as comfrey tea) every week or so during spring and summer for good flower development. Deadhead flowers after a spectacular display over the summer. Prune out any damaged or dead foliage in autumn. For deciduous types (not evergreens), cut back stems to around 10cm above the ground at the end of autumn. Move the container to a frost-free location such as an unheated greenhouse over the winter. (But do not move it anywhere too warm, as this can lead to poor growth and flowering the following year.)
Learn more
Sweet Alyssum Are Easy-To-Grow Annuals - Here's How To Make The Most Of Them
IN THIS GUIDE Overview Alyssum vs Sweet Alyssum Habitat & Growing Conditions How To Grow Sweet Alyssum Ongoing Plant Care Sweet Alyssum Varieties Common Problems Imagine billowing, scented white ‘ornamental clouds’ covering a tract of your garden. Or frothy, colourful purple clusters tumbling out of a planter atop your wall. Add in butterflies and bees, and revel in – besides the soothing colours – the fragrance. That’s what you’ll get with Sweet Alyssum, a charmer that is easy to grow and is even relatively fuss-free. Overview Botanical Name Lobularia maritima Common Name(s) Sweet Alyssum Plant Type Annual / Perennial Native Area Europe, Asia, North Africa Hardiness Rating H3 Foliage Deciduous Flowers Small and often white, purple or pink – very fragrant Plant Out May, June Flowering Months June, July, August, September Sweet Alyssum are very easy-grow annuals that are not at all fussy about soil. They have heights from 10-25cm and spreads from 20-45cm. The leaves are long and narrow, oval-to-oblong shaped and usually slightly hairy. They are greyish-green or silvery-green in colour. One can best describe these plants as mounding, trailing, billowing clouds of zillions of very fragrant and ultra-cute tiny flowers borne in lush clusters and clumps. Sweet Alyssum looks fantastic in a pot As there is such a thing as an ornamental flower, we may call Sweet Alyssum an ‘ornamental cloud’. Colours are limited to white, and several tones of pink and purple. Very new cultivars that bear flowers in oranges and reds are just showing up in the United States. No matter what the colour, these wee flowers pull pollinators in droves. However, Sweet Alyssum cultivars, unlike quite a number of other flowers’ cultivars, do not differ only in colour of the flower and some or another attribute such as a few inches in height or variegation. The considerable variance among these cultivars extends to height, spread, variegation vigour, fragrance, blooming season, size of blooms, besides – of course – the colour of the flowers. Though all varieties of Sweet Alyssum (and also Alyssum) are recognised as being excellent companion plants for roses, geraniums, snapdragons, and other flowering plants, we reckon that with all their genuinely pleasing and heart-lightening characteristics, they will make just as excellent garden, porch or patio companions for you! Alyssum vs Sweet Alyssum Gardeners know that in the universe of plants and gardening we have our fair share of twins – and also imposters! This article is about one such plant, Sweet Alyssum, which is twins with ‘plain’ Alyssum – these two plants are often mistaken for each other. We leave it up to the reader to decide which is the real deal and which is the imposter. Alyssum saxatile Alyssum are plants belonging to the Alyssum genus whereas Sweet Alyssum are plants of the Lobularia genus and are sometimes – incorrectly and confusingly – referred to as just ‘Alyssum’. In the United States they are also known as ’Sweet Alison’. Not only do these two different genera’s respective species bear a close resemblance, they were originally classified in one and the same genus namely Alyssum. Lobularia was separated out from it over two centuries ago but we’re still stuck with the confusion. Both genera belong to the Mustard or Brassica family. Sweet Alyssum Though Genus Lobularia includes only five species, one of these, L. maritima, is parent to dozens of cultivars, several of which have been awarded the RHS Award of Garden Merit. These plants have not only become garden favourites but are even also automatic choices for several different garden purposes. These are popularly known as Sweet Alyssum. Habitat & Growing Conditions When one sees this charming, floriferous and somewhat dainty plant, one would feel stretched to believe that parent species Lobularia maritima’s habitats are gravelly and sandy locales, including even sand dunes, in their native regions of the Mediterranean. It is often found close to coastal areas including near the beach and on cliffs. With a hardiness rating of H3, Lobularia varieties are that anomaly, half-hardy annuals. They are effectively annuals in many parts of the United Kingdom but if you live somewhere along the southern coast or a very mild region where they can survive the winter outdoors, you’ll have short-lived perennials. How To Grow Sweet Alyssum To get a head start on Sweet Alyssum in the garden, seeds are generally sown in February or March – either in a heated propagator or on a sunny windowsill. We cover this seed-growing process in a separate guide. Planting Out After the soil temperature has crossed 16°C, young plants started indoors can be transplanted outdoors. Before doing so, harden them progressively for one week. However, though you can sow Sweet Alyssum indoors in a seed tray to start them before spring, the truth is that for easy-grow annuals that are meant for planting in a bed, be it for edging, it may well be more trouble than it is worth to sow Sweet Alyssum in a tray and then transplant outdoors if your region’s growing season is not very short. Now if you would like to have Sweet Alyssum flowering by mid-spring in a planter for the patio parapet or in a hanging basket for the front door, by all means start them early indoors. You can do so directly in the container itself to avoid transplanting and the possibility of losing some seedlings. These plants flower in five to seven weeks. Whether sowing seeds or transplanting, make note of the spread of the variety in question and space accordingly as many are mat-forming and several varieties have a trailing habit. Where To Plant Perhaps a better question would be “Where not to Plant Sweet Alyssum”, for this incredibly versatile plant has a vast range of garden uses. Here are some examples: The ‘classic’ usage is for borders and also, specifically, for edging, be it for a bed or along a walkway. In mild regions they make excellent groundcover, including on slopes and verges. Planted in close proximity these plants produce the effect of a floral cloud or blanket. Mass plantings of any kind will draw bees and butterflies in quantity. They make charming companion plants that set off taller flowering plants of richer, deeper, hues. They are eminently suitable for both filler and accents in rock gardens. They can be hung in a basket by a window or set in a container on the patio’s parapet. You can probably think of other and further garden purposes for Sweet Alyssum! Keep in mind that this ’sweet’ plant descends from a maritime species (as reflected in its scientific name); therefore, many varieties are good to grow in coastal regions and even by the seaside. Sweet Alyssum makes a delightful spreading groundcover Ongoing Plant Care Sweet Alyssums are sow-and-grow annuals; in truth even a child can grow them – in fact, they’re lovely little plants with which to hook children to gardening. Soil Requirements The soil should neither be poor nor overly rich. Light sand- and chalk-based loam amended with about 20% organic compost will be ideal. Though this fuss-free plant will readily grow in poor soils, heavy soils must be avoided. Soil pH should ideally be in the range of slightly acidic to neutral, that is 6.1-7.3, though there is certainly considerable leeway with this easy-going plant. The soil should drain very well and be kept slightly moist – this really is the only hard-and-fast rule for Sweet Alyssum care. The soil should not be allowed to dry out completely nor should it get waterlogged. Aspect Sweet Alyssum seeds need light to germinate. Therefore, sow seeds by merely nudging them into the soil or dropping them on the soil and then sprinkling the finest dusting of soil on them. Site Sweet Alyssums in full sun. Southern or eastern exposure is preferable, and is a must in the colder regions of the United Kingdom. ‘Royal Carpet’ Be aware that varieties with darker and more saturated floral shades tolerate heat less well than the white and light-coloured ones so in the warmest parts of the country these won’t mind some afternoon shade or filtered sunlight. That explained, if shade is not available, no problem – if there’s a dainty little charmer that can tolerate heat, it’s Sweet Alyssum. Watering These plants need regular watering. After seedlings have sprouted they should be watered moderately every other day for about four weeks. After this period the watering frequency can gradually be reduced and the amount of water gradually increased. Accounting for rainfall, you should water such that the soil does not get dried out nor becomes soggy. Weeding Weeds will pose a problem for Sweet Alyssum and in view of the thick mat these plants make, weeding will be an even bigger chore than it is. Circumvent the problem by applying about 4cm of mulch around the plants when they are young but do so about 6cm from the main stem to leave the young plants sufficient space to grow. Fertilising Sweet Alyssum do not need fertilising but it will help. A bi-monthly feeding with a balanced liquid fertiliser, appropriately diluted, will prove to be a quick and efficient method, and also an effective one. A Floriferous Variety of Sweet Alyssum in Rose Pink Pruning Keep cutting old and spent flower clusters to keep those blooms coming. Though this is the default (and probably only) gardening task needed for Sweet Alyssum in any kinds of containers, you have a choice for plants in your garden or anywhere in the open. Sweet Alyssum self-seeds quite well so if you allow spent blooms to go to seed, and if you live in a region where this plant grows as an annual (most parts of the UK), then the following season you’ll get new plants, courtesy of Mother Nature. Of course, they will not resemble the originals and will likely revert to the original white – again, that’s Mother Nature! Apart from that, halfway through the season or if the plants look overgrown and unkempt, cut them back by a half. “I cut back Sweet Alyssums mid-season, as by this point, they are often starting to look a bit straggly and bare in patches,” says Master Horticulturist Colin Skelly. “Cutting back helps to restore vigour and stimulates fresh growth and re-flowering into late summer and early autumn.” This will not only stimulate fresh growth, but cooler weather in autumn will also combine to give the plants renewed vigour and bring a second bloom. Sweet Alyssum Varieties Underneath we describe a selection of some best-selling varieties identified by cultivar name, omitting Lobularia maritima from the names. ‘Wonderland’, ‘Easter Bonnet’, ‘Clear Crystals’, and ‘Golf’ are the names of the series, each of which has a few member-cultivars. The blooming period is strongly dependent on several factors, such as sun, watering, fertilising, and cutting back. However, you can count on all varieties producing flowers for at least a solid three months, for the most part in the summer. ‘Wonderland White’ is renowned for the honey-sweet fragrance of its little blossoms. It is also known for being a vigorous variety. The flowers are a dense, chalky white and they occur in incredible profusion. It reaches a height of 10cm and a spread of 30-40cm. RHS Award of Garden Merit. ‘Snowdrift’ is a very floriferous variety that produces pure white flowers with an intense fragrance. They have distinctive rounded inflorescences. It reaches a height of about 15cm and a spread of about 30cm. RHS Award of Garden Merit. ‘Frosty Knight’ is not very floriferous nor very vigorous either but it is valued for another reason. It has variegated foliage: the leaves have a substantial lemon-yellow edging which adds to the visual appeal. The flowers are bright white and the plant attains heights of 12-15cm. ‘Violet Queen’ is the basketball player among these diminutive plants as it attains a height of up to 25cm. The flowers have a purplish hue with the tones varying from lilac to rich, saturated purple. They have a light, sweet scent. RHS Award of Garden Merit. Tall ‘Violet Queen’ has Flowers in Purples and White ‘New Carpet of Snow’ lives up to its billing because the flowers are truly snowy white. It is an ‘improvement’ on the ‘Snow Carpet’ or ‘Carpet of Snow’ variety. This variety has a long blooming season that typically starts and ends later than those of other varieties. It reaches a height of about 13cm and a spread of 13-20cm. ‘Rosie O’Day’ is a very popular variety. The flowers are white when they open and turn pink-purple as they mature; thus, this plant essentially bears flowers in white and in different tints of pink-purple. Flower heads are more rounded than most. Reaching a height of 7-10cm it is very much of a mat-forming habit. RHS Award of Garden Merit. ‘Rosie O’Day’ ‘Easter Bonnet Violet’ attains a height of up to 15cm and a spread of about 45cm. It bears clusters of mid-purple flowers that have a pleasantly sweet scent. This variety also has one of the longest blooming seasons but it is one of the last to stop blooming in late autumn. ‘Easter Bonnet Lavender’ is among the shortest cultivars at only about 8-10cm. The flowers are of the lightest, gentlest shade of lavender and they have a light and gentle fragrance to match. It is one of the earliest to bloom and has one of the longest blooming seasons. It is known to be one of the least vigorous and least resistant cultivars. ‘Easter Bonnet Lavender’ ‘Wonderland Deep Purple’ produces masses of flowers that are possibly the most intensely hued among Sweet Alyssum, being of a deep, brilliant, jewel-like purple tone. It grows to only about 10cm but has a spread of 30-45cm. It is a very vigorous variety. ‘Golf Series’ includes varieties in different colours. Its main attraction is the dense profusion with which it produces blooms. The Mix includes flowers in white, baby pink, and light purple. It rises to only about 10cm, making it a proper mat-forming variety. RHS Award of Garden Merit. ‘Clear Crystals White’ ‘Clear Crystals’ is renowned for its vigour and its larger flowers, which are scented to boot. Plants reach a good height of up to 23cm and they have a spread of 30-35cm. The Mix includes seeds for flowers in white, pink, lavender, and rich purple. Common Problems Sweet Alyssum can be attacked by slugs and snails, and flea beetles, all of which are fairly easy to control. They are susceptible to only two or three diseases but, unfortunately, these are serious ones, being downy mildew and white blister. Slugs & Snails Slugs and snails can be dealt with using good old beer traps. If that doesn’t work, you can try Aluminium Sulphate in a 1:60 dilution. Pour it around the crown. Other remedies, such as microscopic nematodes, against these pests are also available. Flea Beetles Flea beetles are best defeated by releasing ladybugs, lacewings, and other beneficial insects. You can also try approved chemical pesticides. Downy Mildew & White Blister In an unfortunate twist, one of the very garden purposes of this plant, which is to create a groundcover or an ornamental floral blanket, is what makes it so susceptible to downy mildew and white blister. If you intend to grow Sweet Alyssum in such a way you will have to watch out for these diseases because when these plants are hemmed in and, therefore, do not enjoy good air circulation and are subject to high humidity, these two diseases can affect them. If your plants are affected by either disease you should promptly remove all diseased parts or even entire plants, and destroy them. Try to open up the (remaining) plants by pruning them, and try to improve air circulation and exposure to sunlight.
Learn more
How To Grow A Cherry ‘Sakura’ Tree For Stunning Early Spring Blossom
IN THIS GUIDE Overview Why Grow Sakura? Do They Produce Edible Fruit? Common Varieties Planting Where To Plant How To Plant Creating A Cherry Blossom Guild Ongoing Care Watering Feeding Pruning References Growing a cherry tree in your garden is a great idea. If you are looking for a garden tree which provides visual appeal, then a flowering cherry tree is one of the very best options to consider. Of course, edible cherry trees also have beautiful blossom – and provide food – so don’t rule out a fruit tree that will add to the food you can grow at home. Here though, we will cover the largely ornamental flowering cherry trees commonly referred to as ‘Cherry Blossom Trees’. Overview Botanical Name Prunus (various) Common Name(s) Japanese Cherry, Cherry Blossom Tree, Sakura Plant Type Tree Native Area Japan, Europe Hardiness Rating H6 Foliage Deciduous Flowers White or pink blossom When To Plant January, February, March, November, December Flowering Months March, April When To Prune July When we talk about cherry trees, these are usually categorised into three main groups. There are sweet cherries (with fruits which can be eaten straight from the tree), sour cherries (whose fruits are tarter and usually cooked) and cherry blossom trees – or flowering cherry trees – which are usually grown predominantly for their ornamental appeal. In Europe and N. America, these cherry trees are categorised into the Prunus genus, along with those cherry trees grown primarily for their edible fruit. In Japan, and elsewhere in the East, they are classified as Cerasus – around 100 species distinct from the main Prunus genus.1 Each year, there is a cherry blossom forecast which tracks the progression of the cherry blossom blooming from the south to the north of Japan. Many people watch eagerly and turn out in their droves to enjoy these beautiful trees. Many foreign visitors are also drawn to the country to see the cherry blossoms each spring. Cherry trees prized for cherry blossom viewing are usually cultivars rather than wild species; many cultivars were created in Japan, and also in Europe around the end of the 19th Century and the beginning of the 20th. Why Grow Sakura? The UK climate is ideally suited to growing a range of ornamental cherry trees. These bring great ornamental appeal during the springtime when the blossom is out. Wildlife such as pollinators and other insects will also love the trees while they are in flower. Some cultivars also have other features of ornamental appeal, such as purple foliage, for example. There are many cultivars which make great specimen trees in the climate of many UK gardens. Do They Produce Edible Fruit? As mentioned above, cherry blossom trees are typically grown for their ornamental appeal rather than for any edible yields. However, the fruits from some ornamental cherry trees (but not the seed inside) is edible when cooked. Though there is not typically much flesh on these fruits, when the seeds are removed the fruits can be cooked and processed into preserves. Caution (and plenty of research) is advised, however. Common Varieties When choosing a cherry blossom tree, there are a number of things to think about. Consider how much space is available and whether you wish to grow in the ground or in a container. Think about the eventual size of the tree you are considering, as some grow larger than others. It is also important, of course, to think about the appearance of the blooms, which can vary significantly, and also about whether a particular cultivar also offers autumnal colour, beautiful bark or notable coloured foliage, for example. ‘Kanzan’ Cherry Blossoms Here are just some of the highly regarded cherry blossom trees that you might wish to consider: P. serrolata (e.g. ‘Amanogawa’, ‘Erecta’) P. x sieboldii (e.g. ‘Caespitosa’, ‘Takasago’) P. ‘Royal Burgundy’ P. ‘Shogetsu’ P. ‘Kursar’ P. ‘Kanzan’ P. ‘Accolade’ P. ‘Kojo-no-mai’ P. ‘Pink Perfection’ P. ‘Snow Goose’ P. incisa ‘The Bride’ P. cerasifera ‘Nigra’ P. x incam ‘Okame’ P. x subhirtella (e.g. ‘Autumnalis Rosea’) P. pendula ‘Ascendens Rosea’ These are just a few interesting examples and there are of course many more to consider, so you are sure to be able to find one which appeals to you, and which would suit your garden style and preferences. Prunus cerasifera Planting Cherry blossom trees are usually purchased either as pot-grown specimens throughout the year, or as bare-root examples over the dormant period. It is usually cheaper, and you will have more variety, if you select and plant a bare-root cherry tree between November and February. If you do choose a pot-grown tree, planting out in spring or autumn offers the best chances of success in transplantation and establishment. Where To Plant Choosing a spot in full sun is ideal, and trees will bloom best in such a setting. However, many cultivars can also cope with some light or partial shade. Make sure there is sufficient space for the cultivar you have chosen. Some smaller cultivars are ideal for container growing, and planting in a container of 40-60cm or so should suffice. A sheltered spot is best as strong winds can blow the blossom off the trees. The soil or growing medium should be rich, fertile, and moist yet free draining. Most varieties are relatively unfussy about soil pH. How To Plant When planting in the ground, dig a hole three times the radius of the rootball, and a few inches deeper. Place your tree into this hole, making sure that the graft point is above the soil and the highest roots are around 2-3cm below the soil level. Fill back in the soil around your tree, pressing it down gently but not compacting, and water well. Mulch around your new tree with plenty of organic matter, but make sure this is not piled up around the trunk. Creating A Cherry Blossom Guild Even when trees are not grown for edible yields, creating a guild of companion plants around your tree can help to keep it healthy. Flowering perennials will help to attract beneficial insects to keep down numbers of pests like aphids that might impact the appearance of your flowering cherry tree. Deep-rooted perennials used around the base will help to draw up nutrients, which can be chopped and dropped to maintain fertility. Nitrogen-fixing plants will help to feed your tree, and ground cover plants will help to reduce competition from weeds and grasses – also helping with soil moisture retention. Ongoing Care Cherry blossom trees are generally quite easy to care for in your garden, though when grown in containers, will require a bit more work. Watering Water well, especially during establishment, and remember that trees growing in containers will require more watering than trees growing in the ground. Container trees will usually continue to require watering during dry spells, while mature flowering cherry trees grown in the ground in a suitable spot will usually find natural rainfall sufficient here in the UK. You will need to water flowering cherry trees in the ground only during prolonged dry spells once they are established. Feeding Mulch well around your flowering cherry tree and replenish the mulch with more organic matter each spring. Trees growing in the ground will not usually require additional fertilisation. If growing in a container, however, it is a good idea to feed with a balanced organic fertiliser each spring. Pruning Flowering cherry trees should not usually be pruned unless absolutely necessary – most will retain a healthy and pleasing form without any pruning. However, if there is any dead, damaged or diseased material or pruning is required, this should always be undertaken in early-mid summer to reduce the chances of infection creeping in through pruning cuts. Silver leaf and bacterial cankers can become issues when pruning is undertaken later in the year or during the dormant period, as Horticultural Consultant Colin Skelly explains: “Whilst most trees and shrubs are best pruned in winter when dormant, mature cherries (along with plums, peaches, nectarines and apricots) should be pruned in summer (ideally late July or August) to time with the reduced prevalence of silver leaf disease.” Once well established in the right spot, a flowering cherry tree should be a beautiful and relatively low-maintenance addition to your garden. References 1. Kato, S., Matsumoto, A., Yoshimura, K., Katsuki, T., Iwamoto, K., Tsuda, Y., Ishio, S., Nakamura, K., Moriwaki, K., Shiroishi, T., Gojobori, T., & Yoshimaru, H. (2012). Clone identification in Japanese flowering cherry (Prunus subgenus Cerasus) cultivars using nuclear SSR markers. Breeding Science, 62(3), 248–255. https://doi.org/10.1270/jsbbs.62.248
Learn more
Why And How To Grow Morning Glory - There Can Be Some Confusion With Species
IN THIS GUIDE Overview Why Grow Morning Glory? Common Varieties How To Grow Morning Glory Plant Care References ‘Morning Glory’ is a name given to a number of different plants – many of which have similar appearances but very different growing properties. In this guide, we’ll focus on Ipomoea purpurea and Ipomoea tricolor – annual climbing plants, which are popular with UK gardeners. We’ll also take a look at some other ‘Morning Glories’ along the way. Overview Botanical Name Ipomoea Common Name(s) Morning Glory Plant Type Climber Native Area Mediterranean Hardiness Rating H3 Foliage Deciduous Flowers Large, various colours When To Sow March, April Plant Out May, June Flowering Months June, July, August, September Over a thousand different plants within the Convolvulaceae plant family are referred to as ‘Morning Glory’.1 Many of these are within the Ipomoea genus, though there are also Morning glory plants from many other genera including Argyreia, Calystegia, Convolvulus and more. In UK gardens, two of the most popular morning glory plants are I. purpurea and I. tricolor. I. purpurea, also referred to as ‘Common Morning Glory’, ‘Purple Morning Glory’ or ‘Tall Morning Glory’ – is a climber native to Central and Southern America.2 Ipomoea purpurea Another climbing native of the new world tropics, I. tricolor is also popular in UK gardens. Ipomoea tricolor Both of these can be perennial in their native ranges, and in warmer climes, but are almost always grown as annuals in the UK’s climate. Confusion occurs because ‘Morning Glory’ is sometimes a term also used to refer to a couple of common weeds found here in the UK: Calystegia sepium (hedge bindweed or wild morning glory) and Convolvulus arvensis (field bindweed, perennial morning glory or small-flowered morning glory) can be problematic weeds in some gardens. Convolvulus arvensis They can spread very rapidly and outcompete or choke other plants. And confusion is compounded by the fact that common garden Ipomoea morning glory species can also be invasive ‘problem weeds’ in some regions of the US and elsewhere, though they do not tend to pose an issue in the UK.3 Why Grow Morning Glory? Assuming that most gardeners will not wish to grow the bindweeds mentioned above in their gardens, in the rest of this article we will focus on how to grow the two main species of climber mentioned above as ornamental annuals in your garden. These annuals are popular choices with UK gardeners because they are fast-growing plants which bloom attractively through summer and into early autumn. As the name suggests, morning glory plants flower early in the day – blooms appear just for a single morning before fading away in the afternoon – but many flowers are borne in succession, so plants will create lovely displays for a number of months. These blooms can be up to around 8cm across, and come in a range of different colours, from purples and blues, through pinks and reds. Some cultivars have bi-coloured petals. Common Varieties I. tricolor ‘Heavenly Blue’ Some excellent morning glory options to consider growing include: I. purpurea ‘Grandpa Ott’ I. purpurea ‘Ensign Rose’ I. purpurea ‘Party Dress’ I. purpurea ‘Scarlet O’Hara’ I. purpurea ‘Lazy Luxe’ I. purpurea ‘ Sunpuma Purple Princess’ I. purpurea ‘Star of Yelta’ I. tricolor ‘Heavenly Blue’ I. tricolor ‘Flying Saucers’ I. ‘Hazelwood Blues’ I. purpurea ‘Grandpa Ott’ How To Grow Morning Glory Ipomoea morning glory climbers need a sunny and sheltered spot. These plants do best in moist but well-drained soil. They can also be grown in containers, as long as they are provided with suitable support. Support As climbers, they will of course need some form of support to scramble up. An established shrub or conifer can be used in certain settings as a natural trellis support. However, more commonly, Morning glory will be grown up free-standing obelisk type supports, or up a trellis on a sunny wall or fence. Container Growing Even if you do not have any outside space at all, these morning glories can be grown as a container plant in a sunny porch or conservatory, or in another sunny spot inside your home. When grown indoors, these can sometimes act as short-lived perennials as they do in their native range. Sowing If you want to grow morning glory in your garden then you will most likely have to grow your plants from seed, as mature plants are rarely available for sale. I. tricolor requires a long growing season, so you should sow your seeds in early-to-mid spring, indoors. Before you sow your seeds, to increase the chances of successful germination, it is a good idea to soak the seeds overnight. The water will soften and break down the hard coating on the seeds and make them more likely to sprout successfully. Sow the seeds around 1cm deep, in a moist seed-starting potting mix. They will need to be kept in a warm spot until germination has taken place – so using a propagator is ideal. I. purpurea can be sown indoors, as above, but can also be sown in spring where it is to grow. If you have sown under cover, once the seedlings emerge and are large enough to handle, pot them up into their own individual pots. Use small, thin canes inserted in the soil of each pot to give the baby climbers something to cling to. Be sure to harden off your indoors grown plants before placing them outdoors into their final growing positions if you will be placing them outdoors. Planting Morning glory that has been sown and grown indoors should not be placed out before late May or early June. “Do not be tempted to plant out too early, however much some early spring sunshine tempts you into it,” says Master Horticulturist Colin Skelly. “Overnight frosts can occur well into May across the UK but especially in the north. “It’s happened to me a few times and I now like to think that I’ve learned (the hard way). “Wait until into June and the extra soil warmth will also help to get your Morning Glory off to a strong start once outside.” Make sure supports are in place before planting your morning glory in the ground or in containers. If growing in a container, place 3-5 morning glory plants around the edges of a large pot – this should ideally be at least 40cm wide and 40cm deep. The container should be filled with good quality, peat-free multi-purpose potting mix, top dressed with organic matter such as homemade compost or leaf mould, for example. Water your plants in well, and gently wind the stems of the plants into their new supports. Plant Care Watering Water should be provided as required to keep the soil or potting medium evenly moist. But you should take care not to overwater as these plants will definitely not thrive in waterlogged conditions. Feeding Especially when growing in pots, and for best results when growing in the ground, you should also feed morning glory with a high potassium organic liquid plant feed (such as a comfrey tea, for example) every couple of weeks or so once the first flowers arrive. Training These climbers will generally climb up and twine around their supports on their own. Occasionally, however, you will need to give them a little helping hand to make sure they head in the right direction. Check every few days and if stems have gone astray, guide them gently back onto their supports. Deadheading & Pruning Deadheading the flower heads will encourage new blooms to form over the summer months. No pruning is required, but you can if you wish snip off the growing tip once the plant reaches the top of the support. This can also encourage new shoots to emerge lower down. Growing morning glory can give you impressive annual blooms over a relatively long period, and quickly cover support structures over the summer months. Though there are definitely some morning glory plants (bindweeds) which can pose a problem in your garden, these ornamental plants are definitely a plus for your garden. References 1. The Editors of Encyclopaedia Britannica. (1998e, July 20). Convolvulaceae | Description & Major Species. Encyclopedia Britannica. Retrieved March 21, 2023, from https://www.britannica.com/plant/Convolvulaceae 2. Ipomoea purpurea. (n.d.). Kew Royal Botanic Gardens. Retrieved March 21, 2023, from https://powo.science.kew.org/taxon/urn:lsid:ipni.org:names:30043043-2 3. Field Bindweed (aka Morning Glory). (2009, September). King County Noxious Weed Control Program Weed Alert. Retrieved March 21, 2023, from https://www.nwcb.wa.gov/pdfs/Bindweed_factsheet_King.pdf
Learn more
Permaculture Gardener Shares Her 10 Favourite Alternatives To A Grass Lawn
IN THIS GUIDE Why Get Rid Of Your Grass Lawn? What A Grass Lawn Alternative Might Provide 1) A Neat, Open Space Without Grass 2) Wildflower Meadows 3) Ponds & Water Features 4) Other Wildlife Habitats 5) No-Dig Annual Food Producing Beds 6) Perennial Vegetable Beds 7) A Forest Garden 8) Natural Play Areas For Kids 9) Forage For Chickens / Other Garden Livestock 10) Eco-Friendly Patio / Decking References Boring grass lawns are not the best choice for an eco-friendly garden. Most gardens have at least some lawn, but increasingly, people are beginning to question whether this really is the best use of the space. Historically, lawns were the preserve of grand estates, where they were kept short by livestock or the use of a scythe.1 With the advent of the powered lawn mower, and the decrease in the need for domestic food production with the proliferation of supermarkets and global supply chains, they became the norm for typical home gardens. Where, once, every home would have had its own kitchen garden and grown a range of useful and appealing plants, mono-culture grass lawns began to take over.2 But things are beginning to change, with more and more gardeners realising that lawns are not the best use of their space. Read on to learn why boring mowed grass lawns are not ideal, and to discover some of the interesting alternatives to a grass lawn to consider: Why Get Rid Of Your Grass Lawn? Typical mowed grass lawns are an example of a monoculture. They typically include just one dominant plant – grass. Many gardeners struggle to keep their lawns looking neat, they get rid of any ‘weeds’ and mow them very regularly to maintain them. Fighting to maintain a neat grass lawn damages the ecosystem of a garden. This has led to prominent campaigns like ‘No Mow May’, which encourage gardeners to skip mowing for a month, in order to benefit local wildlife species.3 Even when a lawn is maintained organically, a mono-culture grass lawn is not natural at all. Diversity – a range of plant and animal life working together in harmony – is key for a healthy garden.4 The lack of diversity in a grass lawn is not just boring – it contributes to biodiversity losses.5 Regular mowing harms wildlife, and the surrounding environment is diminished and becomes less resilient as a result. Another thing to consider is that lawns actually take quite a lot of work. Just think what you could do with all the time that you would have spent mowing! What A Grass Lawn Alternative Might Provide When you ditch a mono-culture grass lawn and opt for a more natural and diverse alternative, there is a lot to be gained. A grass lawn alternative might provide: Food for you and your family. Other yields for your household, including herbs and crafting materials which help you live in a more sustainable way. Biodiverse environments which help you and your family keep happy as you interact more harmoniously with nature. Improved amenity outdoor living areas – with shade, increased privacy, better protection from air or noise pollution. An enhanced environment which attracts and benefits a wide range of local wildlife. 1) A Neat, Open Space Without Grass Some gardeners are reluctant to give up a grass lawn because they like the open outlook. They do not want to increase shade, nor block the views with higher plantings. But it is important to remember that you can create ground cover planting without sticking to a grass that needs to be mowed. Small areas of lawn can relatively easily be replaced with other ground cover plants which are suited to the environment and growing conditions in your garden. ”There is a temptation to put borders around the outside of a lawned area,” shares Horticultural Consultant Colin Skelly. “Get rid of this idea and the lawn becomes at most a supporting part to other plantings in the garden.” Alternatively, just try to mow parts of the garden and leave other areas to grow, cutting once or twice a year (preferably removing and composting the cut material). “Once you do this, the chore of regular grass cutting is replaced with more interesting and biodiverse garden space.” A chamomile lawn is one famous example, but there is actually a range of herbs that are great for ground cover. These low growing, spreading herbs (creeping thyme, marjoram, oregano etc.) not only cover a sunny, free-draining area without making it feel too closed in, they are also great for wildlife, and can provide you with a range of yields. They can cope with occasional foot traffic. Clovers are another interesting option to consider. Clovers are other great ground cover plants and they can also be fantastic for wildlife – as well as being great for the fertility in your garden. An area of clover will keep the garden feeling open, while fixing nitrogen for the benefit of surrounding plants. In shaded, boggy areas, grass lawns may be patchy, but moss can make for a soft and lush looking ground cover in such areas. If you choose the right plants for the right places, you can create a range of different ground covers for diverse spaces without sticking to boring grass lawns. 2) Wildflower Meadows Perhaps the most popular option today for those looking to create a more eco-friendly alternative to a grass lawn is a wildflower meadow.6 Joining the ‘no mow’ movement and letting weeds and wildflowers colonise an existing lawn is one way to let nature back into your garden. As well as grasses, a natural ‘wild’ lawn will be mowed far less frequently. In addition to grasses, such a lawn may also include nitrogen-fixing plants like clovers, lawn flowers such as dandelions, daisies, creeping primrose, germander speedwell, selfheal, chickweed and more… It may also have larger self-seeding plants like nettles, dock, thistles, cow parsley and plantain, for example. Some people are going one stage further and sowing perennial meadow seed mixes into existing grasses. These mixes don’t just rely on self-seeding ‘weeds’ but include specific flowering plants which help suppress grass growth and create a more diverse ecology.7 Some people may also plant flowering bulbs to naturalise in the wild lawn/perennial meadow area. Where there is no existing grass cover, or where the turf has been removed, another option is creating an annual meadow, with plants like poppies, cornflowers etc. Both perennial and annual meadow planting schemes can be wonderful alternatives to a grass lawn. 3) Ponds & Water Features If you want to do the right thing for wildlife in your area, another way to use an area that was a lawn is to create a wildlife pond, or other water feature. Water will be beneficial for a wide range of wildlife, and can also improve the space for you and your family too.8 Ponds are perhaps one of the best features you can add to boost the biodiversity in your space. Create a pathway winding through planting to a secret spot where you can watch the wildlife, see the sunlight on the water, and even hear sounds of flowing water, perhaps. A pond, maybe one with a solar-powered water feature, can make your garden a more interesting and relaxing place to be. 4) Other Wildlife Habitats Meadows and ponds are two excellent habitats to create for a wildlife-friendly garden, but these are by no means the only wildlife habitats which could be great alternatives to a grass lawn. You might also replace a lawn with: A woodland garden, with native trees, shrubs and ground cover plants. A rockery or alpine garden. A stumpery or stump garden in a shadier spot. An attractive herb garden. Wide perennial borders, with a winding path between them. 5) No-Dig Annual Food Producing Beds Of course, areas currently taken up by grass lawns could also become a place to grow food for you and your family. It is very easy and straightforward to make new ‘no dig’ lasagna beds on top of an existing lawn. Simply mark out the area where you want new beds, place bed edging to keep things neater, cover the area with cardboard, then layer organic matter (carbon-rich and nitrogen-rich – as you would do in a composting system) to build up your new beds to the desired height. Top these new beds with compost, and plant into them right away. 6) Perennial Vegetable Beds When you think about growing your own food, your mind may jump straight to annual production. But growing common annual crops is not the only option when it comes to growing your own. New beds might also be used to grow perennial edibles, for a far more low-maintenance scheme. Perennial crops which are well known include plants like strawberries, rhubarb, artichokes and asparagus, but there are far more perennial vegetables to consider. Perennial brassica (cabbage family crops), perennial alliums, sorrels, marrows, and many other plants can also be used on their own, or in combination with perennial flowers and herbs, to replace an area of lawn with new, productive beds or borders. 7) A Forest Garden Edible perennials, of course, also include a wide range of fruit trees, cane fruits and fruiting shrubs. These too can be great options to create diverse planting schemes to replace a grass lawn. A forest garden, or edible woodland garden, is all about creating a productive, beautiful space that provides food and a range of other resources in carefully considered, layered planting schemes which mimic a natural woodland or forest. A garden given over to forest garden planting will be a rich space, filled with beneficial wildlife and useful plants. Once established, this is perhaps the ultimate low-maintenance food-producing system – since all the elements in a forest garden design are carefully chosen to work together, meaning you can largely let nature take the reigns. 8) Natural Play Areas For Kids Some people are reluctant to get rid of their lawn because they worry that without a lawn, kids will not have space to play. While a lawn may be the best place to kick a ball around, the more diverse environments created by establishing the alternatives above can be wonderful environments for children to learn and play. Mow paths in a wildflower meadow or create paths through other plantings which kids can explore, race around on, or play hide and seek. Plant trees for kids to climb, make dens using natural materials, or allow kids to make their own. Send kids on a bug hunt to learn more about the creatures with whom they share their space. Create a safe space for foraging, so kids can graze as they go. Make each journey into your garden an adventure with lush, dense planting, and kids certainly won’t miss the lawn. 9) Forage For Chickens / Other Garden Livestock If you like the idea of becoming more self-sufficient and living the ‘good life’ then you might also like to consider adding some livestock to your garden. As well as giving over some of your lawn to food-producing areas, you might also like to make an area where chickens or other garden wildlife can forage, and sowing a diverse forage mix in place of mono-culture grass. Whether you fence off growing areas from chickens, or chickens or other livestock from the rest of the garden, in some areas, this could be another interesting option to consider. Just make sure you know the rules in your area before you introduce any animals to your garden. 10) Eco-Friendly Patio / Decking Finally, of course, you might choose to replace an area of lawn with some eco-friendly decking or an eco-friendly patio area. Just make sure, in a sustainable garden, that you choose materials for any such areas which are natural or reclaimed. Maximising photosynthesis and adding more plants is always the most eco-friendly choice. Permeable surfaces, with lush planting all around, are the best choices for a sustainable garden. References 1. History of Early American Landscape Design. (n.d.). National Gallery of Art. Retrieved March 20, 2023, from https://heald.nga.gov/mediawiki/index.php/Lawn 2. Balogh, A. (2021, December 13). The rise and fall of monoculture farming. Horizon Magazine. Retrieved March 20, 2023, from https://ec.europa.eu/research-and-innovation/en/horizon-magazine/rise-and-fall-monoculture-farming 3. Ways to support us. (n.d.). National Trust. Retrieved March 20, 2023, from https://www.nationaltrust.org.uk/support-us 4. Wilson, E. (2008). Why do we need to protect biodiversity? Environment: European Commission. Retrieved March 20, 2023, from https://ec.europa.eu/environment/nature/biodiversity/intro/index_en.htm 5. Kogut, P. (2020, October 20). Monoculture Farming In Agriculture Industry. EOS Data Analytics. Retrieved March 20, 2023, from https://eos.com/blog/monoculture-farming/ 6. Wildflower Meadows. (n.d.). Sustainability Exchange. Retrieved March 20, 2023, from https://www.sustainabilityexchange.ac.uk/wildflower_meadows 7. Forest Research. (2022a, February 9). Wildflower meadow habitats. Retrieved March 20, 2023, from https://www.forestresearch.gov.uk/tools-and-resources/fthr/urban-regeneration-and-greenspace-partnership/greenspace-in-practice/benefits-of-greenspace/wildflower-meadow-habitats/ 8. Water: Garden for Wildlife. (n.d.). National Wildlife Federation. Retrieved March 20, 2023, from https://www.nwf.org/Garden-for-Wildlife/Water
Learn more
17 Vivid Flower Garden Ideas And Designs With Tips From Ann-Marie Powell
IN THIS GUIDE Top Design Tips For New Flower Gardens 1) Think Holistically About Flowers & Garden Design 2) Observe Carefully & Choose The Right Plants For The Right Places 3) Choose Flowers For Blooms Over As Much Of The Year As Possible Flowers With Functions: Integrating Flowers Into Garden Design 4) Companion Planting In An Annual Vegetable Plot 5) Perennial Beds Or Borders With Flowers, Vegetables & Herbs 6) Fruit Tree Guilds & Forest Gardens 7) Wildflower Meadows & Other Habitats 8) Rain Gardens, Ponds & Wetland Gardens Choosing A Location For A Flower Garden 9) Tips For Flower Gardens In Full Sun 10) Tips For Flower Gardens in Partial Or Dappled Shade 11) Soil Types & Soil Characteristics 12) Raised Bed Flower Gardens 13) Container Flower Gardens & Vertical Gardens Stylistic Choices In A Flower Garden 14) Design By Garden Type 15) Follow Moods & Themes 16) Consider Your Bed Or Border Shape 17) Embrace Colour & Form Combining Different Flowering Plants References If you are thinking about creating a new flower garden, there are many things to think about. In this article, we cover a range of ideas and designs to help you make decisions that will benefit your space for years to come. All gardens should have flowers, not only for visual appeal but to bring in wildlife, and deliver a range of other benefits. But it can be difficult to know where to begin when considering which flowers to grow, and where to grow them. In this guide, I’ve brought together some key ideas which will help you create a flower garden that you can really be proud of. Read on to find out our top tips, ideas and design suggestions: Top Design Tips For New Flower Gardens First things first, it’s crucial to make sure that you are thinking about your flower garden in the right way. Of course, it’s important that your flower garden looks good, but aesthetics are not the only consideration. No matter what type of flower garden you wish to create, and no matter where it is to be created, here are 3 important things to bear in mind as you make your choices: 1) Think Holistically About Flowers & Garden Design Many gardeners will start with flowers they like, and work from there to create their gardens. But to create a truly abundant and beautiful garden that will stand the test of time, it is important to work from broader patterns to the finer details. Consider specific individual plants but also the bigger picture. Ithink it is a very good idea to learn how flowers will work with other plants and with wildlife, and how flowers can be integrated into a harmonious design for the whole of your garden. “I’m constantly buying new plants, as I think of my garden as a living pinboard to constantly inspire me about what goes well together,” shares Garden Designer Ann-Marie Powell. “I’ve just recently bought lots of new irises, which I’m excited about because I haven’t grown irises for a while. “I also grow tons of annuals, like crocus, linarias and rudbeckias. If you can think of a plant, I’m probably growing it.” By thinking holistically about the process, we can find ways to add flowers in a garden which aid the function and improve the utility – as well as the appearance – of a space. 2) Observe Carefully & Choose The Right Plants For The Right Places New gardeners sometimes fall into the trap of choosing plants based on aesthetic preferences. However, new flowers for a garden should always be chosen with the specific characteristics of the garden in mind, choosing the right plants for the right places is the key component for success in any garden. Before you even begin to think about choosing particular flowers, you should spend some time observing the space, and thinking about the climate, microclimate conditions, soil – and any other characteristics of the garden in question. Matching up plants with the location and its characteristics is one of the most important jobs in a healthy organic garden. Choosing the right places to grow the flowers in your space is also essential. Again, this is often a case of matching up the requirements of the plants with the conditions which can be provided. 3) Choose Flowers For Blooms Over As Much Of The Year As Possible Most flowering plants fulfil key functions in the garden while in bloom. When they flower, they not only look their best, but also attract a range of beneficial wildlife to the space. Whatever other decisions you make about which flowers you grow and how and where you grow them, it is a good idea to make choices that mean you have flowers in bloom in your garden over as long a period as possible. This means thinking carefully about when different flowering plants are in bloom, and also ensuring that you aim for as much diversity as possible, in each month, and over the course of the year. Flowers With Functions: Integrating Flowers Into Garden Design Flowering plants can also have a range of functions in garden design. By considering the functional benefits that different flowering plants can provide, we can find numerous ways to integrate them into our gardens. 4) Companion Planting In An Annual Vegetable Plot One of the first interesting ways to integrate flowers into your garden is as companion plants in an area for annual food production. Both annual and perennial flowering plants can be extremely beneficial as companion plants for annual fruit and vegetable crops. Flowers like calendula, French marigolds, nasturtiums and borage, to name just a few examples, make wonderful companions in a kitchen garden. Flowers can, of course, attract bees and other pollinators. They can also attract predatory species which help keep pest numbers down and can potentially repel, confuse or distract pest species. It is also worthwhile remembering that a number of flowers can be edible in their own right. They can also provide other yields and be used in a range of ways (for beauty products for example) within your home. They might also be beneficial within a composting system, or be dynamic accumulators which help you maintain the fertility in your growing areas.1 5) Perennial Beds Or Borders With Flowers, Vegetables & Herbs When planning a food-producing garden, it is also important to consider the potential of perennial food production. Perennial beds and borders do not need to be flowers alone. Integrating ornamental planting with edible plants is a great way to create diversity and abundance. Flowers can also serve as companion plants within a perennial plant context and the flowers too can benefit from the various other plants included in such as scheme. “I don’t really grow vegetables so at this time of year, so I have a lot of bedding annuals on the go,” shares Sunil Patel, owner of the garden at 13 Broom Acres. “They are for the many patio pots and unexpected gaps in the borders. This year we’re trying to grow Zinnias and Cerinthe as well as our more usual staples of lobelia, calendula, bidens and mimulus. “I’ll also sow various perennials from seed that I’ll then grow on for sale either at Open Days or for the Plant Sale of our local gardening club. “We currently have delphiniums, thalictrum, evening primrose and Sisyrinchium, all from seeds collected in the garden last autumn.” Many herbaceous perennial flowering plants usually thought of as ornamentals can work well alongside interesting perennial vegetables and herbs. Those perennial vegetables and herbs can themselves be ornamental and may also be attractive flowering plants. Creating perennial planting schemes can be a great low-maintenance choice. Perennial schemes sequester more carbon, keep the soil healthy and of course, they’re also great for the wildlife which shares your garden. 6) Fruit Tree Guilds & Forest Gardens Of course, abundant perennial planting schemes need not only include herbaceous perennials, but also a range of trees and shrubs. Fruit trees and fruiting shrubs are excellent choices for many gardens, including my own. In order to achieve the best possible yields from fruit trees and fruit bushes, it is a good idea to create guilds, or diverse polycultures of beneficial plants around them – including plenty of flowers.2 “In my own garden the early flowering apples sometimes failed to be pollinated,” shares RHS-qualified Horticulturist Colin Skelly. “Since introducing more early flowering perennials into the space this has not been an issue as a greater number of pollinators attracted to the area. “The plants used include Pulmonaria cultivars (Lungwort), Erysimum cheiri (Wallflower), Digitialis purpurea (Foxgloves) and Dianthus barbatus (Sweet William).” A fruit tree guild will usually include flowering plants to bring in pollinators early in the season and while the blossoms are out – and to attract wildlife to reduce problems with pests throughout the year. Some other flowers will also work well as companion plants for fruit trees due to their dynamic accumulation, or because they are good at providing ground cover or suppressing competitive grass growth. Extend the idea of a fruit tree guild and you can create a forest garden, or food forest – a syntropic ecosystem with layered planting. Again, flowers play crucial roles within the different layers in a forest garden scheme. 7) Wildflower Meadows & Other Habitats The ways in which flowers are planted together can bring many benefits through the ways in which they bring wildlife into a space, and provide for and protect that wildlife once it arrives. As well as integrating flowers into food-producing systems, as mentioned above, flowers should also serve as the backbone for a wildlife-friendly garden. One of the most common types of flower gardens are wildflower meadows. Both annual and perennial types of wildflower meadow are a great way to protect endangered species and attract wildlife to your space.3 Flower gardens can help fill a number of ecological niches. As well as creating a meadow habitat, a flower garden might also include marginal pond planting, or a bog garden or wetland area, for example. Flowers might also serve as the under-storey in a natural woodland garden setting. 8) Rain Gardens, Ponds & Wetland Gardens As well as playing a role in food production and wildlife attraction, flowers in your garden might also be used in schemes designed to manage water more effectively. Rain gardens, for example, often include a range of flowering plants, which can cope with saturation in wet weather, and drier periods in the summer months. More damp-tolerant flowers are placed at the base of a basin dug for a rain garden, with other flowering plants around the sides of the depression, and drought-tolerant wildflowers around the outer sides. A flower garden might also be placed in and around the water to improve the function of a wildlife pond, or used in vegetated swales, for example, which help direct water to where it is needed, away from where it is not wanted, or which keep water around in the plants and soil in your garden. Choosing A Location For A Flower Garden Once you have thought about how flowers can be useful in your garden and how they can be integrated into an overall design, you should be one step closer to choosing your plants. However, before you dive straight in and start making your plant choices, you need to determine the exact characteristics of the area or areas where flowers will be grown. Will you be growing flowers in the ground? Will the site be sunny or shaded? What will the soil be like? Will you be growing in raised beds, or containers? How much space is available? 9) Tips For Flower Gardens In Full Sun Many flowers can thrive in full sun, and you will have an amazing choice of plants, no matter what other characteristics you are dealing with on the site. However, when designing a flower garden for full sun, it is important to remember that areas in full sun can get very warm in summer, and may be more exposed in winter. One of their key characteristics is that they will tend to dry out more quickly, so it is important to bear this in mind. I’d recommend that you choose plants that like the heat and that can cope with the drier conditions that are likely to prevail. Some good suggestions include nepeta, scabiosa, dahlias, agastache and salvia. 10) Tips For Flower Gardens in Partial Or Dappled Shade Not all flowers will enjoy full sun conditions, of course, and there are plenty of excellent flowering plants to consider for a garden in partial or dappled shade. Some can even cope with more deeply shaded conditions. When choosing flowers for shade, be sure to think about what kind of shade you are dealing with. Some plants prefer damp shade, while others are better suited to dry shade conditions. Aesthetically, some of the best choices for flowers to grow in shade include plants with white or pale flowers, which stand out well in lower light conditions. Plants with variegated foliage can also work well, and choosing varied plant form and textures can be important. Hostas, ferns, begonia and coleus are all good choices for shady spots! 11) Soil Types & Soil Characteristics A flower garden for one type of soil (clay soil, for example) will look very different to a flower garden for another (such as free-draining sand). As well as thinking about the sunlight and shade, exposure and water characteristics, it is important to understand your soil when planning a flower garden. Be sure to choose flowers which are appropriate for the soil type and its properties, and for your soil pH. If you have acidic or alkaline soil, it is best to avoid amending it too heavily. Instead, simply choose flowering plants which are suited to the soil conditions where you live. 12) Raised Bed Flower Gardens If you do wish to grow flowers which are not particularly suited to your soil in your garden – rather than amending the soil, it is better to consider creating your flower garden in raised beds or containers. Growing flowers in raised beds can bring a range of benefits. Raised beds can make things easier to tend, and may require less weeding.4 They can bring flowers level with seating height in an outdoors living area, or enhance the view from a window, for example. Raised beds can come in a range of shapes and sizes, and can play an important role in determining the look and feel of a space. 13) Container Flower Gardens & Vertical Gardens Those who are short on space can still create stunning flower gardens. Even if you do not have any space to grow in the ground, growing in containers and in vertical gardens means that you can still have a colourful, abundant, beautiful space. As long as you choose the right containers for the flowers you wish to grow, you can still include a wide range of plants in the smallest of spaces. Growing flowers in pots on shelving, placing them in hanging containers, or in planting pockets within a structure affixed to a wall or fence can help you make the most of your space. Remember, there are plenty of reclaimed materials you could use for such a project. Stylistic Choices In A Flower Garden Once you have considered the practicalities, thinking about flowers, their needs, and the roles they can play in your garden as a whole, there are still a range of decisions to make when creating a flower garden. 14) Design By Garden Type One thing to think about, when it comes to aesthetics and style, is the type of garden you wish to create. Flower gardens can be created to establish a certain type of garden. For example, you might want to create: An English cottage garden. A woodland garden. An alpine garden or rockery. A Mediterranean style garden. Meadow planting. Prairie style planting. A formal cutting flower garden. And these ideas are just the beginning. There are plenty of other garden types to consider, no matter where you live, and no matter how much space you have available. 15) Follow Moods & Themes Stylistically, you may also find it helpful to think about what mood or theme you wish to evoke through your layout and plant choices. For example, you might want your flower garden to be: Rustic and naturalistic. Calming and tranquil. Vibrant and energizing. Classic and traditional. Sleek and contemporary. Think about whether you would like your plant choices to fit within a certain theme or to evoke a certain atmosphere. 16) Consider Your Bed Or Border Shape Another key choice that can make a big difference to the look and feel of a flower garden is the size and shape of any beds or borders. Many gardeners make the mistake of thinking that flower beds and borders need to fit around the edges of the space. But sometimes, it can be useful to think outside the box, and bring flowers out to position them front and centre in the space. Remember, beds and borders can be created in any shape. Think about whether you want to stick to straight lines and hard angles, or make the space more natural and relaxed with curved shapes and flowing lines. Beds can certainly be square or rectangular, but they can also be circular, or have irregular, curving or wavy shapes. A mandala garden is beautiful way to bring artistry to a space – creating circular and flower-shaped designs picked out in different flowers and forms, for example. When thinking about the space used for beds or borders, it can also be helpful to think in three dimensions. You might create a spiral form bed for flowers and herbs, for example, which rises up towards the centre. You might stack raised beds in a range of forms, or, as mentioned above, create vertical gardens in a range of different ways. 17) Embrace Colour & Form Flower colours and the forms of different plants all add together to create the stylistic look and feel you are going for. Even when aesthetics are not the primary consideration, colours can be important. Remember that certain flower types and flower colours will be more attractive to bees and other wildlife than others. For example, bees will tend to be preferentially attracted to purple or blue flowers.5 Think about how colours can create different moods in your garden – cool and calming blues and greens, and hot and vibrant pinks and reds, for example. If you want a calming vibe, stick to a few colours. If you want something more uplifting, don’t be afraid to clash and combine a range of hues. Think about adding colours in drifts rather than placing individual plants and creating too frenetic a polka-dot style scheme. Combining Different Flowering Plants There are of course many things to learn about combining different plants in your garden, both for function and aesthetics. As long as you keep these basics in mind, and consider all the different ideas mentioned above, you should find it easier to create the flower garden you have been dreaming about. References 1. Zarro, G. (2020b, July 20). Breaking Ground with Dynamic Accumulators. Cornell Small Farms. Retrieved March 15, 2023, from https://smallfarms.cornell.edu/2020/07/breaking-ground-with-dynamic-accumulators/ 2. Finney, D. M., & Kaye, J. P. (2017). Functional diversity in cover crop polycultures increases multifunctionality of an agricultural system. Journal of Applied Ecology, 54(2), 509–517. https://doi.org/10.1111/1365-2664.12765 3. Forest Research. (2022, February 9). Wildflower meadow habitats – Forest Research. Retrieved April 3, 2023, from https://www.forestresearch.gov.uk/tools-and-resources/fthr/urban-regeneration-and-greenspace-partnership/greenspace-in-practice/benefits-of-greenspace/wildflower-meadow-habitats/ 4. Raised Beds vs. In-Ground Gardens. (n.d.). University of Georgia. Retrieved March 15, 2023, from https://extension.uga.edu/publications/detail.html?number=C1027-3 5. Reverté, S., Retana, J., Gómez, J. M., & Bosch, J. (2016, August). Pollinators show flower colour preferences but flowers with similar colours do not attract similar pollinators. Oxford Academic. Retrieved March 15, 2023, from https://academic.oup.com/aob/article/118/2/249/1741474
Learn more
Garden Speedwell: How To Grow These Upright Herbaceous Perennials For Summer Colour
IN THIS GUIDE Overview Why Grow Veronica longifolia? Common Named Varieties How To Grow Garden Speedwell Ongoing Care References Garden speedwell is a popular perennial, which can be a good choice for many UK gardens. Veronicas sit within the Plantaginaceae plant family, and cultivars within this species – commonly referred to as garden speedwell, or long-leaved speedwell – are among the best.1 Overview Botanical Name Veronica longifolia Common Name(s) Garden Speedwell, Longleaf Speedwell Plant Type Perennial Native Area Europe Hardiness Rating H7 Foliage Deciduous Flowers Purple-blue upright spikes When To Sow / Plant March, April, May, September, October, November Flowering Months July, August, September These are upright herbaceous perennials, growing up to around 1m tall, which have long flower spikes, usually with purple or lilac hues, though white and pink cultivars are also available. Veronica longifolia is found in Northern, Central and Eastern Europe to South West Asia, Mongolia, Korea and Northern China.2 It is one of around 500 different species within this varied genus, which also includes many other plants with the term ‘speedwell’ in their common names.3 Veronicas for gardens are generally divided into three main groups: Veronica longifolia belongs to the first of these three groups: herbaceous perennials. These plants are long-lived and die back each autumn before returning with new growth in the spring. There are also dwarf Veronicas, commonly referred to as alpines, which are great for rock gardens, and Veronicas best for boggy or waterlogged conditions, or shallow waters. Why Grow Veronica longifolia? Garden speedwell is well known as an excellent wildlife-friendly plant for gardens. It attracts and benefits bees, butterflies, other pollinators, and beneficial insects which help keep pest numbers down. “Veronica longifolia is often recommended for inclusion in planting schemes designed to attract pollinators,” says Master Horticulturist Colin Skelly. “It is also very attractive to humans too, but for the eye rather than for the pollen or nectar.” This can therefore be a great plant for those who wish to garden in an organic and eco-friendly way. This plant can be useful in companion planting, especially in perennial schemes and in fruit tree guilds – and it can look wonderful over a long period. It will typically bloom right through the summer months and often well into the autumn. You can expect beautiful blooms to attract pollinators and other beneficial insects from June right through to October. V. longifolia is a great low maintenance plant, which is relatively easy to grow and which will quickly spread to fill available space in the right setting, filling in beds or borders. Common Named Varieties Some named varieties of V. longifolia to consider include: ‘Alba’ ‘Blauriesin / Blue Giant’ ‘Blue Shades’ ‘Charlotte’ ‘First Glory’ ‘Marietta’ ‘Pink Shades’ Other Veronicas, such as V. spicata, V. gentianoides and V. austriaca can also be popular with UK gardeners, and some Veronicas like germander speedwell are common ‘weeds’ in lawns. How To Grow Garden Speedwell Veronica longifolia can grow well in full sun or partial shade. It is a hardy (H7) plant throughout the UK – it will thrive in most soil types as long as they are moist or moist yet free-draining, and can cope with most pH levels.4 This is a plant that will often look great in the middle or towards the back of a border with other perennial plants which like similar growing conditions. It can be grown somewhere sheltered or exposed but as a tall plant, it may need staking in more exposed locations. Sowing V. longifolia is fairly easy to grow from seed. Seeds can be sown from March to May, or from September to November in a cold frame or with some protection. Once seedlings are large enough to handle, they can be potted into individual pots, to be planted out in spring or late summer or early autumn if spring-sown, and in late spring if sown in autumn. Planting Whether sowing from seed, planting divisions from existing plants, or plants purchased from a garden centre or plant nursery, V. longifolia is planted out between June and September into its permanent growing positions. Spring and early autumn are generally the best times to plant for the most successful establishment. V. longifolia should typically be spaced at around 50-60cm apart, depending on the specific cultivar which is being grown. Companion Planting V. longifolia is a plant that, as mentioned above, will benefit many plants growing close by due to its ability to attract a range of beneficial insects to your garden. Over its long blooming period, it can protect fruit trees or other perennial plantings from aphids by attracting species which prey on them. It will also bring pollinators to food-producing spaces. In ornamental schemes, V. longifolia works well alongside many other perennial flowering plants such as: Agastache Monarda Nepeta Penstemons Salvias Verbena Other Veronicas Yarrow It also looks good in prairie-type planting schemes with ornamental grasses like Stipa tenuissima, for example. Ongoing Care V. longifolia, as mentioned above, is a great choice for a relatively low-maintenance perennial planting scheme. If placed in a suitable spot, these herbaceous perennials will look great for many years to come, bringing benefits to you, and the wildlife which shares your space. Watering V. longifolia should definitely be watered during establishment, but once established, rainfall should generally be sufficient. Watering will generally only be required during prolonged periods of drought. Feeding As long as a mulch of organic matter is added around perennial plantings, there should be little need for additional feeding in most circumstances. Replenish mulch in perennial beds and borders each spring to suppress weed growth, retain moisture, and provide slow-release fertility. Pests & Problems V. longifolia is not a plant which is typically prone to pest problems. In fact, as mentioned above, it can aid in pest control in an organic garden by drawing in predatory species. However, Veronicas can sometimes be prone to fungal issues like downy mildew, powdery mildew and leaf spot. Making sure that there is good airflow around plants, ensuring adequate moisture but not letting waterlogging occur, not letting the area dry out entirely and keeping good biodiversity in growing areas can help reduce their incidence and spread. Remove any affected materials as soon as you see signs of such problems to prevent their spread. Pruning Deadhead regularly throughout the blooming period for repeat blooms. Faded flowers on V. longifolia can be cut back after they have flowered in the autumn if neatness is desired. However, leaving dying stems in place over winter can provide habitat for wildlife like ladybirds to overwinter. Division Mature clumps of V. longifolia should be divided every few years in March/April, or in September/October. This can rejuvenate the existing plant and allow you to propagate new plants for your garden. As you can see from the above, V. longifolia can be a high-value and low-effort plant to introduce if you have suitable conditions in your garden. References 1. Speedwells (Genus Veronica). (n.d.). iNaturalist United Kingdom. Retrieved March 27, 2023, from https://uk.inaturalist.org/taxa/51611-Veronica 2. Veronica longifolia. (n.d.). Kew Royal Botanic Gardens. Retrieved March 27, 2023, from https://powo.science.kew.org/taxon/urn:lsid:ipni.org:names:812239-1 3. Veronica. (n.d.). Kew Royal Botanic Gardens. Retrieved March 27, 2023, from https://powo.science.kew.org/taxon/urn:lsid:ipni.org:names:30005997-2 4. Veronica longifolia | garden speedwell. (n.d.). Royal Horticultural Society. Retrieved March 27, 2023, from https://www.rhs.org.uk/plants/18847/veronica-longifolia/details
Learn more


