

Growing

Looking To Grow More Verbena? Take Softwood Or Semi-Ripe Cuttings From Existing Plants
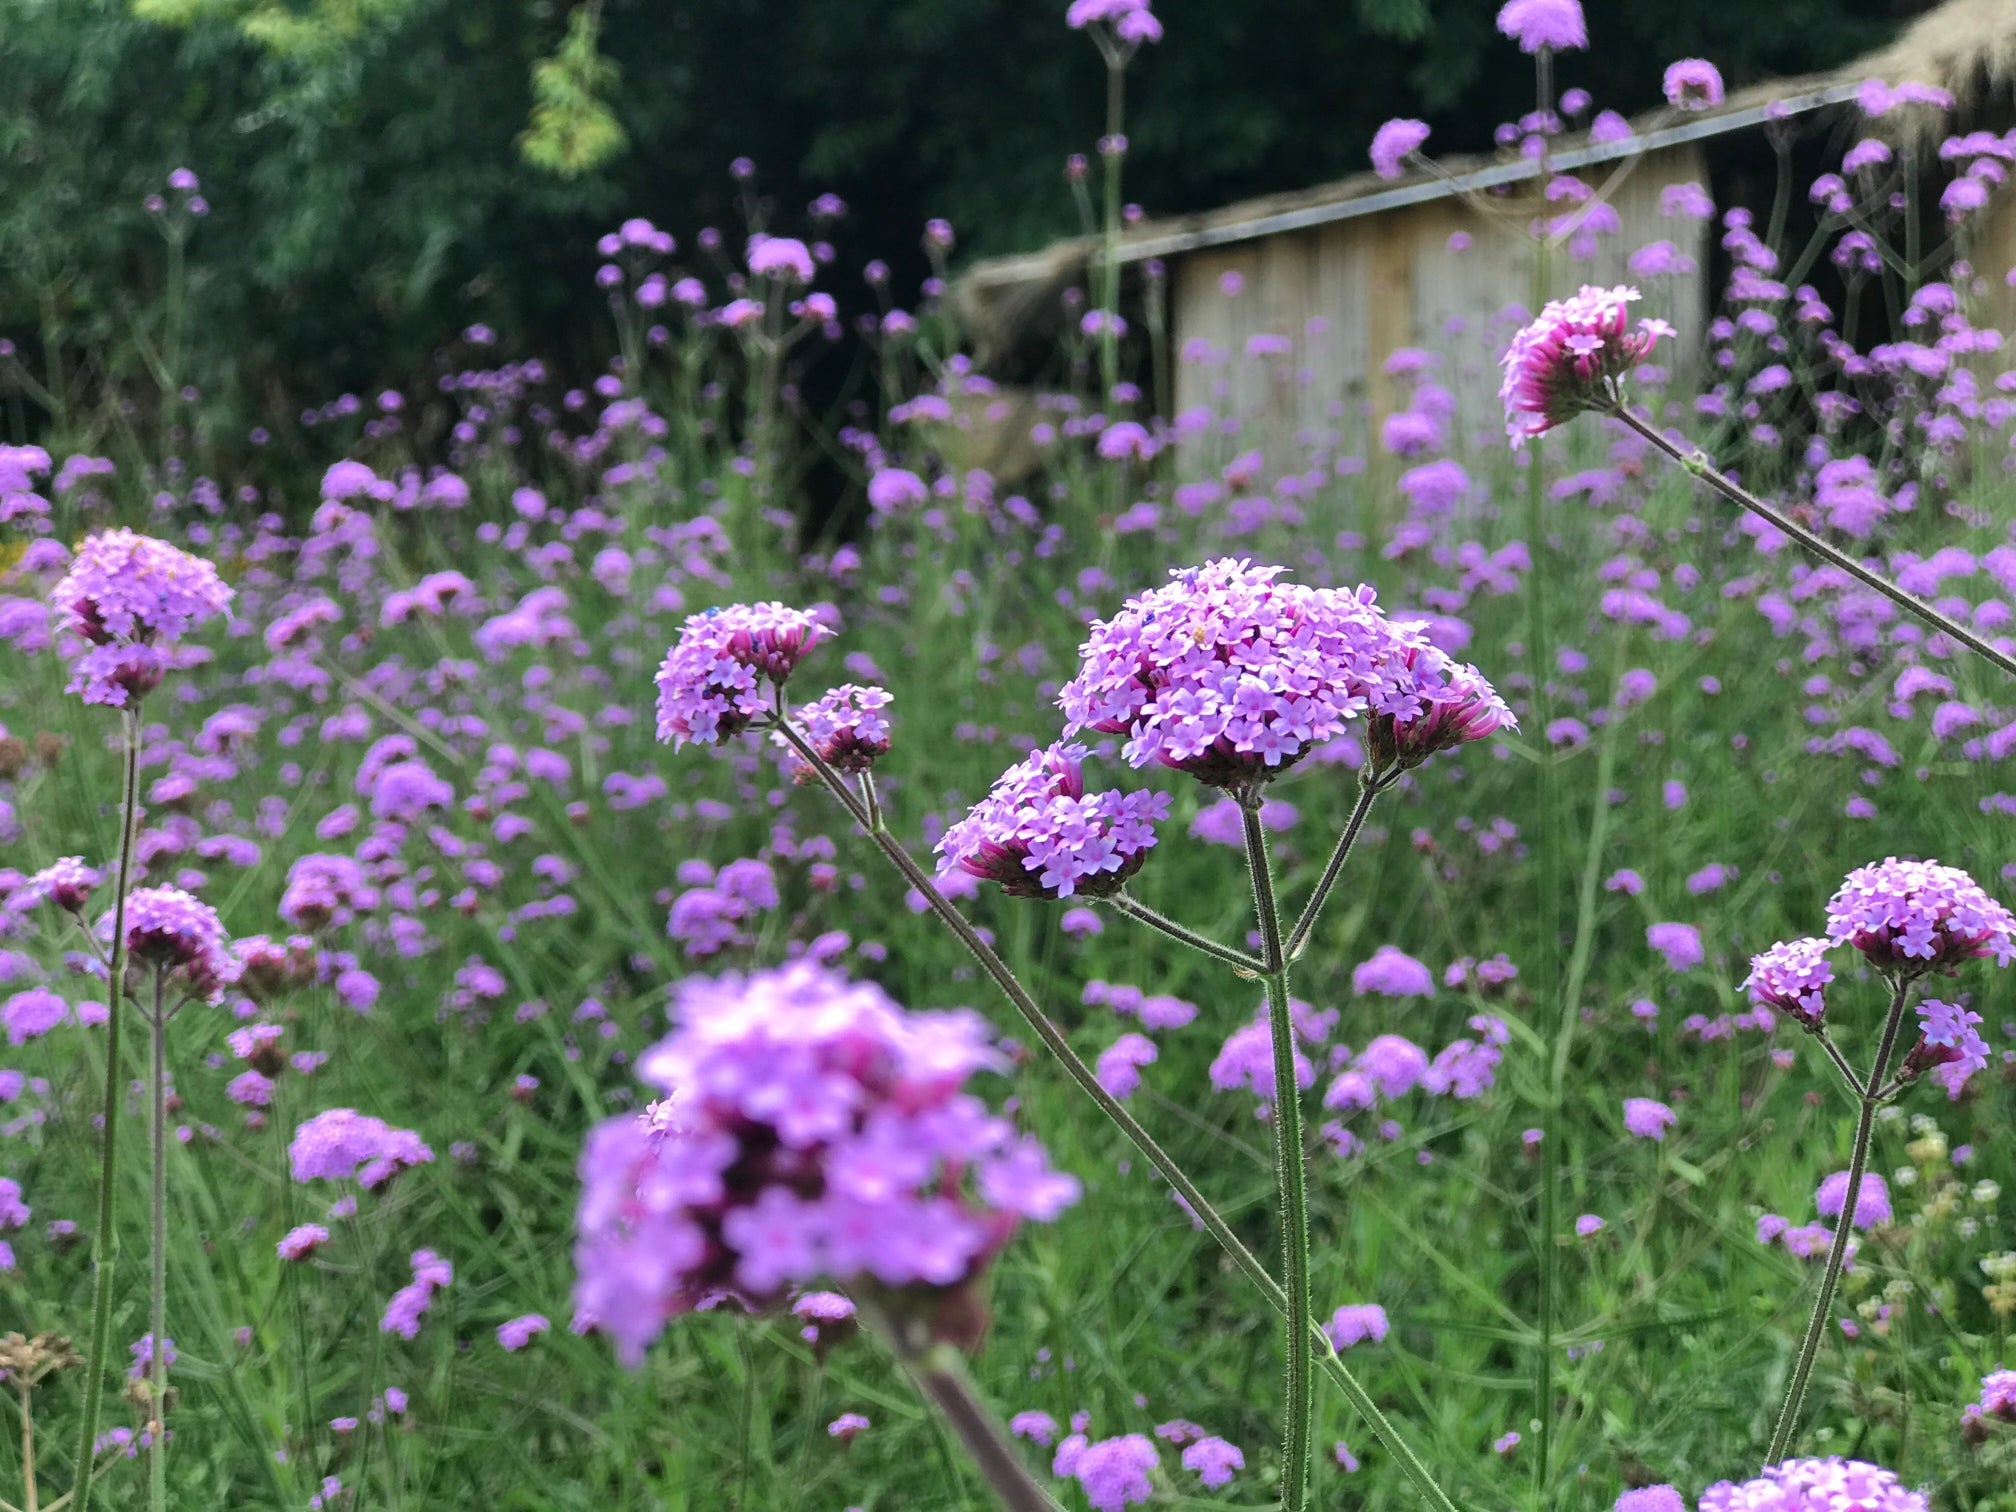
IN THIS GUIDE Taking Softwood Cuttings Taking Semi-Ripe Cuttings Verbenas are beautiful and wildlife-friendly plants for your garden. Some are typically grown as annual bedding plants, while others are popular perennials which will bloom in your garden over several years. If you have some verbenas in your garden and would like to grow more, you can collect seeds from your existing plants. Many verbenas can also be successfully propagated by taking cuttings. By taking cuttings, you can create clones of bedding types to keep them going through to the following year. To propagate Verbena from cuttings, you can either take softwood cuttings in spring or early summer or semi-ripe cuttings a little later in the summer season, as I explain below. Taking Softwood Cuttings Firstly, you need to select a soft and flexible tip from a young non-flowering shoot. You should prepare to take your cuttings early on a spring or summer day. Take a clean, sharp pair of secateurs and cut off around 10cm of selected shoots, cutting just above a bud. Trim the cutting just below a node (leaf joint) and remove the lower leaves. Dip the end of the cutting in a rooting powder or liquid. Taking care that the cuttings do not dry out, place them in a moist yet free-draining compost with added grit, around the edges of a pot or pots. Place the cuttings in a cloche or cover them over completely to maintain humidity. Cuttings should root within 2-4 weeks. Gradually harden off the cuttings and pot them into individual pots, planting them out into the garden after the lost frost date in your area. Taking Semi-Ripe Cuttings Semi-ripe cuttings can be taken from more tender bedding verbenas in later summer or early autumn. This can be the best way to ensure that you can continue to enjoy displays of flowers from these plants over more than one year. Early morning is the best time to take cuttings. Look for non-flowering shoots which are hardening towards the base but still soft at the tip. Trim the cuttings just below a node and remove the lower leaves to leave around 4 leaves in place. Again, make sure the cuttings do not dry out and plant them up as soon as possible. Keep the young plants moist and pot them into individual pots once the cuttings have rooted well. Overwinter under glass, ideally at a temperature of around 7°C in bright, frost-free conditions. Start to harden off your young plants in May and place them out in the garden once all risk of frost has passed and the garden is warming up. “If you do not have sufficient space to store overwintered Verbena, taking cuttings is the best way to ensure that you do not need to buy new plants the following year,” says Colin Skelly, a Master Horticulturist. “Take more than you need as ‘insurance’ for any winter losses.” Softwood cuttings may flower in the same year, while semi-ripe cuttings will typically flower the following year.
Learn more
Pruning Requirements For Verbena Are Minimal, But Differ For Bedding And Perennial Types
IN THIS GUIDE Pruning Bedding Types Pruning Perennial Types Both bedding and hardy perennial verbenas are perfect choices for a wildlife-friendly garden. All love full sun and well-drained soil and, when planted in the right spot, won’t require a lot of care and can be a good choice for relatively low-maintenance gardens. One thing to think about when growing verbena is whether you need to prune your plants. The good news is that pruning requirements for verbena are minimal and some types may not need to be pruned at all. Below, I share the basic things you need to know about pruning verbena. Pruning Bedding Types Bedding verbenas are usually used as summer plants, which are discarded after their flowering displays in autumn. They are a popular choice for container gardens and summer bedding displays in garden borders. Beyond deadheading, your bedding verbena might not need to be pruned at all. ‘Vepita’ However, these plants can typically tolerate trimming if they get too tall for the space or, with trailing types, if they become too leggy. You can give them a light trim as desired throughout the growing season. You can also snip off unsightly straggling sections or get rid of dead or damaged parts. However, in general, you will not need to do so. Pruning Perennial Types Perennial types are those which can remain in your garden over the winter months and provide further flowering displays over subsequent years. With these types, including Verbena bonariensis and V. hastata, you should cut down old flower stems to as close to the base as possible before any new growth emerges in spring. It is best not to cut back in autumn because, although it may be tempting to tidy up your border, leaving the dead material in place can be better for the plants and for wildlife. The dead foliage can offer a degree of cold protection to the overwintering plants. The seed heads also provide a valuable source of food for birds which eat seeds and the foliage cover provides a winter habitat for a range of other creatures. The other benefit of leaving the seed heads in place is that this allows for the potential for self-seeding. “One of the first plants that I ever grew from seed was Verbena boniarensis and I have had it in my garden ever since,” shares Colin Skelly, an expert Horticulturist. “I have never resown it as it has self-seeded year on year and I edit out those that I do not want, often potting on these seedlings for other projects or for friends and neighbours.” So, even if the original plant does not make it through the winter, you may well have new seedlings popping up.
Learn more
These Are Gardener Elizabeth Waddington's Favourite Verbena Types To Grow
IN THIS GUIDE 1) Aloysia triphylla 2) V. bonariensis ‘Buenos Aires’ 3) V. bonariensis ‘Lollipop’ 4) V. ‘Claret’ 5) Glandularia ‘Endurascape Pink Bicolor’ 6) V. hastata 7) V. hastata ‘Rosea’ 8) V. hastata ‘White Spires’ 9) V. ‘Lawrence Johnston’ 10) V. macdougalii ‘Lavender Spires’ 11) V. officinalis 12) V. officinalis var. grandiflora ‘Bampton’ 13) V. ‘Peaches ‘n’ Cream’ 14) V. rigida 15) V. rigida f. lilacina ‘Polaris’ References Verbenas can be wonderful flowering plants to add to a wide range of different gardens and settings. The biggest challenge can be deciding which of the many wonderful different types and varieties to grow. Some types are more tender and are perfect for pots, hanging baskets or summer bedding, whilst others are somewhat hardier and perennial. Within both of these categories, here are some of the different Verbena varieties that you might grow. Keep in mind that all of these varieties grow best in full sun. 1) Aloysia triphylla COMMON NAME(S): lemon verbena HARDINESS RATING: H3 FLOWERS: purple and white FLOWERING SEASON(S): summer SIZE: 1.5-2.5m in height, 1.5-2.5m spread Though not within the Verbena or the Glandularia genus like the other verbena on this list, lemon verbena is one plant that is well worth considering for home growing. This is a deciduous sub-shrub, which has leaves with a strong lemon scent. It also bears panicles of tiny white or pale lilac blooms in the summer. Although it is only H3 hardy, it can be grown in full sun in a sheltered spot outdoors in milder areas or cultivated indoors or in a greenhouse or polytunnel in colder areas. This could also be a good addition to an edible garden, as the leaves are commonly used as a pot herb or to make tea.1 “Lemon Verbena makes a great plant for making refreshing tea,” shares Horticulturist and Garden Consultant Colin Skelly. “Only half hardy, it is best grown in a pot or container and brought under cover in the winter months. It can be pruned back to manage the size.” 2) V. bonariensis ‘Buenos Aires’ COMMON NAME(S): purple top HARDINESS RATING: H4 FLOWERS: purple FLOWERING SEASON(S): summer / autumn SIZE: 1.5-2.5m in height, 0.1-0.5m spread Also known as purple top or tall verbena, this is one of the most popular varieties to grow in UK gardens. It is not only loved by gardeners, but also by bees and other pollinators. It bears branched groups of small purple flowers through summer and often into early autumn. This tall perennial grows up to around 2m in height with a spread of up to 50cm. It likes moist but well-drained soil and is H4 hardy. 3) V. bonariensis ‘Lollipop’ COMMON NAME(S): purple top ‘lollipop’ HARDINESS RATING: H4 FLOWERS: purple FLOWERING SEASON(S): summer / autumn SIZE: 0.1-0.5m in height, 0.5-1m spread If you like the above but don’t have the space to grow it in your garden, this dwarf cultivar is a good one to consider. It grows to only around 60cm tall with a similar spread and also bears groups of small, purple flowers in the summer and into autumn. This option is also H4 hardy. 4) V. ‘Claret’ COMMON NAME(S): vervain ‘claret’ HARDINESS RATING: H3 FLOWERS: red FLOWERING SEASON(S): summer / autumn SIZE: 0.1-0.5m in height, 0.1-0.5m spread Technically a glandularia but often referred to as verbena, this cultivar has deep, velvety flowers with a reddish-pink hue, set against deep green foliage. It blooms through summer and into the autumn too. Although it is only H3 hardy and won’t overwinter outside in most parts of the UK, it is great for container growing, with a height and spread of less than 50cm. 5) Glandularia ‘Endurascape Pink Bicolor’ COMMON NAME(S): vervain ‘endurascape pink bicolor’ HARDINESS RATING: H3 FLOWERS: pink FLOWERING SEASON(S): summer / autumn SIZE: 0.1-0.5m in height, 0.1-0.5m spread Another glandularia, ‘Endurascape Pink Bicolor’ is a semi-evergreen perennial which is often grown as an annual. It grows around 30cm tall with a similar spread. The flowers are small, with deep pink centres and lighter pink edges, and are held in clusters which grow up to around 5cm across. This option is also H3 hardy. 6) V. hastata COMMON NAME(S): american blue vervain HARDINESS RATING: H5 FLOWERS: purple FLOWERING SEASON(S): summer / autumn SIZE: 1-1.5m in height, 0.5-1m spread Also known as American blue vervain, this is a clump-forming perennial which grows to around 1-1.5m tall with a spread of 0.5-1m. It has narrow leaves and spikes of small violet-blue to pinkish-purple flowers which bloom in branched stems resembling a candelabra between early summer and early autumn. This variety is H5 hardy. 7) V. hastata ‘Rosea’ COMMON NAME(S): verbena hastata ‘rosea’ HARDINESS RATING: H5 FLOWERS: pink FLOWERING SEASON(S): summer / autumn SIZE: 1-1.5m in height, 0.1-0.5m spread This is a pink flowered cultivar of the above, with a similar height and spread and the same characteristics. It could be a wonderful choice if you want to tie it in with other pink flowers or a pink planting scheme in your garden. 8) V. hastata ‘White Spires’ COMMON NAME(S): vervain ‘white spires’ HARDINESS RATING: H5 FLOWERS: white FLOWERING SEASON(S): summer / autumn SIZE: 1-1.5m in height, 0.5-1m spread Likewise, if you want a plant with the characteristics of Verbena hastata but are looking for white flowers, then this is the option to choose. The small white flowers are also long-lasting with this cultivar and bloom throughout the summer and into early autumn. 9) V. ‘Lawrence Johnston’ COMMON NAME(S): vervain ‘lawrence johnston’ HARDINESS RATING: H3 FLOWERS: red FLOWERING SEASON(S): summer / autumn SIZE: 0.1-0.5m in height, 0.1-0.5m spread This half-hardy perennial grows to around 45cm tall and bears bright red flowers around 1cm in diameter in clusters through the summer and into early autumn. This plant will look great in a well-drained border in full sun but is also a great choice for container growing in loam-based compost. It will overwinter if moved into a greenhouse or another sheltered spot over the coldest months. 10) V. macdougalii ‘Lavender Spires’ COMMON NAME(S): mountain blue vervain ‘lavender spires’ HARDINESS RATING: H5 FLOWERS: purple FLOWERING SEASON(S): summer / autumn SIZE: 1.5-2.5m in height, 0.1-0.5m spread Also known as mountain blue vervain, this is a perennial which grows to around 1.8m in height. It has rough, narrow leaves and bears branching stems which hold small lavender-hued flowers from the middle of summer into autumn. It is pretty drought tolerant and is H5 hardy. 11) V. officinalis COMMON NAME(S): common vervain HARDINESS RATING: H5 FLOWERS: purple FLOWERING SEASON(S): summer SIZE: 0.5-1m in height, 0.1-0.5m spread This lovely plant is a native perennial and is also known as common vervain or common verbena. In the late summer, it produces wiry flowering stems which bear numerous tiny flowers with a pale purply-pink colour. This wildflower is well known for attracting wildlife and is a low-maintenance choice for many gardens. 12) V. officinalis var. grandiflora ‘Bampton’ COMMON NAME(S): vervain ‘bampton’ HARDINESS RATING: H6 FLOWERS: purple and pink FLOWERING SEASON(S): summer / autumn SIZE: 0.5-1m in height, 0.5-1m spread This cultivar of the above is also H6 hardy. It is a bushy, upright perennial which bears short spikes of purplish-pink flowers from mid-summer to mid-autumn. This ornamental option still shares many of the benefits of the above in terms of its hardiness and resilience. 13) V. ‘Peaches ‘n’ Cream’ COMMON NAME(S): vervain ‘peaches ‘n’ cream’ HARDINESS RATING: H3 FLOWERS: cream, yellow, orange and pink FLOWERING SEASON(S): summer / autumn SIZE: 0.1-0.5m in height, 0.1-0.5m spread This H3 hardy, bedding verbena performs well over a long period in summer and into autumn. It is perennial but is often grown as an annual like other more tender verbenas. It has neat, oblong-shaped leaves and bears flat heads of light, peachy, orange to pink flowers, which fade over time to a creamy yellow. It is a compact plant, perfect for containers, which grows around 20cm tall and wide. 14) V. rigida COMMON NAME(S): slender vervain HARDINESS RATING: H3 FLOWERS: purple FLOWERING SEASON(S): summer SIZE: 0.5-1m in height, 0.1-0.5m spread This tuberous perennial is also often grown as an annual. It grows to around 60cm tall and bears clusters of fragrant flowers in a bright purple hue on branching stems in late summer. This variety is H3 hardy. 15) V. rigida f. lilacina ‘Polaris’ COMMON NAME(S): slender vervain ‘polaris’ HARDINESS RATING: H3 FLOWERS: purple FLOWERING SEASON(S): summer SIZE: 0.1-0.5m in height, 0.1-0.5m spread This variant has a height and spread of less than 50cm and forms clumps of dense, stiff leaves. In summer and often right through to the first frosts, it bears clusters of pale purple flowers on wiry stems. Of course, there are many other verbena types and cultivars to consider growing in your garden. However, when looking for a verbena variety to grow, the options listed above are a good place to start. References 1. Lemon verbena: Overview, Uses, Side Effects, Precautions, Interactions, Dosing and Reviews. (n.d.). WebMD. Retrieved March 27, 2023, from https://www.webmd.com/vitamins/ai/ingredientmono-632/lemon-verbena
Learn more
Deadheading Is The Secret Weapon For Prolonging Verbena's Summer Blooming
IN THIS GUIDE Should You Deadhead Verbena? Deadheading To Prolong Flowering Deadheading In Late Summer How To Deadhead Verbena Verbenas are beautiful flowering plants which can be treated as bedding plants or grown as perennials to bloom over a number of years. How much effort it takes to maintain and care for your verbena plants will depend on which variety you have chosen to grow and where you have chosen to grow them. Often, they can be relatively easy and trouble-free plants to grow. Generally speaking, perennial verbena is a lower maintenance option that requires very little care and you will not usually even wish to deadhead them. However, bedding verbenas, especially those growing in containers, will require a little more care. Deadheading can be a good idea if you wish to prolong the summer blooming period. Should You Deadhead Verbena? Whether or not you should deadhead verbena very much depends on which varieties you are growing, where you are growing them, the time of year and your own gardening preferences. Deadheading verbena is typically an approach which aims to prolong the flowering period. It is also used to prevent plants from self-seeding and growing out of control. Some gardeners may prefer to deadhead to keep their garden looking neat. However, deadheading prevents the plants from fulfilling their natural life cycle, which can deprive you of seedlings and can sometimes be a bad decision for wildlife in your garden. When thinking about whether or not deadheading verbena is a good idea for you and your garden, it can be helpful to look at two different periods when deadheading is sometimes recommended. Deadheading To Prolong Flowering The first period when deadheading may be beneficial is in spring or early summer, just after the first flush of blooms has begun to fade. If you do not deadhead at this time, then the plants will focus their attention on producing seeds and may not bear further flowers. So, if you would like to get further blooms over the rest of summer, then it can be a good idea to deadhead or cut back at this time. Many gardeners who have planted bedding verbena will take this approach. Of course, this is not strictly essential, and if you have planted hardier verbena as part of a wilder and more natural, low-maintenance garden, then you might wish to simply let the plants continue with their natural process of development. Deadheading In Late Summer The second period when deadheading is often suggested is towards the end of the blooming period. This is a period when some gardeners may choose to remove unsightly spent flowering stems. Some may also deadhead again at this time to prevent plants from producing seeds. However, in most cases, I do not recommend deadheading after the first deadheading in spring. The main reason for this is that the seeds which develop on the plants are a boon for wildlife – especially seed-eating birds. Allowing the plants to self-seed can also be a great way to obtain new verbena plants. How To Deadhead Verbena If you decide to deadhead verbena in spring, the best approach is simply to wait for the first flush of flowers to fade, then trim back the top quarter of the plants. Simply take a pair of clean gardening shears and lop off the upper section of the plants. This can be the best way to spur new growth and ensure further blooms over a longer period. “For bedding Verbenas I would typically deadhead to stimulate further flowering,” says Colin Skelly, a Master Horticulturist. “Hardy perennial Verbenas are generally later flowering and I would not deadhead to support both wildlife and self-seeding.” Later, if you really don’t want plants to self-seed, simply snip off the flowering heads, but do not trim as broadly as above.
Learn more
Early Spring? Time To Sow Your Chrysanthemum Seeds And Follow These 5 Steps
IN THIS GUIDE When To Sow Chrysanthemum 1) Sow Your Seeds 2) Provide The Correct Care 3) Transplant Seedlings Into Pots 4) Harden Off In Early May 5) Plant Out In Late May There are tons of chrysanthemum varieties, each boasting bold and captivating colouration. The shape and style of the flower changes between varieties as well, so spend time choosing the right one(s) for you before buying seeds. There may be some minor variation between planting times and growing advice, depending on the variety you choose. I would always recommend checking the instructions on each packet before starting – you can see on the variety I grew for this guide (C. segetum) that it can be sown under glass year-round, but only sown outdoors during limited months of the year. Generally I would advise germinating indoors and then planting out – otherwise, yours might not flower before dying off. Also be aware that chrysanthemum seeds can vary from their parent plant, and it’s hard to guarantee that the flower you grow will be the one you’re expecting. Here’s an overview of the process: Sow indoors in late winter or early spring Keep seedlings in temperate conditions Transplant seedlings into pots Harden off indoor seedlings to ensure sturdiness Transplant outdoors and enjoy the show Let’s take a closer look at how to grow chrysanthemums from seed. Difficulty Medium Equipment Required Seed compost, seed trays, seeds When To Sow February to March When To Plant September to December When To Sow Chrysanthemum UK conditions lend themselves best to sowing chrysanthemums indoors. Sow in February or March, before the last frost. If you have a heated propagator (ideally with light fittings) you will find it gives you a head start – so that your plant should flower even more profusely come late summer. I started my seeds in early February and was not disappointed with how my plant turned out. 1) Sow Your Seeds Put a layer of seed compost in your seed tray before planting your seeds. You can see these are extremely small seeds – and be difficult to separate and divide into individual cells if using a seed starting tray. Each seed needs to be about 0.5cm beneath the surface of the soil and you can do this by pushing the seed gently beneath the surface of the compost or by scattering them onto the top of the soil. 2) Provide The Correct Care Chrysanthemum seeds will do best when kept between 18-21°C. You can achieve this by keeping them in a room where you’re confident the temperature will stay within this range or by using an aforementioned propagator with a heated base. You should thin out your seedlings when you notice multiple seedlings starting to sprout. I actually used an eyebrow-plucker to navigate the sensitive seedlings, which can be easily disturbed at such a young age. Leave the strongest-looking seedling in place, whilst removing any which are less developed or which have turned leggy in search of light. 3) Transplant Seedlings Into Pots Seeds will sprout within a fortnight of planting and once they’ve sprouted, you need to transplant them into modules or small pots so their roots have space to thrive. After, transplant to larger pots before planting; I moved mine into small compostable pots that were easy to transplant outside when May arrived. 4) Harden Off In Early May To give your chrysanthemum seedlings the best chance of growing when you move them outside, you’ll need to harden them off first. Take your pots or seed tray outside and leave it in a shady spot for a couple of hours. The next day, leave it a little longer and repeat this for 7-10 days before planting out, gradually incorporating sunlight into their routine. Mine were planted out in mid-May and although they took some time to establish themselves in their new environment, I experienced no ill effects given the last frost had already been and gone. 5) Plant Out In Late May Once your chrysanthemums are hardened off you can plant them outside. It’s recommended to do this in late May up to July. Here’s the end result and my Chrysanthemum segetum (Corn Marigold) in flower, with many other buds ready to flower. These were an absolute hit with the local insect population and at one point I must have counted between 15-20 flowers in bloom, from just one plant in a single day. For best results, you should plant your mums into well-drained but moist soil. I fertilised mine every week or two and it certainly seemed to help them flower in an area of the garden that only gets limited sun during mornings and early-afternoon.
Learn more
This Is How To Harvest Ginger Without Bruising Or Damaging The Plant
IN THIS GUIDE 1) Get Your Timings Right 2) Keep An Eye On The Foliage 3) Dig Around The Plant 4) Harvest Your Ginger 5) Prepare The Root Although ginger is a native of tropical parts of the world, it will thrive in the UK if planted indoors or inside a greenhouse. As it’s so easy to cultivate and lends itself well to a variety of culinary dishes, it’s favoured by amateur horticulturalists and chefs across the country. In order to make sure you get the full flavour of this root spice, it’s important to harvest it at the right time and to do so without bruising or otherwise damaging the plant. By following the steps below when harvesting your ginger, you can’t go wrong: Time your harvest right – ensuring your plant has fully matured. Keep an eye on the foliage beginning to wilt to indicate when it’s ready to dig up. Dig around the plant using a trowel, being careful not to damage any of the roots. Harvest your ginger by gently removing it from the soil. Prepare the root by washing and chopping (if desired). Each of those stages is described in more detail to make things as simple as possible below. Difficulty Easy Equipment Required Trowel, gardening gloves, sharp knife When To Take Cuttings After flowering 1) Get Your Timings Right When ginger is planted and cared for correctly, it should be fully mature and ready for harvest after around 10 months. You can, if you wish, harvest ‘green ginger’ much sooner – cutting off small portions from around 4 months after planting, but this does not taste the same as ginger that is fully mature. By autumn, in temperate climates, you should also have the option to harvest stem ginger in small amounts. Stem ginger has a unique flavour and can be more difficult to get your hands on than root ginger if you do not grow your own. After around 10 months, however, the foliage on your ginger plant will begin to die down; this is the perfect time to harvest. 2) Keep An Eye On The Foliage As with most crops, the leaves and stems of ginger are excellent indicators of when it is ready to harvest. Ideally, you should wait until after it has completed its flowering cycle. This means that the flowers will have wilted and the leaves turned yellow, while the stems themselves will also be sagging. At this point, you can be sure that the ginger is fully mature and ready to dig up. 3) Dig Around The Plant It’s important that you do not damage the ginger plant when harvesting, especially if you plan to continue growing it afterwards. Firstly, loosen the soil around the plant using a trowel or your hands. Then, dig in a circular pattern around the plant at a distance of between 5-10cm from its base. You can expect to dig around the same distance in depth to encounter the rhizomes. They will be easy to spot, as they will be white or light brown against the darkness of the soil. 4) Harvest Your Ginger It’s now simply a case of gently removing the plant from the soil. If you plan to harvest the entire plant, you needn’t worry about leaving any rhizomes behind. However, if you wish to continue enjoying its benefits far into the future, simply leave behind a rhizome with at least 2 eyes and cover it back over with soil. “Ginger is definitely a perennial crop to consider for growing in a heated glasshouse or polytunnel or for bringing indoors and then planting out in a cool greenhouse or polytunnel,” shares Master Horticulturist Colin Skelly. “Like many home-grown crops, it might be cheaper to buy from the grocers or supermarket but the pleasure of getting a harvest from the soil is priceless.” This will ensure it remains unharmed and can blossom again next year. 5) Prepare The Root Next, you should take the harvested ginger and wash it thoroughly to remove any dirt, bacteria or fungi that might be left on its surface. You can then use the knife to chop the ginger into portion-sized pieces and freeze them in individual plastic bags. Stored in this method, the ginger will remain good to eat for around 3-4 months.
Learn more
You Can Take Cuttings From Existing Ginger Plants To Grow More - Just Follow These Steps
IN THIS GUIDE 1) Acquire Your Ginger Plant 2) Cut It Into Pieces 3) Prepare The Growing Tray 4) Plant Your New Rhizomes 5) Transplant Into Pots 6) Care For Your Plant(s) 7) Harvest And/Or Propagate Again! A common ingredient in Asian cuisine, ginger is a delightfully fresh and lightly spicy addition to curries, stews and stir-fries. Its versatility in the kitchen and its ease of cultivation make it a firm favourite with gardeners throughout the country. To propagate your own ginger, you can take cuttings from existing plants, or simply buy a healthy ginger rhizome from any supermarket or grocery store. “This is a fantastic project for a school gardening club or youth group,” Colin Skelly, Horticultural Consultant suggests. “What a great way to learn about where plants come from and what they need to grow!” It’s possible to take cuttings at any time of the year, as long as you make sure you aren’t exposing the newly propagated plants to extreme outdoor temperatures. To grow yours from cuttings, follow these steps: Choose your ginger plant (you can use supermarket-bought roots) Cut it into pieces of at least 1 inch, aiming for at least 2 eyes per section. Prepare the growing tray with sphagnum or cuttings compost. Plant your new rhizomes in the compost mix and cover over slightly. Transplant to pots once your ginger begins to develop roots and shoots. Water regularly and keep adding compost as the stem develops. Harvest for propagation (again!) or for eating. For more information on each stage of the process, please see our detailed instructions below. Difficulty Easy Equipment Required Spade or fork, knife, bleach, cuttings compost mix, module tray, pot When To Take Cuttings All year round 1) Acquire Your Ginger Plant There’s no need to trawl the internet when searching for the perfect ginger rhizome from which to propagate new plants. Simply head down to your local supermarket and select a plump, healthy-looking root section. Ideally, you should aim for one with no wrinkles and at least two eyes (protrusions from which new shoots grow). Organic ginger is best if you can get it, since non-organic varieties may carry chemicals that inhibit their growth. Wash your ginger to remove any growth inhibitors. 2) Cut It Into Pieces This step is entirely optional, but doing so will allow you to grow more plants simultaneously. Again, you want to guarantee that every section you slice has at least 2 eyes and is at least 1 inch in length. Leave the ginger for a couple of days so that the wounds callus over, which will protect it when it’s in the ground. 3) Prepare The Growing Tray Ginger thrives in well-draining terrain, so you may wish to use sphagnum moss or coconut fibre module tray as these both drain exceptionally well. Otherwise, a tray with adequate drainage holes should work fine. Partially fill the tray with a high-quality cuttings compost mix, leaving plenty of room for the ginger to sit on top. 4) Plant Your New Rhizomes Lay the ginger on top of the cuttings compost mix with the eyes facing upwards. Sprinkle around 1 inch of compost mix on top of the rhizomes, taking care to leave the eyes exposed. Position the module tray in a warm location with partial shade. The ideal temperature for the soil is around 20°C, but slightly cooler environments will suffice. Water the ginger regularly to keep the soil damp but not saturated. 5) Transplant Into Pots Before transplanting the ginger into bigger pots, you must wait for it to develop both roots and shoots. This normally takes around 2 weeks, but keep an eye on your plant(s) so that you’re ready to act when it happens. When ready, gently remove the rhizome from the module tray and place it into a pot at least 30cm deep. If planting in rows, give at least 20cm for each plant. Place 5cm of soil over the rhizome, taking care to ensure the shoot is exposed. 6) Care For Your Plant(s) Water the ginger plant regularly, always guaranteeing that the soil remains moist and not any wetter. Keep adding soil to the pot as the stem grows to ensure it remains covered. It’s possible to move it outdoors during the summer months if desired, but it will not tolerate an exposed location well. Ginger also demands warmer temperatures at all times, so it must be moved indoors when the mercury drops. 7) Harvest And/Or Propagate Again! There is no limit to the number of times you can propagate your ginger plants. When propagating an existing plant, just be sure you handle it gently during the uprooting process so as to avoid damage to the rhizome. You can chop off as many pieces of the plant as you like (either for further propagation or for use in your culinary dishes) without killing it – as long as you ensure that the original rhizome still has at least 2 healthy eyes. Then simply repeat the process above for unlimited ginger!
Learn more
Coreopsis 'Tickseed' - This Is An Easy Plant To Grow In The Right Setting
IN THIS GUIDE Overview Growing From Seed Planting Tickseed Ongoing Coreopsis Care References Coreopsis, also known as ‘Tickseed’, can either be grown as an annual or a perennial here in the UK. Both types can be attractive additions to a summer garden, with cheerful daisy-like blooms that come in a range of colours. Though not native to Britain, this can be a good choice for those who wish to attract wildlife to their gardens. The beautiful blooms are a boon for bees, butterflies and other beneficial insects, and birds like to eat the seeds. This is an easy plant to grow in the right setting and can enrich an informal and relaxed-looking garden with its lovely flowers that are bound to put a smile on your face. Overview Botanical Name Coreopsis Common Name(s) Tickseed Plant Type Annual / Perennial Native Area North & South America Hardiness Rating H3-H6 Foliage Deciduous Flowers Daisy-like flowers in yellows, pinks, oranges, reds, and other bright colours When To Plant May-June When To Prune October-November or March Coreopsis is a genus which contains a number of species in the Asteraceae plant family, commonly called calliopsis or tickseed, though this is a name that they share with a number of other plants.1 There are between 75-80 species in all, all of which are native to North, Central or South America.2 There are many different species and named cultivars of coreopsis grown in the UK. If you are considering growing some, the first decision that you will have to make is whether you will grow an annual or perennial type. Growing From Seed Annual coreopsis can be sown in the ground, where they are to bloom in March or April, or can be sown under cover from late winter to early spring. The seeds should be grown in a moist yet free-draining seed-starting medium and should not be covered with compost – they need lots of light to germinate. Seedings from direct-sown seeds should then be thinned to around 15cm apart. Perennial coreopsis is best sown under protection in late winter or early spring and then grown on in pots before they are hardened off and planted out. Planting Tickseed Coreopsis of both types should be planted out in May or June, having been hardened off if they were sown indoors. For more tender types, it is very important to wait until after the last frost date and until after the weather has warmed up reliably where you live. Perennial coreopsis divisions from established plants should be planted in early spring. Simply prepare a suitable growing area in the garden, or a container filled with a suitable, free-draining growing medium, and place the plants into their planting holes before firming the soil back around them. Ongoing Coreopsis Care When you choose the right spot, tickseeds can be incredibly easy to grow and care for. Preferred Aspect Plant coreopsis in full sun or partial shade. Most coreopsis can cope with both sheltered or exposed positions, but taller perennial types are best grown in a more sheltered spot, as they might require some additional support if planted in a windy location. Soil Requirements Coreopsis grows well in chalk, loam or sandy soil. A soil that becomes waterlogged, cold and damp will not be suitable, as the one main thing that these plants cannot tolerate is having ‘wet feet’. When growing in pots, use any peat-free multipurpose compost or homemade equivalent and just make sure that it is sufficiently free-draining. Watering Coreopsis growing in the ground should usually be watered regularly during establishment but should be fine with natural rainfall once established. Coreopsis growing in containers should be watered regularly to provide even moisture levels throughout the summer months. Fertilising Perennial types growing in the ground and annuals growing in reasonably fertile soil should not require additional feeding beyond an organic mulch. However, those grown in containers for summer displays should be fed every 2 weeks with an organic liquid plant feed high in potassium to boost flowering (like comfrey tea, for example). Pruning Deadheading coreopsis, especially when they are growing in containers, can help keep them looking good and encourage more blooms. Perennials in borders can also be deadheaded, but it is best to leave the heads on to provide food for birds which eat the seeds. Perennials can be cut back in autumn, but it is best to leave the habitat for wildlife and cut back close to the ground in the spring just before new leaves emerge. “Dead-heading Coreopsis, as with Dahlias, can be a bit of a challenge, as buds and spent blooms look similar,” adds Peter Lickorish, a Master Horticulturist. “Buds tend to be firm and more rounded and, if elongated, the bright new petals are visible. “Spent blooms are usually elongated and soft or mushy.” Flowering Coreopsis are generally easy and reliable growers and will bloom readily when provided with the right conditions. If they fail to bloom, environmental issues, such as insufficient sunlight, are usually to blame. It is also important to avoid overfeeding, especially with a nitrogen-rich feed, since this can encourage foliage growth at the expense of blooms. “Coreopsis tinctoria flowers can be used to dye wools and fabrics in various sunset colours – another facet to this fascinating plant,” adds Peter. Common Problems One of the biggest dangers to coreopsis plants are slugs and snails, which can be a major threat, especially to seedlings and young plants. Make sure that you attract plenty of predators that eat these pests to your garden (birds and hedgehogs are probably the most common). These will help to keep their numbers down; consider adding a protective barrier over, or wool compost around, young plants until they become more established. Transplanting If you wish to transplant perennial coreopsis, the best time to do so is either in early spring, perhaps when you are dividing a mature specimen, or in September. Propagating Aside from growing coreopsis from seed, the other main method of propagation is by means of the division of mature perennial types. Perennial coreopsis at least a few years old can be lifted, divided and replanted early in the spring. Companion Planting Annual coreopsis can work well in bright and cheerful summer displays with a wide range of other annual flowers which like sunny and free-draining conditions in containers or borders. Perennial types of tickseed are ideal for informal prairie planting schemes alongside echinacea, yarrow, Ammi majus, asters, penstemons, helenium, salvias, verbena, verbascum and ornamental grasses. They can also blend well into Mediterranean-style borders along with lavender, thyme, and other Mediterranean herbs. This is a versatile flowering perennial which can work well in a wide range of different schemes for a sunny and free-draining spot. References 1. Coreopsis. (n.d.). New Jersey Agricultural Experiment Station. Retrieved March 14, 2023, from https://njaes.rutgers.edu/plant-of-the-month/coreopsis.php 2. Coreopsis “Jethro Tull.” (n.d.). Missouri Botanical Garden. Retrieved March 14, 2023, from https://www.missouribotanicalgarden.org/PlantFinder/PlantFinderDetails.aspx?taxonid=270827&isprofile=0&
Learn more
Keep Penstemon Seeds In Cold Storage For 3 Months Before Sowing, Say Experts
IN THIS GUIDE 1) Prepare Seeds 2) Sow Penstemon & Cover Lightly 3) Prick Out & Pot On 4) Harden Off Before Planting Out Penstemon are not native to the UK, but can still be useful plants for native wildlife nonetheless. Of course, they are also attractive flowering plants that can look wonderful in a range of settings. If you would like to grow penstemon, the most usual approach is to purchase the plants in spring or early summer to place in your garden. However, it is also possible to grow penstemon from seed. To grow penstemon in this fashion: Collect or purchase the penstemon seeds and prepare them for better germination. Sow the seeds in spring, in a propagator at temperatures of around 15°C. Prick out the seedlings and pot on when they are large enough to handle. Plant out any time between March and October. Difficulty Easy / Medium Equipment Required Seeds, seed tray or pots, growing medium, propagator 1) Prepare Seeds The first thing to think about is whether you are planning to collect seeds from an existing penstemon plant or you are going to buy some seeds. If you are purchasing seeds, these may already have been stored for a while, and germination rates can be increased by this period of storage, which mimics the natural cycles of the plant. Hardier penstemon varieties can be directly sown where they are to grow as soon as they are collected from the plant. However, you will usually get better results if you store the seeds in a cold location over winter. A period of 3 months in cold temperatures can increase the germination rates with penstemon seeds. “You can normally achieve this cold stratification by placing seeds in the fridge for a few months, but make sure they are kept free from moisture,” says Dan Ori, a Horticultural Consultant. “One or two species will benefit from colder temperatures and you can place them in the freezer for 4-6 weeks, but I advise trying this with a few seeds first to check the type you have picked survives this deep freeze.” You can also store the seed you collect for several years before planting, as this period of maturation may also improve germination rates. With some varieties, scarification to remove the coating of the seed can sometimes be a good idea and can help break dormancy in trickier penstemon species. How complicated and challenging it is to grow penstemon from seed certainly depends greatly on which particular type and variety you are trying to grow. 2) Sow Penstemon & Cover Lightly In the UK, it is best not to directly sow in autumn but rather to sow indoors during spring. The best results will be achieved if, after cold stratification, the seeds are sown into trays in a propagator with the temperature set to 15°C. Scatter the seeds in the top of a seed tray filled with peat-free seed compost, then cover them over lightly with a little more compost on top. 3) Prick Out & Pot On As soon as the leaves emerge and have grown a couple of pairs of true leaves, you should prick them out and pot them on into their own individual containers. “Always handle seedlings by a leaf, not the stem, as young plants can grow new leaves if damaged but will rarely grow a new stem,” says Dan. 4) Harden Off Before Planting Out Remember to harden off indoors grown plants to get them acclimatised to outdoor conditions. Then, you can plant the penstemon you have grown into your garden anytime between March and October – though I’d say spring is best. If planting later in the year, it is crucial to stay on top of watering needs, especially during hot weather.
Learn more


