

Growing

Pruning Cordyline: 'Cut Half A Metre Below The Size You Want The Plant To Regrow To'
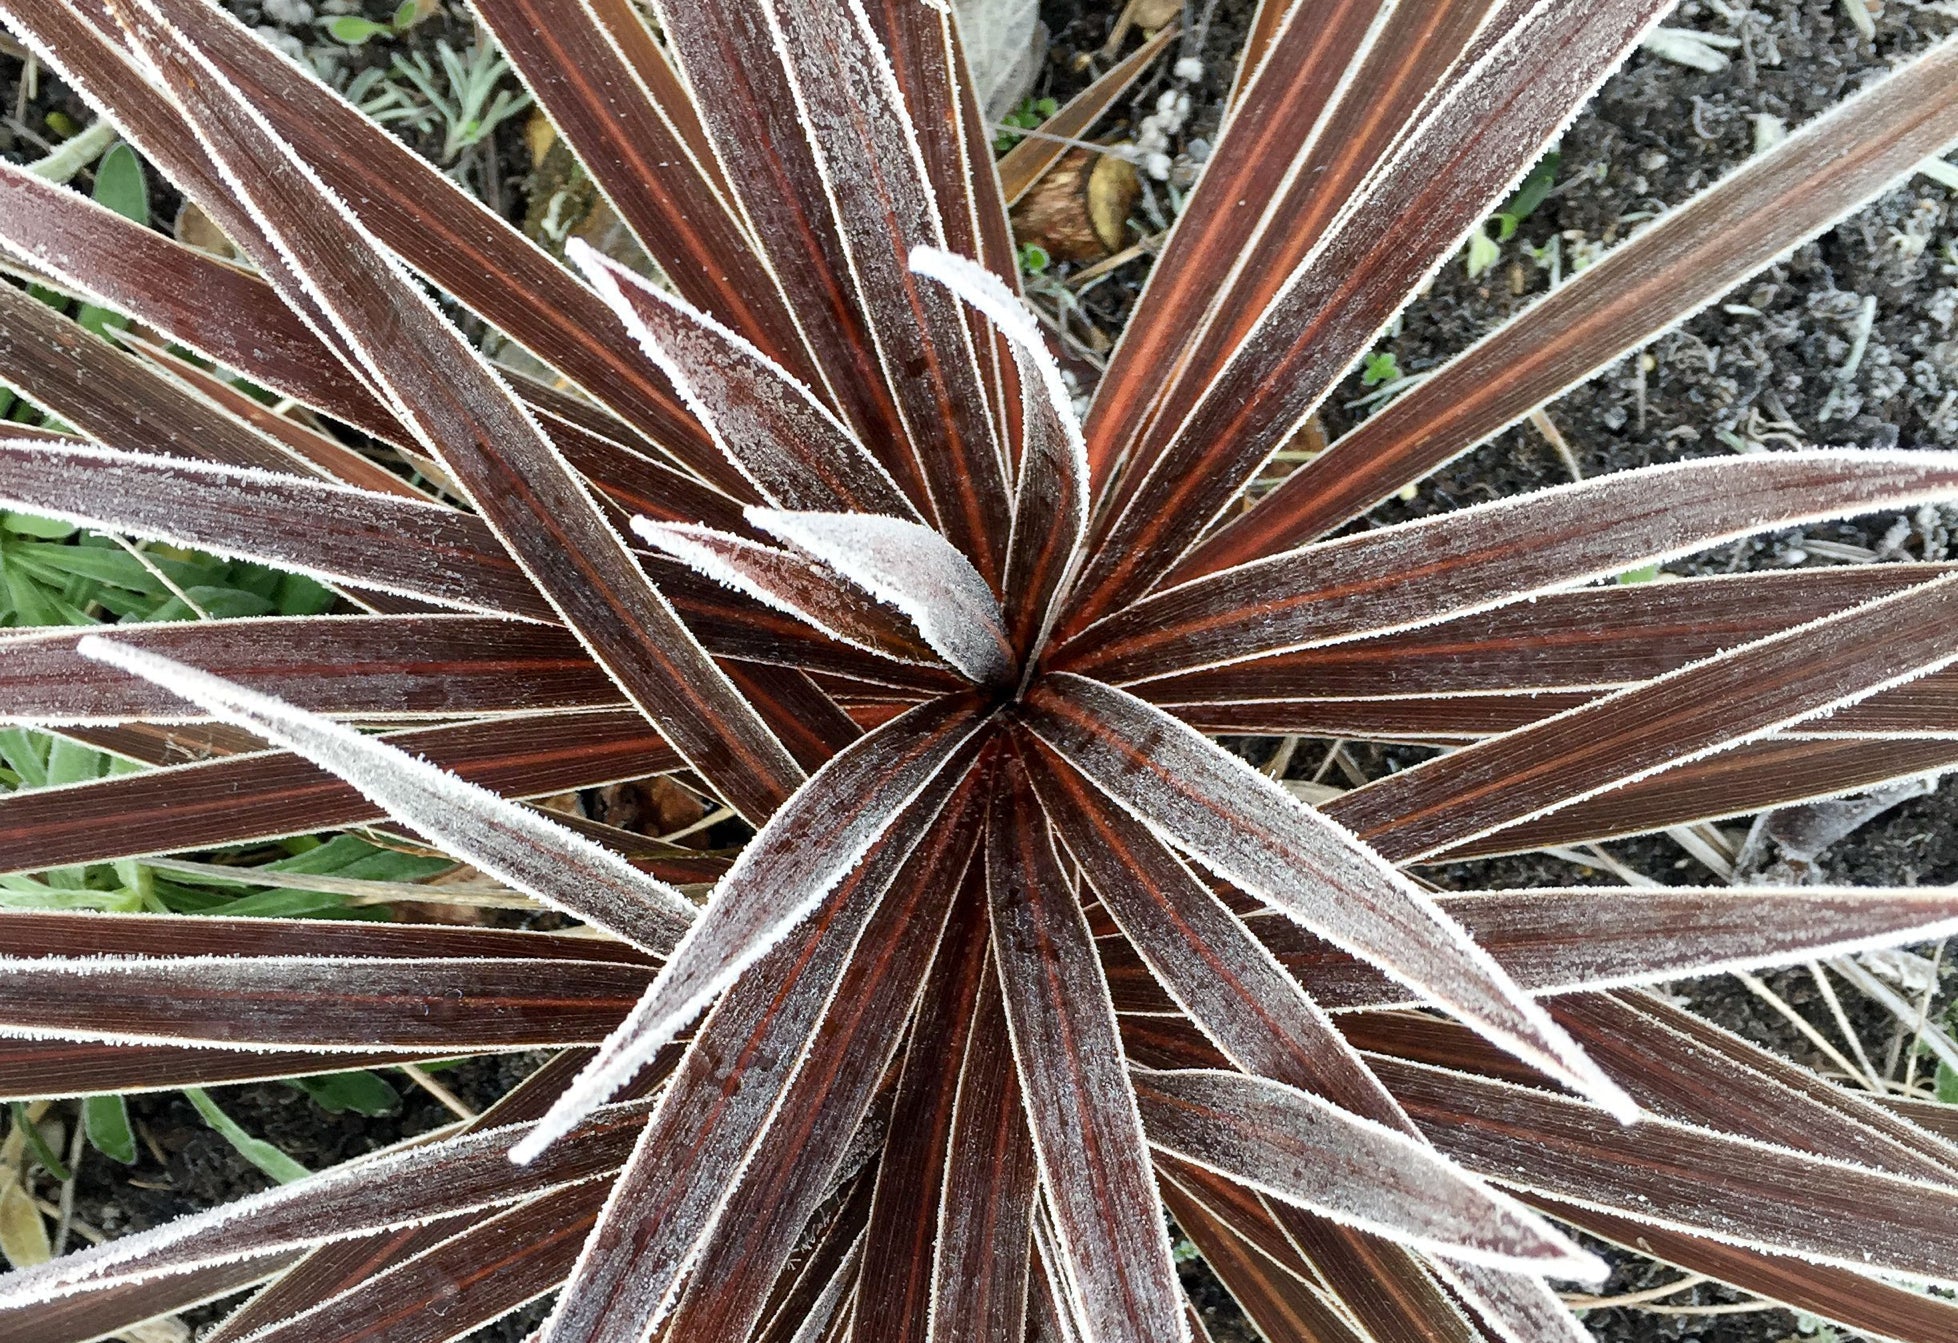
IN THIS GUIDE Pruning For Aesthetics Why Hard Pruning? How To Hard Prune Cordyline Whether or not you need to prune your cordyline plant depends entirely on the variety you are growing and whether it is a smaller container-grown specimen or a larger cultivar growing outside. The smaller varieties that are usually grown as container plants do not need to be pruned. For one thing, they grow very slowly – and for another, they have a fine habit and display a naturally balanced form. However, you can choose to lightly and judiciously prune varieties of some of these species, including Cordyline fruticosa, for the desired shape. Larger specimens might need more hard pruning to keep their desired shape over time. Difficulty Medium-Hard Equipment Required Gardening gloves, secateurs, pruning shears/saw When To Prune April-May Pruning For Aesthetics Regardless of the size of the cordyline, those varieties that have a radial form with sword-shaped leaves hang on to brown, withered leaves. Simply pull off this type of old foliage to keep the plant in good trim. Leaves should come off easily enough, but with an immature plant, as you pull off leaves with one hand, steady it with the other. The larger, open-ground varieties can be pruned severely if you wish. The first rule is, if it’s lop-sided, lop-off! In other words, if the little tree has grown crooked, the trunk has a bend or it has put out awkward branches, prune it. The tree can be cut down at the point where the main stem or trunk is aesthetic and upright. Awkward branches are pruned at their attachments. Depending on the thickness and maturity of the branches, you may use pruning shears, anvil loppers or a pruning saw. Why Hard Pruning? Cordylines trees grow quite tall with a head of those strappy leaves up high that can end up looking straggly and awkward. You can reboot this plant by pollarding and cutting down the cordyline to your desired height, as low as 25cm in favourable conditions, and it’ll bounce back without skipping a beat. “Single-stem cordylines can, through careful pruning, be encouraged to branch at an appropriate height,” shares Horticulturist Peter Lickorish. “Pruning to just above head-height is a good option if you’re hoping to plant underneath.” Depending on the size of the cordyline and the width of its trunk or main stem, you will need an axe or a pruning saw. If it is a young plant and the point at which you want to cut the incipient, undeveloped trunk is just under one inch thick, then you can use anvil loppers. Depending on the height of the cordyline and its weight you may need helpers and ropes. Do not attempt to cut a 6m tall cordyline by yourself unless you have the skills and experience. How To Hard Prune Cordyline Branches that are around your height or shorter can be cut in stages, working down the branch, to make them more manageable. Anything larger is probably going to need professional help. When cutting thick branches, remember that pruning saws may jam inside the wood. Use an axe to open up branches as you slice through or make a flat cut part-way through the wood and another sloped cut a few centimetres above to remove a wedge. This will open the wood more and prevent the saw from jamming. The final lowest cut, at the desired height, should slope slightly to drain and needs to be as clean as possible. Removing the weight of the upper growth will reduce the risk of this cut tearing. Afterwards, water the tree and fertilise it judiciously, keeping well away from the roots. As the rebooted cordyline starts to regrow, it will put out several shoots. Remove the ones close to the base and watch the others. After some time, select a leader to your liking with 2-3 side shoots and prune the rest away. As the tree regrows, continue pruning unwanted side-growths during months of active growth, avoiding autumn and winter, to achieve the desired form and shape. “When pruning cordylines, you need to remember that the regrowth will be in the form of one or more heads of leaves which can become fairly tall themselves,” adds Peter. “Pruning cuts must therefore be at least half a metre below the size you want the plant to regrow to.”
Learn more
Potted Cordyline Plant Care: Drainage And The Type Grown Is Key For Success
IN THIS GUIDE Can You Grow Cordyline In Pots? Containers For Cabbage Palms Choosing Compost Sowing & Growing Potting Up & Transplanting Potted Cabbage Palm Care References Cordyline varieties come in a staggering array of sizes making them suitable for a range of locations in your garden or home. The smaller cordylines, hailing from the South Pacific, are dainty, decorative houseplants flaunting colourful and variegated leaves, whilst their bigger cousins are New Zealand natives.1 What they have in common is sword-like foliage and cool-toned or blazing shades of colour. This interesting foliage is enjoyable year-round, as both major kinds of cordylines are evergreens. Can You Grow Cordyline In Pots? It entirely depends on the variety of cordyline. For example, though C. australis and nearly all its cultivars can certainly be started in a pot, sooner or later these trees should be transplanted into open ground. On the other hand, C. fruticosa and its cultivars are ideally suited for growing in pots, including indoors, and make fantastic plants for your home displays. There are, however, a few cordyline varieties that are small trees, right at the junction of container plants and open-ground trees. C. australis ‘Torbay Dazzler’ and C. ‘Pink Stripe’ are prime examples. If there can be such a thing as an architectural potted plant, then this type of Cordyline in a large container fits the bill to perfection. This guide covers cordylines that are typically grown in containers, mainly focusing on C. fruticosa varieties. Containers For Cabbage Palms The most important thing when it comes to choosing a container is that it should have drainage holes, as Peter Lickorish, Master Horticulturist, shares: “Drainage is the key in containers, especially for plants like Cordyline, which can rot if not drained sufficiently. “Ensure water can actually get out of the holes on a flat surface, which is only possible if the bottom of the pot is contoured. “Otherwise, it can be placed on pot feet. “Terracotta pots may just have one drainage hole which, if clogged, will not function. “Place a curved object, such as a broken roof tile or curved crock, over the hole, with the concave side down. “This lets water get to the hole from either side and reduces the chance of blockages.” The container also doesn’t have to be too big compared to the size of the plant because potted cordylines grow fairly slowly and will do well even in pots that appear to be a size too small. As a rule, the height of the container should be about half the above-soil height of the plant (or spread in case of a variety with a radial or radiating form). Though I’d recommend clay and terra-cotta pots as a rule, as long as other factors are favourable, cordyline should not suffer in a pot made of synthetic material if one is chosen for aesthetic reasons. Choosing Compost Moderately fertile and moist but well-drained sums up the kind of soil best suited to cordylines. They also prefer a slightly acidic to neutral pH. You can choose a commercial organic potting compost or prepare your own soil. If you opt for the latter, use a loam-based mix and amend with a generous quantity of well-rotted manure, organic compost or both. Either way, the soil should be amended with grit or perlite to facilitate drainage. Sowing & Growing Depending on the variety, cordylines can be propagated from seeds, cuttings or suckers. However, C. fruticosa and its varieties are fairly easy to propagate from cuttings. This can be done very successfully during late spring to mid-summer. They are also very widely available as potted plants. The container can be kept outdoors or indoors in warm weather, but C. fruticosa varieties are tender, so they must be brought indoors for winter. Potting Up & Transplanting Cordylines do not have to be potted up at all frequently. For one thing, they are slow-growing plants and in containers, especially when kept indoors, they grow even more slowly. Pot on when the size of the plant is clearly too big for the size of the pot, or when the roots are visible in the drainage holes, every 2-3 years. If transplanting cordyline, be sure that the particular variety is sufficiently hardy for your hardiness region. Late spring is the best time to transplant cordylines. In the UK, cordylines should be sited in a sheltered position. Depending on your location, the best spot may be full sun or partial shade, though either of the two should work well. How Many Can You Plant Per Pot? There is nothing that says you may not have 3 cordylines in a wide enough planter, however, aesthetics come into play here. Just about every cordyline is, to a greater or lesser extent, an accent plant, so I’d suggest that you plant one per pot. Potted Cabbage Palm Care Cordylines do not need much in the way of care and you should simply make sure that they are planted in the right conditions. The amount of water a container cordyline needs depends on its maturity, whether it is outdoors or indoors, and the climate at the time. Younger plants need frequent watering whereas mature plants, even in containers, don’t need to be watered as often. Outdoor potted cordylines should be watered more frequently than indoor ones. They should be watered fairly regularly in summer and less frequently in winter. From mid-spring to mid-autumn, simply check the soil down to only about 1cm. If it is dry, water the plant so that the soil is made damp through to the base and do not water again until the subsoil has become dry. Container-bound cordylines should be fed with a balanced liquid fertiliser. Once a month excluding winter is a good plan. We recommend that you dilute the liquid fertiliser to 60-70% and that you pour it away from the centre of the plant when feeding. References 1. Clarke, J. (n.d.). General Information about Cordylines. The International Cordyline Society. Retrieved March 14, 2023, from https://www.cordyline.org/index.php?option=com_content&task=view&id=15&Itemid=28
Learn more
Discoloured Cordyline Leaves Can Signal Something Is Wrong: Here Are 6 Common Causes
IN THIS GUIDE 1) Too Much Sunlight 2) Issues With Watering 3) Excess Salt In Water 4) Incorrect Humidity Levels 5) Fungal Infections 6) Potbound Issues References Cordylines are exotic palm-like plants that are attractive and architectural. Some can thrive in mild coastal locations and in city gardens, though often need winter protection. Others make excellent, striking houseplants. Cordyline leaves turning yellow or brown is typically a sign that something is wrong with the environmental conditions or care. Discoloured leaves can often be a natural sign of ageing and some leaves are naturally yellow or brown and drop off as part of the natural shedding process. However, yellow or brown leaves can also be caused by: Too much sunlight or an abrupt change in light or temperature. An issue with watering (too much or too little). Excess salts in the water used on the plant. Humidity levels are too low. Fungal infections like root rot. Potbound conditions. Read on to understand each of these issues in more detail: 1) Too Much Sunlight Cordyline leaves can turn yellow or brown if they suddenly receive too much direct sunlight, or if there is a sudden and dramatic change in temperature. “The former can effectively bleach the colour in some of the more vibrantly pigmented leaves,” shares Peter Lickorish, a Lecturer in Horticulture. The latter is most likely to occur when plants grow inside over winter and are moved outdoors. 2) Issues With Watering Cordyline leaves changing hue can also often be a sign that there is a problem with watering. Cordyline leaves can turn yellow around the edges when overwatering or waterlogged conditions have occurred. Whole leaves can also turn yellow or brown when the plant has not been watered enough, or during drought conditions. As the leaves are so tough, they will not wilt in the way many other plants do. 3) Excess Salt In Water Another issue with watering could be that tap water with excess salts has been used to water the plant. This can produce scorch-like damage on leaves. Watering with rainwater wherever possible is always best, but tap water can also be left out before watering for excess salts to evaporate. 4) Incorrect Humidity Levels A tender cordyline grown as a houseplant inside may often suffer due to low humidity levels, which is another issue that can cause leaves to discolour and turn yellow or brown. Homes that are centrally heated can be very dry, so misting your plants to create the more humid conditions that these plants enjoy can be a good idea. 5) Fungal Infections Unfortunately, yellow leaves can also indicate a fungal infection. Yellow splotches on the leaves could be a fungal leaf problem, and yellow leaves from the base of the plant could indicate that a root or stem rot has impacted the ability of water to reach the rest of the plant. Fusarium root rot is an unfortunate possibility, especially if waterlogged conditions have prevailed.1 6) Potbound Issues Yellow leaves on cordylines might also be a sign that the plant has become potbound. It may be time to think about moving your plant into a larger container, so pot up your plant to see whether this allows it to recover if it seems like it has outgrown its current position. References 1. Having issues with your Cordylines? Answered Problems & FAQ. (2023, April 21). Exotic Plants Online. Retrieved May 9, 2023, from https://www.exoticplantsonline.co.uk/blogs/having-issues-with-your-cordylines-answered-problems-faq/
Learn more
Experiment With These 5 Cordyline Propagation Methods Says Master Horticulturist
IN THIS GUIDE 1) From Suckers 2) Pruning Stem Sections 3) Germinating Seeds 4) Dividing The Plant 5) By Cuttings Cordyline can be propagated by multiple methods without much trouble at all. Different methods are more suitable for different varieties of cordyline, but the methods by which most cordylines can be propagated are: From suckers Pruning stem sections Growing from seed (some varieties) Dividing the plant (some varieties) Taking cuttings (some varieties) “During the main growing season, the hardier cordylines, such as Cordyline australis, are fast-growing,” shares Master Horticulturist Peter Lickorish. “This enables a variety of propagation techniques to be experimented with. “However, remember that young plants are vulnerable to winter cold so many need fleecing over winter or moving indoors if potted.” I would say that suckers, as an easy, nature-made way of propagating cordyline, is the first choice – with stem sections or cuttings a second preference. No matter which method you use, I would recommend that you wear gardening gloves. Each of these five methods is explained in more depth below. Difficulty Medium Equipment Required Gardening gloves; secateurs; planting materials When To Propagate Late spring to early summer 1) From Suckers Though cordylines produce suckers themselves, some varieties bear more than others, you can actually stimulate a plant to put out suckers, assuming it is a suckering variety. So, if you want your cordyline to sucker, you can help it along by pruning out some of the top growth and stimulating shoots lower down. Suckers are small offshoots at the base of the plant that emerge very close to the main stem. To propagate by sucker, avoid new little suckers that are just shooting up or that are just putting out fresh leaves. Allow these to grow and develop their foliage until it looks like a small, young plant. You can propagate cordyline from mature suckers in late spring or early summer. Prepare a container with an appropriate free-draining medium in which to pot the sucker. Loosen and pull away the soil between and along the mother plant and sucker, taking care not to damage the roots or the sucker itself. You will see that the sucker is connected to the mother plant by what looks like a very short subsoil branch. The sucker will have its own developing root system, so gently dig down to expose its roots. Using a sharp sterilised knife, cleanly cut through the subsoil branch, taking care to keep the roots intact. Dust each of the severed sections with an anti-fungicide powder or spray them with a stimulating disinfectant solution. Re-pot the sucker into the container, taking care to ensure that the soil level does not come up any higher on the stem than it did originally. Firm up the soil around the roots and give the new plant a good watering in its new home. 2) Pruning Stem Sections Cordylines can be propagated by stem sections very reliably during the period from late spring to early summer. Prepare a pot with potting mix, sand, and perlite and then thoroughly dampen this medium. On the donor plant, choose a cane that is of intermediate or mature age; such a cane will be brownish and bare near the attachment and will be greenish and may have leaves at the distal or upper end. Prune the cane using sterilised secateurs. Using the secateurs or a sterilised sharp knife, cut out a 5-6cm section from the middle of this cane, making sure the section has leaf nodes. On more mature plants, woody stem sections can be used, but these are slower to root and shoot. Dip the ends of this section in fungicide powder or cinnamon and honey. Insert the section in the pot and nudge it downwards so that half of the stem section’s length is inside the medium and half above. Keep the pot indoors in a warm spot where it gets indirect sunlight and give it a sprinkling of water every 2 days so that the soil is kept continuously moist. After 4-8 weeks you should see green shoots sprouting. After they appear, increase the plant’s exposure to light and gradually increase the amount of water it gets while gradually decreasing the frequency. When it has become a young plant, pot on into an appropriately-sized container with suitable compost. 3) Germinating Seeds Cordyline seeds may be collected from the plant’s tiny flowers in summer and are also easily found at nurseries. These vigorous seeds can be sown immediately after being collected. Of course, you may choose to dry them, put them in an envelope and store them in the fridge’s crisper. Growing cordylines from seed is a relatively slow process, and until mature, they are vulnerable to winter cold. Give the seeds an early start by sowing them in a tray of free-draining compost indoors, if you are keen to get going during the autumn and winter months. Lightly cover the seeds with compost, and germination is usually fairly fast. Transplant them into individual pots once they are just over 5cm tall and harden them off gradually from mid to late spring, until moving them outdoors completely. Even hardier species, such as Cordyline australis, will still need winter protection, so bring them undercover for their first winter. If sowing in an unheated greenhouse or outdoors into seed trays, the process is the same, except be sure to sow them well after the last frost when the weather shows a warming trend. Use a moderately fertile sand or loam-based growing medium. To sow outdoors in the ground, amend the soil with well-rotted manure or organic compost and for container cultivation, use potting compost and sand. Push seeds to about 2-3mm below the surface or put them on the surface and just barely cover the seeds with the growing medium. Keep them continuously moist until they germinate, which will be in 4-6 weeks. 4) Dividing The Plant Cordyline trees can grow quite tall and gangly. Many C. australis varieties develop a mass of sword-shaped foliage on top of slim trunks, around 5-8cm in diameter. From this type of mature plant, with multiple main stems that are less than 1.5m, you can propagate several new cordylines. The number you can propagate will depend on the height of the shrub, the number of stems and your needs. Attempt this type of propagation well after the last frost and when the weather has warmed up. Fork around the base of the plant to expose the joint between trunk and roots. Using a sharp pruning saw, cut down vertically through the base of the plant to remove stems, each with its own roots. You may find the stems are too tightly packed to divide or all emerge from one growing point, in which case, do not attempt this method. Ensure that each stem is no more than 60cm high unless there is a strong root network, so trim top growth accordingly. If large numbers of leaves remain, pull or slice off the lower leaves to reduce stress on the limited roots. Prepare the appropriate number of planting spots outdoors with the right type of free-draining soil by forking and adding some organic matter such as leaf mould, and then thoroughly dampen and ready the planting holes. Plant each division into a planting hole and firm soil up the original soil mark on the stem and water generously. Apply a judicious quantity of organic fertiliser and do so again after about 3 weeks. Until the divisions establish and you see new shoots emerging, keep watering regularly, gradually reducing the frequency and quantity. 5) By Cuttings In late spring, prepare a pot with a medium of potting mix and sand or perlite. From the donor C. fruticosa, choose a young branch that is green at its outer length and has some leaves. Using a pair of sterilised secateurs, cut this branch 12-15cm, measuring from its tip, from just underneath or inwards of a leaf node. Snip off all the leaves except for the uppermost 2 or 3 and then dip the base of the cutting into rooting hormone powder. Make a hole in the soil in the pot and insert the cutting, watering it in well afterwards. Keep the pot in a warm spot indoors where it gets bright but indirect sunlight. You can help matters by tying a clear polythene bag around the pot to conserve humidity. Perforate the bag first and make sure it does not touch the cutting, removing it for an hour or so every couple of days. The cutting should be watered moderately daily or every other day to keep the soil continuously moist. The cutting should root in anything from 4-8 weeks. As long as the original leaves look healthy and turgid, you can be assured that something good is happening below the soil!
Learn more
Without Pruning, Raspberry Plants Become Crowded And Diseased - Follow These Steps
IN THIS GUIDE Pruning Summer Fruiting Varieties Pruning Autumn Varieties Raspberries are delicious and are also very easy to grow in many UK gardens. These delicious soft fruits are one of my favourites and one I would definitely recommend if you are new to growing soft fruits. They won’t take up a lot of your time when growing but will still provide abundant yields, and there are a number of different varieties to choose from. One job that you do need to think about when growing raspberries is pruning. “Without correct pruning, plants simply do not have the air-flow and light they need to crop well,” shares Peter Lickorish, a Horticultural Consultant. “Eventually, your raspberry plant will be so crowded with unproductive canes, all acting as an entry point for disease, that there simply won’t be room for those with fruiting potential to grow.” However, learning how to prune raspberries is simple as long as you know which type of raspberries you are growing. The key thing to determine when trying to work out how to prune raspberries is whether you are growing summer or autumn fruiting types. Though autumn fruiters may yield in late summer, they grow differently – hence why plants are categorised as summer or autumn fruiting. The two categories your raspberries fall into will dictate the pruning process. Pruning Summer Fruiting Varieties When To Prune These raspberries, which bear fruit on the growth of the previous year, are pruned after the berries have been harvested. The floricanes, those stems which have flowered and fruited, are removed once they begin to die back. You can see the difference between these and this year’s fresh green growth. If you wish to prune to restrict height, then this should be done in late winter, around February. Sometimes, you may also wish to prune out excess or unwanted primocanes (new canes) in early spring. How To Prune Summer Fruiting Varieties The main thing to remember when pruning these raspberries is that you only want to remove ones that have already fruited (floricanes) and not the primocanes. Remember, the canes that grew this year will turn into floricanes and bear raspberries next year. If you prune these out then you will deprive yourself of next year’s fruits. The only time that you may wish to get rid of some primocanes is if your raspberry patch or row has become too congested. In that case, you may wish to thin out some of these. As mentioned above, a good time to thin these out is in early spring, but don’t thin out primocanes until the plant is at least 3 years old, as doing so may reduce yield and vigour too excessively. To identify the floricanes to remove, look for the brown or greyish colour of the stems and for those that have a more brittle texture. This will help to provide a clear contrast with the pliable green primocanes. Use a pair of clean, sharp shears or secateurs to cut the floricanes as close to ground level as possible. Leave the green canes to grow on and tie these into your support structure if there is one in place. If you wish to remove primocanes, you can also cut these off at ground level. If you decide that you would like to restrict the height of the raspberries in February so they don’t outgrow their support, simply trim off the tops of the canes to the required height. You should aim for around 10cm above the top of their support structure or to a height that you personally can comfortably reach. Pruning Autumn Varieties When To Prune Raspberries that produce berries on this season’s growth, called primocanes, are best pruned in late winter. I typically carry out this job in February. “I do make sure I have gloves on for pruning raspberries, as their stems are scratchy,” says Peter. Pruning in late winter means that over the winter months, the plants should have stored plenty of carbohydrates in their roots, which leads to healthy growth the following year. If you opt for double cropping (see below), then you may undertake additional pruning in the summer. However, this is not an option that I would necessarily recommend. How To Prune Autumn Varieties When you prune these types of raspberries, things are generally very simple. First of all, when planting out new bare-root raspberries over the winter months, prune all canes to within 25cm of the ground. Usually, for the annual prune, all you need to do is cut off all the canes at ground level. Double Cropping However, with some specific raspberry cultivars, you can prune a little differently in order to aim to achieve a second harvest in one year – a technique known as double cropping. If you are aiming for double cropping, rather than cutting off all the canes at ground level, you will select the strongest 6-8 canes and leave those canes at around 1m in height, before cutting off all the others to ground level. Double cropping is said to be useful for those who do not have enough space to grow both summer and autumn fruiting raspberries in their gardens. When you prune in this way, you can get a small earlier crop as well as your main harvest. However, it is important to note that this treatment only works with some raspberries of this type and not with all. Also, splitting the harvest can reduce the quality of the fruits, which is why I would always recommend growing both types of raspberry mentioned in this guide rather than trying to get a double crop from autumn fruiting raspberry varieties. However, if you do decide to opt for this pruning strategy, the canes that you left at 1m in height should be cut down to ground level straight after they finish fruiting in the summer. A simple pruning regime for your raspberries will help make sure that you get a great raspberry crop year after year.
Learn more
Growing Purple Perennials With These 38 Plants From Master Horticulturist Dan Ori
IN THIS GUIDE 1) Viola odorata 2) Viola cornuta 3) Lavandula angustifolia 4) Aquilegia vulgaris 5) Aquilegia ‘Purple Emperor’ 6) Verbena bonariensis 7) Streptocarpus 8) Perovskia atriplicifolia 9) Salvia verticillata 10) Salvia nemorosa 11) Leucophyllum frutescens 12) Phlox paniculata 13) Phlox subulata ‘Purple Beauty’ 14) Vinca major 15) Vinca minor 16) Crocus sativus 17) Crocus vernus 18) Calluna vulgaris 19) Erica cinerea 20) Geranium × magnificum 21) Geranium himalayense 22) Agastache foeniculum 23) Pericallis × hybrida 24) Lupinus albifrons 25) Lupinus ‘Purple Emperor’ 26) Iris germanica 27) Iris sibirica 28) Iris ‘Purple Magic’ 29) Buddleja davidii 30) Clerodendrum myricoides ‘Ugandense’ 31) Clematis viticella 32) Dianthus caryophyllus 33) Rhododendron ponticum 34) Rhododendron kaempferi 35) Oxalis triangularis 36) Trifolium pratense 37) Trifolium rubens 38) Hydrangea macrophylla References If you’re looking for a perennial that produces stunning purple flowers that will return every year, then this is the list for you. Here are thirty-eight of my favourite purple-flowering perennials that all have fantastic flowers of striking hues, ranging from pale lilac through rich purple to blackish violet. 1) Viola odorata COMMON NAME(S): sweet violet HARDINESS RATING: H6 FOLIAGE: evergreen FLOWERING SEASON(S): winter / spring SUNLIGHT: full sun / part shade I’ve begun this list with a classic purple flower that is even named after a shade of purple – the violet. Incorrectly thought of solely as annuals, sweet violet is a hardy perennial that is one of two perennial varieties in the plant’s species. Of course, there are innumerable cultivars in all shades of purple, but they are not reliable perennials. Sweet Violet flowers often show ‘rabbit ears’. “Viola odorata can be invasive or at best difficult to restrict as it spreads in a rhizomatous way (a mat of rhizome roots),” shares Master Horticulturist Dan Ori. “For this reason, it may not be suitable for some borders.” 2) Viola cornuta COMMON NAME(S): horned pansy HARDINESS RATING: H5 FOLIAGE: evergreen FLOWERING SEASON(S): spring / summer SUNLIGHT: full sun / part shade Much like sweet violet, Pyrenean violets are low-growing mat-forming evergreens with brilliant green foliage. They are only 2-3cm wide but are produced in profusion all through spring. Violets are found in various shades of purple, from mauve through bright purple to deep violet. 3) Lavandula angustifolia COMMON NAME(S): English lavender HARDINESS RATING: H5 FOLIAGE: evergreen FLOWERING SEASON(S): summer SUNLIGHT: full sun Next up is the quintessential English purple flower, the English lavender. This evergreen shrub of a bushy habit appears as a clump of upright plants when in flower, courtesy of those erect floral spikes that grow from 0.2-1m depending on the cultivar. Each spike holds numerous tiny flowers of a royal purple hue which are renowned for their fragrance. English Lavenders flower during summer. 4) Aquilegia vulgaris COMMON NAME(S): common columbine HARDINESS RATING: H7 FOLIAGE: deciduous FLOWERING SEASON(S): spring / summer SUNLIGHT: full sun / part shade With nearly 100 purple or purplish varieties to choose from, aquilegias are one of the list leaders of the purple perennials club. Popularly known as columbines, these are herbaceous deciduous perennials. For the most part, the flowers are delightfully charming, their intricate complexity only adding to their charms. This common columbine variety is fully hardy and flowers throughout spring and well into the depths of the summer months. 5) Aquilegia ‘Purple Emperor’ COMMON NAME(S): columbine ‘purple emperor’ HARDINESS RATING: H5 FOLIAGE: deciduous FLOWERING SEASON(S): spring / summer SUNLIGHT: full sun / part shade Another columbine, ‘Purple Emperor’ has inner petals of a lighter shade framed by outer sepals in a darker one. Columbines are among the few perennials that include flowers in deep, intense tones of violet, including an absolutely riveting black violet. This variety pictured above has darker flowers than that of the common columbine listed above. 6) Verbena bonariensis COMMON NAME(S): purple top / Argentinian vervain HARDINESS RATING: H4 FOLIAGE: deciduous FLOWERING SEASON(S): summer SUNLIGHT: full sun By the standards of Botanical classification, quite a variety of perennials, both deciduous and semi-evergreen, fall under the umbrella of Verbena. Though the little flowers vary in size, verbenas are all borne in big, handsome clusters and are displayed over a very long blooming season that often begins before summer and lasts until autumn. As for the tone of purple, with Verbena you get to choose your shade from pale lavender right through to deep purple. Argentinian vervain is of a pinky-purple shade and can reach up to 2.5m in height and spread. “This is a beautiful plant that is great for pollinators, but be warned, as it can spread through your garden quickly,” says Dan. “You and your neighbours may find yourselves constantly weeding Verbena bonariensis out of the random places it pops up.” 7) Streptocarpus COMMON NAME(S): cape primrose HARDINESS RATING: H1C FOLIAGE: evergreen FLOWERING SEASON(S): spring / summer / autumn SUNLIGHT: part shade If you like to mix and match your colours, cape primrose might just be the purple plant for you, as many of its varieties come in bi-coloured shades. With a hardiness rating of H1C, these plants are best grown indoors as houseplants here in the UK. Despite this, the vast majority of Streptocarpus varieties are a mere 10-50cm high and wide and produce an abundance of ravishing flowers. 8) Perovskia atriplicifolia COMMON NAME(S): Russian sage HARDINESS RATING: H5 FOLIAGE: deciduous FLOWERING SEASON(S): summer / autumn SUNLIGHT: full sun A dizzying array of over 100 salvia cultivars come in purple hues, so it’s no surprise that Russian sage is the first of 3 of my favourites on this list. This deciduous sage is one of the taller varieties and has two-toned purple flowers that make this perennial a particular favourite of mine. 9) Salvia verticillata COMMON NAME(S): whorled clary HARDINESS RATING: H5 FOLIAGE: deciduous FLOWERING SEASON(S): summer SUNLIGHT: full sun Of an upright habit, Salvia verticillata ranges from 0.5-1m in height with a narrow spread. They bear small purple flowers ranging up and down spikes or in racemes, with this variety producing frillier flowers than others in its family. 10) Salvia nemorosa COMMON NAME(S): woodland sage HARDINESS RATING: H6 FOLIAGE: evergreen FLOWERING SEASON(S): winter / spring SUNLIGHT: full sun / part shade The last salvia on this list, woodland sage bears flowers that are fragrant and pull in squadrons of bees and butterflies. Planted in drifts or beds, this plant makes a stunning sight in winter and spring, which is unusual for sage plants, which normally flower throughout the summer months. 11) Leucophyllum frutescens COMMON NAME(S): purple sage / Texas ranger / silverleaf HARDINESS RATING: H2 FOLIAGE: evergreen FLOWERING SEASON(S): spring / summer SUNLIGHT: full sun This evergreen easily grows to 1.5m in height with a similar spread, yet it is content in a large container. Its small leaves are a dull silvery greyish-green and it produces plump blooms in regular flushes, sometimes with the rains and sometimes at its own sweet will. The flowers are somewhat funnel-shaped in a vibrant shade of purple with a paler, stripy, speckled throat. When in flower, Silverleaf is a favourite of the honeybees. “Unfortunately, you are unlikely to find this plant available for sale in the UK as it requires a dry climate,” Dan shares. 12) Phlox paniculata COMMON NAME(S): perennial phlox HARDINESS RATING: H7 FOLIAGE: deciduous FLOWERING SEASON(S): summer / autumn SUNLIGHT: full sun / part shade Phlox is the answer for those who like bright purple hues. These deciduous perennials are found in quite a span of heights up to 1.5m, though even the taller ones have a narrow spread as these plants are mostly of upright habit. The perennial phlox produce lovely leaves that are oblong or lanceolate and of a soft, bright green hue. 13) Phlox subulata ‘Purple Beauty’ COMMON NAME(S): moss phlox ‘purple beauty’ HARDINESS RATING: H6 FOLIAGE: evergreen FLOWERING SEASON(S): spring / summer SUNLIGHT: full sun / part shade Although most cultivars are bright magenta-purple, the pale lilac blooms from this moss phlox variety are truly charming. The flowers are wide-open and disk-shaped, with overlapping petals and are borne in clusters for most of the summer, which is also when their fragrance wafts through the air and draws in honeybees. 14) Vinca major COMMON NAME(S): greater periwinkle HARDINESS RATING: H6 FOLIAGE: evergreen FLOWERING SEASON(S): spring / summer / autumn SUNLIGHT: full shade / full sun / part shade Whether the Vinca species are major or minor, one thing is constant – the colour purple. V. major is a slightly bigger plant at 40-50cm and bears somewhat bigger flowers at 5cm wide. These five-petalled, wide-open, simple little flowers are charming in their own right. This plant is considered invasive in many areas so be prepared to curtail its growth if you do plan on growing it at home.1 15) Vinca minor COMMON NAME(S): lesser periwinkle HARDINESS RATING: H6 FOLIAGE: evergreen FLOWERING SEASON(S): spring / summer SUNLIGHT: full shade / full sun / part shade Vinca minor plants grow to between 10-30cm tall but can spread up to 3 times as wide. What adds to their innocent charm is that they start blooming in spring and obligingly continue until the end of summer. Most cultivars’ blooms are in soothing shades of purple and violet. These easy-to-care-for evergreens are not specimen plants but are ideal for edging, bedding and cottage gardens. 16) Crocus sativus COMMON NAME(S): saffron crocus HARDINESS RATING: H6 FOLIAGE: deciduous FLOWERING SEASON(S): autumn SUNLIGHT: full sun Amongst all the spring flowering bulbs, the crocus is probably the one most would associate with the colour purple. Even the white variety ‘Picturatus’ displays veins that, though finely etched, are in rich purple. However, did you know that some crocuses can also flower in autumn? C. sativus is one of these bulbs, and its pale purple flowers can add a touch of colour to the browning foliage as the months turn colder. 17) Crocus vernus COMMON NAME(S): spring crocus HARDINESS RATING: H6 FOLIAGE: deciduous FLOWERING SEASON(S): spring / summer SUNLIGHT: full sun The more popular spring-flowering crocuses have several cultivars that are bi-coloured or striped with purple, as well as the standard deep purple flowers. This colour is wonderfully complemented by the bright yellow centres. The goblet-shaped and stiffly upright and can bloom from early spring right through until the start of summer. 18) Calluna vulgaris COMMON NAME(S): heather HARDINESS RATING: H7 FOLIAGE: evergreen FLOWERING SEASON(S): summer / autumn SUNLIGHT: full sun Calluna and Erica varieties of heather have such different blooming seasons that if you combine the varieties correctly, you can enjoy their purple flowers all throughout the year. Calluna vulgaris produces lovely flowers throughout summer and autumn that adorn the upright stems they grow along, so much so that they render the foliage, which is attractive in its own right, pretty much invisible. 19) Erica cinerea COMMON NAME(S): bell heather HARDINESS RATING: H7 FOLIAGE: evergreen FLOWERING SEASON(S): summer / autumn SUNLIGHT: full sun Although this might not be the obvious choice, bell heather can be a great option if you are looking for a purple perennial that is perhaps a little different. These evergreens cover a range of heights from a mere 10cm to over 1m, though the vast majority of this variety will sit comfortably at 30-50cm tall. 20) Geranium × magnificum COMMON NAME(S): purple cranesbill HARDINESS RATING: H7 FOLIAGE: deciduous FLOWERING SEASON(S): summer SUNLIGHT: full sun / part shade Geraniums are great for cottage gardens and are beloved by pollinators here in the UK. Their five-petalled flowers are saucer-shaped and many are decorated with dark eyes, veined petals or both. Hues range from pastel lilacs and lavenders to solid, rich violets. 21) Geranium himalayense COMMON NAME(S): Himalayan cranesbill HARDINESS RATING: H7 FOLIAGE: deciduous FLOWERING SEASON(S): summer / autumn SUNLIGHT: full sun / part shade Geraniums are prized for their incredibly long blooming seasons, producing a profusion of blooms from late spring through to mid-autumn. Although the Himalayan cranesbill might not bloom for so long, it will still brighten up your borders for a good few months and is an incredibly easy geranium variety to grow and care for. 22) Agastache foeniculum COMMON NAME(S): anise hyssop HARDINESS RATING: H3 FOLIAGE: deciduous FLOWERING SEASON(S): summer / autumn SUNLIGHT: full sun Hyssops are deciduous herbaceous perennials and most varieties are of upright, clump-forming habit, but some are bushy. The vast majority of varieties are 0.5-1m in height. Many varieties’ foliage, of a soothing, light, sea-green shade, exudes a bracing anise scent. This particular cultivar displays small tubular flowers densely packed on spikes that are in a stunning lilac hue. 23) Pericallis × hybrida COMMON NAME(S): cineraria HARDINESS RATING: H3 FOLIAGE: deciduous FLOWERING SEASON(S): summer SUNLIGHT: full shade / part shade Pericallis × hybridas are treated as annuals in open ground but can also be grown as perennial houseplants. Even though these plants are not hardy enough to be considered outdoor perennials, they are included on this list for their compelling bright, neon-purple blooms. Cineraria varieties bear wide-open flowers that resemble daisies. Most varieties are clump-forming evergreens, clocking in at under 50cm, and they display their electric blooms for most of the summer. 24) Lupinus albifrons COMMON NAME(S): silver lupine HARDINESS RATING: H7 FOLIAGE: evergreen FLOWERING SEASON(S): spring / summer SUNLIGHT: full sun Lupins are predominantly herbaceous deciduous perennials and their flowers boast colours that include numerous shades of purple that are often bicoloured. Its leaves are palmate with radiating leaflets, and the amusing charm of this star-like foliage is doubled when these plants are grown in pots, as they often are. From the midst of those leafy stars rise spikes holding aloft brilliantly coloured spires, densely packed with small flowers for the better part of summer. 25) Lupinus ‘Purple Emperor’ COMMON NAME(S): lupin ‘purple emperor’ HARDINESS RATING: H5 FOLIAGE: deciduous FLOWERING SEASON(S): summer SUNLIGHT: full sun / part shade This lupin variety has bicoloured flowers that are two variations of purple, adding even more purple into your beds with just a single plant! This variety will look great in a cottage garden or in your perennial beds and borders when grown alongside other colourful plants. 26) Iris germanica COMMON NAME(S): bearded iris HARDINESS RATING: H6 FOLIAGE: evergreen FLOWERING SEASON(S): spring SUNLIGHT: full sun Irises are super-hardy bulbous or rhizomatous perennials that come in a wide range of heights, have attractive lily-like foliage and, of course, produce bilaterally symmetric flowers that have contrasting beards (if you opt for the bearded variety!). This lovely hardy flower works well in most gardens and will provide your spring beds with an abundance of colourful blooms. 27) Iris sibirica COMMON NAME(S): Siberian iris HARDINESS RATING: H7 FOLIAGE: deciduous FLOWERING SEASON(S): summer SUNLIGHT: full sun / part shade The Siberian iris is another wonderful choice for most gardens in the UK and is actually less fussy than its bearded counterpart. This deciduous perennial can be grown in all soil types and will also work quite well as ground cover or as a shelter for any wildlife, thanks to the plethora of grassy leaves it produces. 28) Iris ‘Purple Magic’ COMMON NAME(S): iris ‘purple magic’ HARDINESS RATING: H6 FOLIAGE: semi-evergreen FLOWERING SEASON(S): spring / summer / autumn SUNLIGHT: full sun Most Irises are deciduous perennials while some are evergreens, but this specific cultivar is semi-evergreen. ‘Purple magic’ is the last iris on this list, as it is well worth a mention, producing flowers that last from spring right through to autumn! If you plant this perennial in a spot in full sun, you are bound to reap the brilliant purple rewards that this plant can provide! 29) Buddleja davidii COMMON NAME(S): butterfly bush HARDINESS RATING: H6 FOLIAGE: deciduous FLOWERING SEASON(S): summer / autumn SUNLIGHT: full sun / part shade Named after their ability to draw in butterflies and other pollinators in abundance, the butterfly bush is an attractive perennial that can grow up to a towering 4m in height with a spread twice as wide! They have attractive arcing, swaying, foliage branches that bear a profusion of tiny flowers in various shades of purple. The prime flowering season is early summer to mid-autumn. 30) Clerodendrum myricoides ‘Ugandense’ COMMON NAME(S): butterfly bush ‘Ugandense’ HARDINESS RATING: H1B FOLIAGE: evergreen FLOWERING SEASON(S): summer / autumn SUNLIGHT: full sun / part shade This evergreen can be difficult to grow in the UK due to its large size and frost-tender hardiness rating. Too tender to grow outside year-round, but potentially too large to be a houseplant, this stunning purple-flowering perennial is definitely a risk – but I would say it’s worth it! The very special charm of Clerodendrum myricoides ‘Ugandense’ is that its flowers are shaped like butterflies! 31) Clematis viticella COMMON NAME(S): Italian leather flowers / Italian clematis HARDINESS RATING: H5 FOLIAGE: deciduous FLOWERING SEASON(S): summer / autumn SUNLIGHT: full sun / part shade Although many clematis plants are climbers, there are some perennials that bear purple flowers, including the Italian clematis. This purple variety is of a rich purple and can grow up to 4m in height with only a 1.5m spread. Grow this plant against a wall or trellis to get the best results for your garden displays. 32) Dianthus caryophyllus COMMON NAME(S): border carnation HARDINESS RATING: H4 FOLIAGE: evergreen FLOWERING SEASON(S): summer SUNLIGHT: full sun You wouldn’t think of dianthus, usually associated with white, pinks and reds, as perennials that bear purple flowers, but many varieties do, and they are special and spectacular. Most of these are herbaceous evergreen perennials that grow between 20-90cm in height. The flowers are spectacular as they burst open with pinky-purple colour that is often different shades around the edges. 33) Rhododendron ponticum COMMON NAME(S): pontica rhododendron HARDINESS RATING: H6 FOLIAGE: evergreen FLOWERING SEASON(S): spring SUNLIGHT: full shade / part shade / full sun Although not all that common, there are some stunning purple R. ponticum varieties lend themselves to garden cultivation here in the UK. This larger rhododendron variety grows up to 4m in height and spread and can be a great choice for a hedge or for the back of a garden border. Their purple star-shaped blooms are bound to signal the start of spring when they emerge as soon as the weather starts to warm up again after winter. 34) Rhododendron kaempferi COMMON NAME(S): Kaempferi azalea / torch azalea HARDINESS RATING: H7 FOLIAGE: evergreen FLOWERING SEASON(S): spring SUNLIGHT: full sun / part shade Torch azalea is a touch smaller than the previous rhododendron, but it can still reach an impressive 2.5m in height. The shades of purple that this azalea comes in are typically pinkish-purple to magenta-purple. 35) Oxalis triangularis COMMON NAME(S): purpleleaf false shamrock HARDINESS RATING: H3 FOLIAGE: deciduous FLOWERING SEASON(S): summer SUNLIGHT: part shade With purple foliage instead of purple flowers, the purple shamrock is a deciduous perennial of clump-forming habit. This plant produces tiny funnel-shaped flowers, which are usually pale pink. However, it is the lobed clover-like leaves that are purple and provide stunning visual interest. 36) Trifolium pratense COMMON NAME(S): red clover HARDINESS RATING: H7 FOLIAGE: deciduous FLOWERING SEASON(S): spring / summer SUNLIGHT: full sun The first of two clovers on this list, red clovers produce flowers in the spring and summer that are somewhat spherical or ovoid. These stunning purple blooms dance on tall stems up to 50cm in height with double the spread and will make a great addition to perennial borders or a cottage garden display. 37) Trifolium rubens COMMON NAME(S): ruddy clover HARDINESS RATING: H7 FOLIAGE: semi-evergreen FLOWERING SEASON(S): spring / summer SUNLIGHT: full sun Ruddy Clovers are usually semi-evergreens with clump-forming or bushy habits. They produce dense cylindrical clusters of tiny pinky-purple flowers on green stems that grow up to 1m in height, taller than those of the red clover. 38) Hydrangea macrophylla COMMON NAME(S): hortensia HARDINESS RATING: H5 FOLIAGE: deciduous FLOWERING SEASON(S): summer SUNLIGHT: full sun / part shade Hydrangea macrophylla, renowned for its ability to change colours, gives you the liberty to take any pink or blue variety and purple-shift it by changing your soil pH! However, you can also purchase many purple varieties that will save you the trouble of altering your growing medium too much. “When buying a Hydrangea macrophylla, you should be aware that regardless of the flower colour you buy, it will shift over time to match the soil conditions you have unless you alter the soil pH with amendments,” explains Dan. “Alkaline soils (pH 6.5-7.5) produce pink flowers, acid soils (pH 4.5 – 5.5) will produce blue flowers, and neutral to acidic soils (pH 5.5 – 6.5) are best for maintaining purple flower colour.” This flower’s floral forms include fluffy-looking, rounded mop heads and flattish lace caps that are produced during summer into autumn. References 1. Invasive to Avoid: Big Periwinkle. (n.d.). Wildlife. Retrieved March 23, 2023, from https://wildlife.ca.gov/Conservation/Plants/Dont-Plant-Me/Big-Periwinkle
Learn more
Rhubarb Stems And Foliage Naturally Die Back In Late Autumn - Cut Back The Rest
IN THIS GUIDE When To Prune Rhubarb 1) Cut Back Dead Foliage 2) Remove Flowering Stems 3) Dispose Of Old Foliage References Rhubarb is a perennial vegetable grown for its colourful and tasty stems that can be harvested from March until June. “Rhubarb is great, as you can put it in the ground and forget about it and save money, rather than buying it from the shop,” shares Garden Designer Humaira Ikram. “Rhubarb plants also look so architectural and pretty.” As a perennial, the stems and foliage of a rhubarb plant naturally die back in late autumn as the plant enters its winter dormancy, in order to produce new growth the following spring. Pruning rhubarb is fairly simple if you follow a simple process for cutting back the plant: Fully cut back the spent foliage and stems to the base of the plant. Remove any of the flowering stems to prevent your rhubarb from going to seed. Dispose of the old leaves (despite common misconceptions it is safe to compost them).1 This process is explained in more depth below. Difficulty Easy Equipment Required Gloves, secateurs or a gardening knife When To Prune October to December When To Prune Rhubarb Rhubarb should be cut back after the current season’s growth has turned soft and died back. Here in the UK, this is generally around October to November, but can be later in milder parts of the country. 1) Cut Back Dead Foliage Once the rhubarb’s stalks and leaves have died back, they can be removed from the plant, leaving the growing tips of the plant open to the colder temperatures they need to receive over winter. This can either be done by cutting the stems close to the base of the plant with a sharp and clean pair of secateurs or a knife, or by pulling them gently away from the crown. “The advice I would give whenever you are removing rhubarb leaves is to try and twist the stems away from the base and not cut or snap them off unless they are too tough,” shares Dan Ori, a Horticultural Consultant. “This will help prevent rot and damage to the crown.” If not removed, the dead foliage will start to soften and rot which can lead to problems such as disease and crown rot. 2) Remove Flowering Stems Although not that common, rhubarb plants can sometimes flower during the summer months, especially after periods of heavy rain. These flowering stems which will eventually set seed if not removed can take precious energy away from the plant and cause it to weaken. To remove the flowering stalks, simply cut the stem at the base of the plant with a clean and sharp knife. 3) Dispose Of Old Foliage With rhubarb, only the stems are edible, so there can often be some concern as to whether the leaves can be safely added to a home compost pile. However, during the decomposing process of composting, the oxalic acid in the leaves degenerates – meaning they are perfectly safe to compost at home.2 References 1. Composting rhubarb leaves. (n.d.). Chicago Botanic Garden. Retrieved April 27, 2023, from https://www.chicagobotanic.org/plantinfo/composting_rhubarb_leaves 2. Are rhubarb leaves safe to put in the compost pile? (n.d.). Iowa State University. Retrieved April 27, 2023, from https://hortnews.extension.iastate.edu/faq/are-rhubarb-leaves-safe-put-compost-pile
Learn more
Remove Dying Foliage And Mulch Well To Successfully Overwinter Rhubarb Plants
IN THIS GUIDE 1) Move Pot-Grown Rhubarb Undercover 2) Remove Old Foliage 3) Mulch Annually 4) Divide Older Plants Rhubarb is an easy-to-care-for perennial vegetable that is widely grown here in the UK for its delicious and colourful stems. It has a hardiness rating of H5, which indicates that it is a hardy plant and can withstand a harsh winter and temperatures down to as low as -15°C. Caring for rhubarb over the winter period involves: Potentially moving pot-grown rhubarb undercover to overwinter. Removing any old or dying foliage from the plant. Mulching the rhubarb crowns with organic matter. Dividing more mature plants if necessary. This process is explained in more depth in this guide. Difficulty Easy Equipment Required Secateurs, gloves, mulch, spade, knife 1) Move Pot-Grown Rhubarb Undercover Rhubarb is a hardy plant and here in the UK does not generally need any winter protection. In fact, rhubarb actually needs a couple of months with temperatures close to freezing point to grow well. That being said, frost can damage any new growth or pot-grown plants, so it can be advisable to move any container-grown rhubarb out of a frost pocket or exposed site to the lee of a wall. 2) Remove Old Foliage In autumn, the rhubarb foliage and stems will naturally die back and become soft and tatty looking. After dying back, the foliage can be cut away with a clean and sharp pair of secateurs or a knife and removed and composted safely, as the leaves will lose their toxicity as they decompose. 3) Mulch Annually Being hungry feeders, rhubarb plants, whether grown in the ground or in containers, will benefit from an annual mulch of organic matter or well-rotted manure. This mulch can be added in winter or early spring and will not only help feed the plant for the growing season but also help conserve moisture during the warmer months. To prove effective, this layer of mulch should be 5-8cm thick and spread evenly around the plant, being careful not to cover the crown or growing tips, as this can lead to the crown rotting. 4) Divide Older Plants Over time, rhubarb plants can lose vigour or become congested, so they can benefit from being divided every 4-5 years. In winter when the rhubarb is dormant, simply lift the crown with a spade from the soil and split it into 2-3 pieces using a knife, ensuring that each new division has at least 1-2 new buds. “I like to use an old bread knife for dividing plants,” shares Dan Ori, a Master Horticulturist. “On big clumps, I use sharp two spades driven in back to back pulling the handles back and forth to prise the clump apart.” These new divisions can then be potted up or planted out to replace old stock.
Learn more
While Rainwater Should Be Enough For Rhubarb, It Is A Medium-Heavy Feeder
IN THIS GUIDE Watering Feeding Rhubarb is a delightful vegetable that can bring colour to your garden beds as well as a delicious harvest. If you’re wondering how to get the best out of your rhubarb plants, you might be wondering if you can feed them to help improve growth and yields. In this article, I share my top tips for fertilising and watering rhubarb growing in your garden. Watering Rhubarb requires free-draining soil but also soil that is continuously moist. You will have an easier time of irrigating this plant if you get your soil right. One thing you could do is to plant rhubarb in ridges or mounds to protect the crown from getting soggy. Water young plants regularly with 2-3cm of water per week. Established plants do not require as much water and in many regions of the UK, rainwater will be all the water they need. During dry spells and in hot weather, you will need to water rhubarb regardless of rain. As a general guideline, if the soil surface is dried out, you should provide more water. You do not need to water the dormant crowns in winter but be sure that they do not stay dry for a prolonged period. Feeding First, mulching rhubarb plants will lock in moisture and suppress weeds. In late March to early April, apply a 5cm layer of mulch but be sure to leave an open ring around the crown. Rhubarb is a medium-heavy feeder but do not fertilise this plant in its first year. For the second year onwards we suggest that you avoid chemical fertilisers and opt for organic ones to minimise risk to the crown as it is nearly at the soil surface. Apply fertiliser once in late March to early April. Sprinkle 2-3 pinches of granular fertiliser around the plant and lightly work it into the soil or use an organic liquid plant feed around the base. “Mulching can be the easiest way to feed your rhubarb,” says Master Horticulturist Dan Ori. “In autumn, I cut back all the growth to the base and apply a good layer of rich organic material like well-rotted garden compost. “Care should be taken when mulching not to cover the crown, as this can encourage rot.”
Learn more


