

Growing

This Camellia Nursery Advocates These Methods For Common Growing Problems
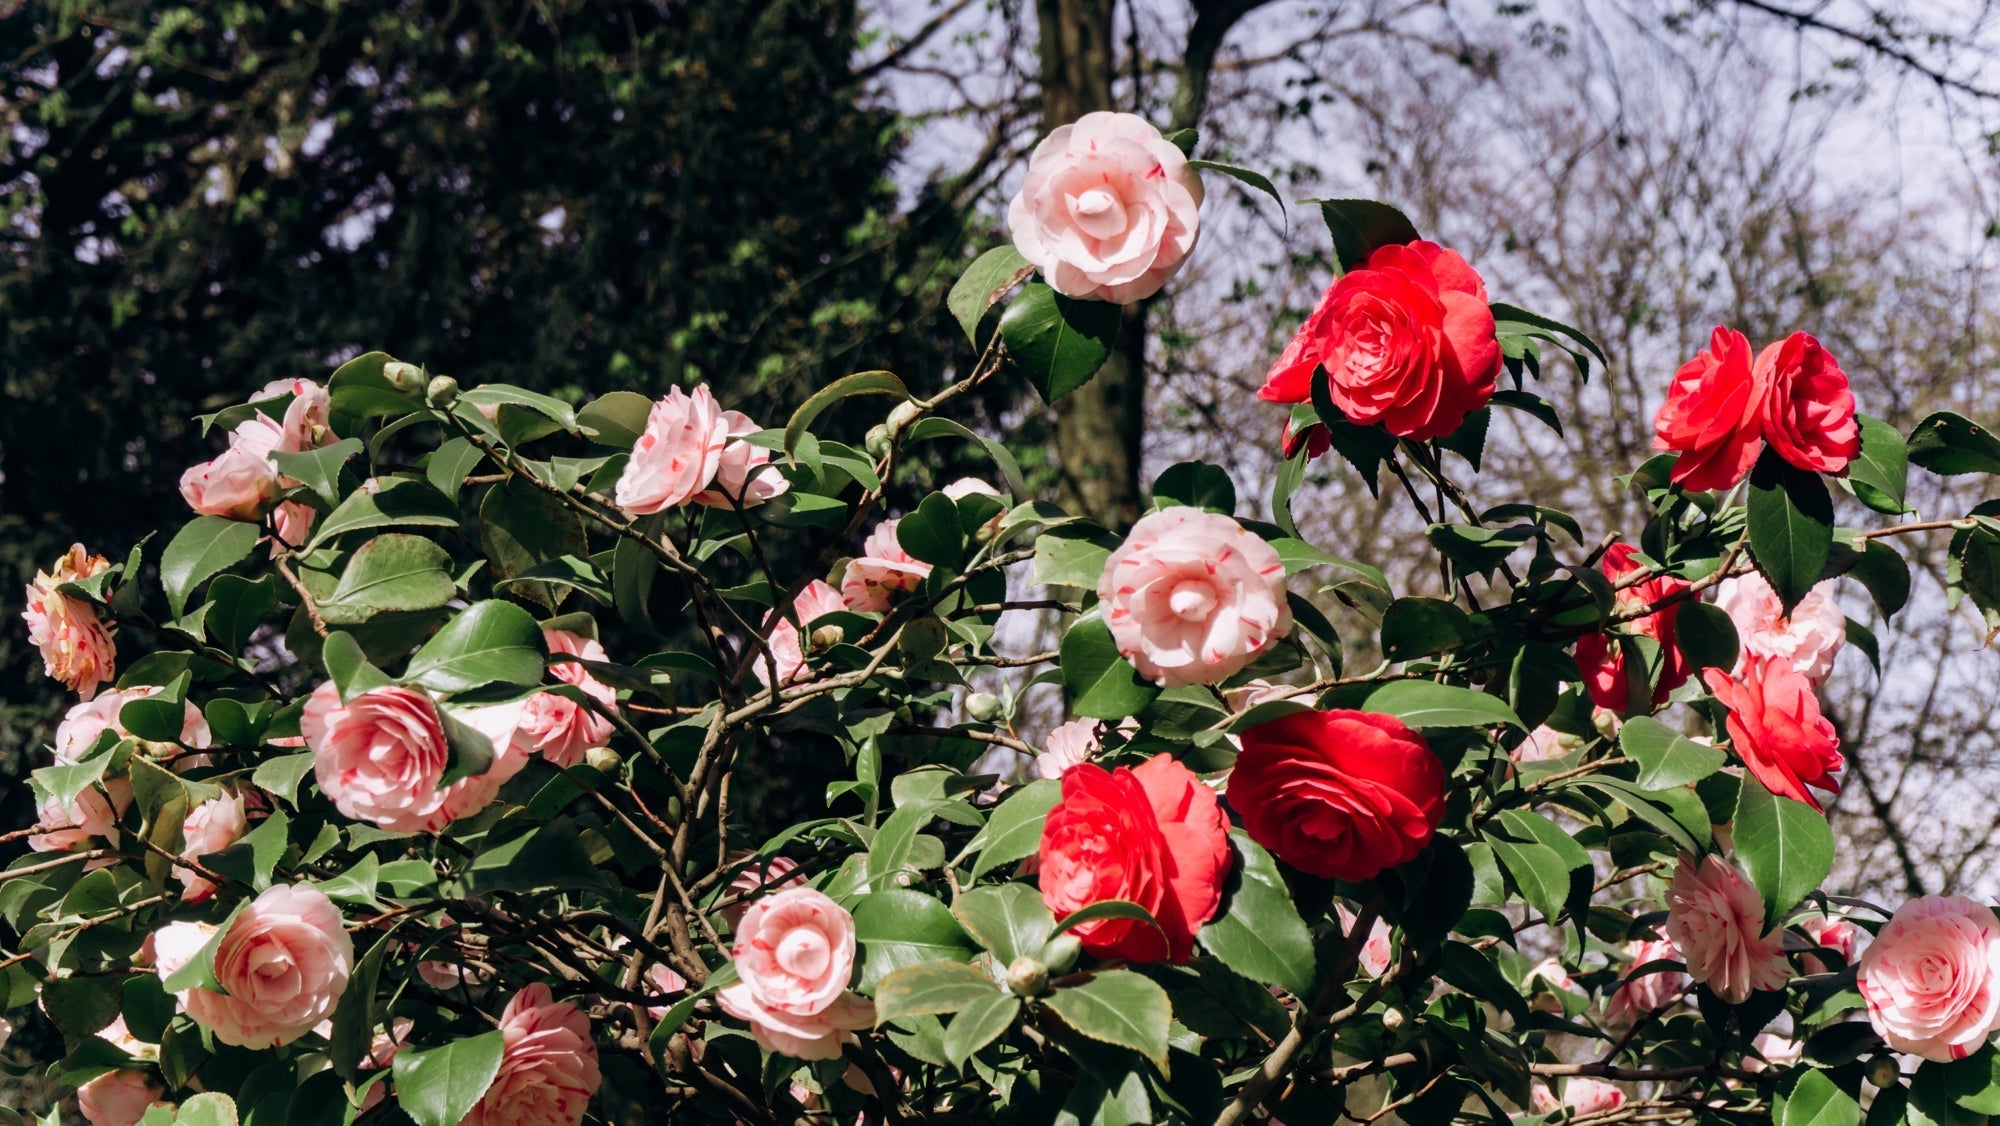
IN THIS GUIDE 1) Root Problems 2) Leaf Problems 3) Branch Problems 4) Bud Problems 5) Flower Problems References Camellias can be relatively trouble-free plants when grown in the right place, as long as you care for them correctly. However, as always in gardening, things can go wrong. Some of the most common problems encountered by those growing Camellia can be grouped into: Roots rotting due to a lack of drainage. Leaf discolouration, which is typically a sign of nutritional issues, water shortages, or a fungal infection known as ‘camellia gall’. Branch dieback, which is again typically caused by a lack of water uptake. The plant failing to flower or dropping its buds, mostly caused by a lack of water, over-feeding or an over-exposure to cold conditions. The flowers dying back – usually caused by cold exposure or fungal infection. We offer further explanations for each of these problems underneath. 1) Root Problems Camellias need free-draining conditions, so overwatering or a lack of drainage can be one of the most common problems when growing these shrubs. If a camellia seems to be dying and the roots are mushy or brown inside, this is root rot. Root rot can be caused by waterlogging or by a fungal problem that can creep in due to overly saturated conditions. If the problem has not progressed too far, you might be able to repot with a new growing medium, move your plant or improve drainage to allow it to recover. Root damage can also occur in container-grown camellias due to frost-damage in winter. Protect the plants by wrapping insulating materials around the pot in cold weather to prevent this damage. Roots of container-grown plants might also be eaten by vine weevil larvae. “Vine weevil larvae love fine roots, particularly of plants grown in pots, and will slowly eat away the roots until the plant dies back,” explains Horticultural Consultant Colin Skelly. “If vine weevil is suspected and the damage is moderate, check the compost for larvae and destroy if found. The plant can then be re-planted. As a preventive measure, a nematode is available that can be applied to soil that parasitises the vine weevil larvae. “I have found this to be very effective, but the temperatures and moisture levels of the compost need to warm up in spring before to ensure a successful application.” Keep an eye out for these pests to prevent the problem from getting out of control, and repot your plant in a new growing medium to allow it to recover. 2) Leaf Problems Yellow leaves can be a sign of root problems, but it can also be a sign of nutritional issues that have developed for another reason. Make sure the growing medium is right and that the conditions are acidic. Yellow blotches on your camellia leaves can also be a sign of disease, such as a viral infection. Brown leaves can be a sign of water shortage caused by root damage, drought, under-watering, frost damage, sun scorch or strong, drying winds. If the brown appears in patches, it might be leaf blight, a fungal infection. Brown leaves due to any of the above causes might also drop off. If you see dark growth on your leaves, this is sooty mould, a fungal infection which develops because of insects feeding on the plant’s sap. “The black soot on your camellia leaves is a fungus or sooty mould growing on honeydew secreted by scale insects,” explains Lorraine Summers, Owner of Trehane Nursery. “These may be white cushion scales or yellowy-green soft scales which are most commonly found on the underside of the leaves. “Washing the plants with warm soapy water will remove the black soot. “You will also need to spray under the leaves to kill the scale insects. Neem oil is good for this.” If a small number of leaves look swollen then turn white, this is a fungal disease called camellia gall.1 Although this is not a serious problem, you should remove affected areas before spores are produced and the problem spreads. 3) Branch Problems Branch dieback that occurs on camellias is typically an advanced sign of a root problem and is most indicative of the fact that there is a problem getting water to the affected area. However, branch dieback can also occur if a leaf blight fungus infestation is allowed to progress. Cut off all affected areas as soon as possible to reduce losses and allow the plant to recover. 4) Bud Problems Bud problems can usually be averted by thinking about 3 key things. The first thing to think about is water availability during the late summer, when buds begin to form. Next, make sure you do not use too much fertiliser on your camellia and never feed camellias, even those in pots, after July. Finally, make sure that your camellia is in a sheltered spot over the winter and protected during the coldest months with horticultural fleece or some other form of protection. 5) Flower Problems If flowers on a camellia open but quickly turn brown, this is often due to frost damage. Remember, some camellias are hardier than others. Flowers may also fall prey to a fungal infection. Two likely causes of flowers turning brown and falling off are issues with mould or blight. These are just some of the most common problems that you might encounter when growing camellia in your garden. References 1. Camellia gall. (n.d.). Royal Horticultural Society. Retrieved May 2, 2023, from https://www.rhs.org.uk/disease/camellia-gall
Learn more
Master Horticulturist Shares 5 Reasons Your Camellia Leaves Have Brown Spots
IN THIS GUIDE 1) Frost Damage 2) Sun Scorch 3) Overwatering 4) Root Rot 5) Leaf Blight Camellia can often be easy plants to grow, but, as always, there are a number of things that can go wrong. Brown spots on camellia leaves can be an early indication of one or a number of problems. These brown patches on your camellia might often be caused by: Frost damage, especially on tender varieties susceptible to cold temperatures. Sun scorch, which is a problem more likely to affect plants in the fierce summer sun. Overwatering or waterlogged soil, where roots are sat for long periods in a damp growing medium. Root rot, which is the next step for plants left too long in waterlogged soil. Camellia Leaf Blight – a fungal issue that is more likely in prolonged wet periods. Read on for a more detailed breakdown of each of these issues – 1) Frost Damage Brown spots on the leaves of a camellia plant can often be caused by frost damage. In winter, when the temperatures are low, cold winds can cause water to evaporate from leaves more quickly than it can be replenished from the roots. This can cause the leaf tips and upper leaves on your plant to turn brown in places. Remember, some camellias are hardier than others, so when choosing and positioning a camellia, it is always important to look at whether the particular type and cultivar you are considering can cope with the winter conditions where you live. Fortunately, frost damage will usually be a temporary problem. You can simply remove the affected foliage and the plant will usually recover just fine in spring, putting out new growth. 2) Sun Scorch Leaves can also turn brown in places during the summer when the weather is particularly hot and the sun is fierce. Remember, most camellias are best grown in partial or dappled shade, where they are protected from solar rays. Sun scorch can usually be avoided by carefully positioning a camellia so that it is protected from the sun in summer. Again, as above, a problem with brown spots or leaves caused by seasonal variation is not life-threatening. Simply remove the affected foliage and the plant should have no problem recovering. 3) Overwatering Brown patches on leaves that seem damp and watery are often a sign that the camellia has been overwatered or that excess water could not drain away. If you think that you have overwatered your camellia, reduce watering right away and water only when the top few centimetres of the soil or growing medium is dry. Take steps to improve drainage and hopefully it won’t be too late to allow the plant to recover. 4) Root Rot If there has been prolonged waterlogging, this can, unfortunately, lead to root rot and a fungal infection could take hold. When root rot occurs, the roots will not be able to do their job of transmitting water and nutrients to the foliage, so leaves may begin to turn brown. 5) Leaf Blight Another fungal issue that can sometimes occur in camellias and cause brown spots on the leaves is leaf blight. This problem can often take hold after prolonged wet periods and, if left unchecked, brown leaves can progress to full branch dieback. “Camellia leaf blight is far more likely to affect newly propagated and young plants,” explains Colin Skelly, a Master Horticulturist. “Mature camellias tend to be very robust, healthy plants with leaf browning due to hot or wet conditions.” If you suspect a fungal infection like this, remove affected foliage as soon as possible to prevent its spread. Remember to practice good garden hygiene to avoid spreading the fungal infection to other parts of the same plant or other plants in your garden.
Learn more
Bud Drop? Lorraine Summers Shares 3 Reasons Your Camellia Buds Are Not Flowering
IN THIS GUIDE 1) Water Shortage 2) Excessive Or Late Feeding 3) Low Winter Temperatures Camellia blooms come in a range of different hues and the beautiful flowers of these evergreen shrubs are one of the main reasons to grow them. Therefore it can be very disappointing if, before buds open, they turn brown or drop off. “I often get asked why camellias are failing to flower,” says Lorraine Summers, Owner of specialist Camellia growers Trehane Nursery. “Most times, this is down to the plants not having enough water during the summer months, which is when camellias are making their flower buds. “It can also be because the plant has not received enough light to set the buds.” With that in mind, Camellia buds turning brown or dropping off before they open is usually caused by: An inadequate supply of water during late summer of the previous year. Excessive or late feeding of camellia shrubs. Low winter temperatures causing damage to more tender varieties. A lack of exposure to light, which helps set the buds. We discuss each of these issues with more background information below. 1) Water Shortage Camellia buds start to form during late summer. Sometimes adverse environmental conditions during this earlier period of bud formation, or during the early spring, can cause them to abort and drop off prematurely. Dry soil is most commonly to blame, so it is important to make sure that you water well if the weather is dry, as Master Horticulturist Colin Skelly shares: “In the UK, low winter temperatures would historically have presented the greatest risk of bud drop, but summer drought has taken over in much of the country as a more likely occurrence. “I try to ensure that irrigation is available if needed for existing plants and that new plants are located where the soil does not routinely dry out in summer.” Remember, you will usually need to water your camellia more if you are growing it in a container compared with when you are growing these shrubs in the ground. 2) Excessive Or Late Feeding Another problem that can cause buds on camellias to turn brown or drop off is excessive or late feeding. Do not feed any camellias, even those growing in pots, after the end of July. Also, remember that camellias growing in a reasonably fertile soil should not need additional feeding at all – and should instead be provided with just an organic mulch around the plant each spring. 3) Low Winter Temperatures Not all camellias are hardy enough to withstand winter temperatures and conditions in the UK. So, when growing camellias, it is important to know how hardy the variety you are growing is – and to make sure that it is placed in an appropriate position. A plant affected by frost might have bud drop that looks something like this: Some types can suffer leaf damage due to frosts or drying winds in the winter months, and the buds can also turn brown and drop off with more sensitive cultivars during excessive cold. If you are growing a somewhat less hardy cultivar, move it to a sheltered position or protect it with horticultural fleece to ensure it makes it through the winter with the buds intact. A number of environmental issues can cause buds to fail to form altogether or cause them to turn brown and fall off, but the above are the most common causes and each is a fairly easy problem to avoid. Position your camellia correctly in the first place, and provide it with the right care, and you should find that it blooms reliably year after year.
Learn more
Do You Even Need To Prune Escallonia? Only If It's Become Congested - Here's Why
IN THIS GUIDE Do You Need To Prune Escallonia? When To Prune Escallonia Pruning Hedged Escallonia Renovation Pruning Shrub Aftercare Escallonias are attractive evergreen shrubs that come in a range of sizes and colours. These plants are generally quite hardy and require a moderate to low amount of care. Pruning shrubs can sometimes be rather confusing for new gardeners, but the good news is that with escallonias, things are very simple. There is no need to prune most escallonias on a regular basis each year. The only exception to this is where you are growing it as part of the hedge or your shrub has become congested, as we explore below. Difficulty Easy Equipment Required Secateurs or gardening knife When To Prune Spring or autumn Do You Need To Prune Escallonia? As mentioned above, you really don’t need to prune escallonia shrubs at all if you are growing them in a bed or border in your garden. The shrubs generally tend to have a pleasing natural form and do not really benefit from regular maintenance pruning. Some gardeners give the plant a light prune in late winter or early spring, but this can actually reduce flowering if you are too vigorous. With this in mind, I would suggest that if you do wish to prune, it is best to restrict yourself to very light reshaping by focusing on the removal of any dead or damaged material. When To Prune Escallonia If you are growing escallonia as a hedge and want abundant flowers, prune annually just after flowering in September or October. If you want a more formal and neat hedge, you can also shear over the hedge a couple of other times through the year. However, keep in mind that if you do this you will have fewer flowers in the blooming season. A mature shrub that has become overgrown and congested can be renovation pruned. This involves taking out one in three of the oldest branches either close to the ground or where they join another main stem in mid-spring. Pruning Hedged Escallonia If you are growing escallonia as a hedgerow, a little more shaping will naturally be required to keep your hedging looking good. There are different schools of thought about when and how much to trim escallonia hedges. However, if you are interested in and like your hedge to flower well, then the best time to prune these hedging shrubs is immediately after they have finished flowering for the year in autumn. Alternatively, if you like a neater hedge and are not too bothered about abundant flowers, you can also trim the escallonia hedge a couple of times throughout the growing season. “Escallonia hedges have a tendency to grow incrementally year by year if pruned annually,” says Colin Skelly, a Horticultural Consultant. “To keep them within bounds, I find it necessary to cut them back 2 or 3 times a year. Ideally, cut back some older branches every year to rejuvenate growth and avoid bare patches or die back.” When pruning the hedge, think about making it a trapezoidal shape so that sunlight can reach the base of the hedge and ensure that it remains healthy. Thin out the odd old branch in congested sections if necessary. Renovation Pruning If you have a mature escallonia shrub that is overgrown and congested with old wood, you can give it a new lease of life through gradual renovation pruning. The idea is to remove up to one-third of the oldest branches each year over a number of years. This type of more extreme pruning is best carried out in mid-spring. This more extreme pruning will create plenty of new growth, so after doing this job, you might also want to consider taking cuttings in mid-late spring to propagate your shrub. Shrub Aftercare Whether pruning a hedge or a mature congested shrub, aftercare is crucial for the best results. Make sure that after pruning you spread a good quality organic mulch around the root area of your shrubs. This mulch, which should be around 5cm deep, provides fertility, reduces moisture loss from the soil and helps to suppress weeds. A good quality homemade compost would be ideal.
Learn more
Expert Gardeners Teach How To Grow Arbutus Unedo AKA ‘Strawberry Tree’
IN THIS GUIDE Overview Common Varieties How To Grow Strawberry Tree Strawberry Tree Care References If you are looking for a small evergreen tree for your garden which can also provide an edible yield, then the strawberry tree, Arbutus unedo, could be a good choice. This tree is not native, though it is native to Southwest Ireland, but it can survive and even thrive in many UK gardens. “Arbutus unedo is one of my favourite trees and I had two of them in my garden at the Chelsea Flower Show in 2017,” shares award-winning Garden Designer Manoj Maldé. Overview Botanical Name Arbutus unedo Common Name(s) Strawberry Tree Plant Type Tree / Shrub Native Area Southern Europe, Ireland and Asia Hardiness Rating H5 Foliage Evergreen Flowers White or pink bell-shaped blooms When To Plant September to November Harvesting Months November to December When To Prune February to March Arbutus unedo is a large bushy shrub that is often pruned to give it a more tree-like form. Although it is commonly referred to as the ‘Strawberry Tree’, this plant is not related to the common garden fruit you might be more familiar with. This evergreen tree is a great choice for gardens, relatively compact in size and provides plenty of visual appeal throughout the year. It is especially attractive between September and November, which is when the flowers and fruits are both born at the same time. This tree is tolerant of a wide range of growing conditions and can be very resilient once established. Opinions differ about how tasty the fruits may be, but they are edible.1 “Perhaps the common name of Strawberry Tree sets the bar too high, but from experience, the fruits are not very tasty,” shares Colin Skelly, a Horticultural Consultant with experience that includes 5 years at The Eden Project. “They do look good on the tree though. Arbutus unedo is also a wind-tolerant tree for coastal locations.” They can be eaten raw and are often used to make preserves like jams and jellies, either on their own or in combination with other ingredients. Common Varieties In the UK, the Royal Horticultural Society has given two cultivars an Award of Garden Merit. The first with an AGM is A. unedo f. rubra, which is a variant with pink flowers. The second is the cultivar A. unedo ‘Atlantic’, with white flowers. “I would, love an A. x andrachnoides in my current garden, but they are so hard to find,” says Manoj. How To Grow Strawberry Tree A. unedo works well as a stand-alone specimen tree, as part of a forest garden design or in a mixed border. It is frequently used to stabilise and improve soils and is a pioneer plant often used in certain parts of the world in ecosystem restoration and to redress deforestation.2 It also can be used as an ornamental in gardens. It might be a good plant for where soils are poor and other fruiting trees or shrubs are failing to thrive. This tree will do best in areas where the soil is free-draining, as it cannot cope with waterlogged soil. Even though it is in the Ericaceae plant family, most of which are acid-loving plants, it is unfussy about pH and can even cope with alkaline conditions. Planting Arbutus unedo trees are best purchased and planted in the autumn. You should think carefully about where you initially plant them, as these trees do not always take well to transplantation. Younger trees are best purchased because these will usually establish most easily. Dig a hole large enough to accommodate the root system and then place the tree inside. Fill back the soil around the tree, water in well and then mulch with organic matter. Growing From Seed Though A. unedo can be grown from seed, this can be challenging and is a time-consuming process, so most gardeners will choose to purchase this plant instead. Seeds need to go through a month-long period of cold stratification and are then soaked in warm water for 5-6 days to improve germination rates. Even after this, germination success rates rarely exceed around 20%. Seedings are very fussy and are prone to damping off and fungal issues. They will need to be mollycoddled for their first year. Strawberry Tree Care Light & Aspect This tree needs full sun to fruit well and should be placed in a sheltered position here in the UK. A south or west-facing aspect is ideal. In small spaces, this tree might be espaliered against a south-facing wall. Overwintering A. unedo will survive temperatures down to -15°C and has a hardiness rating of H5. Watering & Feeding Water regularly during dry spells until the tree becomes established. Once mature, the tree should have reasonable drought tolerance. Replenish the mulch around the tree each spring to provide fertility, retain moisture and suppress weeds. It is also a good idea to consider creating a guild with beneficial companion plants around this fruit tree (see below). Pruning Pruning is not usually required and any pruning should be light. Simply remove dead, damaged, diseased or poorly-placed branches in the late winter or early spring. Common Pests & Diseases The tree is susceptible to aphids, though this can be easily handled by attracting wildlife that eats them to your garden through companion planting. Aim for as much biodiversity in your garden as possible. Though usually not plagued by many issues, Arbutus leaf spot is one problem that may occur. Propagating Though seed propagation is challenging, it is, of course, possible. An easier way to propagate these trees is through semi-ripe cuttings taken during the summer months. Companion Planting You should consider making a guild of beneficial companion plants, which might include: Spring-flowering bulbs Yarrow Comfrey Clovers Mediterranean herbs References 1. Gardens, K. (n.d.). “Strawberry Tree.” Kew Royal Botanic Gardens. Retrieved March 9, 2023, from https://adoptaseed.kew.org/seed/strawberry-tree.html 2. Strategies for the improvement of Arbutus unedo L. (strawberry tree): in vitro propagation, mycorrhization and diversity analysis. (2011). Universidade De Coimbra. Retrieved March 9, 2023, from https://core.ac.uk/download/pdf/19131968.pdf
Learn more
Choosing Winter-Flowering Viburnum With Gary Ladman From Classic Viburnums Plant Nursery
IN THIS GUIDE 1) V. tinus ‘Eve Price’ 2) V. tinus ‘Gwenllian’ 3) V. tinus ‘Lisarose’ 4) V. tinus ‘Israel’ 5) V. lucidum 6) V. × bodnantense 7) V. × bodnantense ‘Charles Lamont’ 8) V. × bodnantense ‘Deben’ 9) V. farreri 10) V. farreri ‘Album’ 11) V. farreri ‘December Dwarf’ 12) V. carlesii ‘Aurora’ References Not only are they low-maintenance and fairly easy to care for, but viburnums also produce aromatic floriferous blooms that can add a splash of colour to any garden display. In addition to that, there are viburnums that bloom in each of the four seasons – even in winter. We spoke to Gary Ladman, the Co-Owner of plant nursery Classic Viburnums, about his favourite viburnums to grow. “With 150 plus known species and more still being discovered, the genus viburnum offers immense diversity, making it next to impossible to not find a viburnum to fit a particular site or need,” says Gary. “Asking me to name my favourite viburnum is like asking me who my favourite child is! “Viburnums have at least 3 seasons of interest while some also have winter interest, so my favourites are constantly changing as the seasons change. “In other words, they are all my favourites, it just depends on when you ask me.” Underneath I present 12 viburnum varieties that are guaranteed to bring you colourful flowers and foliage, fragrance or berries throughout the dead of winter. Keep in mind that all of the plants listed below can be grown in most soil types with any pH. 1) V. tinus ‘Eve Price’ COMMON NAME(S): laurustinus ‘Eve Price’ HARDINESS RATING: H4 FLOWERS: pink and white FRUIT: blue FRUITING SEASON(S): autumn SUNLIGHT: full shade / full sun / part shade Viburnum tinus is the undisputed champion of winter-flowering types, and we open with one of its AGM-winning cultivars – ‘Eve Price’.1 Its delightful leaves are perfectly ovate and of a rich green shade. This cultivar produces red buds that open to pink-tinged white flowers in clusters. As buds form and open continuously over a period of time, the happy outcome is clusters of mixed red and white from mid-winter to late spring. 2) V. tinus ‘Gwenllian’ COMMON NAME(S): laurustinus ‘Gwenllian’ HARDINESS RATING: H4 FLOWERS: pink and white FRUIT: blue FRUITING SEASON(S): autumn SUNLIGHT: full shade / full sun / part shade Bushy and of a naturally tidy habit, ‘Gwenllian’ is another brilliant evergreen shrub, not too dissimilar from ‘Eva Price’. Over much of the season, this cultivar forms bright red buds that open to little star-shaped yellowy-pink flowers which fade to white. This means that you can often see mixed red, pink and white clusters from mid-winter into spring. Autumn brings yet another colour in the form of dark blue berries. This plant is also a recipient of the RHS Award of Garden Merit. 3) V. tinus ‘Lisarose’ COMMON NAME(S): laurustinus ‘Lisarose’ HARDINESS RATING: H4 FLOWERS: pink and white FRUIT: blue FRUITING SEASON(S): autumn SUNLIGHT: full shade / full sun / part shade ‘Lisarose’ flaunts rose pink flowering stems in autumn on which pretty buds of the same hue are on show. These start opening in winter, producing round clusters of small pinky-white flowers interspersed with those rose pink buds. The flowers continue into mid-spring with deep blue berries setting in late summer. Reaching around 2m in height and spread, it displays evergreen foliage of a deep green shade. 4) V. tinus ‘Israel’ COMMON NAME(S): laurustinus ‘Israel’ HARDINESS RATING: H4 FLOWERS: pink and white SUNLIGHT: full shade / full sun / part shade While ‘Israel’ displays glossy dark green foliage in winter, the flowers are the real crowd-pleaser. Red flower buds not only form in autumn, but they also open in the same season, with the blooms on show all winter long that continue deep into spring. As a result, you can enjoy dense spherical clusters of small, snowy white flowers for over 6 months of the year. Climbing up to 3m in height and spread, this is a big, evergreen shrub that would be great for hedging. 5) V. lucidum COMMON NAME(S): laurustinus ‘lucidum’ HARDINESS RATING: H4 FLOWERS: cream and white FRUIT: blue and black FRUITING SEASON(S): autumn / winter SUNLIGHT: full shade / full sun / part shade The largest of our winter-flowering selections, ‘Lucidum’ can reach a good 4m tall and wide. It has oblong leaves of a dark, smoky green shade and the winter buds give way to small white flowers which last well into spring. These flowers are borne in flat, lacecap flowerheads which are quite large, at 8-10cm across. Formed in autumn, the deep blue berries provide further winter colour. 6) V. × bodnantense COMMON NAME(S): bodnant viburnum HARDINESS RATING: H6 FLOWERS: pink and white SUNLIGHT: full sun / part shade One of the original winter-flowering varieties, Viburnum × bodnantense is a stunning large shrub that can reach over 3m high. As its deciduous branches become bare in autumn, it starts forming buds that open to reveal small flowers in clusters. Their colour varies from pink-flushed white to candy pink, but they all have the same sweet fragrance. The flowers last long and keep coming through winter and into spring and can sometimes last up to half the year. 7) V. × bodnantense ‘Charles Lamont’ COMMON NAME(S): laurustinus ‘Charles Lamont’ HARDINESS RATING: H6 FLOWERS: pink SUNLIGHT: full sun / part shade ‘Charles Lamont’ also boasts a fantastic blooming season and it is floriferous as well. In autumn, it sets pinky-red buds which open before winter even arrives into small flowers with a sweet fragrance, covering the denuded tree in clusters of soft pink blooms. These blooms span over winter and well into spring, providing colour for over six months. It is about 2m high with a somewhat narrower profile. This cultivar has received the RHS Award of Garden Merit. 8) V. × bodnantense ‘Deben’ COMMON NAME(S): arrowwood ‘deben’ HARDINESS RATING: H6 FLOWERS: white SUNLIGHT: full shade / full sun / part shade ‘Deben’ is another viburnum that can flower for over half of the year with its blooms lasting all throughout the winter. This cultivar starts forming buds of a baby pink hue in autumn that open to reveal pink-flushed flowers that fade to white. They release a sweet fragrance and last into spring. ‘Deben’ reaches about 2m in height with a spread of around 1m and has received the RHS Award of Garden Merit. 9) V. farreri COMMON NAME(S): farrer viburnum HARDINESS RATING: H6 FLOWERS: white FRUIT: red FRUITING SEASON(S): winter SUNLIGHT: full shade / full sun / part shade Viburnum farreri doubles the winter joy, with rich clusters of white flowers and bright red berries both on display throughout the season. “Viburnum farreri is a great choice for winter interest and is a real treat from autumn right through to the festive period,” says Horticultural Consultant Colin Skelly. “First autumn colour, berries and then flowers, then handing the baton on to the early spring flowering bulbs and shrubs.” The buds set in autumn, whilst the fragrant flowers open in the same season and continue through winter into spring. It rises to about 2m tall and has leaves that display conspicuous veining. This is another variety that has been awarded the RHS Award of Garden Merit. 10) V. farreri ‘Album’ COMMON NAME(S): farrer viburnum ‘candidissimum’ HARDINESS RATING: H6 FLOWERS: white SUNLIGHT: full sun / part shade If you’d like to see flowers whiter than the snow that decorate bare branches, this is the cultivar for you. It is of an upright habit and reaches a good 3m in height. Like the above, this cultivar also has prominent veining on its leaves. The little clusters of flowers have a shorter blooming season than the species, with buds forming in autumn and flowers fading at the end of winter, but they are pure white and wonderfully fragrant. 11) V. farreri ‘December Dwarf’ COMMON NAME(S): farrer viburnum ‘December dwarf’ HARDINESS RATING: H7 FLOWERS: pink SUNLIGHT: full sun / part shade Growing to only about 1m high and wide, ‘December Dwarf’ is the most aptly named entry on our list. This tidy deciduous shrub’s deeply-veined leaves display rust and russet autumn colours before its buds and flowers are seen. Clusters of flowers appear on the dwarf’s bare stems in December, as its name suggests, and they last well into spring. They are a soothing pastel pink and are wonderfully fragrant. 12) V. carlesii ‘Aurora’ COMMON NAME(S): arrowwood ‘aurora’ HARDINESS RATING: H6 FLOWERS: pink and red FRUIT: black and red FRUIT SEASON(S): autumn SUNLIGHT: full shade / full sun / part shade Although deciduous Viburnum carlesii shrubs are typically spring-flowering types, ‘Aurora’ reliably sets its buds in winter, with flowers starting to open even before the season bids farewell. Their buds give way to rounded clusters of pastel pink flowers that are sweetly scented. In winter, you can also catch bunches of those red and black berries left over from autumn. Another recipient of the RHS Award of Garden Merit, this delightful shrub is perhaps my favourite on the list. References 1. Ornamental Plants. (2021, July). Royal Horticultural Society. Retrieved March 27, 2023, from https://www.rhs.org.uk/plants/pdfs/agm-lists/agm-ornamentals.pdf
Learn more
How To Grow Laurustinus Shrubs With Advice From Viburnum Expert Gary Ladman
IN THIS GUIDE Overview How To Grow Laurustinus Viburnum Tinus Care Common Problems References There’s nothing like a nice shrub to bring depth and a splash of colour to your boundaries and borders, and the Viburnum tinus shrub is a perfect candidate for this. The rich depth of its green leaves is captivating, and the dazzling white-pink floral bloom from late winter through to early spring is a great forerunner to the other flowers in your garden. This guide includes advice from the Co-Owner of Classic Viburnums, Gary Ladman. Overview Botanical Name Viburnum tinus Common Name(s) Laurustinus / Common Laurustinus / Tinus Plant Type Shrub Native Area Mediterranean Hardiness Rating H4 Foliage Evergreen Flowers Clusters of small white, creamy flowers with a pink tint in the centre followed by dark blue berries When To Plant September-November When To Prune February-May While native to the Mediterranean, this plant has established itself nicely in the UK. Viburnum tinus goes by several names based on the root Laurus, alluding to its similarity to the bay laurel plant. How To Grow Laurustinus You’re best off planting out your Laurustinus in autumn to give it the best chance at taking hold before the harshest conditions set in. Planting out in spring works too, but only for plants already established in containers. Viburnum tinus is quite adaptable, meaning it’s suited to a variety of conditions. “The dappled shade of larger trees and shrubs is perfect for Viburnum tinus, providing shade from intense summer sun and some protection from cold winds,” says Colin Skelly, a Master Horticulturist. “A perfect companion for spring bulbs.” As a rule, you’ll want to protect it from chilly wind in the colder months and hot sunshine in the summer. Viburnum Tinus Care Once your viburnum is in the ground, you’ll want to take good care of it to maximise the likelihood of a long and fruitful life. Overwintering As we’ve mentioned, V. tinus is suitably hardy for most British gardens. An RHS hardiness rating of H4 signifies a minimum temperature of between -5 to -10°C – anything below this and your plant may not survive. Unless you live in the furthest northern reaches of Scotland or there’s a particularly punishing winter, you should be able to grow this plant with no issues. Aspect The ideal aspect for Laurustinus is anything but north-facing. The plant enjoys shade or sun and you just need to protect it against the hottest summer rays. You’ll also want to make sure the plant is well sheltered, as cool winds aren’t ideal. Soil Requirements In terms of soil composition, this plant isn’t fussy and will tolerate most soils and pH levels. Soil moisture levels are where you need to be careful as viburnum likes moist but well-drained soil that is never dry but is also not prone to becoming waterlogged. “If you have a particular issue with wet soil, a method you could opt for is to butterfly the root ball,” says Gary. “With your spade or sharp knife, cut through the bottom half of the root ball entirely and spread it out horizontally in the planting hole which is now just half as deep as if you were planting the root ball intact. “This keeps the roots closer to the surface which is going to dry out faster which prevents root rot. “I have planted in situations where water would fill a planting hole as soon as the hole was dug. “Situations such as this require drastic measures where you might have to leave the entire root ball above the ground and backfill with a mound of soil, gradually sloping away from the crown of the plant.” Feeding To ensure healthy growth, you’ll want to test the soil regularly and amend any nutrient deficiencies. It’s recommended to do this every 2-3 years. Using an evenly balanced fertiliser once a year will encourage a vibrant bloom and healthy foliage. Pruning This plant has been placed into pruning group 8 by the Royal Horticultural Society, meaning that it needs little to no pruning once established.1 If you do decide to prune to keep the plant at a manageable size, aim to do this before the growing season begins in mid-spring. Prune after the last frost to reduce the risk of frost damage. Companion Planting This plant goes works really well when planted with Snowdrops, Black Mondo and Lady’s Mantle. Propagation You can propagate this plant by taking cuttings between 8-10 inches long that have multiple growth nodes. Remove all the leaves, dip them in some water and then add rooting hormone. Aim to take cuttings in warm months, as doing so earlier or later may lead to root rot before it takes hold. Common Problems V. tinus is especially vulnerable to two specialist pests, the viburnum whitefly and the viburnum beetle. Viburnum Beetle The larvae of this pest cause the first round of damage, which is then amplified by the adult beetles later in the year. Symptoms include holes in the leaves with the veins untouched and visible cream-coloured larvae from April or grey adult beetles from July. Removing bugs by hand is a good way to control infestations initially, although if they become heavily established pesticide control may be necessary. Encouraging wildlife may help keep them in check too, as birds and other bugs like these beetles as tasty snacks. Viburnum Whitefly These sap-suckers are small flies with white wings that live beneath leaves in the summer and remain present over winter. Unless your viburnum has black sooty mould, whiteflies may not need to be removed. With this in mind, tolerate their presence or attempt to encourage predatory wildlife before looking into pesticide solutions. References 1. Shrubs: pruning evergreens. (n.d.-c). Royal Horticultural Society. Retrieved March 27, 2023, from https://www.rhs.org.uk/plants/types/shrubs/evergreen-pruning-guide
Learn more
Cotoneaster Makes A Great Border And Wall Shrub - But Avoid These Invasive Types
IN THIS GUIDE Overview Common Varieties Planting Cotoneaster Cotoneaster Plant Care Common Problems References Cotoneasters are a huge range of border and wall shrubs which can work well for year-round interest and wildlife-friendliness in many gardens. While it should be noted that some cotoneasters, such as C. horizontalis, are considered invasive species in the UK and can pose a threat to rural ecosystems, many cotoneasters can actually be great choices for British gardens.1 Overview Botanical Name Cotoneaster Plant Type Shrub Native Area Temperate Asia, Europe & Northern Africa Hardiness Rating H6 Foliage Evergreen Flowers White or pink When To Plant September When To Prune March Cotoneasters come in a range of shapes and sizes. Some are large shrubs, or even small trees, while others grow only a short height above the ground and make a great ground cover. Some are great for garden borders, whilst others are wall shrubs that can be used to cover a wall or fence. They are native to temperate Asia, Europe and North Africa, with flowers that can range from white through pink, and are followed by vibrant berries in a range of hues. Many cotoneasters are evergreen, providing visual interest all year round. A small number of varieties are considered to be problematic, invasive non-native plants. Invasive species are best avoided by gardeners, as they can be spread to wild ecosystems and have a negative impact on native ecology. Some invasive species to avoid are: C. bullatus C. horizontalis C. integrifolius C. microphyllus C. simonsii Fortunately, there are plenty of other cotoneasters to choose from and these can be hugely beneficial for local wildlife. “Bees will cover flowering plants in the spring and birds will enjoy the berries right into the winter,” shares Master Horticulturist Roy Nicol. Common Varieties If you are looking for a cotoneaster that will be a good border shrub for your garden, here are some good options to consider: C. amoenus C. frigidus ‘Cornubia’ C. lacteus C. procumbens ‘Queen of Carpets’ C. rhytidophyllus C. ‘Rothschildianus’ C. salicifolius ‘Avonbank’ C. salicifolius ‘Pink Champagne’ C. aff. sternianus C. x suecicus ‘Coral Beauty’ If you are looking for a wall shrub, I’d recommend: C. conspicuus ‘Decorus’ C. franchetii Planting Cotoneaster Cotoneasters are planted like any other shrub. Prepare the soil well and add plenty of organic matter. Dig a planting hole large enough to accommodate the root system. Make sure that the shrub is planted at the same depth that it was in the pot it came in. Firm in the soil around the base of the plant and water it in thoroughly. Mulch with organic matter such as garden compost or bark. Cotoneasters are best planted out in early autumn, when the soil is still warm after the summer, yet reasonably moist. When planted at this time, the plants have time to develop strong root systems by the onset of winter. Cotoneaster Plant Care Cotoneasters are incredibly unfussy and low-maintenance shrubs that can work well for many gardens. If you choose the right cotoneaster for your space, it really won’t need all that much care at all. Soil & Fertilising Cotoneasters require rich soil with plenty of organic matter, which is moist yet free-draining. They can also cope with more free-draining conditions as long as their nutrient needs are met. Most soil types will be suitable, and pH levels are not really important. It is a good idea to mulch around your shrub when planting and to replenish the mulch each spring. Other than this, additional fertilisation will not typically be required as these plants will more or less look after themselves. Light, Temperature & Exposure Cotoneasters can cope with various conditions when it comes to light levels, from full sun through to partial shade, just as long as the shade is not too deep. Watering Cotoneaster should be watered well during their first year whilst they become established. Don’t let the soil dry out during prolonged periods without rain. After the shrubs become established, they will not usually require additional watering as natural rainfall should be sufficient. Pruning How much pruning your cotoneaster will require and how it should be pruned will depend on the variety you are growing. Cotoneasters can have a range of different growth habits and forms. Most cotoneasters will benefit from regular pruning to keep them dense and well-formed, though those grown as small trees usually don’t need much pruning at all. Usually, evergreen types are pruned in early spring and deciduous types a little later, just before spring growth begins. Cotoneasters are usually relatively tolerant of hard pruning, though flowering and berries may be reduced after a hard cutback. Companion Planting Cotoneaster can be combined in beds and borders with many other plants. Many cotoneasters look great at the back of a border, alongside conifers, rowan trees, holly, Chaenomeles japonica, mahonia and many other shrubs. Be sure to consider the eventual size of the cotoneaster you have chosen before planting it with other shrubs. Propagation Cotoneasters can often propagate themselves through layering, which is when a plant’s stems touch the ground and form new roots. These rooted sections can easily be removed from the parent plant and transplanted somewhere else in your garden. Other methods of propagation for cotoneasters include taking softwood cuttings of deciduous types and semi-ripe cuttings of evergreen varieties. Common Problems Cotoneasters tend to be mostly trouble-free, though some cultivars can be susceptible to a bacterial disease called fire blight. If your plant does get fire blight, affected stems should be promptly pruned out and disposed of, ensuring tools are cleaned afterwards. If allowed to spread the disease will soon kill the plant as no chemical controls are available. Why Are My Cotoneaster Shrubs Turning Brown? Remember that some Cotoneasters are deciduous and this may just be a natural part of their life cycle. However, if the leaves of evergreen cotoneaster are turning brown, this could be due to a lack of water. Unfortunately, it could also be fire blight, and all affected plants should have affected growth pruned out, or whole plants removed and carefully disposed of to prevent its spread. References 1. Cotoneaster. (n.d.). The Wildlife Trusts. Retrieved March 14, 2023, from https://www.wildlifetrusts.org/wildlife-explorer/trees-and-shrubs/cotoneaster
Learn more
Gardener's Advice For Growing Daphne: 'Plant It Somewhere You'll Walk Past'
IN THIS GUIDE Overview Common Varieties Planting Daphne Daphne Shrub Care References Daphnes are small or medium shrubs which can work well in many gardens. These are plants that some people believe are fussy and a little challenging to grow, but as long as you understand where they thrive and what they need, you should not find them too difficult. Overview Botanical Name Daphne Common Name(s) Daphne Plant Type Shrub Native Area Asia, Europe & Northern Africa Hardiness Rating H4-H6 Foliage Deciduous / Evergreen Flowers Varies When To Plant March-April When To Prune June-August Daphne is a genus containing a wide range of evergreen and deciduous shrubs. It is in the Thymelaeaceae plant family and is native to Asia, Europe and the north of Africa, and many are grown in gardens and are popular decorative plants.1 Daphne shrubs can vary significantly in size and appearance. Upright species can grow to 1.5m or so in height, while others remain far smaller and will even grow rather happily in containers. Daphne usually flowers in late winter or early spring. Evergreen varieties tend to have greenish-white or yellow flowers, while deciduous types tend to produce pink blooms. However, most types have fragrant flowers, which is a definite added benefit to growing a daphne shrub. Common Varieties Some common daphne varieties to consider include: D. bholua “Daphne bholua flowers in mid-winter which is lovely for bees that are around at that time of year,” shares Sue Fisher, a Garden Designer. Try ‘Jacqueline Postill’ (pictured above) or ‘Darjeeling’. D. x burkwoodii ‘Somerset’ is my favourite Burkwood variety. D. cneorum A top variety is ‘Eximia’. D. laureola D. mezereum D. odora (Grow ‘Aureomarginata’ for lovely flowers). D. x transatlantica Try ‘Eternal Fragrance’ (pictured above) or ‘Pink Fragrance’. Planting Daphne Larger daphne shrubs work well towards the back of a border, while smaller daphne might be positioned more to the front. These are naturally woodland shrubs, which can help inform the position where they will be most at home. Smaller daphne shrubs often work well in rock gardens or alpine houses, but they are fussier types which are a little harder to grow. “To enjoy the blooms and fragrance of your Daphne, I recommend planting it somewhere you will be walking past when it’s in flower,” suggests Horticultural Consultant and Instructor Dan Ori. “Too often, we hide away winter flowering Daphne in borders that only receive our attention in the summer.” Follow these guidelines to plant your young daphne shrubs: Dig a hole which is at least half again as wide as the pot the daphne was in, which is the same depth as the plant’s previous container. Soak the plant and the hole thoroughly, then place the plant in the hole. Turn it to the preferred orientation. Refill the soil or growing medium around the plant. When To Plant Daphnes are best planted out in March or April to get them off to the best possible start. “If you have struggled with getting a Daphne to grow in your garden you could try ‘Jacqueline Postill’ or ‘Aureomarginata’, as I have found these easier to get established,” adds Dan. Daphne Shrub Care Daphne has a reputation for being somewhat challenging to grow successfully, but as long as these shrubs are positioned carefully and not disturbed, they can flower pretty reliably. Here are some notes to help you understand the environmental conditions that these plants require: Aspect & Light Some varieties will be fine in full sun, but others will prefer a position in a dappled or light shade. Growing in the dappled shade below deciduous trees is usually the best option. Preferred Soil Daphnes prefer moist yet free-draining soil which is neutral or alkaline in pH. Moist soil types will suit, but if you have heavy clay soil, it may be better to grow daphne in a raised bed or container. Temperature & Humidity Daphne vary in their tolerance of cold and their winter hardiness. Some are H4 hardy, while some can be quite a lot tougher, with a hardiness rating of H6. While these will all usually make it through the winter in the UK, many will benefit from generous mulching to protect the roots and a cover of horticultural fleece or similar during prolonged periods of cold weather. Growing From Seed Growing daphne from seed is challenging, time-consuming and can often have poor success rates, even for more experienced gardeners. I’d recommend either propagating through cuttings or purchasing daphne plants. Propagating Semi-ripe cuttings can be taken in late summer and usually root fairly successfully. So, if you admire a daphne in a friend’s or neighbour’s garden, this is a good way to obtain one of the same for your own displays. Container Growing Smaller daphne can be grown in containers as long as they are large enough to accommodate the roots. Make sure that the container allows for free drainage, and fill it with a suitable free-draining yet moisture-retentive medium. Watering Water regularly during dry spells, but take care not to overwater. Daphnes are not tolerant of wet and cold roots, or of extreme drought. Remember that plants in pots will need to be watered more frequently. Fertilising Daphnes do not usually require additional fertilisation. The use of enriching organic mulches should suffice to meet their nutritional needs in most cases. Upon planting and each spring, spread a good quality compost or well-rotted manure around your plant. Then, each autumn, add a thick layer of autumn leaves or other carbon-rich mulch to protect the roots. Pruning Daphnes do not usually require any pruning at all. Harvesting a few flowering branches for use in cut flower arrangements will usually suffice. If you wish, you can remove stems for aesthetic reasons in the summer, but this is not often necessary. Common Problems Root rot caused by poor drainage, high rainfall or overwatering is one of the most common issues encountered. Sometimes, this may be caused by environmental conditions alone, though sometimes in those conditions, fungal problems like honey fungus and phytophthora root rot can take hold, as well as other fungal issues and virus infections. References 1. Two members of the family Thymelaeaceae. (2012, March 10). University of Washington Botanic Gardens. Retrieved March 14, 2023, from https://botanicgardens.uw.edu/about/blog/2012/03/10/march-2012-plant-profile-two-members-of-the-family-thymelaeaceae/
Learn more


